1
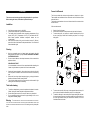
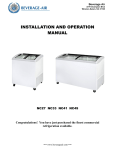
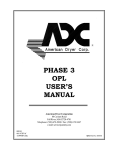
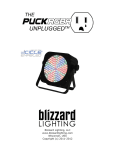
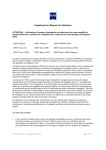
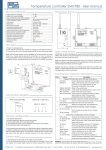
Product Registration READ AND SAVE THIS INSTRUCTIONS The information contained in this Owner's Guide will instruct you on how to properly operate and care for your product. Please read through the information contained in your literature pack to learn more about your new appliance. Record Your Model and Serial Numbers Record the Model No. and Serial No. of this freezer in the space provided below. The nameplate is located at the back of the equipment. Model No.: _____________________________________ Serial No.: _____________________________________ Energy Saving Ideas MODELS: NC27-1-W, NC33-1-W, NC41-1-W, NC49-1-W 1. The freezer should be located in the coolest area of the room, away from heat producing appliances or heating ducts, and out of direct sunlight. 2. Overloading the freezer forces the compressor to run longer. Do not exceed the load limit according to labels fixed on the inner cabinet (which corresponds to the baskets height) since the product will start warming up instead a cooling down and the compressor will run longer. 3. Product to be loaded should be at -4° F (-20° C) since the equipment is intended for maintaining a cool product at 0° F (-18° C) at load level rather than cooling or freezing up a warm product 4. Grids at the side and backside of the freezer should not be interfered allowing a clear space of 4” (10 cm.) 5. Assure keeping the lids closed to avoid warm air and moisture get into the freezer. Important Safety Instructions READ ALL INSTRUCTIONS BEFORE USING THIS FREEZER. WARNING For Your Safety Do not store or use gasoline or other flammable vapors and liquids in the vicinity of this or any other appliance. WARNING Child Safety Destroy carton, plastic bags, and any exterior wrapping material immediately after the freezer is unpacked. Children should never use these items for play. Cartons covered with rugs, bedspreads, plastic sheets or stretch wrap may become airtight chambers and can quickly cause suffocation. A child might suffocate if he crawls into a freezer to hide or play. Remove the door of a freezer when not in use, even if you plan to discard the freezer. Many communities have laws requiring you to take this safety precaution. Remove and discard any spacers used to secure the shelves during shipping. Small objects are a choke hazard to children. WARNING Electrical Information These guidelines must be followed to ensure that safety mechanisms in the design of this freezer will operate properly. Refer to the serial plate for correct electrical rating. The power cord of the appliance is equipped with a three-prong grounding plug for protection against shock hazards. It must be plugged directly into its own properly grounded three prong receptacle, protected with a 15 amp time delay fuse or circuit breaker. The receptacle must be installed in accordance with the local codes and ordinances. Consult a qualified electrician. Receptacles protected by Ground Fault Circuit Interrupters (GFCI) are NOT RECOMMENDED. DO NOT use an extension cord or adapter plug. If voltage varies by 10 percent or more, freezer performance may be affected. Operating the freezer with insufficient power can damage the motor. Such damage is not covered under the warranty. If you suspect voltage is high or low, consult your power company for testing. To prevent the freezer from being turned off accidentally, do not plug unit into an outlet controlled by a wall switch or pull cord. Do not pinch, knot, or bend power cord in any manner. WARNING 1. 2. 3. Other Precautions Never unplug the freezer by pulling on the power cord. Always grip the plug firmly and pull straight out from the receptacle. Turning the control to OFF turns off the compressor, but does not disconnect power to other electrical components. If the power cord is damaged, it should be replaced through your service agency or qualified personal only. First Steps This user’s manual contains general working instructions for your freezer. Before starting the freezer, follow these important first steps: Installation Freezer Lids Removal The lids are provided with aluminum angle retainers to keep them in place. These retainers are installed at the front and at the rear of the aluminum frame where the lids run The aluminum angle retainer at the rear is shorter than the front ones to allow the lids removal. If lids must be removed: Verify that your energy source is 1ph/120V~ Choose a place that is near a grounded electrical outlet. The freezer should be located where surrounding temperatures will not exceed 110°F (43°C). Temperatures of 32°F (0°C) and below will NOT affect freezer operation. Additional compressor heaters are not recommended. Allow space around the unit for good air circulation. Leave a 4” (100 mm) space on all sides of the freezer for adequate circulation. Do not block the side and backside grids. 1. 2. 3. Stand- in front of the freezer. Assure that the lower lid is totally closed to the right side of the freezer. To remove the top lid, run it open to its maximum and then pull it up from the rear (see figure). Handle the lid carefully and place it in a straight safety place. Cleaning Wash any removable parts, the freezer interior, and exterior with mild detergent and warm water. Wipe dry. DO NOT USE HARSH CLEANERS ON THESE SURFACES. Do not use razor blades or other sharp instruments, which can scratch the appliance surface. Dice: Aluminum angle retainer SCRAPPING OF FROST It is recommended to remove the frost accumulated before reloading the freezer or anytime when one quarter inch of frost has accumulated. Debe decir: Aluminum angle retainer Keeping the freezer plugged-in, with product, place a clean dry soft cloth over the product to catch the frost that will be removed in the following step. Remove the frost using a plastic scrapper trying to go through the basket handles to eliminate as much frost as possible. The soft cloth, already wet with the frost removed, could be used for light cleaning the inner cabinet prior to reloading. Total inside cleaning To perform a deep cleaning, remove the product and relocate it in another freezer. Unplug the freezer and allow the equipment to defrost. Do the cleaning with a wet cloth. Do not pour water or any other liquid. Dry up completely and plug the freezer in again allowing 4 hours to run empty before reloading it again. Warning THE LOWER SIDE OF THE GLASS LIDS IS PROVIDED WITH A SPECIAL FILM. DO NOT USE RACER BLADES OR OTHER SHARP INSTRUMENTS WHICH CAN SCRATCH THIS SURFACE AND DAMAGE THE FILM. For cleaning use only a damp soft cloth. 4. 5. To remove the lower lid, slide it open to the opposite side and then pull it up from the rear. Handle the lid carefully and put it in a safety place. To install the lids again, reverse the previous steps starting with the lower lid, assuring that the grooves in the plastic profiles at the rear and the front of the lids get inserted correctly into the aluminum retainers, first to the front side and then at the rear. Setting the Temperature Control metallic scouring pads, brushes, abrasive cleaners, or alkaline solutions on any surface. Do not wash removable parts in a dishwasher. Cleaning the Outside Cool Down Period Allow 4 hours for freezer to cool down completely. The freezer will run continuously for the first several hours. Foods that are already frozen may be placed in freezer after the first few hours of operation. Unfrozen foods should NOT be loaded into freezer. Wash the cabinet with warm water and mild liquid detergent. Rinse well and wipe dry with a clean soft cloth. Do not shower water with a hose nor use ammonia based cleaners. Temperature Control To access to the temperature control, the right side grid should be removed using a Phillips screw driver. The temperature control is factory pre-set to provide satisfactory product storage products. However, the temperature control is adjustable to provide a range of temperatures for your personal satisfaction. If a cooler temperature is desired, turn the temperature toward coldest (clockwise) and allow several hours for temperature to stabilize between adjustments. Cooling of the compressor The fan motor (except on models CH-68 and CHP-68) located inside the right side compartment helps to cool down the compressor and eliminate the refrigerant superheat thus helping to maintain the exterior cabinet to an acceptable temperature to be touched. To access the fan motor, remove the right side grid using a Phillips screw driver. Care and Cleaning Vacation and Moving Tips WARNING Damp objects stick to cold metal surfaces. Do not touch interior metal surfaces with wet or damp hands. Short Vacations: Leave the freezer operating during vacations of less than three weeks. Cleaning the Inside After defrosting, wash inside surfaces of the freezer with a solution of two tablespoons of baking soda in one quart of a gallon (1.136 liters) warm water. Rinse and dry. Wring excess water out of the sponge or cloth when cleaning in the area of the controls, or any electrical parts. Wash the removable parts and door basket with the baking soda solution mentioned above, or mild detergent and warm water. Rinse and dry. Never use Long Vacations: If the freezer will not be used for several months: Remove all food and unplug the power cord. Clean and dry the interior thoroughly. To prevent odor and mold growth, leave the freezer door open slightly. Moving: Avoid Service Checklist Disconnect the power cord plug from the wall outlet. Remove foods, then defrost, and clean the freezer. Secure all loose items such as baskets and fix the lids by taping them securely in place to prevent damage. In the moving vehicle, secure freezer in an upright position, and secure to prevent movement. Also protect outside of freezer with a blanket, or similar item. Power Failure/Freezer Failure Avoid Service Checklist OCCURRENCE FREEZER DOES NOT RUN Freezer runs too much or too long NOTE: Do not open freezer door unnecessarily if freezer is off for several hours. If a power failure occurs, frozen foods will stay frozen for at least 2 hours if the freezer is kept closed. If the power failure continues, pack seven or eight pounds of dry ice into the freezer every 24 hours. Place over the product a thick cardboard or one inch polyurethane sheet and close the lids. Look in the Yellow Pages under "Dry Ice," "Dairies," or "Ice Cream Manufacturers" for local dry ice suppliers. Always wear gloves and use caution when handling dry ice. If the freezer has stopped operating, see "Freezer does not run" in the Avoid Service Checklist Section of this manual. If you cannot solve the problem, call an authorized servicer immediately. Do not allow inexperience people to repair or modify the electrical wiring and/or refrigeration components. If the freezer remains off for several hours, follow the directions above for the use of dry ice during a power failure. If necessary, take the food to a local locker plant until the freezer is ready to operate. Look in the Yellow Pages under "Frozen Food Locker Plants." Before calling for service, review this list. It may save you both time and expense. This list includes common occurrences that are not the result of detective workmanship or materials in this appliance. SOLUTION Temperatures inside the freezer are too cold Temperatures inside the freezer are too warm Temperature of external freezer surface is warm SOUND AND NOISE Louder sound level whenever freezer is on Louder sound levels when compressor comes on Popping or cracking sound when compressor comes on Bubbling or gurgling sound, like water boiling Vibrating or ratting noise Moisture forms on inside freezer walls ODOR IN FREEZER DOOR PROBLEMS Check to ensure that freezers are not plugged into a circuit that has ground fault interrupt. If you are unsure about the outlet, have it checked by a certified technician. Temperature control is in the OFF position. See Setting the Temperature Control Section. Freezer may not be plugged in, or plug may be loose. Be sure plug is tightly pushed into electrical outlet. House fuse has blown, or circuit breaker has tripped. Check/reset circuit breaker, or replace fuse with 15 amps. Time delay fuse Power outage. Check house lights. Call local electric company. Room or outside weather is hot. It is normal for the freezer to work harder under these conditions. Freezer had recently been disconnected for a period of time. Freezer requires 4 hours to cool down completely. Large amounts of warm or hot product have been stored recently. Warm product will cause the freezer to run more until the desired temperature is reached. Door is kept open too long or too frequently. Warm air enters the freezer every time the door is opened. Open the door less often. Freezer door may be slightly open. Temperature control is set too cold. Turn the control knob to a warmer setting. Allow several hours for the temperature to stabilize. Temperature control is set too cold. Turn the control to a warmer setting. Allow several hours for the temperature to stabilize. Temperature control set too warm. Turn the control to a colder setting. Allow several hours for the temperature to stabilize. Door is kept open too long or is opened too frequently. Warm air enters the freezer every time the door is opened. Open the door less often Door may be open slightly. Freezer has recently been disconnected for a period of time. Freezer requires 4 hours to cool down completely. The exterior freezer walls can be as much as 30° F warmer than room temperature. This is normal while the compressor works to transfer heat from inside the freezer cabinet. The fan motor in the compressor compartment is damaged or has a loose connection Modern freezers have increased storage capacity and more even temperatures. They require a high efficiency compressor. When the surrounding noise level is low, you might hear the compressor running while it cools the interior. Freezers operate at higher pressures during the start of the ON cycle. This is normal. Sound will level off or disappear as freezer continues to run. Metal parts undergo expansion and contraction, as in hot water pipes. This is normal. Sound will level or disappear as freezer continues to run. Refrigerant (used to cool freezers) is circulating throughout the system. This is normal. Freezer is not level. It rocks on the floor when it is moved slightly. Level the unit. Floor is uneven or weak. Freezer rocks on the floor when it is moved slightly. Be sure floor can adequately support freezer. Level the freezer by putting wood or metal shims under art of the freezer. Weather is hot and humid, which increases internal rate of frost build-up. This is normal. Door is slightly open. Door is kept open too long, or is opened too frequently. Door is slightly open, causing the cold air from inside the freezer to meet warm moist air from outside. Interior needs to be cleaned. Clean interior with sponge, warm water, and baking soda. Product with strong odors is in the freezer. Cover the product tightly.