1
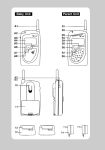
Parent unit
B1 On/Off button . . . . . . . . . . . . . . Switches power on or off
B2 Channel indicator. . . . . . . . . . . Shows the channel that has been set. Blinks when the unit is in
standby mode and remains on constantly when it is activated
B3 Low battery indicator . . . . . . . . Blinks when the battery is drained
B4 Range indicator . . . . . . . . . . . . Blinks if there is no contact with the baby unit
B5 Volume indicator . . . . . . . . . . . Blinks to show sound level when the unit is activated. Shows
the volume setting for two seconds when the unit is turned on
and remains on constantly when setting the volume
B6 ▼ button . . . . . . . . . . . . . . . . . Button for lower volume/programming
B7 M button. . . . . . . . . . . . . . . . . . Button for programming/storing
B8 ▲ button . . . . . . . . . . . . . . . . . Button for higher volume/programming
B9 Speaker
B10 Vibrator switch . . . . . . . . . . . . . Switches vibrator function on/off
11
12
13
14
15
16
17
Adapter contact
Switches to set digital code . . This is set at the factory, but you can set your own digital code
to avoid unnecessary interference. See detailed instructions
Battery pack contact
Belt clip
Battery compartment . . . . . . . Open to remove battery pack
Battery pack. . . . . . . . . . . . . . . NiMH rechargeable battery pack
Adapter
All warning sound signals from the parent unit are combined with a blinking symbol in one of the
units showing the cause of the alarm. The baby unit only gives a sound signal when turned on or
off, but not if the battery is weak. This means you can avoid waking the baby unnecessarily.
A warning that the baby unit batteries are weak is indicated by a blinking symbol on the baby unit
and a sound signal on the parent unit. If the parent unit emits a sound signal without any red lights
blinking, it is warning that the batteries in the baby unit are weak.
When out of range of the baby unit, the parent unit will indicate this with a sound signal and the
range indicator will blink. This is for safety reasons, as walls, particularly concrete walls, and
ceilings can significantly reduce the range. Metal plates (cars, motor homes) may block reception
of the signal. Relocating the baby unit and/or the parent unit may help because radio signals are
reflected from objects, people etc. This means there will be areas where no communication is
possible even if the range is short.
Detailed instructions
Setting the digital code
Code Switch setting Code Switch setting
ON
ON
PrimaNOVA is equipped with a digital code
system DSIP (Digital Selectable Interference
Protection) with eight digital codes (1– 8).
The same code MUST be used on
both units! If the DSIP codes or the
set channel (A or B) are different
you will not hear a sound from the child,
and the units will indicate that they are not
communicating with each other!
The digital codes can be set using the switches
(12) in the battery compartment. Each unit has
three switches and the code is set according to
the following table.
1
5
1 2 3
ON
1 2 3
ON
2
6
1 2 3
1 2 3
ON
3
ON
7
1 2 3
ON
4
8
1 2 3
3
1 2 3
ON
1 2 3
M
V
V
M
V
V
M
V
V
Baby unit
1. Adjust the channel
Press the M button once, A or B blinks rapidly.
Select the desired channel A or B using the ▲ and ▼ buttons.
Then press the M button to store.
The unit now returns to normal operations.
2. Adjust sound sensitivity
Press the M button and hold until the sensitivity indicator lights.
Adjust desired sensitivity using the ▲ and ▼ button. More arcs indicate higher
sensitivity (one light = low, two lights = medium and three lights = high sensitivity).
Then press the M button to store.
Parent unit
1. Adjust the channel
Press the M button once, A or B blinks rapidly.
Select the desired channel A or B using the ▲ and ▼ buttons.
Then press the M button to store.
The unit now returns to normal operations.
NOTE! If the M button is not pressed within 20 seconds after the last button
press the unit will automatically return to normal operations without storing
the new settings!
Using the charger and batteries
Both units can be used while being charged.
The units are connected to the wall power outlet using the adapters included (17). Only these
adapters must be used.
Plug the adapters into the contact (11) on the baby unit and the parent unit. The
batteries will now be charging and will be fully charged within four to six hours.
The units will then switch to maintenance mode. The batteries will therefore not
be damaged even if they remain connected to the adapter for a long period.
V
M
Note: Rechargeable batteries are consumables, gradually losing power
3
when used.
Extra battery packs can be purchased from the dealer. Read the
troubleshooting guide in case of problems.
V
Technical specifications (subject to change)
* 2 sets of environmentally friendly battery packs 3.6V NiMH 600mAh.
* Transmitter frequency: 2 channels, frequency range 863 - 865 MHz.
* Working temperatures: 0°C to +40°C. Storage temperature: -20°C to +40°C.
* Output rating baby unit < 10mW.
General
The authorities have assigned only a limited number of frequencies and a very limited transmitter
power rating to electronic baby monitors. Interference may therefore occur from other baby monitors
while your baby unit has been activated by sounds from your child(traffic interference). This is
normally heard as distortion and/or screeching/beeping sounds in the speaker. If this occurs, try to
switch channels and select a lower sensitivity to prevent it from being activated due to weak
sounds/movement from your child. If this does not help, there is nothing else that can be done, but
4
it was after all sounds from your child that activated your parent unit, so you have not been alerted
unnecessarily! Distortion during transmission may thus be expected because units in the same area
normally use the same frequency.
This is not a problem when your PrimaNOVA is on standby: You will not be disturbed unless another
PrimaNOVA has been adjusted to identical codes and channels, in contrast to other baby monitors.
Also bear in mind that radio signals may be blocked in areas where there is radio noise or physical
barriers. Baby monitors work in a frequency range where there may be interference, and they may
occasionally fail even if there is nothing wrong with the units. This applies in particular if there are
many baby monitors within range of each other, or if there is another baby monitor between your units
or close to the parent unit. The range is significantly reduced when the batteries begin to be drained.
Guarantee
The guarantee is void in the following cases:
* The unit seals have been broken
* The units or adapters have been damaged
* The label with the serial number has been removed, damaged or rendered unreadable
* The product has been damaged because the instructions provided in the user manual have not been
followed
The guarantee does not apply to the batteries, which are consumable goods. If you wish to lodge
a complaint about the product, a copy of the receipt must be attached. The guarantee is valid for
1 year from the date you purchased your unit. Both units must be sent for repair. Once they have
been sent in, a decision will be made as to whether to repair or replace them. It is important to
supply the most complete description of the defect. Please avoid descriptions like "does not work",
"only works intermittently" or similar. If the description is incomplete or a complaint is lodged
for a unit that has no defects, a fee may be charged to cover unnecessary additional
expenses. In general all defects are repaired, but if the description is incomplete or unclear, the
repairman may be unable to locate the defect. A complete description of the defect will tell the
repairman what must be repaired even if the defect cannot be reproduced in the workshop.
Please remember to state:
* The distance between the units.
* Whether the defect occurs on battery power or power from the mains.
* Whether the channel indicator is illuminated constantly in the baby unit when the child cries.
* Does the defect occur after the unit has been on for some time – how long?
* If the defect is intermittent – how often?
If you supply a complete description of the defect you are ensured the best service and you will be
just as happy with your NOVA quality product as thousands of others in Europe.
5
Troubleshooting chart
Problem
Possible cause
Solution
No indicators are displayed.
The unit turns itself off shortly after
the unit is switched on, or the unit
cannot be switched on.
The unit cannot be switched on.
The unit is not switched on.
The batteries are discharged.
Press the On/Off button (A1, B1).
Recharge the batteries while the units
are turned off. Remove the batteries for
30 seconds then switch the unit on.
Charge the batteries. Try switching the
batteries between the units to see whether the defect follows with the batteries.
Plug the adapter into the wall socket and
to the unit.
If the wall socket has an On/Off switch,
this must be on.
Charge the batteries for two days while
the unit is off.
Purchase new battery packs from the
dealer.
Adjust the volume.
The batteries are not charged (also
see above).
No sound in the parent unit.
No contact between the baby unit and
the parent unit.
The parent unit indicates that it is out
of range.
The batteries are low or dead.
The adapter is not connected to
the unit.
The adapter is connected to a wall
socket that does not work.
The batteries are completely dead
The batteries are spent/destroyed
NOTE! Not covered by guarantee!
The volume has been turned right
down.
The units are set to different DSIP
codes and/or channels.
The baby unit is not switched on.
The baby unit and the parent unit
are set to different channels.
The baby unit and the parent unit
are set to different DSIP codes.
Out of range.
Interference during transmission.
Too great a distance between the
units.
Local conditions, interference.
Loud screeching/beeping sound.
Units are too close to each other.
Volume is too high.
Destroyed or spent batteries.
Local conditions.
Short range.
The parent unit does not indicate that
it is out of range even if the baby unit
is switched off.
Another PrimaNOVA in the vicinity
is adjusted to the same channel
and DSIP code.
6
Set the same digital codes and/or
channel on both units (see the section
on setting the digital code).
Turn the baby unit on.
Check that they display the same letter,
A or B.
Check that the switches (12) are set the
same on both units.
Reduce the distance. Local conditions
may reduce the range dramatically. Try
switching channels. Charge the batteries
for at least 12 hours.
Reduce the distance.
Move the units slightly.
Local conditions cannot be changed.
Try turning off light dimmers or other
noise sources.
Units rarely have a defect.
Increase the distance.
Adjust the volume.
Check the batteries as mentioned above.
Other baby monitors in the vicinity may
reduce range dramatically. Try to switch
channels, or move the baby unit and/or
parent unit.
This can never be caused by a defect!
Change the channel and DSIP channel
code. That will resolve the problem!