1
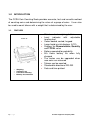
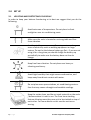
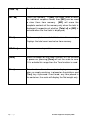
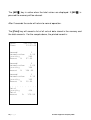
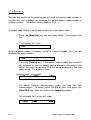
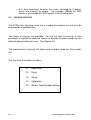
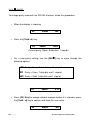
Adam Equipment
CCSA
Coin Count Scale
Supervisor’s Manual
(P.N. 6199, Revision C1, October 2009)
1|P a g e
© Adam Equipment Company 2009
Easy Reference:
Model name of the scale:
Serial number of the unit:
Software revision number
(Displayed when power is first turned on):
Date of Purchase:
Name of the supplier and place:
2|P a g e
© Adam Equipment Company 2009
CONTENTS
1.0
INTRODUCTION ...................................................................................................... 4
1.1
FEATURES........................................................................................................... 4
2.0
SET UP..................................................................................................................... 5
2.1
LOCATING AND PROTECTING YOUR SCALE................................................... 5
2.2
DISPLAY WINDOWS............................................................................................ 6
2.3
KEY DESCRIPTIONS ........................................................................................... 6
2.4
BATTERY CHARGING ....................................................................................... 10
2.5
BACKLIGHT OPERATION.................................................................................. 10
2.6
TEMPORARY WEIGHT DISPLAY...................................................................... 10
2.7
SETTING DATE AND TIME................................................................................ 11
3.0
BASIC OPERATION............................................................................................... 12
3.1
ZEROING THE DISPLAY ................................................................................... 12
3.2
TARING .............................................................................................................. 12
3.3
COIN COUNTING............................................................................................... 13
3.4
MEMORY ACCUMULATIONS............................................................................ 14
3.5
MEMORY RECALL ............................................................................................. 16
4.0
RS-232 INTERFACE .............................................................................................. 17
4.1
RS-232 OUTPUT ................................................................................................ 17
4.2
PRINTING........................................................................................................... 17
4.3
INPUT COMMANDS ........................................................................................... 20
5.0
PARAMETERS....................................................................................................... 21
5.1
SETTING COIN WEIGHT ................................................................................... 21
5.1.1
Procedure .................................................................................................... 22
5.2
DETERMINING NEW COIN OR TOKEN WEIGHTS .......................................... 24
5.2.1
Procedure .................................................................................................... 24
5.3
SECURED FEATURES ...................................................................................... 25
F15.4.1
F1 Baud Rate Setting................................................................................... 26
5.4.2
F2F2 PARITY .................................................................................................. 28
5.4.3
F3F3 SLEEP.................................................................................................... 29
5.4.4
F4F4 Weight Calibration .................................................................................. 30
5.4.5
F5- Access Code Number ............................................................................ 31
6.0
ERROR MESSAGES ............................................................................................. 33
7.0
SPECIFICATIONS.................................................................................................. 34
8.0
WARRANTY STATEMENT .................................................................................... 35
3|P a g e
© Adam Equipment Company 2009
1.0 INTRODUCTION
The CCSA Coin Counting Scale provides accurate, fast and versatile method
of counting coins and determining the value of a group of coins. It can also
be used to count tokens with a weight that is determined by the user.
1.1
FEATURES
CCSA-20
•
•
•
•
4|P a g e
Weighing
Automatic tare
Coin/token Counting
Memory Accumulation
• Stainless steel weighing platform
• Level indicator with adjustable
leveling feet
• Colour coded, sealed, keypad
• Large liquid crystal displays (LCD)
• Displays for Denomination, Quantity
and TOTAL value
• Battery operated for portability
• 50+ hours battery life when fully
charged
• The scales can be upgraded when
new coins are released
• Tokens can be counted
• Standard bi-directional RS-232
• Date and time printed
© Adam Equipment Company 2009
2.0 SET UP
2.1 LOCATING AND PROTECTING YOUR SCALE
In order to keep your balance functioning at its best we suggest that you do the
following:
Avoid extremes of temperature. Do not place in direct
sunlight or near air conditioning vents.
Make sure the scale is located on a strong table and free
from vibration.
Avoid unstable power sources. Do not operate near large
users of electricity such as welding equipment or large
motors. Do not let the balance battery go flat – if you are not
using it for a long time you should charge the battery up
periodically to make sure the battery dose not lose its
charge.
Keep free from vibration. Do not place near heavy or
vibrating machinery.
Avoid high humidity that might cause condensation, and
keep away from direct contact with water.
Do not place near open windows, air-conditioning vents or
fans that may cause a draught and unstable readings.
Keep the scales clean, and do not stack material on the scale
/ balance when it is not in use. The Core has a stacking
feature allowing more than one unit to be stacked on top of
each other. For more details on this see the section on
storing.
5|P a g e
© Adam Equipment Company 2009
2.2
DISPLAY WINDOWS
The Denomination window shows the current denomination that has been
selected, an arrow will indicate when the scale is at zero (ZERO) and when
the weight is stable (STAB) or if the scale has been tared (Net) and is
displaying a net weight.
The Quantity window displays the number of coins counted. An arrow will
show whether the weight of new style coins (NEW) or old style coins (OLD)
was used to count them.
The TOTAL window shows the value of the coins counted. An arrow will also
indicate when a value has been stored in memory (MEMORY).
2.3
KEY DESCRIPTIONS
The keypad has 20 keys.
counties or applications.
6|P a g e
Other keypads may be used for different
© Adam Equipment Company 2009
7|P a g e
© Adam Equipment Company 2009
The following are used for parameter entry:
Function
[Total] ↵, ENTER for completing an entry
[MC]
, increment the value being entered or move to the next parameter
[MR]
, Move active digit to next available digit
[CE]
ESCAPE back to normal operation
Other Keys are:
[1c] to [50c], Select the denomination of coins to be counted.
[R1] to [R5],
[Token] keys
[0] to [9] keys
Numeric keys to set values during special applications.
[CE/Esc]
Used to clear a coin denomination.
[New/Old]
Toggles between using new and old coin weights when
determining the quantity and value of coins on the
scale. Used when older styles of coins have been
replaced by new styles with a different weight. An
arrow in the Quantity window indicates the selection.
[M+]
Enters a new entry into memory. The memory will
accumulate up to 99 entries. Tokens cannot be added
to memory with coins. If nothing is in memory then
tokens can be added but an error would be shown if
both tokens and coins are added to memory.
[MR / ]
Recalls the separate entries from memory.
8|P a g e
© Adam Equipment Company 2009
[Total / ↵]
Recalls the total value stored in memory
[MC / ]
Clears the memory. If [MR] has been used to recall
the individual samples stored, then [MC] can be used
to clear them from memory. [MC] will erase the
complete contents of the memory only when the total is
displayed (irrespective of whether [Total /↵
↵] or [MR] is
pressed when the final total is displayed).
[Print]
Prints a complete record of all data stored in memory.
Displays the total count and value from memory.
[CE/ Esc]
Resumes normal operation.
[Zero]
When the weight on the scale is within ±2% of the zero
at power on, pressing [Zero] will set the scale to zero.
If it is outside this range then the Tare function is used.
[Tare]
Tare function allows the scale to display zero weight
when an empty container is placed on the platform and
[Tare] key is pressed. Once tared, any item placed in
the container, the scale will display the Net weight only.
9|P a g e
© Adam Equipment Company 2009
2.4
BATTERY CHARGING
• The scale has an internal rechargeable lead acid battery. This
battery will allow more than 50 hours of operation when fully charged
or less if the backlight is on.
• The Denomination display will show an arrow above the battery
symbol when the battery needs to be re-charged. The battery should
be charged as soon as possible. There is approximately 1/2 hour
service still available when the indicator first appears. If the battery is
not recharged in this time the power to the scale will be turned off to
protect the battery from getting damaged.
2.5
BACKLIGHT OPERATION
• The LCD display has a backlight that operates automatically. To
maximise the battery life it may be necessary to turn the backlight
off.
• Hold the [Print] key for 4 seconds to enter the backlight control
mode. Use the [MC /] key to change the setting for the backlight to
OFF, ON (set to on for full time) or AUTO (set to on only when there
is a weight on the scale).
2.6
TEMPORARY WEIGHT DISPLAY
• Press and hold the [CE/Esc] key for 4 seconds for the display to
change the weight in the Denomination window.
• Pressing any key except the [Tare] and [CE/Esc] keys will have no
effect to the operation. Pressing [Tare] will operate as a Tare
function and [CE/Esc] will return the scale to normal operation.
10 | P a g e
© Adam Equipment Company 2009
2.7
SETTING DATE AND TIME
The Real Time Clock (RTC) is used only for the RS-232 output. The Date
and Time can be set as required. The scale will keep the clock running even
when the power is off.
Setting up the clock
• Press and hold the [1c] key when power is first turned on, release the
key when the revision is displayed. The initial displays show the current
date and time set.
“ rtC
“ “11,14,06” “16,41,35”
• Press the [CE] key to change the date and time. The display will show
the current time format, “H-m-S”.
• Enter the time using the numeric keys using a 24 hour clock format,
3:41PM is “154100”.
• Press the [Total/↵
↵] key to accept the time. The display will show the
current date format.
• Press the [MC/
] key to change the date format. Available formats
are:
“Y-m-d” year, month, day
“m-d-Y” month, day, year
“d-m-Y” day, month, year
• Press the [Total/↵
↵] key to accept the chosen format and then enter the
date in this format.
• Press the [[Total/↵
↵] key to accept the date.
An error code will be shown if the time (Err 1) or the date (Err 2) is not the
permissible values. For example, 34th day of a month is an invalid entry.
11 | P a g e
© Adam Equipment Company 2009
3.0 BASIC OPERATION
3.1
ZEROING THE DISPLAY
• Press the [Zero] key to set the zero point from which all other
weighing is measured. This will normally be done only when the
platform is empty. A new zero is set if the scale is already within
±2% of the original zero at power on.
• When the zero point is obtained the Denomination display will
show an arrow above the zero symbol (ZERO). This indicates the
scale is at the zero condition.
• The scale has an automatic re-zeroing function to account for
minor drifting or accumulation of material on the platform.
However you may need to press [Zero] to re-zero the scale
whenever a small amount of weight is shown even though the
platform is empty.
3.2
TARING
• Taring is used to eliminate the weight of a container so that only
the net weight is displayed.
• Zero the scale by pressing [Zero] if necessary. The zero indicator
will be on.
• Place an empty container on the platform, a value for its weight
will be displayed.
• Press [Tare] to zero the scale. The weight is stored as the tare
value. An arrow above the “Net” will be on.
12 | P a g e
© Adam Equipment Company 2009
• When both the product and container are removed the Quantity
and TOTAL display will show bars “- - - - -“ as the weight is below
zero.
• If a different container is to be used, remove this negative tare
value by pressing the [Tare] key once more.
• Any time the weight is negative, only bars will be shown in the
TOTAL display “- - - - - “.
3.3
COIN COUNTING
• To count coins simply place the coins in the container and press
the key corresponding to the value of the coin. The displays will
immediately show the denomination selected in the
Denomination window, the number of coins in the Quantity
window and the value of the coins in the TOTAL window.
• To change to Old or New types of coin, press the [New/Old] key.
Note an arrow in the Quantity window shows the selection.
• The Scale determines the weight of the coins and divided the
weight by the average weight for the denomination selected. This
determines the Quantity of coins. The total value is the quantity
multiplied by the denomination.
• As some coins have been redesigned the weight of the old style
may differ from the weight of the new style. Make sure you select
the correct coin style when counting.
• It is necessary to set an average weight into memory before any
of the token keys [T2] or [T1] can be used. See Sections 5.1 and
5.2 for more details.
13 | P a g e
© Adam Equipment Company 2009
3.4
MEMORY ACCUMULATIONS
• When the coins have been counted it is possible to store the
results of this sample into memory by pressing [M+].
• The displays will show a number corresponding to the item
number in memory (Denomination display “≡1≡”) and the total
quantity of coins counted in memory (Quantity display) and the
total value of coins that have been stored into memory (TOTAL
display).
For Example:
“ 0.20”
“ 285”
“ 57.00”
“ 285”
“ 57.00”
Press [M+]
“ ≡1≡ ”
After 2 seconds the scale will return to normal operation. Put next
batch of coins on the scale, select denomination [R1]
“ 1.00”
“ 108”
“ 108.00”
“ 393”
“ 165.00”
Press [M+]
“ ≡2≡ ”
After 2 seconds the scale will return to normal operation. Put next
batch of coins, select denomination [10c]
“ 0.10”
14 | P a g e
“ 105”
“
10.50”
© Adam Equipment Company 2009
Press [M+]
“ ≡3≡ ”
“ 498”
“ 175.50”
• After 2 seconds the scale will return to normal operation. The
weight on the scale must return to zero before another value is
allowed to be stored into memory.
NOTE: Tokens cannot be added to memory as they do not have a value
associated with them.
•
If tokens are to be added to memory with coins, an error message
will be displayed:
“ ErrOr ”
“ TYPE”
“
”
After that the scale will return to normal operation.
15 | P a g e
© Adam Equipment Company 2009
3.5
MEMORY RECALL
• Pressing the [MR/
] key will allow you to view each set of data
stored into the memory.
• The first time [MR/
] is pressed the first set of data is shown with
Denomination window showing “ ≡ 1 ≡” for 1 second followed by
the Denomination, Quantity and TOTAL windows showing the
quantity and value for this first item.
“ ≡1≡ ”
“
“
”
“
0.20” “ 285”
“
” for 1 second and then
57.00”
• Pressing [MR/
] again will show the second set of data.
“ ≡2≡ ”
“
“
”
1.00” “ 108”
“
” for 1 second and then
“ 108.00”
• Continue to press [MR/
] until the total values from the memory
are shown:
“
≡3≡ ” “ TotAL”
“ 175.50”
After 2 seconds the scale will return to normal operation.
• If [MC/ ] is pressed when the total is shown-
“
≡3≡ ” “ 498”
“ 175.50” as in the above example,
all data in the memory will be erased. The displays will show Zero
and it will return to normal weighing after 2 seconds.
16 | P a g e
© Adam Equipment Company 2009
4.0 RS-232 INTERFACE
The Scale includes a RS-232 output as standard. The RS-232 allows a
record to be sent to a serial printer as work is done on the scale.
4.1
RS-232 OUTPUT
The RS-232 interface is bi-directional with commands that function similar to
some of the front panel keys and other commands to input data into the scale
for coin weights, denominations and symbols used. The parameters for the
RS-232 interface are:
Baud Rate:
300, 600, 1200, 2400, 4800 or 9600 baud
Parity:
None, Odd or Even
Data bits:
8 or 7
Stop bit:
1
Data:
ASCII
Connector:
d-subminiature 9 pin plug (DE 9P)
Mating connector:
d-subminiature 9 pin socket (DE 9S)
Pin 2
Pin 3
Pin 5
RXD Data Input
TXD Signal Output
GND Signal Ground
The scale does not require RTS/CTS signals to be used.
4.2
PRINTING
The scale will output data when the following keys are pressed.
[M+] outputs the current record at the same time as the results are stored in
the memory. See Section 3.4.
17 | P a g e
© Adam Equipment Company 2009
A display produced as shown in the previous example is as follows:
“ 0.20”
“ 285”
“ 57.00”
“ 285”
“ 57.00”
Press [M+]
“ ≡1≡ ”
Printed record shows as follows:
Date:
2009/01/05
Time:
12:23:15
Record
1
Denomination
0.20
Quantity
285
Amount
R
57.00
Any time the [Total /↵
↵] key is pressed the current totals held in memory are
nd
printed. After the 2 weighing in the previous sample, the printed record
shows as follows:
. . . . . . . . . . .
Date:
2009/01/05
Time:
12:23:15
Total
Quantity
498
Total
Amount
R
175.50
18 | P a g e
© Adam Equipment Company 2009
The [MC/
] key is active when the total values are displayed. If [MC/
] is
pressed the memory will be cleared.
After 2 seconds the scale will return to normal operation.
The [Print] key will record a list of all sets of data stored in the memory and
the total amounts. For the sample above, the printed record is:
Date:
Time:
2009/01/05
12:23:15
Record
1
Denomination
0.20
Quantity
285
Amount
R
57.00
Record
2
Denomination
1.00
Quantity
108
Amount
R
108.00
Record
3
Denomination
0.10
Quantity
105
Amount
R
10.50
. . . . . . . . . . .
Total
Quantity
498
Total
Amount
R
175.50
19 | P a g e
© Adam Equipment Company 2009
4.3
INPUT COMMANDS
The following commands duplicate the functions of keys. All commands are
terminated by carriage return/line feed.
Z
Same as [Zero] key. Zeros the display.
M+
Same as [M+] key.
P
Same as [Print] key.
T
Same as [Total] key.
MC
Clears memory.
The following are for the factory to set new denominations and coin weights.
The format is to send the key number, followed by the denomination and the
new coin weight and then the old coin weight.
ExamplesK01, 1.00, 3.995, 11.971<cr><lf>
1R key (assume key 01),
With denomination 1.00, weight of new coin =3.995g, weight of old coin=11.971g.
K07, 0.20, 4.489, 2.505<cr><lf>
5c key (assume key7),
With denomination 0.20, weight of new coin =4.489g and weight of old coin = 2.505.
K10, T3, 1.234, 2.456<cr><lf>
Token 3 key (assume key10),
With of a token, number 3, weight of new token = 1.234g and weight of old token = 2.456g.
Key numbers are the same as the numeric entry values shown on the keys,
the 11th key (marked 0.01) will be key number 10.
To change the printed symbol for the monetary unit, send the command $
followed by the hex code for the letter or symbol to be used.
For example, to print a “R” symbol send the command $52.
20 | P a g e
© Adam Equipment Company 2009
5.0 PARAMETERS
5.1
SETTING COIN WEIGHT
There are 9 coins and 2 tokens available for the user in the South African
version. Other versions of this scale may use other combinations. See the
Secured Parameters Section (6.0) for details on how this can be changed. In
addition each coin has a weight associated with the old style or a new style.
For South Africa the initial values set for the coins are:
Coin
Denomination
New (Wt1)
Old (Wt2)
Token1 , T0
0.000
0.000
Token2 , T1
0.000
0.000
1c
1.489
2.996
2c
2.995
3.974
5c
4.489
2.505
10c
1.987
3.960
20c
3.488
5.934
50c
4.910
9.488
R1
3.995
11.971
R2
5.470
7.006
R5
9.509
6.965
21 | P a g e
© Adam Equipment Company 2009
5.1.1 Procedure
To enter this section of the program you will need the access code number. It
may be that your manager has changed the default access code number to
another number. The default access code is 0000.
A restore code 4455 will set all coin weights as in the above table.
• Press the [New/Old] key and then apply power. Then release the
key.
• The displays will show:
“ Pin ”
“
”
“
”
Enter the access code (4 numbers) using the numeric keypad. An “-” will be
displayed for each number.
“ Pin
”
“ ----”
“
”
• Press the [Total/↵
↵] key. If the access code number was correct it
will advance to the unit weight setting program, otherwise it will
return the scale to counting. The first value displayed is the first
token value. The displays show:
denomination unit weight
“
t1 ” “
0.00”
“
0.00”
• To select another denomination press the key for that
denomination. To select either the old or new style press the
[New/Old] key. Note the arrow in the Quantity window.
For example the 10c key will show:
“
22 | P a g e
0.10”
“ 1.987”
“
0.00”
© Adam Equipment Company 2009
Unit weight is 1.987 grams for the new style and 3.960 for the old
style.
• Press the [Total/ ↵] key to reset the value desired. The unit
weight will change to 0.000 and flash.
“
0.10”
“ 0.000”
“
0.00”
• Use the numeric keys to enter a new unit weight. For example
press 1, 9, 8, and 5 to set, the numeric keys are shown with small
numbers in the corner of the keys.
“
0.10”
“ 1.985”
“
0.00”
• Press [Total/↵
↵] to store the new value. “SAVE” will be displayed
briefly.
• Repeat the procedure for any other changes necessary.
• If a printer is connected press the [Print] key to list of all the
denominations and their values. .
• At any time press the [CE /Esc] key to escape the function.
23 | P a g e
© Adam Equipment Company 2009
5.2
DETERMINING NEW COIN OR TOKEN WEIGHTS
The following procedure is used to determine the average weight of coins or
tokens. This can be used to verify the coin weight stored in memory and to
set new weights for tokens.
5.2.1 Procedure
• Before beginning have a representative sample of the coins or
tokens to be used. You should have a minimum of 100 pieceslarger the number of coins more accurate the average weight will
be.
• Set the scale to show weight temporarily by pressing the
[CE/Esc] key for 4 seconds. The weight will be displayed until
[CE /Esc] or any other key except [Tare] is pressed to return to
normal operation. The [Tare] key will continue to function as
normal to zero the display.
• Verify the scale calibration by placing a known weight on the
platform.
• If the scale is not accurate (±2g) it must be re-calibrated before
proceeding. See Section 5.4.3 for calibration details.
• Place the tokens or coins to be checked on the scale. If they are
in a container it will be necessary to Tare the weight of the
container so the Quantity display shows zero before placing the
coins or tokens in the container.
• The Denomination display will show the weight of the coins.
• Determine the average weight by dividing the total weight by the
number of coins or tokens in the sample.
24 | P a g e
© Adam Equipment Company 2009
• It is then necessary to enter this value (rounded to 3 places:
x.xxx) into memory as above. For example 12883g for 2000
tokens is an average of 6.4415 grams, Enter 6.442 grams.
5.3
SECURED FEATURES
The CCSA Coin Counting scale has a number of functions that can only be
accessed by a qualified user.
Two levels of security are available. For the first level of security, a user
password is required to allow the access to change the piece weight for the
different denominations of coins. See Section 5.1.
The second level of security will allow more functions to be set. See section
6.0.
The first level of functions includes:
25 | P a g e
F1
Baud Rate
F2
Parity
F3
Sleep
F4
Calibration
F5
Access Code Number Setting
© Adam Equipment Company 2009
5.4
WEIGHING PARAMETER FUNCTIONS
The following functions control the weighing system in the scale. To set these
functions, follow the procedure• Turn the scale on while holding the [Total/ ↵]
release the key.
“ Pin ”
“
”
“
key down and then
“
• Enter the default access code “0000”.
“ Pin ”
“ ---- ”
“
“
• Press the [Total/ ↵] key. The first function is F1 Baud Rate Setting.
“ F1 ”
“ bAud ”
“ SEt
”
• Press the [MC/
] key to advance to each of the other functions or
[CE/Esc] to return to normal operation after running a self-test.
5.4.1 F1F1 Baud Rate Setting
To change the baud rate used with the RS-232 interface, follow this
procedure.
• When the display is showing:
“ F1 ”
“ bAud ”
“ SEt ”
• Press the [Total/ ↵] key.
26 | P a g e
© Adam Equipment Company 2009
“ F1 ”
“ bAud ” “ 1200 ”
Current baud rate
• For setting a new baud rate use the [MC/
] key to cycle through the
options which are 600, 1200, 2400, 4800 and 9600.
“ F1 ”
“ bAud ” “ 4800 ”
New baud rate
• Press [CE /Esc] to escape without changes before it is stored or press
the [Total / ↵] key to confirm and store the new value.
“ F1 ”
“ bAud ”
“ SEt ”
• To move to the next function press [MC/
]
“ F2 ”
“ ParitY ”
“ SEt ”
• Or press [CE /Esc] to return to normal operation.
27 | P a g e
© Adam Equipment Company 2009
5.4.2 F2F2 PARITY
To change parity used with the RS-232 interface, follow this procedure.
• When the display is showing:
“ F2 ”
“ ParitY ”
“ SEt ”
• Press the [Total/ ↵] key.
“ F2 ” “ ParitY ”
“ n81 ”
Current parity, None, 8 data bits, 1 stop bit
• For a new parity setting, use the [MC/
] key to cycle through the
following options:
n81 Parity = None, 8 data bits and 1 stop bit.
E71 Parity = Even, 7 data bits and 1 stop bit.
o81 Parity = Odd, 7 data bits and 1 stop bit.
“ F2 ”
“ ParitY ”
“ E71”
• Press [CE /Esc] to escape without changes before it is stored or press
the [Total / ↵] key to confirm and store the new value.
“ F2 ”
28 | P a g e
“ ParitY ”
“ SEt ”
© Adam Equipment Company 2009
• Press [MC/
] to advance to the next functions
“ F3 ”
“ SLEEP ”
“SEt ”
• Or press [CE /Esc] to return to normal operation.
5.4.3 F3- SLEEP
The scale can be set to trun off automatically if it is not being used. The time
can be from 1 to 10 minutes, or disabled. To change the time , follow this
procedure.
• When the display is showing:
“ F3 ”
“ SLEEP ”
“ SEt ”
• Press the [Total/ ↵] key.
“ F3 ” “ SLEEP ”“
1”
Current setting, 1 minute
• For a new value, use the [MC/
] key to cycle through the options, 1, 5
or 10 minutes, 0 will disable the automatic turn off function.
• Press [CE /Esc] to escape without changes before it is stored or press
the [Total / ↵] key to confirm and store the new value.
“ F3 ”
29 | P a g e
“ ParitY ”
“ SEt ”
© Adam Equipment Company 2009
5.4.4 F4- Weight Calibration
To calibrate the scales it is necessary to have a weight suitable to the
capacity of the scale. It should have a mass near to the capacity of the scale,
without exceeding it. For example use 20kg mass to calibrate the CCSA. The
calibration weight should be accurate to assure accuracy of all weighing.
Weights of OIML Class M1 or better should be used. Other values of mass
can be used., see below.
The user calibration must verify the calibration is within 10% of this
calibration. This prevents calibration with no weight on the scale or with
grossly wrong weights.
• When the display is showing:
“ F4 ”
“ CAL
”
“ SEt ”
• Press the [Total / ↵] key. The display will show the following:
“ CAL ”
“ 0.000 ” “ 12345”
The number in the TOTAL window is the number of internal
counts representing the zero weight, from the analog to digital
converter within the scale.
• Make sure no other weights are on the scale. Press the [Total / ↵]
key to set the zero point. The display will show:
“ LoAd ”
“
20”
“ KiLoS”
• If a different mass is required from the one shown press the [CE]
key to clear the value, then enter the value of the calibration
mass, i.e. 10 kilograms.
• The display will show:
“ LoAd ”
30 | P a g e
“
10”
“ KiLoS”
© Adam Equipment Company 2009
•
Place the calibration weight on the scale. Press the [Total / ↵] key
to show the ADC values for this weight.
“ LoAd ”
•
“
10 ” “ 345689”
Press the [Total / ↵] key to show the ADC values for this weight.
The display will then show:
“ SPAN ” “ PASS ” “
•
”
After few seconds it will show the next function.
“
F5 ”
“ ACCES ”
“ CAL ”
• Remove the weight from the scale.
If [CE/ESp] is pressed during calibration return to normal operation without
doing the calibration.
5.4.5 F5- Access Code Number
To change the user access code number used to enter the section of the
program for changing coin weights (see Section 5.2) follow this procedure.
This parameter can only be accessed by skipping the F3 Calibration function
by using the [MC/
] key.
• When the display is showing:
“ F5 ”
“ ACCES ”
“ SEt
”
• Press the [Total / ↵] key. The display will show:
31 | P a g e
© Adam Equipment Company 2009
“ Pin 1 ” “
”
“
”
Enter the new access code
“ Pin 1 ” “ - - - -”
“
”
• press the [Total/ ↵] key to confirm and store the value, The scale
will ask you to repeat the number again for security.
“ Pin 2 ” “
”
“
”
Enter the new access code
“ Pin 2 ” “ - - - -”
“
”
• Press [CE /Esc] to escape without changes before it is stored or
press the [Total/ ↵] key to confirm and store the value.
“ F5 ”
“ ACCES ”
“ Set
”
• To return to normal operation press the [CE /Esc] key.
32 | P a g e
© Adam Equipment Company 2009
6.0 ERROR MESSAGES
When power is first applied to the scale the software does a self check and
then verifies the voltages from the load cell are acceptable. The display will
show error messages if the voltage is not within certain limits. If these error
messages appear contact your supplier for assistance.
ERROR
CODE
DESCRIPTION
POSSIBLE CAUSES
Err 1
Error setting a date
Trying to set a date that
is not realistic.
Err 2
Error setting time
Trying to set a time that
is not realistic.
Err 4
Initial Zero is greater than
allowed (typically 4% of the
maximum capacity) when
power is turned on or when
the [Zero] key is pressed,
Weight is on the pan
when turning the scale
on.
Excessive weight on the
pan when zeroing the
scale.
Improper calibration of
the scale.
Damaged load cell.
Damaged Electronics.
Err 6
A/D count is not correct when Platform is not installed.
turning the scale on.
Load cell is damaged.
Electronics is damaged.
33 | P a g e
© Adam Equipment Company 2009
7.0 SPECIFICATIONS
CCSA
Capacity,
=
Max
d=
20 kg
1g
NOTE: Weight is not displayed except
in special test program
Tare Range
-20 kg
Working
Temperature
0ºC to 40ºC
Platform
225 x 275mm
Overall
315 x 355 x 110mm
Battery Life
50+ hours typical*
Power
Net Weight
230 VAC, 50/60 Hz., 10 watts
4.1 kg
*Battery Life is less when the optional backlight is used
34 | P a g e
© Adam Equipment Company 2009
8.0 WARRANTY STATEMENT
Adam Equipment offers Limited Warranty (Parts and Labor) for the components failed due to defects in materials or
workmanship. Warranty starts from the date of delivery.
During the warranty period, should any repairs be necessary, the customer must inform the supplier or Adam
Equipment. The company or its authorised Technician reserves the right to repair or replace any components at its
own discretion. Any shipping costs involved in sending the faulty units to a service centre is the customers
responsibility.
The warranty will cease to operate if the equipment is not returned in the original packaging and with correct
documentation for a claim to be processed. All claims are at the sole discretion of Adam Equipment.
This warranty does not cover equipment where defects or poor performance is due to misuse, accidental damage,
exposure to radioactive or corrosive materials, negligence, faulty installation, unauthorised modifications or
attempted repair or failure to observe the requirements and recommendations as given in this User Manual.
Repairs carried out under the warranty does not extend the warranty period. Components removed during the
warranty repairs become the company property.
The statutory right of the purchaser is not affected by this warranty. The terms of this warranty is governed by the
Laws of England and Wales. For complete details on Warranty Information, see the terms and conditions of sale
available on our web-site.
35 | P a g e
© Adam Equipment Company 2009
Manufacturer’s Declaration of Conformity
This product has been manufactured in accordance with the
harmonized European standards, following the provisions of the
below stated directives:
Electro Magnetic Compatibility Directive 2004/108/EC
Low Voltage Directive 2006/95/EC
Adam Equipment Co. Ltd.
Bond Avenue, Denbigh East
Milton Keynes, MK1 1SW
United Kingdom
FCC COMPLIANCE
This equipment has been tested and found to comply with the limits for a Class A digital device,
pursuant to Part 15 of the FCC Rules. These limits are designed to provide reasonable protection
against harmful interference when the equipment is operated in a commercial environment. The
equipment generates, uses, and can radiate radio frequency energy and, if not installed and used in
accordance with the instruction manual, may cause harmful interference to radio communications.
Operation of this equipment in a residential area is likely to cause harmful interference in which case
the user will be required to correct the interference at his own expense.
Shielded interconnect cables must be employed with this equipment to insure compliance with the
pertinent RF emission limits governing this device.
Changes or modifications not expressly approved by Adam Equipment could void the user's authority
to operate the equipment.
WEEE COMPLIANCE
Any Electrical or Electronic Equipment (EEE) component or assembly of parts intended to be
incorporated into EEE devices as defined by European Directive 2002/95/EEC must be recycled or
disposed using techniques that do not introduce hazardous substances harmful to our health or the
environment as listed in Directive 2002/95/EC or amending legislation. Battery disposal in Landfill
Sites is more regulated since July 2002 by regulation 9 of the Landfill (England and Wales) Regulations
2002 and Hazardous Waste Regulations 2005. Battery recycling has become topical and the Waste
Electrical and Electronic Equipment (WEEE) Regulations are set to impose targets for recycling.
36 | P a g e
© Adam Equipment Company 2009
ADAM EQUIPMENT is an ISO 9001:2000 certified global company with more than 35 years
experience in the production and sale of electronic weighing equipment.
For a complete listing of all Adam scales and balances visit our website at:
www.adamequipment.com
© Copyright by Adam Equipment Co. Ltd. All rights reserved. No part of this
publication may be reprinted or translated in any form or by any means without the
prior permission of Adam Equipment.
Adam Equipment reserves the right to make changes to the technology, features,
specifications and design of the equipment without notice.
All information contained within this publication is to the best of our knowledge
timely, complete and accurate when issued. However, we are not responsible for
misinterpretations which may result from the reading of this material.
The latest version of this publication can be found on our Website.
Head Office:
Adam Equipment Co. Ltd.
Bond Avenue,
Milton Keynes,
MK1 1 SW
Tel: +44 (0)1908 274545
Fax: +44 (0)1908 641339
[email protected]
For regional office worldwide visit www.adamequipment.com
37 | P a g e
© Adam Equipment Company 2009