1
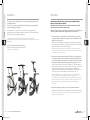
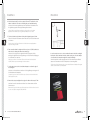
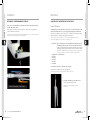
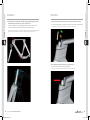
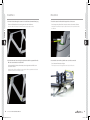
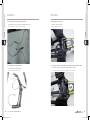
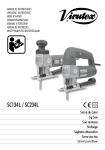
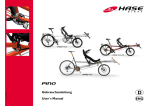
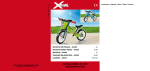
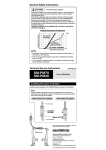
scott 2011
bike owners
manual
SU2
PLASMA 3
SCOTT SPORTS SA | 17 RTE DU CROCHET | 1762 GIVISIEZ | SWITZERLAND
© 2009 SCOTT SPORTS SA, ALL RIGHTS RESERVED | SCOTT-SPORTS.COM
SU02_Plasma3_cover.indd 2-3
22.11.10 14:37
Plasma 3
The Plasma TT frame set is only compatible with Shimano Di2 shifting set:
Der Plasma TT Rahmen ist nur kompatibel mit dem Shimano Di2 shifting set:
Plasma 3
Plasma 3
Le cadre PlasmaTT est uniquement compatible avec le système de changement de
vitesses Di2.
Important:
Plasma 3 started already in 2009 as a project with Team
HTC Columbia and the Commerzbank Triathlon Team and
is now available also for customers.
This bike/frameset follows completely the rules of the UCI
on time trial bikes and suits also perfect for triathlon use.
Plasma3 startete in 2009 als Projekt mit dem Team HTC
Columbia und dem Commerzbank Triathlon Team und ist
jetzt erhältlich für Privatkunden.
Das Fahrrad/Rahmenset entspricht komplett den UCI
Regeln für Zeitfahrräder und ist ebenfalls perfekt für den
Triathloneinsatz.
The Plasma TT frame set can only be assembled with the stem/
handlebar combination delivered with the frame set.
Other stems/handlebars will not fit properly and can even be
dangerous in case combined with this frame set/fork system!
Der Plasma TT Rahmen kann nur mit der dazugelieferten
Lenker/Vorbaukombination montiert werden. Andere Lenker/
Vorbaukombinationen passen nicht und können sogar gefährlich sein.
Le cadre Plasma TT peut uniquement être assemblé avec le cintre et
potence qui sont inclus lors la livraison du cadre. Un autre cintre et/ou
potence ne pourront pas garantir un montage correct et une sécurité
optimale.
Plasma3 a été initié en 2009 comme projet en collaboration
avec les équipes HTC Columbia et Commerzbank Triathlon
Team. Il est désormais disponible au grand public.
Ce vélo/cadre correspond parfaitement aux normes UCI
pour les vélos utilisés lors de compétitions officielles type
contre-la-montre et triathlon.
2
2011 SCOTT BIKE OWNERS MANUAL
SU02_plasma3.indd 2-3
3
24.11.10 08:29
Plasma 3
The Plasma Premium frame set will be delivered with a 40° rise stem without
handlebar.
Seatpost / SAttelstütze / tige de selle
Der Plasma Premium Rahmensatz wird mit einem 40° Vorbau ohne Lenker
ausgeliefert
The seatpost of Plasma 3 needs to be cut on its downside. Please make sure that the
seatpost touches the base of the seatpost pocket inside the frame to avoid a slipping
seatpost.
Plasma 3
Le cadre Plasma Premium est livré avec une potence à 40° sans cintre.
Please note that you cannot use the 0° rise stem of Plasma TT
with this frame and fork!
Achtung! Der Plasma TT Vorbau mit 0° kann nicht verbaut werden.
La potence Plasma TT avec 0° ne peut etre utilisé sur ce cadre ayant
la dénomination TT
Plasma 3
Plasma 3
Die Sattelstütze des Plasma 3 muss an ihrer Unterseite gekürzt werden. Bitte stellen
Sie sicher, dass das untere Ende der Sattelstütze den Stopper am unteren Ende des
Einschubs im Rahmen berührt um ein nach-unten-Rutschen der Sattelstütze zu
vermeiden.
La tige de selle Plasma 3 doit être coupée par le bas. Attention, une fois coupée,
la tige de selle doit reposer sur les bloqueurs à l’intérieur du cadre pour éviter tout
glissements.
You will find attached to each frameset and bike a seatpost cutting tool:
Mit jedem Rad oder Rahmenset wird eine Sattelrohrschneideführung ausgeliefert.
Avec chaque vélo et cadre, il est inclus un outil de coupe pour le tube de selle.
The stem for Plasma Premium is available in 75mm and 90mm length.
Der Plasma Premium Vorbau ist in 75mm und 90mm Länge lieferbar.
La potence Plasma Premium est disponible en 75mm et 90mm.
4
2011 SCOTT BIKE OWNERS MANUAL
SU02_plasma3.indd 4-5
5
24.11.10 08:29
Plasma 3
Plasma 3
The seatpost of the Scott Plasma 3/TT needs to be cut and adjusted to the personal
seat height of the rider.
The tool to do so is added to your Plasma 3/TT and will help to cut properly without
any risk of damaging your seat tube.
Important: pls note that the change to another saddle or pedal model might
influence a lot the length of the seattube!
La tige de selle du Scott Plasma 3/TT doit être coupé a la bonne hauteur.
L’outil spécifique est livré avec chaque cadre et permet de couper le tube de selle sans
dommages.
To do so, pls follow the instructions given below:
Bitte gehen Sie hierzu wie folgend beschrieben vor:
Veuillez suivre ces instructions:
Attention : veuillez noter que si vous changez de modèle de selle ou de pédale, vous
risquez de modifier sensiblement la longueur du tube de selle nécessaire!
Plasma 3
Plasma 3
Die Sattelstütze des Scott Plasma 3/TT muss auf die präzise angepasste Höhe
abgesägt werden. Das passende Werkzeug ist jedem Plasma 3/TT beigelegt und hilft
die Sattelstütze ohne Beschädigung abzusägen.
Wichtig: bitte beachten Sie, dass ein anderer Sattel oder ein anderes Pedal die
Länge des Sitzrohres erheblich beeinflussen kann!
1. Take the exact measure of the distance (d0) from the mid of axle of your pedal
to the upper side of the saddle you use already on your “old” bike which is exactly
adjusted to your seat position.
d2
d1
d0
Nehmen Sie das exakte Maß der Distanz (d1) zwischen der Mitte der Pedalachse
und der Oberkante der Sitzfläche des Sattels, das Sie bereits bei Ihrem „alten“ Rad
haben, das exakt auf Ihre Sitzposition eingestellt ist.
Mesurez avec précision la distance (d0) entre le milieu de l’axe de la pédale et
la face supérieure de la selle que vous utilisez déjà sur votre « ancien» vélo, réglée
exactement sur votre position assise..
2.
Mount your pedals and saddle on the Plasma 3/TT bike. For the cutting, position
your seatpost as low as possible in the frame and measure the distance (d1) from
the mid of the pedal axle to the upper side of the saddle. Remove the seat clamp
and measure the distance (d2) from the downside of the seatpost: d2 = d1 – d0
Montieren Sie Ihre Pedale und den Sattel an Ihr Plasma 3/TT Bike. Für das Kürzen
der Sattelstütze schieben Sie diese soweit wie möglich nach unten und messen Sie
die Distanz (d1) zwischen der Mitte der Pedalachse und der Oberkante der
Sitzfläche des Sattels. Entfernen Sie nun die Sattelstütze incl. Sattel und messen
Sie die Distanz (d2) von der Oberkante des Sitzrohres aus: d2 = d1 - d0
Montez les pédales et la selle sur l‘Plasma. Fixer la selle avec les vis M5 (à l’aide
d’une clé Allen de 4 mm), en appliquant un couple de serrage de 5 Nm.
Pour couper le tige de selle, positionnez laquelle le plus bas possible et mesurez la
distance (d1) entre le milieu de l’axe de la pédale et la face supérieure de la selle.
Retirez la tige de selle et mesurez la distance (d2) depuis le haut du tube :
d2 = d1 - d0
3. Indicate the length (d2) you want to cut on the seatpost with a marker pen.
6
2011 SCOTT BIKE OWNERS MANUAL
SU02_plasma3.indd 6-7
Markieren Sie die Distanz (d2), die Sie abschneiden möchten, mit einem Lackstift.
Faites un repère au marqueur sur le tige de selle pour indiquer la longueur (d2) à
laquelle vous souhaitez le couper.
7
24.11.10 08:29
Plasma 3
Plasma 3
Schieben Sie die Plasma Sägeführung auf der Sattelstütze bis die markierte Linie
im Sägeführungsspalt mit Ihrer Sägemarkierung übereinstimmt
Glissez l’outil de coupe Plasma sur la tige de selle jusqu’à ce que le repère
apparaisse dans la rainure qui vous guidera pendant que vous scierez.
5 Nm
Plasma 3
Plasma 3
4. Slide the Plasma Cutting Tool on the seatpost of Plasma 3/TT until the line of the
marker is visible in the slot on the tool that will guide your saw blade. drawing
5. Fix the two 5mm bolts with a 4mm Allen key with a tightening torque of 6 Nm.
Ziehen Sie die beiden M5 Schrauben (4mm Inbusschlüssel) mit einem Drehmoment
von 6 Nm an.
Fixez les deux vis de 5 mm à l’aide de la clé Allen de 4 mm, en appliquant un
couple de serrage de 6 Nm.
6. Take a saw with a blade for cutting metal. Please only use a 10D/24T teeth blade to
make sure not to damage the carbon tube warning logo
Nehmen Sie eine Säge mit einem Sägeblatt für Metal. Verwenden Sie bitte
unbedingt ein Sägeblatt mit einer Sägezahnung von 10D/24Z um Beschädigungen
des Carbonrohres zu vermeiden
In case the seatpost was cut too short or another rider wants to adjust the seatheight
but keep the seatpost maximum inside the seattube pocket you can use the adapterset as shown below to adjust the length of the seatpost individually.
Munissez-vous d’une scie à métaux. Utilisez exclusivement une lame dentée
10D/24T, afin de ne pas endommager le tube en carbone.
Wenn die Sattelstütze zu kurz abgesägt wurde oder ein anderer Rider das Fahrrad
anpassen will, verwenden Sie bitte das Adapterset wie unten abgebildet.
7. Cut the seatpost, remove the tool and take sandpaper to smoothen the edges of
the cutting area.
Schneiden Sie die Sattelstütze ab, entfernen Sie die Sägeführung und entgraten Sie
die Schnittkanten mit Sandpapier.
Coupez la tige de selle, enlevez l’outil de coupe et émoussez les bords du tube à
l’aide de papier de verre.
Si la tige de selle a été trop raccourci ou si un autre utilisateur veut adapter la longueur
du tube, veuillez utiliser le jeu d’adaptateur.
8. Remount the seatpost and tighten the wedge on the frame with a torque of 5 Nm.
8
Montieren Sie nun die Sattelstütze und ziehen Sie die Klemmschrabe mit 5Nm
Drehmoment an
Remontez la tige de selle dans sa position la plus basse et fixez la selle en vissant le
vis, avec un couple de serrage de 5Nm/ 44in-lbs.
2011 SCOTT BIKE OWNERS MANUAL
SU02_plasma3.indd 8-9
9
24.11.10 08:29
Plasma 3
Rear brake / hinterradbremse / Frein AR.
Cable routing / Kabelführung / Guide Cable
Please only use Shimano BR-7800 as this brake will offer enough clearance between
the brake arms and the cranks.
Plasma 3 TT Version
Bitte verbauen Sie nur Bremse Shimano BR-7800, da nur diese genug Raum lässt
zwischen Bremsarm und Kurbel.
As already before-mentioned the frame set of Plasma 3 TT is only made for the use with
Shimano Di2 shifting parts. To do so you will need the following parts of Shimano Di2:
Veuillez monter uniquement les freins Shimano BR-7800, c’est les seuls qui proposent
assez d’espace entre le bras de frein et la manivelle.
Wie schon vermerkt, können beim Plasma 3 TT nur Shimano Di2 Schaltkomponenten
verbaut werden. Dazu benötigen Sie folgende Komponenten:
Plasma 3
Plasma 3
Plasma 3
Comme mentionné, sur le Plasma 3 TT, vous pouvez uniquement monter des
composants Shimano Di2. Pour cela, vous avez besoin de :
- 2 x EW-7975 (use 2 sets if the battery is mounted behind the saddle) an extension
for the battery cable is needed; we used a second RD cable for this
(2 Sätze wenn die Batterie hinter dem Sattel montiert wird) eine Kabel
verlängerung wird benötigt, wir brauchen dazu ein zweites RD Kabel
(utiliser 2 jeu si la batterie est monté derrière la selle), une rallonge de
câble est nécessaire, nous utilisons un deuxième câble de RD)
- 1 x SM-EW 79A-I or SM-EW 79A-I2
- 1 x ST-7971
- 1 x SW-7971
- 1 x RD-7970
- 1 x FD-7970
- 1 x SM-BTR1
To assemble the cables please follow the steps as shown:
Um die Kabel zu installieren, bitte wie folgt vorgehen:
Pour monter les câbles, veuillez suivre la procédure ci-dessous:
1. Assembly lower bearing on fork carbon crown
Unteres Lager auf Gabel montieren
BR 7800 for Rear Brake / Crank clearance
10
2011 SCOTT BIKE OWNERS MANUAL
SU02_plasma3.indd 10-11
Monter le roulement inférieur sur le pivot
de fourche
11
24.11.10 08:29
Plasma 3
Plasma 3
2.Push the brake cable, starting from the BB housing, upward through the downtube
and the forksteerer until it reaches to upper side of the steerer
3.Assemble to upper headset bearing and the compression washer of the headset
Schieben Sie das Bremsseil vom Tretlagergehäuse beginnend nach oben durch das
Unterrohr und das Gabelschaftrohr bis es oben aus dem Schaftrohr kommt.
Assembler le jeu de direction supérieur et rondelle de compression.
Zu oberem Steuersatzlager und Kompressionsscheibe des Steuersatzes zusammenbauen
Plasma 3
Plasma 3
Poussez le câble de freins, en commençant à hauteur du boitier de pédalier, traverser
le tube transversal en direction du tube de direction jusqu’a ce qu’il en sort
4.Route the brake cable through the front side steerer tube hole
Das Kabel durch die Öffnung im Steuerrohr führen
Introduire le câble de frein par l’orifice avant du tube de direction
12
2011 SCOTT BIKE OWNERS MANUAL
SU02_plasma3.indd 12-13
13
24.11.10 08:29
5.Push the Di2 cable through the steerer holes into the frame downward all way long
7.Insert the compression kit tube in the upper holes of the steerer
Führe das Di2 Kabel durchs Steuerrohr ganz nach unten im Rahmen.
Den Kompressionsschlauch in die oberen Löcher des Steuerrohrs schieben
Passer le câble Di2 à travers le tube de direction jusqu’en bas du cadre
Introduire l’insert afin de bloquer les câbles dans des trous supérieur du tube
de direction
6.Push the brake cable outer housing along the brake cable all way upward from the
BB to the steerer tube holes into the frame
8.Assemble the stem main body with its rear cap on the steerer tube
Die Bremskabelhülle über das Bremskabel, unten beginnend beim BB, bis zum
Steuerrohr schieben
Fixer la potence avec le blocage arrière sur le pivot de frouche.
Plasma 3
Plasma 3
Plasma 3
Plasma 3
Den Vorbau am Rahmen besfestigen
Mettre la gaine de frein en utilisant comme guide le câble, en partant du boitier de
pédalier au jeu direction à travers le cadre.
14
2011 SCOTT BIKE OWNERS MANUAL
SU02_plasma3.indd 14-15
15
24.11.10 08:29
9.Use the cables for the Di2 bar fit as shown below:
11.Assemble the bar on the stem
Die Kabel für den Di2 Lenker gemäss. Abbildung verwenden
Lenker am Vorbau montieren
Utiliser les câbles Di2 pour le cintre selon image
Monter le cintre sur la potence
10. Assemble the Di2 cables on the bar:
12. Connect the Di2 wire plugs and finalize the assembly of front and rear brake cables
Die Di2 Kabel am Lenker montieren
Die Di2 Kabel verbinden und Montage der Bremskabel fertigstellen.
Monter les câbles Di2 sur le cintre
Connectez les câbles et terminer le montage des câbles de freins.
Plasma 3
Plasma 3
Plasma 3
Plasma 3
16
2011 SCOTT BIKE OWNERS MANUAL
SU02_plasma3.indd 16-17
17
24.11.10 08:29
Plasma 3
Plasma 3
User manual
Plasma 3
Plasma 3 Premium
NOtes / Notizen / Notes
Rear Brake
R Brake
Rear
B k
Hinterbremse
RD
Rear Derailleur
Hinteres Schaltwerk
Dérailleur arrière
Frein arrière
FD
Front Derailleur
Umwerfer
Dérailleur avant
Das Bild k ann nicht angezeigt werden. Dieser Computer v erfügt möglicherweise über zu wenig A rbeitsspeicher, um das Bild zu öffnen, oder das Bild ist beschädigt. Starten Sie den Computer neu, und öffnen Sie dann erneut die Datei. Wenn weiterhin das rote x angezeigt wird, müssen Sie das Bild möglicherweise löschen und dann erneut einfügen.
Cyril / 21/10/2010
18
2011 SCOTT BIKE OWNERS MANUAL
SU02_plasma3.indd 18-19
19
24.11.10 08:29