1
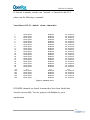
TAP100 User Manual
OpenVox Communication Co.Ltd
TAP100 User Manual
Date: 12th Feb, 2012
Version: 2.2
OpenVox Communication Co. LTD.
URL: www.openvox.cn
TAP100 User Manual
OpenVox Communication Co.Ltd
OpenVox-Best Cost Effective Asterisk Cards
Address: F/3, Building No.127, Jindi Industrial Zone,
Shazui Road, Futian District, Shenzhen, Guangdong 518048, China
Tel:+86-755-82535461, 82535095, 82535362, Fax:+86-755-83823074
Business Contact: [email protected]
Technical Support: [email protected]
Business Hours: 09:00-18:00(GMT+8) from Monday to Friday
URL: www.openvox.cn
Thank You for Choosing OpenVox Products!
OpenVox Communication Co. LTD.
URL: www.openvox.cn
1
TAP100 User Manual
Copyright
Copyright© 2011 OpenVox Inc. All rights reserved. No part of this document may be
reproduced without prior written permission.
Confidentiality
Information contained herein is of a highly sensitive nature and is confidential and
proprietary to OpenVox Inc. No part may be distributed, reproduced or disclosed
orally or in written form to any party other than the direct recipients without the
express written consent of OpenVox Inc.
Disclaimer
OpenVox Inc. reserves the right to modify the design, characteristics, and products at
any time without notification or obligation and shall not be held liable for any error or
damage of any kind resulting from the use of this document.
OpenVox has made every effort to ensure that the information contained in this
document is accurate and complete; however, the contents of this document are
subject to revision without notice. Please contact OpenVox to ensure you have the
latest version of this document.
Trademarks
All other trademarks mentioned in this document are the property of their respective
owners.
OpenVox Communication Co. LTD.
URL: www.openvox.cn
2
TAP100 User Manual
Contents
General Safety Instructions ........................................................................................ 4
Test Environme nts ....................................................................................................... 5
Chapter 1 Ove rvie w ..................................................................................................... 6
Chapter 2 Hardware Setup ......................................................................................... 7
Chapter 3 Software Installation and Configuration ................................................. 9
3.1 Download .......................................................................................................... 9
3.2 Installation....................................................................................................... 10
3.3 Configuration .................................................................................................. 14
Chapter 4 Reference .................................................................................................. 21
Appendix A Specifications ........................................................................................ 22
Appendix B Specifications ......................................................................................... 23
OpenVox Communication Co. LTD.
URL: www.openvox.cn
3
TAP100 User Manual
General Safety Instructions
CAUTION
1. The computers that have TAP100 card installed must comply with
the country’s specific safety regulations.
2. Only service personnel should go to install TAP100 card.
3. Before installing TAP100 card, please unplug the power cord and
remove the cover from your PC.
4. For avoiding personal injuries and damages to your machine and
TAP100 card, make sure bracket of the card is secured to the PC ’s
chassis ground by fastening the card with a screw.
5. Electrical Surges, ESD are very destructive to the equipment. To
avoid it, make sure there is a low impedance discharge path from
your computer to chassis ground.
6. To reduce the risk of damage or injury, please follow all steps or
procedures as instructed.
OpenVox Communication Co. LTD.
URL: www.openvox.cn
4
TAP100 User Manual
Test Environments
CentOS-5.6
Kernel version: 2.6.18-238.el5
DAHDI: dahdi-linux-complete-current
Asterisk: dahdi-tap-1.6.2
Libpri:
libpri-moy
Hardware: OpenVox TAP100
OpenVox D430P
OpenVox Communication Co. LTD.
URL: www.openvox.cn
5
TAP100 User Manual
Chapter 1 Overview
With robust capability, cost-effectiveness and high compatibility with
international standards, OpenVox TAP100 can be widely used as a
reliable tool in call recording application to tap E1/T1/J1 network in a
variety of complex telephony environments.
Up to 2000 ohms high line impedance on tapped E1/T1/J1
transmission lines are provided for applying a non-intrusive tap by
TAP100. And the 1:1 recovered signals are delivered to the monitor
E1/T1/J1 equipment. As a result, there is no need to patch for the
driver to increase the receiver sensitivity of the monitor.
The OpenVox TAP100 card, E1/T1/J1 cards or devices, and straight
cables make a robust recording/monitoring solution on digital
transmission lines. Straight cables are connected between the TAP100 and
a pair of ports on the T1/E1/J1 cards, allowing both sides of the line to be
monitored and recorded.
OpenVox Communication Co. LTD.
URL: www.openvox.cn
6
TAP100 User Manual
Chapter 2 Hardware Setup
There are some points that should be paid attention to when set up
TAP100. You should setup the hardware by following steps.
1. Unpacking: inspect the packing container for any damage. If this
container appears damaged, immediately contact the company
responsible for the shipping and report the damage before opening and
unpacking the container. It is recommended that you also notify
OpenVox.
2. Make sure the PC that has TAP100 installed complies with the country
specific safety regulations.
3. Power off your PC and unplug it from its AC power source.
4. Attach an Anti-static Wrist Strap to your wrist.
5. Open the cover of the PC.
6. Remove the bracket holder and insert the card.
7. Firmly secure the card with the screw.
8. Plug the 4-Pin Hard-drive Power Peripheral Connector into the
corresponding socket.
9. Replace the cover of the PC.
10. Plug the UTP cables into RJ45 jack of the TAP100 and the E1/T1/J1
cards.(See Figure 1)
11. Plug the AC power source and follow the software installation
manual.
OpenVox Communication Co. LTD.
URL: www.openvox.cn
7
TAP100 User Manual
E1/T1 Card
(Record Device)
Rx CPE
Rx NET
Tap100
To CPE
To NET
Gateway
Telecom
(CPE Device)
(NET Device)
Line
are Straight Cables
Figure 1 TAP100 Application Topology
Caution: There are four interfaces of TAP100, which are
Rx CPE, Rx NET, To CPE, To NET from top to bottle. As
the above figure shows us, the “Rx CPE” interface is
connected with an E1 port of record device, the “Rx NET” is connected
with the other E1 port of the record device, the “To CPE” is with your
CPE device and the “To NET” interface is with NET equipment. In
general speaking, CPE device may be an E1 telephony card or gateway
and NET device is your telecom equipment or IP-PBX.
OpenVox Communication Co. LTD.
URL: www.openvox.cn
8
TAP100 User Manual
Chapter 3 Software Installation and Configuration
3.1 Download
DAHDI software packages are available on OpenVox official website or
Digium. Some patches should be added while the driver source is from
Digium, therefore, it is recommended that downloading the DAHDI
driver package from OpenVox official website.
Gain DAHDI source package from OpenVox:
http://downloads.openvox.cn/pub/drivers/dahdi-linux-complete/openvox_
dahdi-linux-complete-current.tar.gz
Get Asterisk software package from digium official website:
http://svn.digium.com/svn/asterisk/team/moy/dahdi-tap-1.6.2
Get libpri software package from digium official website:
http://svn.digium.com/svn/libpri/team/moy/tap-1.4/
Execute the following commands under the directory of /usr/src/ in
generally, the former three below are used for downloading these three
packages and the later three are for unzipping them.
#_wget_http://downloads.openvox.cn/pub/drivers/da
hdi-linux-complete/openvox_dahdi-linux-complete-c
urrent.tar.gz
OpenVox Communication Co. LTD.
URL: www.openvox.cn
9
TAP100 User Manual
#_svn checkout http://svn.digium.com/svn/asterisk/
team/moy/dahdi-tap-1.6.2/
# svn checkout http://svn.digium.com/svn/libpri/
team/moy/tap-1.4/z
#_tar_-xvzf_openvox_dahdi-linux-complete-current.
tar.gz
3.2 Installation
1. Hardware detection
# lspci –vvvv
Check the outcome and confirm your system has recognized D430P. If it
has been recognized, the output information will be displayed like that:
20:00.0 Class ff00: Digium, Inc. Unknown device 1420 (rev 01)
Subsystem: Unknown device 0005:0000
Control: I/O+ Mem+ BusMaster+ SpecCycle- MemWINV+ VGASnoopParErr+ Stepping- SERR+ FastB2BStatus: Cap- 66MHz- UDF- FastB2B- ParErr- DEVSEL=slow
>TAbort- <TAbort- <MAbort- >SERR- <PERRLatency: 64
Interrupt: pin A routed to IRQ 16
Region 0: Memory at 91c00000 (32-bit, non-prefetchable)
[size=32K]
Figure 2 Hardware detection
OpenVox Communication Co. LTD.
URL: www.openvox.cn
10
TAP100 User Manual
If D430P is not recognized by the system, you have to power off and take
out the card, then try to insert it into other PCI slot.
2. Software installation
Some dependencies are crucial. If any of them is absent, the software
installation process would not go through successfully. Let’s run "yum
install XX" (XX stands for the dependency’s name) to check the
availability of dependencies.
# yum install bison
# yum install bison-devel
# yum install ncurses
# yum install ncurses-devel
# yum install zlib
# yum install zlib-devel
# yum install openssl
# yum install openssl-devel
# yum install gnutls-devel
# yum install gcc
# yum install gcc-c++
# yum install libxml2
# yum install libxml2-devel
OpenVox Communication Co. LTD.
URL: www.openvox.cn
11
TAP100 User Manual
If there is no kernel-devel source in the system, users
should run the following command to install the
kernel-devel to peer current kernel:
# yum install kernel-devel-`uname –r`
While if there is no matched kernel-devel found, you should download
matched RPM package to install it, or execute the following command to
update to the latest and stable kernel version:
# yum install kernel kernel-devel
After installed, please reboot your machine to apply the new kernel and
install the dependencies. If the dependency has been installed, system
indicates that nothing to do which means you could go to next one
directly. Otherwise, the system will keep on installing it.
Among libpri, DAHDI and Asterisk, let’s install libpri firstly, please
execute those commands under the directory of /usr/src/ in generally:
# cd tap-1.4
# make
# make install
Then change to the directory of dahdi-linux-complete-XX (XX represents
DAHDI version), then perform commands one by one to install DAHDI.
OpenVox Communication Co. LTD.
URL: www.openvox.cn
12
TAP100 User Manual
# cd /usr/src/dahdi-linux-complete-XX
# make
# make install
# make config
Caution: If there is something wrong after "make",
please refer to HERE. In the url link, the moderator
introduces you a method how to patch. After patching,
save your changes and exit. Then run "make" again, if successfully done,
it is time for you to install Asterisk.
Please operate those commands to install Asterisk.
# cd dahdi-tap-1.6.2
# ./configure
# make
# make install
# make samples
"make samples" will install the standard
sample configuration file in the directory /etc/asterisk. As a
freshman, you should perform "make samples", that is to
OpenVox Communication Co. LTD.
URL: www.openvox.cn
13
TAP100 User Manual
say, it is unnecessary to perform "make samples" every time. Because
once performed, it will cover the old sample configuration files you have
installed.
3.3 Configuration
1. Driver loading
After compiling and installing DAHDI and Asterisk, please load the
driver by running:
# modprobe dahdi
# modprobe wct4xxp
# dahdi_genconf
If there is any error, please trace the cause. Until all errors are clear up,
you could execute "dahdi_genconf" again, and then go to the next step.
By running "dahdi_genconf", it will generate /etc/dahdi/system.conf and
etc/asterisk/dahdi-channels.conf automatically. Checking whether the
generated files information agrees with your hardware setup, if not, you
should modify to your specific requirements. Do not forget to confirm
dahdi-channels.conf is included in chan_dahdi.conf, if not, run command:
# echo "#include dahdi-channels.conf" >>
/etc/asterisk/chan_dahdi.conf
OpenVox Communication Co. LTD.
URL: www.openvox.cn
14
TAP100 User Manual
A part of system.conf which is one of the basic channel configuration
files is displayed.
# Span 1: TE4/0/1 "T4XXP (PCI) Card 0 Span 1" (MASTER) HDB3/CCS/CRC4 ClockSource
span=1,1,0,ccs,hdb3
# termtype: te
bchan=1-15,17-31
dchan=16
# Span 2: TE4/0/2 "T4XXP (PCI) Card 0 Span 2"
span=2,2,0,ccs,hdb3
# termtype: te
bchan=32-46,48-62
dchan=47
# Span 3: TE4/0/3 "T4XXP (PCI) Card 0 Span 3"
span=3,3,0,ccs,hdb3
# termtype: te
bchan=63-77,79-93
dchan=78
# Span 4: TE4/0/4 "T4XXP (PCI) Card 0 Span 4"
span=4,4,0,ccs,hdb3
# termtype: te
bchan=94-108,110-124
dchan=109
# Global data
loadzone
defaultzone
= us
= us
Figure 3 A part of system.conf
2. Country mode modification
In order to match your country pattern, you need to change parameters
loadzone and defaultzone to your country. For example, your system is in
CHINA, you would like them change to:
loadzone = cn
defaultzone = cn
OpenVox Communication Co. LTD.
URL: www.openvox.cn
15
TAP100 User Manual
Some zonedata is available in the file
.. /dahdi-XX/tools/zonedata.c, you can refer to it to match
your country mode. Meanwhile, you also need to modify
another parameter which is in file
/etc/asterisk/indications.conf.
country=cn
A part of file /etc/asterisk/dahdi-channels.conf is showed as below.
(Modification, if it is not agree with the hardware setup)
OpenVox Communication Co. LTD.
URL: www.openvox.cn
16
TAP100 User Manual
; Span 1: TE4/0/1 "T4XXP (PCI) Card 0 Span 1"
(MASTER) HDB3/CCS/CRC4 ClockSource
group=0,11
context=from-pstn
passive=yes
/add this line here/
switchtype = euroisdn
signalling = pri_cpe
/change to pri_cpe/
channel => 1-15,17-31
context = default
group = 63
; Span 2: TE4/0/2 "T4XXP (PCI) Card 0 Span 2"
group=0,12
Context=from-pstn
passive=yes
/add this line here/
switchtype = euroisdn
signalling = pri_cpe
/change to pri_net/
channel => 32-46,48-62
context = default
group = 63
; Span 3: TE4/0/3 "T4XXP (PCI) Card 0 Span 3"
group=0,13
context=from-pstn
switchtype = euroisdn
signalling = pri_cpe
channel => 63-77,79-93
context = default
group = 63
; Span 4: TE4/0/4 "T4XXP (PCI) Card 0 Span 4"
group=0,14
context=from-pstn
switchtype = euroisdn
signalling = pri_cpe
channel => 94-108,110-124
context = default
group = 63
Figure 4 A part of dahdi-channels.conf
After modifying the country mode, please execute the following
command:
# dahdi_cfg –vvvvvv
OpenVox Communication Co. LTD.
URL: www.openvox.cn
17
TAP100 User Manual
The command is used for reading and loading parameters in the
configuration file system.conf and writing to the hardware. A part of
outputs are showed in the following figure.
[root@localhost ~]# dahdi_cfg -v
DAHDI Tools Version - 2.6.1
DAHDI Version: 2.6.1
Echo Canceller(s):
Configuration
======================
SPAN
SPAN
SPAN
SPAN
1:
2:
3:
4:
CCS/HDB3
CCS/HDB3
CCS/HDB3
CCS/HDB3
Build-out:
Build-out:
Build-out:
Build-out:
0
0
0
0
db
db
db
db
(CSU)/0-133
(CSU)/0-133
(CSU)/0-133
(CSU)/0-133
feet
feet
feet
feet
(DSX-1)
(DSX-1)
(DSX-1)
(DSX-1)
124 channels to configure.
Setting
Setting
Setting
Setting
Setting
Setting
Setting
Setting
Setting
Setting
……
……
Setting
Setting
Setting
Setting
Setting
Setting
echocan
echocan
echocan
echocan
echocan
echocan
echocan
echocan
echocan
echocan
for
for
for
for
for
for
for
for
for
for
channel
channel
channel
channel
channel
channel
channel
channel
channel
channel
1 to none
2 to none
3 to none
4 to none
5 to none
6 to none
7 to none
8 to none
9 to none
10 to none
echocan
echocan
echocan
echocan
echocan
echocan
for
for
for
for
for
for
channel
channel
channel
channel
channel
channel
119
120
121
122
123
124
to
to
to
to
to
to
none
none
none
none
none
none
Figure 5 Channel map
3. Asterisk initiation
# asterisk –vvvvvvvgc
OpenVox Communication Co. LTD.
URL: www.openvox.cn
18
TAP100 User Manual
If Asterisk is already activate, run "asterisk –r" instead. In the CLI,
please run the following command:
localhost*CLI> dahdi show channels
1
2
3
4
5
6
7
8
9
10
11
12
13
14
15
17
18
19
20
21
……
120
121
122
123
124
from-pstn
from-pstn
from-pstn
from-pstn
from-pstn
from-pstn
from-pstn
from-pstn
from-pstn
from-pstn
from-pstn
from-pstn
from-pstn
from-pstn
from-pstn
from-pstn
from-pstn
from-pstn
from-pstn
from-pstn
……
from-pstn
from-pstn
from-pstn
from-pstn
from-pstn
default
default
default
default
default
default
default
default
default
default
default
default
default
default
default
default
default
default
default
default
……
default
default
default
default
default
In
In
In
In
In
In
In
In
In
In
In
In
In
In
In
In
In
In
In
In
Service
Service
Service
Service
Service
Service
Service
Service
Service
Service
Service
Service
Service
Service
Service
Service
Service
Service
Service
Service
……
In Service
In Service
In Service
In Service
In Service
Figure 6 channels show
If DAHDI channels are found, it means they have been loaded into
Asterisk successfully. You are going to edit dialplan by your
requirements.
OpenVox Communication Co. LTD.
URL: www.openvox.cn
19
TAP100 User Manual
4. Dialplan edit
Users must make sure that the context "from-pstn" and "from-internal"
are in extensions.conf, here a simple example is given:
# vim /etc/asterisk/extensions.conf
[from-pstn]
exten => _X.,1,Answer()
exten => _X.,n,Record(advanced-recording%d:wav)
exten => _X.,n,Hangup()
Figure 7 dial plan
Additional function
Users should run command "cat /proc/interrupts" to check D430P has
independent interrupt. If it shares interrupt with other device, it may
cause some problems even cannot work normally. While D430P allows
users to modify interrupt pin during firmware upgrade for avoiding
conflict.
OpenVox Communication Co. LTD.
URL: www.openvox.cn
20
TAP100 User Manual
Chapter 4 Reference
www.openvox.cn
www.digium.com
www.sangoma.com
www.asterisk.org
www.voip-info.org
www.asteriskguru.com
Tips
Any questions during installation, please consult in our forum or look up
for answers from the following websites:
Forum
wiki
OpenVox Communication Co. LTD.
URL: www.openvox.cn
21
TAP100 User Manual
Appendix A Specifications
Features
• High line impedance on tapped line
• No need for patching driver
• Small Size 2U Form Factor
• Integrates in Asterisk®
Dimension
•Includes Low Profile PCI/ PCIe Short Form Factor in 2U Chassis
• 61.4×87.5mm (PCB)
Interface
• RJ45
Power Requirments
• 0.2A @5V
Operating Temperature Range
•0 - 50 °C
Humidity
•10 - 90% NON-CONDENSING
OpenVox Communication Co. LTD.
URL: www.openvox.cn
22
TAP100 User Manual
Appendix B Specifications
Hard-Driver Power
Socket
RJ45 Socket
(Connect with Monitor Device)
RJ45 Socket
(Conenet with NET Device)
RJ45 Socket
(Connect with Monitor Device)
RJ45 Socket
(Connect with CPE Device)
Figure 8 TAP100 Socket View
OpenVox Communication Co. LTD.
URL: www.openvox.cn
23