1
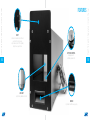
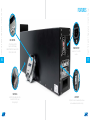
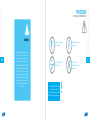
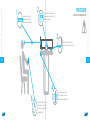
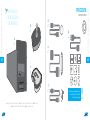
DEPTH
PERCEPTION
APPARATUS
USER´S
GUIDE
Model
14012A
Congratulations!
You have just acquired an innovative, high
quality product. We have put our highest
effort into each development stage. We are
sure that you will find this equipment most
reliable and accurate - exceeding your
expectations.
Before using this device, we strongly
recommend that you carefully read the
user manual. There you will find all related
information for correct handling and usage
of this product.
We hope that you enjoy using this
equipment as much as we did creating it.
De la Rosa Research Team.
Pag.
9
Details
INDEX
Pag.
11
Specification
Pag.
13
Applications
Pag.
15
Features
Pag.
21
Procedure
The Depth Perception Apparatus tests depth perception acuity. Depth
perception is the ability to see the world in three dimensions and to
perceive distance (the ability to judge which of several objects is closer
or farther away from you, or to judge the distance between you and
an object). In addition to being aesthetically appealing, the Depth
Perception Apparatus represents the state-of-the-art in sensation and
perception measurement technology, and offers feature-packed high
performance, unparalleled functionality, superior accuracy, ease-of-use,
and expandability. The Depth Perception Apparatus is the embodiment
of an experienced psychologist’s vision and technical perfection.
Depth Perception Apparatus // User´s manual
Depth Perception Apparatus // User´s manual
6
DETAILS
7
Line Voltage: 110/220 V AC - 50/60 Hz.
Current: 10 Amps.
Heigh: 11” // Wide: 10” // Depth: 27”
Weight: 11 kg Aprox.
Accuracy: 1mm-0.5mm
Supplied with User Guide.
Depth Perception Apparatus // User´s manual
Light discrimination aparatus // User manual
SPECIFICATIONS
9
Good depth perception is critical among people engaged in
certain occupations, trades, or professions is essential, e.g.,
airplane and helicopter pilots, crane operators, bus drivers,
athletes etc. Since good depth perception is so important
to these professions, testing devices that can determine the
quality of an individual’s depth perception are essential for use
in the employment selection process. Furthermore, the Depth
Perception Apparatus can be found in hundreds of psychology
laboratories worldwide, where they are used for research, as
well as demonstrations for sensation and perception classes.
Depth Perception Apparatus // User´s manual
Depth Perception Apparatus // User´s manual
10
APPLICATIONS
11
Light discrimination aparatus // User manual
Recyclable
materials
Depth Perception Apparatus // User´s manual
FEATURES
13
BODY
Aluminum - stainless steel, HDPE and
acrylic body for sturdy usage.
High resistance (and 100% recyclable)
polymer base, easy to clean.
JOY STICK CONTROL
Digital joystick for
controlling displacement.
14
LED LIGHT
High intensity calibrated white LED.
HANDLE
Ergonomic handle for easy carrying.
Depth Perception Apparatus // User´s manual
Depth Perception Apparatus // User´s manual
FEATURES
15
LCD CONTROL
LCD and key pad control
Easy to read LCD display
Allows RPM and time measurements.
255 step motor control.
POWER SUPPLY
Available for 110 V and 220V
countries.
16
Depth Perception Apparatus // User´s manual
Depth Perception Apparatus // User´s manual
FEATURES
17
MATERIALS
Built from high-quality components
manufactured in USA, Japan,
Germany, Italy, etc.
USB PORT
USB port for serial communication (the software
will be available and supplied at no charge).
18
Depth Perception Apparatus // User´s manual
General recommendations
Initial settings
Operating
Depth Perception Apparatus // User´s manual
PROCEDURE
19
WARNING
Before you plug in the equipment be sure
that the electric supply of your country
or region is the right one to operate the
equipment. Be aware that the unit can
operated at 110V or 220V (50 or 60Hz). To
arrange the voltage, change the position
of the red switch located in the back of
the equipment and select 110v or 220v
supply by sliding left or right accordingly to
your country’s power supply. Failure to do
so may cause permanent damage to the
equipment.
Avoid using sharp objects
with the product.
Always ensure the proper
power input.
Protect the product from
rain and water.
Do not try to fix or
disassemble this product
by yourself.
In case the product is not working
properly, is damaged or needs
maintenance, please contact us. We
will gladly help you to solve any issue.
Depth Perception Apparatus // User´s manual
Depth Perception Apparatus // User´s manual
20
PROCEDURE
// GENERAL RECOMMENDATIONS
21
Locate the test subject at a
distance of 4 meters away
from the equipment window.
PROCEDURE
Place the LCD control away from the
subject to prevent him/her to see the
information displayed.
// GENERAL RECOMMENDATIONS
3
Be sure the support points are in
contact with the supporting surface.
22
Depth Perception Apparatus // User´s manual
Depth Perception Apparatus // User´s manual
1
2
23
4
5
Provide the joystick control to
the subject ensuring the DIN
5 connector faces toward the
window direction.
Place the equipment in a flat
surface. Leveling the surface is
required for optimal performance.
PROCEDURE
// INITIAL SETTINGS
b.
x1
a.
x1
d.
x1
g.
x1
e.
x1
24
Depth Perception Apparatus // User´s manual
Depth Perception Apparatus // User´s manual
WHAT SHOULD
BE INCLUDED IN
THE PACKAGE?
25
c.
x1
f.
x1
a. Depth Perception Apparatus body X1 // b. Joy Stick Control x 1 // c. LCD control x 1 // d. DIN 5 cable x 1
e. Serial cable DB25 x 1 // f. USB cable A-B x1 // g. Power cable (AC cable) x 1.
Depending on the geographical area,
you will be given one of these AC
cables (one per package).
POWER VOLTAGE SELECTOR
USE ONLY IF USING CONTROL SOFTWARE.
The smallest end B of the USB cable (f) should
be connected to this port.
The opposite end of cable A should be
connected to a computer USB port.
220
USB CABLE
BEFORE start, select the proper Power Input
Voltage. If don’t the equipment could suffer
serious damage and it will not work again.
Choose between 110 or 220 by sliding right or
left depending on your countrie’s power supply.
This USB cable has two different ends:
26
A/C POWER CABLE.
A
B
Connect the A/C cable (g), to this port.
The opposite end should be connected to
a 110/220VAC- 50/60Hz power outlet.
DIN 5 CABLE
Connect the male end of any DIN 5 cable (d) to the Left
DIN 5 female left side connector. The opposite end of
the cable should be connected to one knob control (b).
Repeat the process with right side connector.
*Knob controls works in any DIN 5 port of this device
SERIAL DB25 CABLE.
Connect the male end of the Serial DB
25 cable (e) to this port.
The female end of the cable should be
connected to the LCD control (c).
Depth Perception Apparatus // User´s manual
// INITIAL SETTINGS
110
Depth Perception Apparatus // User´s manual
PROCEDURE
HOW TO ASSEMBLE IT?
27
WHAT DOES IT MEAN?
S
TR
TS means TEST and makes reference to
the kind of test that you are running out.
TEST can be A: Automatic or M: Manual
// INITIAL SETTINGS
S means STATUS and makes reference to
the TEST STATUS.
Makes reference to the trial number.
System is ready to save a maximum of 10
trials. Each trial saves position and time.
TS
PROCEDURE
T
Ts:
D:
S:
Tr:
T:
T means TIME and make reference to
time taken by the subject to align mobile
row with static row.
It will be measured in milliseconds.
1000 = 1
milliseconds
Up
Start /
Stop
Right
second
Reset
Down
WITH STATUS CODES
STRT
Means that there is a test on course.
STP
Means that there is NO test on course.
CAL
Means that equipment is being calibrated.
Moving row is aligning to static row.
D
ADJ
D means DISTANCE, in this space you will
see the mobile row distance in reference
to the static row. This distance can be
positive or negative. It will be measured
in thousandths.
Left
FAMILIARIZE
10
thousandths
=
1
centimeter
When TS is Automatic, ADJ means that moving
row is adjusting to an automatic position
SLCT
When TS is Manual, SLCT means that mobile
row’s position is being selected by evaluator.
SAVE
Means that Trial information is being stored. It
will take a few seconds.
Depth Perception Apparatus // User´s manual
Depth Perception Apparatus // User´s manual
28
3
29
2
SELECT THE KIND OF TEST.
Manual Test // Automatic Test
a.
Once test mode has been selected, you
should select the position to store the data
of each test. Follow this steps:
Ts:M
Tr:0
S:STP
T:0
D:0.00
Up
Ts:M
Tr:2
T:0
D:0.00
Left
Press the LEFT button to choose
Manual Mode (M)
b.
S:STP
Ts:a
Tr:0
T:0
D:0.00
Press the RIGHT button to choose
Automatic Mode (A)
// OPERATING
a.
Once the device has been plugged and
turned ON, follow these steps.
Right
PROCEDURE
SELECT THE TRIAL MEMORY
LOCATION
The manual test allows
the researcher to
manually adjust the
distance from which he/
she will set the starting
point of the rod for depth
perception evaluation.
The automatic test the
equipment automatically
adjusts the distance for
the depth perception
evaluation. In this mode
you can select up to ten
(10) different distances
presented by the
manufacturer.
S:STP
Down
By pressing UP or DOWN buttons,
you can select one of the 10
posible location to store the data.
Please note that if you do not change location number each time that a
new test starts, the information will be rewritten in the same location.
To avoid that, each time that you end a test, change the location
number to prevent data lost.
The equipment has
20 memory locations,
ten (10) correspond
to manual mode and
ten (10) for automatic
mode. These positions
go from zero (0) to (9)
in either of the two
modes.
You can store distance
(D) and time (T)
information acquired
during the performed
test in any of the ten
(10) memory positions
that are independent
for each mode.
Depth Perception Apparatus // User´s manual
Depth Perception Apparatus // User´s manual
30
1
31
PROCEDURE
MANUAL MODE
Calibration.
This has to be done at the beginning of each test trial .
a.
If the rod is not at zero position (0) or if not aligned with the fixed rod indicator,
the system will need a self-calibration to zero position (0).
a.
Start / Stop
S:SLCT
Ts:m
Tr:2
T:0
D:2.56
S:CAl
Ts:m
Tr:2
T:0
D:0.00
32
// OPERATING
Selection moving rod position.
Press START/STOP button.
The equipment state (S) changes from Stop
(STP) to Calibration (CAL).
b.
In the case when the distance is zero (0) or the indicators are aligned, system will
not need to calibrate. System will start immeditely.
Use the joystick control to slide the rod
FORTH to the desired position.
Distance (D) will show the distance
of the moving rod in reference to the
static rod position.
b.
Start / Stop
S:SLCT
Ts:m
Tr:2
T:0
D:-2.56
S:SLCT
Ts:m
Tr:2
T:0
D:0.00
Press START/STOP button.
The equipment state (S) changes from Stop
(STP) to Select (SLCT).
Use the joystick control to slide the rod
BACK to the desired position.
Distance (D) will show the distance
of the moving rod in reference to the
static rod position.
Depth Perception Apparatus // User´s manual
Depth Perception Apparatus // User´s manual
2
33
MANUAL MODE
Starting a test.
Ending a test.
a.
PROCEDURE
// OPERATING
a.
Once the desire position has been selected, evaluator
shoul give the JoyStick control to the subject.
Once evaluated subject has announce that
both rows are aligned, follow these steps:
Start / Stop
Start / Stop
A white light inside the equipment body
will turn on.
Evaluator should press START/STOP
button to Start the test.
34
S:STRT
Ts:m
Tr:2
d:2.58
t:2011
t:207O
t:2083
Press START/STOP button.
S:Save
Ts:m
Tr:2
T:5582
D:2.30
Time (T) will start running.
b.
TIME (T) will stop and will save the data at
the selected position.
Subject should decide if moving the joystick lever forth or back to align both rows.
When Joystick lever is incline FORTH the
moving rod will move FORTH in the rail.
A When Joystick lever is incline BACK, the
moving rod will move BACK in the rail.
The white light inside the equipment body
will turn off.
After this steps you will
be able to startup a new
trial, repeat the current
trial or start a new test.
S:STP
Ts:m
Tr:2
T:5582
D:2.30
A few seconds after stoping the test the STATUS (S)
will change from SAVE to STOP (STP)
Depth Perception Apparatus // User´s manual
Depth Perception Apparatus // User´s manual
2
35
PROCEDURE
AUTOMATIC MODE
Starting a test // Calibrating
// OPERATING
Starting a test
a.
If the rod is not at zero position (0) or if not aligned with the fixed rod
indicator, the system will need a self-calibration to zero position (0).
S:CAl
Ts:A
Tr:4
d:0.00
t:0
Start / Stop
The STATUS (S) will change from STOP
(STP) to CALIBRATING (CAL).
36
b.
Evaluator should press START/STOP
button to Start the test.
In the case when the distance is zero (0) or the indicators are aligned,
system will not need to calibrate. System will start ADJUSTING (ADJ)
mobile rod distance immeditely.
a.
S:ADJ
Ts:A
Tr:4
d:-87.6
t:0
Immediately after STATUS (S) will change
from ADJUST (ADJ) to START (STRT), these
two things will happen:
S:ADJ
Ts:A
Tr:4
d:-90.2
t:0
S:STRT
Ts:a
Tr:4
d:-87.6
t:2011
t:207O
t:2083
Time (T) will start running.
The STATUS (S) will change from STOP
(STP) to ADJUSTING (ADJ).
Warning: Once the equipment has finished the automatic adjustment of the movable rod the
equipment state (S) will change immediately from Adjust (ADJ) to Start (STRT), be sure the
evaluated subject holds the joystick control, as evaluation will begin right at this point.
A white light inside the equipment body will
turn on.
When equipment is set at Automatic (A)
mode, each Trial Location (TR) has a
predeterminated distance for the moving
rod, these are the values for each TR:
TR # 0:
TR # 1:
TR # 2:
TR # 3:
TR # 4:
-90.2
1.25
62.57
87.6
-87.6
TR # 5:
TR # 6:
TR # 7:
TR # 8:
TR # 9:
37.53
-37.53
-1.25
-62.57
90.2
Depth Perception Apparatus // User´s manual
Depth Perception Apparatus // User´s manual
3
37
Depth Perception Apparatus // User´s manual
Ending a test
a.
Once evaluated subject has announce that
both rows are aligned, follow these steps:
Start / Stop
THIS IS THE END OF THIS USER GUIDE.
Press START/STOP button.
38
The white light inside the equipment body
will turn off.
S:Save
Ts:a
Tr:4
T:5582
D:-80.5
TIME (T) will stop and will save the data at
the selected position.
After this steps you will
be able to startup a new
trial, repeat the current
trial or start a new test.
S:STP
Ts:a
Tr:4
T:5582
D:-80.5
A few seconds after stoping the test the STATUS (S)
will change from SAVE to STOP (STP)
This was all the basic information you need for
using the DEPTH PERCEPTION APPARATUS; but
this is just the beginning of the fun.
If there is something that is not clear to you, or
if you have any questions, please feel free to
contact us at any time.
We will be very happy to hear from you.
[email protected]
(+57 1) 6275686
(+57) 3003642343
Cll 147 A # 48 - 08. Bogotá, Colombia
2550NW 72nd Ave. Suite 115. Miami, Fl. 33122.
De la Rosa Research Team.
[email protected]
(+57 1) 6275686
(+57) 3003642343
Cll 147 A # 48 - 08. Bogotá, Colombia
2550NW 72nd Ave. Suite 115. Miami, Fl. 33122.