1
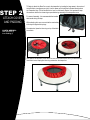
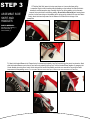
Pure Fun
Race Car Jumper Trampoline
simply good products
for real life TM
USER
MANUAL
Model No.
9020CT
Age Recommendation:
4 - 10
Do not allow more than one person on this product at any time.
Adult supervision is required.
ADULT ASSEMBLY REQUIRED.
Please read all the instructions before using this product. Consult a physician
before beginning any exercise program or strenuous activity.
!
WARNING
The contents of this package are not suitable for children
under 3 years of age. Contains small parts which may cause choking.
75 LBS MAXIMUM WEIGHT RATING
IMPORTANT MESSAGE
PLEASE READ
WARNING
CHOKING HAZARD - Small Parts
NOT for children under 3 year of age.
ADULT ASSEMBLY REQUIRED
WARNING
While every attempt is made to ensure the highest degree
of protection in all equipment, we cannot guarantee freedom
from injury. The user assumes all risks of injury due to use.
All merchandise is sold on this condition, which no
representative of the company can waive or change.
WARNINGS
IMPORTANT PLEASE
READ!
Please read these
warnings and the
information in this manual
in its entirety. Failure to
comply with the following
instructions may increase
the risk of serious injury
and/or death:
● This unit must be assembled and
● DO NOT allow children to wear loose fitting clothing, clothing
with straps/loops, backpacks or wear and/or hold accessories
with straps or loops, or any article of clothing or accessory with
sharp edges which may present a hazard or become snagged
or caught on the Trampoline during use. Serious injury and/or
accidental strangulation may occur.
● DO NOT place objects on or under the trampoline, or allow
people and pets to stand or sit on, near or under the unit.
disassembled by ADULTS ONLY.
● DO NOT allow children to sit or stand on the frame pad edge
● This Trampoline is suitable for use by
or attempt to hang or swing from the hand rail – this presents a
most children 4 to 10 YEARS OF AGE.
● DO NOT exceed the MAXIMUM WEIGHT limit of
75lbs (35kgs) regardless of age.
tipping hazard and can cause serious injury.
● Never allow a child to jump from or onto this trampoline from
any other object or surface area.
● FOR INDOOR HOME USE ONLY: This Trampoline is designed
● Children must ALWAYS jump while securely centered on the
for indoor family residential use. It is NOT intended for use
Trampoline mat. It is recommended that children always keep a
outdoors, or in commercial applications and/or use in public areas
firm grip on the handrail during exercise.
such as schools, parks, nurseries, day schools, day cares, etc.
● DO NOT store this item outside, or in extreme humidity or
● ALWAYS locate this equipment on a stable, level surface AT
temperatures.
LEAST 7 feet away from any structure, obstruction, or possible
● ALWAYS secure the Trampoline against unauthorized and
hazard(s) such as walls, pools, power lines, overhangs, other
unsupervised use.
playground equipment, driveways, hard surfaces and/or
● It is not recommended that this trampoline is used while
roadways.
wearing shoes. Additionally, children should always wear socks
● Children must be supervised at all times when using this
when jumping to prevent injury to feet.
equipment. DO NOT leave children unattended at any time.
● Before each use of this product, inspect this unit for any
● DO NOT attach items to the trampoline not specifically
worn, defective or missing parts. Although this Trampoline is
designed for this purpose. Especially in the case of jump
made to take a lot of wear, over time parts may need to be
ropes, chains, clotheslines, pet leashes and cables.
replaced. It is important to check the unit to ensure the Springs,
These may cause a strangulation or physical hazard.
Frame, Padding and Safety Skirt are undamaged and secure
● This Trampoline is NOT for adult or adolescent use.
and all parts are in good condition. If any loose, cracked,
● DO NOT allow more than one child on the Trampoline at any
missing, or otherwise damaged components are found, cease
time.
use of this item immediately and secure it from unauthorized
● DO NOT allow children to wear glasses or helmets when using
use until the issue has been corrected and/or replacement parts
the Trampoline.
obtained. Failure to do so may result in injury and/or void your
● DO NOT allow the padding cover of this trampoline to become
warranty.
wet. If accidental spillage occurs, immediately blot this with a moist
● Please read and refer to other warnings and use information
paper towel and allow to dry.
in the Trampoline instructions before use.
Dispose of all packaging materials safely and
per local ordinance.
PRIOR TO
ASSEMBLING
When you are ready to start, make sure that you have the correct tools at hand, and
adequate space for assembly. Please refer to the following pages for part
descriptions and numbers. The assembly instruction uses these descriptions and
numbers as reference. Make sure you have all parts listed.
IMPORTANT: USE GLOVES TO PROTECT AGAINST PINCH
POINTS DURING ASSEMBLY.
Enclosed are the current specifications and product features
available at time of printing, however, changes may be made
in equipment, availability, specifications and features
without notice.
Tools Required (Included): Spanner Wrench, Allen Wrench,
Spring Tool.
PARTS LIST
(Trampoline)
2
4
3
5
5
16
6
1
7
8
9
10
11
12
13
3
TRAMPOLINE
EXPLODED
VIEW
2
4
7
1
8
9
14
15
Part No.
1
2
3
4
5
6
7
8
10
5
6
16
Description
Trampoline Mat
Left Handle w/ Foam
Right Handle w/ Foam
Center Handle w/ Foam
Qty
1
1
1
1
Frame Leg
Leg Cap
Bolt
Washer
6
6
12
12
Part No.
9
10
11
12
13
14
15
16
Description
Hex Nut
Spring
Spring Tool
Wrench
Qty
12
30
1
1
Allen Key
End Cap
Handle Base Insert
Frame Section
1
2
4
6
STEP 1
ASSEMBLE FRAME
PARTS NEEDED:
Frame Legs (6 PC)
Frame Pieces (6 PC)
Bolt (12 PC)
Nut (12 PC)
Washer (12 PC)
Mat (1 PC)
Springs (30 PC)
1. Place a Frame Leg (5) against a Frame Section (16). Ensure that the grooved side of the
frame section is facing inwards, parallel with the open end of the Frame Leg (see below for
clarification). Line up one of the Bolt holes in the Frame Leg to the corresponding hole in the
Frame Piece.
Thread 1x Bolt (7) through the Frame Leg and Frame Section so that the threaded end points
down towards the plastic Leg Cap. Place a Washer (8) on the Bolt End and loosely secure with
a Hex Nut (9). Take another Frame Section and secure it to the remaining hole in the Frame Leg
using the above instructions. Continue assembling the frame as described above.
DO NOT FULLY TIGHTEN NUT/BOLT COMBINATIONS UNTIL THE ENTIRE FRAME IS
ASSEMBLED. ALSO NOTE THAT BEFORE THE SPRINGS AND MAT ARE ATTACHED, THE
FRAME MAY NOT BE COMPLETELY CIRCULAR. ONCE THE SPRINGS ARE ATTACHED TO
THE MAT, THIS WILL CAUSE THE FRAME TO CONFORM TO ITS PROPER CIRCLE SHAPE.
NUT ON THIS
SIDE
2. Once the Trampoline frame is complete and you have tightened all the bolts securely, flip the trampoline over and install the mat.
Center the Logo on the mat so it is perpendicular to any one of the legs, and begin to attach the springs using the Spring Tool.
Using the Spring Tool: Place the end of the spring which is more “closed” onto the V-Ring sewn into the Trampoline Mat. Next,
Hook the end of the spring which is more “open” with the spring tool, and pull the tool towards you until the spring extends to the
corresponding hole. Push the spring down into the hole with your palm, making sure you do not pinch your other fingers in the spring
or against the frame.
Installing the Springs: Using compass points as a general reference, install two springs at N and S, and then an additional two
at E and W. Once installed, count the holes in the top rail and ensure these match up to the available V-Rings sewn into the mat.
Note: You may have to move a spring over a space or two to ensure that it is properly matched to its V-Ring. Continue installing the springs
by placing 2 on either side of the N spring, and then 2 on either side of the S spring, followed by two on either side of the E and W
springs. Installing the springs in this fashion will ensure that the mat
is kept evenly centered, and will greatly assist in ease of attaching
the springs.
Once complete, fold the mesh safety skirt down so it is covering
the springs. You may need to place a few weights (such as several
books) on this skirt for a few minutes while it flattens against the
frame.
3. Begin to attach the Race Car cover to the trampoline by locating the large seam in the center of
STEP 2
ATTACH COVER
AND PADDING
PARTS NEEDED:
Race Car Cover (1)
Inner Padding (1)
the black fabric (see diagram on right). Line this seam up to the leg that is located directly above
the Trampoline logo. This will be where the “nose” on the head is located. It is important to keep
this seam as close to the chosen leg as possible during assembly of the trampoline cover.
For ease of assembly, it is recommended that another
adult assist during this step.
While attaching this cover, ensure that the mesh safety
skirt stays flat against the springs.
Once attached, place the foam ring on top of the black
cover fabric.
Next fold the red top fabric of the Race Car cover in the same fashion which you attached the
black fabric base, keeping the foam ring centered on the trampoline.
STEP 3
ASSEMBLE SIDE
SKIRT AND
HANDLES
4. Fold the Side Skirt (sewn to the top cover) down so it covers the frame of the
trampoline. Begin to tuck the white side skirt padding on the inside of the Side Skirt fabric
between it and the trampoline legs. Carefully tuck the top of the padding up into the sewn
seam of the top skirt fabric and the top padding. Do not tie the Skirt ends yet. Leaving these
ties free, tie the inner strings on the padding to the strings on the inside of the cover skirt fabric.
Finally, attach the foam loops sewn into the bottom of the Side Skirt to the legs of the
trampoline.
PARTS NEEDED:
Side Skirt Foam Padding (1)
Hand Rail Bases (2)
Center Handle (1)
5. Attach the Handrail Bases to the Trampoline by first removing the plastic Leg Cap from the Legs they are to be placed on. Next,
slide the Handrail Bases up onto the unit, and secure by replacing the Leg Cap. Join the Handrail Bases together by snapping the
Center Handle piece into place. Lastly, the the strings at the ends of the padding and side cover around the leg using the fabric
loops sewn into the padding. NOTE: If you are unable to attach the center handle piece, switch the sides the Handrail Bases are attached to.
STEP 4
ASSEMBLE
HEAD and
ACCESSORIES
6. To attach the head of the Race Car to the trampoline, first slide the remaining leg through the loop
sewn into the center of the back of the head. Next, tie the bottom side panel of the head to the
Handrail Bases. Next, attach the sides of the head using the velcro straps. Lastly, secure this assembly using the ties at the top of the side panels.
PARTS NEEDED:
Race Car Head (1)
Race Car Wheels (4)
License Plate Insert (1)
6. To attach the wheels to the side panel of the Race Car, first peel the backing off of the hook and
loop straps on the rear side of the wheels (if present). Affix to the side panel of the skirt using these
straps. Next, remove the license plate from the sleeve and insert into the clear plastic pocket on the
rear of the unit.
Note: Visit pureglobalbrands.com for information on how to obtain a personalized license plate!
CARE AND
MAINTENANCE
Your kids’ trampoline is designed to be very low maintenance.
● If any part of the trampoline frame requires cleaning, simply wipe with a damp cloth. (Do not jump
on the trampoline after cleaning until completely dry)
● If the paint is chipped, we recommend you lightly rub the damaged area and cover using a
non-toxic enamel paint.
● If the cover becomes dirty or needs washing, remove the foam insert (top foam and side skirt
foam). If possible, spot wash the cover. If necessary, you may hand wash the trampoline cover, but
please be aware that this will affect the efficiency of the flame retardant applied to to it. DO NOT
Machine Wash or Tumble Dry. Always allow to air dry.
IMPORTANT: While no regular maintenance is required, you must inspect the trampoline before
each use and replace any worn, defective, or missing parts. The following conditions could represent potential hazards: Missing, improperly positioned, or insecurely attached frame padding; Punctures, frays, tears, or holes worn in the bed or frame padding; Deterioration in the stitching or fabric
of the bed or frame padding; Broken or missing springs; A bent or broken frame; A sagging jump
mat; or sharp protrusions on the frame or suspension system. Cease using trampoline immediately
and secure it against unauthorized use if any of these conditions are present.
FREQUENTLY
ASKED
QUESTIONS
Question: “The Handrail ends do not point in the right direction, I cannot assemble the center handrail piece, are the
holes drilled wrong?”
Answer: IF THE HANDLE PIECES DO NOT SEEM TO BE ORIENTED IN THE CORRECT
DIRECTION, YOU MAY HAVE ASSEMBLED THE HANDLE PIECES ON THE WRONG
LEGS. REMOVE THE HANDLE BASES AND SWAP THE SIDES THEY ARE ATTACHED TO.