1
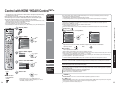
Control with HDMI “HDAVI ControlTM”
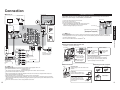
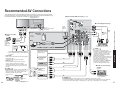
Ŷ Connecting this unit to a DVD recorder and AV amp
Recommended HDMI Connections
Follow the connection diagrams below for HDMI control of
a single AV piece of equipment such as a Panasonic DIGADVD recorder, RAM Theater or Player Theater system.
Refer to page 34 for Setup Menu settings and additional
control information.
Optional HDMI and/or optical cables are not provided.
(Continued)
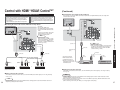
When using an “Control with HDMI” audio-video amplifier and a compatible DIGA recorder, use a daisy chain
connection as shown below.
If connection (or setting) of equipment compatible with HDMI
control is changed, switch the power of this unit Off then On
again while the power of all equipment is On (so that the
unit can correctly recognize the connected equipment) and
check that DIGA, RAM theater and Player theater playback
operates.
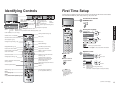
Ŷ Connecting this unit to a DVD recorder, RAM theater or Player theater
For DIGA :
Connect with HDMI cable
For RAM theater and Player theater :
Connect with HDMI cable and audio
cable.
Connect the TV’s PROG. OUT audio
(L&R) to listen to the TV program
through the theater system.
Back of the unit
•
Note
HDMI 1 is recommended.
When connecting to HDMI 2, set the
input mode to HDMI 2 (p. 29) initially
before connecting to HDMI 2. After
connection, confirm the HDMI control
functions (p. 34-35).
Optic fiber
•
HDMI cable
Note
HDMI 1 is recommended.
When connecting to HDMI 2, set the input mode
to HDMI 2 (p. 29) initially before connecting to
HDMI 2. After connection, confirm the HDMI
control functions (p. 34-35).
Control with HDMI “HDAVI ControlTM”
•
•
Digital audio input
(Optic)
HDMI cable
HDMI cable
Audio Cable
HDMI
(AV OUT)
HDMI
(AV OUT)
Audio
IN
HDMI
(AV OUT)
Audio
IN
Panasonic AV amp
or
DIGA
(Panasonic DVD Recorder)
HDMI
(AV IN)
HDMI
(AV OUT)
Advanced
•
•
HDMI
(AV OUT)
One AV amp and one
DIGA recorder can be
operated with this unit.
Be sure to connect the AV
amp between this unit and
the DIGA recorder.
DIGA (Panasonic DVD Recorder)
or
Panasonic RAM theater
Panasonic Player theater
Ŷ Setting of this unit after connection
After making connections as shown above, set “Ctrl with HDMI” (under “Other adjust”) to “On” using the Setup
menu. (p. 34).
Ŷ Setting of this unit after connection
After making connections as shown above, set “Ctrl with HDMI” (under “Other adjust”) to “On” using the Setup
menu. (p. 34).
•
36
Note
Individual HDMI equipment may require additional menu settings specific to each model. Please refer to their
respective operating instruction manuals.
Note
•
•
Individual HDMI equipment may require additional menu settings specific to each model. Please refer to their
respective operating instruction manuals.
When audio from other equipment connected to this unit via HDMI is output using “DIGITAL AUDIO OUT” of this
unit, the system switches to 2CH audio.
(When connecting to an AV amp via HDMI, you can enjoy higher sound quality.)
37