1
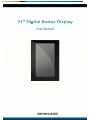
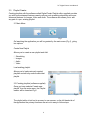
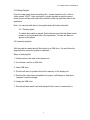
21” Digital Poster User Manual Contents Contents .................................................................................................................................................... 1 1.0 Introduction ..................................................................................................................................... 2 1.1 Box Contents .............................................................................................................................. 2 1.2 Display unit setup ...................................................................................................................... 2 1.3 Remote Control. ......................................................................................................................... 3 2.0 Playlist Creator ............................................................................................................................... 4 2.1 Main Menu .................................................................................................................................. 4 2.2 Creating playlists (software supplied) ..................................................................................... 4 2.2.1 Step 1 – Add Schedule ........................................................................................................... 5 2.2.2 Step 2 – Add selected Items .................................................................................................. 5 2.2.3 Step 3 - Saving ....................................................................................................................... 6 2.4 Uploading playlists .................................................................................................................... 7 3.0 Media Formats ............................................................................................................................... 8 Supported Media Format ................................................................................................................ 8 4.0 Display Menu/Settings .................................................................................................................. 9 4.1 Main menu .................................................................................................................................. 9 4.2 Language Setup ......................................................................................................................... 9 4.3 Scroll Display Activation ........................................................................................................... 9 4.4 TV Type ..................................................................................................................................... 10 4.5 Clock display ............................................................................................................................ 10 4.6 ON/OFF setup .......................................................................................................................... 10 4.7 Clock Setup .............................................................................................................................. 11 4.8 ON/OFF Timer setup ............................................................................................................... 11 4.9 Volume setup ........................................................................................................................... 12 4.10 Display Setup ......................................................................................................................... 12 5.0 Installation ..................................................................................................................................... 13 5.1 Paste Wall Mounting – Slick surface ..................................................................................... 13 5.2 Screw fixing wall mount .......................................................................................................... 13 1 21” Digital Poster User Manual 1.0 Introduction This user guide will ensure that your new display unit is up and running within a short period of time. 1.1 Box Contents 1 x 21 Inch Digital Poster Display unit 1 x Power cable 1 x CD (User manual and software) 1 x Remote Control 1 x Key 1.2 Display unit setup 1. Setup display unit in desired location. 2. Plug in power cable to the display unit and than to the mains outlet. 3. To power the unit on press the power button on the remote control. You will be greeted by the main menu picture. 4. The Storage media compartment is located under the display unit, which requires the key (supplied) to gain access to insert a USB drive. Note: Do not alter display unit parameters unnecessarily. 2 21” Digital Poster User Manual 1.3 Remote Control. Note: For the remote control to function you have to point the remote close to the infra red panel on the display unit which is located on the right side. Remote Functions 3 21” Digital Poster User Manual 2.0 Playlist Creator Creating playlists with the software called Digital Poster Playlist editor supplied provides you with more advanced features namely options such as adding scheduling and more advanced features for Images, Video and audio. The software also allows you to edit any part of a pre- existing playlist. 2.1 Main Menu Fig.1 On launching the application you will be greeted by the main menu (Fig.1), giving two options: Create New Playlist Allows you to create a new playlist and Add: Scheduling Images Audio Video Load existing playlist. Allows you to load previously created playlists and edit any section within that playlist. 2.2 Creating playlists (software supplied) Once you have selected “create new playlist” from the main menu, the Playlist creator will be launched.Fig.2 Fig.2 The playlist editor is laid out in an easy to use manner, on the left hand side of the application the primary functions are set out in easy to follow steps. 4 21” Digital Poster User Manual 2.2.1 Step 1 – Add Schedule The schedule functions as a timer for the playlists, so you can have one or more playlists scheduled to start and end at different times of the day. Note: If you enter more than one schedule ensure that the consecutive schedule times do not overlap the previous. Click on the Add Schedule Button > Type a Schedule name > Select preferred start time > select preferred end time > click OK > schedule will appear in the playlist. To add more schedules simply follow the whole process again for the preferred number of schedules, ensuring you select unique schedule names. 2.2.2 Step 2 – Add selected Items Note: For compatible file formats please refer to media format section. Adding Image Click Add Image >Select appropriate schedule > Click browse and locate file > Enter a duration time > Select Image switch mode > click OK > Image appears in Schedule Note: Please add images and duration in order you wish to view them on the display unit 5 21” Digital Poster User Manual Adding Audio Click Add mp3 >Select schedule > Click browse and select mp3 file > Enter volume level > click ok > Mp3 Appears in Schedule Note: Images have to be loaded before an Mp3 file. Adding Video Click add video > select schedule > click browse and locate video file > Enter preferred repeat > Enter preferred volume >Click ok >Video appears in playlist. Note: You cannot add Videos and Mp3 audio files in the same schedule. 2.2.3 Step 3 – Saving Note: Before saving please ensure location drive is empty. Clicks save to disk > Click browse and Select location of preferred folder or storage device > click save. Note: If a file save path is not chosen, the system will save the “LOOP” file to “C: /” 6 21” Digital Poster User Manual 2.3 Editing Playlists From the main menu click load existing file > Locate playlist to edit > click on folder named “LOOP” >click on playlist > playlist appears in playlist creator > select item to edit and click edit button located on the top right hand side of the application Note: You can also add items to the playlist and add further schedules 2.3.1 Deleting Items To delete items within a playlist, Select the item and click the delete button located on the right hand side of the application. The item will than not appear in the playlist. 2.4 Uploading playlists With the playlist created and all files loaded to a USB drive. You can follow the steps below to ensure the playlist is uploaded. Steps to load playlists 1. Unlock panel on the side of the display unit. 2. You will see a slot for a USB drive. 3. Insert USB drive. 4. The files will start to upload to the built in memory of the display unit. 5. Once the files have been uploaded to the player it will display a “download complete” loaded message. 6. Unplug the USB drive. 7. The unit will then restart itself and display the files once it comes back on. 7 21” Digital Poster User Manual 3.0 Media Formats Supported Media Format Image: JPEG For landscape display: we suggest the screen dimensions at 1366 x 768 (16:9) For portrait display: 768 x 1366 (9:16) Video: MPEG, MPEG2, AVI (Divx, Xvid Codec). VOB format. The max dimensions are 720 x 576. 8 21” Digital Poster User Manual 4.0 Display Menu/Settings If the Display is playing files, you MUST press “stop” key before accessing the Setup Menu. 4.1Main menu SYSTEM SETUP CLOCK SETUP ON/OFF TIME VOLUME SETUP DISPLAY SETUP EXIT SETUP 4.2 Language Setup OSD LANGUAGE: it has CHINESE and ENGLISH,Default setting is ENGLISH 1. Select system setup page 2. Choose OSD language between Chinese and English. 3. Finish setting, then press button to return to OSD Language options 4. Press button to select "main page" and return to the Main menu. 4.3 Scroll Display Activation SCROLL DISPLAY:OFF, ALWAYS ON, Default setting is OFF. The display unit can only support Chinese and English language. 1. Press to select scroll display 2. Press to select OFF or ALWAYS ON 3. Finish setting, and press to return to scroll display 4. Press button to select "main page" and return to the main menu 9 21” Digital Poster User Manual 4.4 TV Type TV type default setting is NTSC 1. Press to select TV Type 2. press to select NTSC or PAL 3. Finish settings, than press to return to the TV TYPE 4. Press button to select “Main page” and return to the main menu. 4.5 Clock display Clock display settings: OFF, HALF HOUR, ONE HOUR or ALWAYS ON OFF: No time shown on the screen HALF HOUR: Display time on the screen every half hour for a minute ONE HOUR: Display time on the screen every hour for a minute ALWAYS ON: Display time always on the screen. 1. Press to select clock display 2. Press to select OFF,HALF HOUR,ONE HOUR or ALWAYS ON 3. Finish setting than press display to return to clock 4. Press to select “MAIN PAGE” to return to the main menu 4.6 ON/OFF setup 1. Press to select on/off setup mode 2. Then press DAY to select SAME SET or EVERY 3. Finish setting, Than press on/off setup menu to return to the 4. Press button to select main page and return to the main menu. 10 21” Digital Poster User Manual 4.7 Clock Setup Year, month, day, week, hour, minute setting 1. In the main menu press to enter the clock setup menu. 2. Use navigation buttons to change values in each field. 3. Finish setting and press the confirm button 4. Select “MAIN MENU” to return to the main menu. 4.8 ON/OFF Timer setup Once the user has clicked on the ON/OFF Timer setup button a menu will appear displaying the whole of the week, in which the user can select certain days and edit the timer settings for that day. Three options shown on each menu for that day are: Always on, Always Off .Time on/off Always On: the display will be on when the power is on Always Off: The display will turn off automatically after a minute. Time on/off: Setting has three phases use / to adjust the time as appropriate. 11 21” Digital Poster User Manual 4.9 Volume setup There are three settings for volume. When none of the three settings are activated, volume is set at a default setting of 50. 1. In the main page, Press to enter the clock setup page. 2. Use the navigation buttons to navigate and select the desired fields to enter values. 3. Finish setting and click “CONFIRM” than click on “BACK TO MAIN PAGE, to return to the main menu. 4.10 Display Setup DISPLAY SETUP: Brightness, Contrast and Colour 1. From the main menu select DISPLAY SETUP to display the main as shown to the right. 2. Use navigation button to navigate to desired setting that you wish to edit. 3. Use the Right and left selection button to increase or decrease the value. 4. Once you have completed altering the settings click on the setup button on the remote to exit the menu. 12 21” Digital Poster User Manual 5.0 Installation 5.1 Paste Wall Mounting – Slick surface 1. Take the wall mounting plate and stick double sided tape on the back. 2. Ensure that the wall has been dusted off 3. Using a levelling rule mark a level line. 4. Place the wall mount on the wall using the double sided tape 5.2 Screw fixing wall mount 1. Mark the positions of the holes on the mounting plate 2. Drill the holes in the mounting plate using an impact drill. 3. Mark the plate position against the wall. Note: Use a level rule to ensure the display unit is level 13 21” Digital Poster User Manual 4. Mark the hole positions on the wall 5. Drill the marked holes 6. Knock the wooden tacks in to the holes 7. Stick double sided stick tape on the mounting plate and mount plate on the wall 8. Screw and secure the mounting plate into the wall 9. Hand the AD display on the wall mount 10. The four short poles on the wall mounting plate should be bedded into the four installation holes on the back of display. 14