1
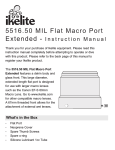
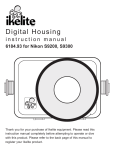
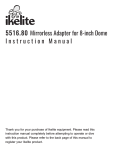
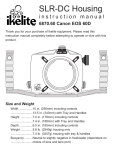
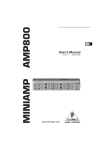
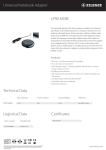
952 3 . 6 4
Housing Tray
and D u a l Handles
Instruction Manual
Included in Box
Bottom View
Top View
Front View
Dual Tray - Qty. 1
Back of Tray
Back of Tray
Front of Tray
Front of Tray
MADE IN USA
Spacer
Right Handle
Left Handle
Non-Ikelite Housing
Anti-rotational Pad
Hex Head Wrench
1/4-20 X 3/8” Screw (2)
1/4-20 Shoulder Washer (2)
12-24 X 1/2” Screw (2)
12-24 Shoulder Washer (2)
3/8-16 Nylon Washer
3/8-16 Hex Jam Nut
Handle Guide Pin
Small Washer
Lockwasher
Cap Screw
1/4-20 X 5/8” Round Head
Screw
1/4-20 Nylon Washer
Table of Contents
Introduction ..................................................................P. 2
Attach Quick Release Handles to Dual Tray..............P. 3
Attach Dual Tray to Ikelite Compact Housing
featuring 3/8-16 Mounting Bolts ................................P. 4
Attach Dual Tray to Ikelite Compact Housing
featuring 12-24 or 3/8-16 Mounts ................................P. 5
Attach Dual Tray to Ikelite ULTRAcompact
Housing featuring 12-24 Mounts ................................P. 6
Attach Dual Tray to Non-Ikelite Housing
featuring a 1/4-20 Mount ..............................................P. 7
Introduction
Thank you for your purchase of Ikelite equipment. Please read this
instruction manual completely before attempting to operate or dive
with this product.
The 9523.64 Housing Tray and Dual Handle kit comes complete with
hardware to connect both Ikelite and Non-Ikelite housings. The Tray is
designed specifically for Ikelite Compact and ULTRAcompact housings.
Non-Ikelite housings can be attached using the Anti-rotational Pad and
1/4-20 X 5/8” Screw.
2
Attach Quick Release Handles to Dual Tray
1.
2.
3.
4.
The Handles are designed to be attached to the Tray one time. A Handle
can be removed for replacement purposes, however constant removal
and attachment can wear away the protective coating on the tray and
handle, which can accelerate corrosion.
Mount each Handle so that the Push Button extends rearward away from
the Tray Front.
Gently insert Handle Guide Pin into Tray Guide Pin Hole.
Slide Lock Washer and then Small Washer over small end of Cap Screw.
Insert Cap Screw through Cap
Screw Hole and into handle
bottom; tighten firmly with Allen
Push Button
Wrench.
Attach remaining Handle to
opposite side of Tray.
Quick Release
Handle
Diagram A
Cap Screw Hole
Tray Front
Allen Wrench - rotate clockwise to tighten
Handle Guide Pin
Tray Guide Pin
Hole
Small Washer
Lockwasher
Cap Screw
3
Attach Dual Tray to Ikelite Compact Housing featuring
3/8-16 Mounting Bolts-
1. Place your Ikelite Compact Housing upside down on a flat surface or on
your lap.
2. Peel protective film off Spacer to expose adhesive, Diagram B. Place
Spacer over Housing Mounting Bolts with adhesive side facing up.
3. Line up the 3/8” Dual Tray holes with the 3/8” Tray Mounting Bolts,
Diagram C. If the tray is positioned properly, the “ikelite” logo will be
facing forward toward the front of the camera housing.
4. Slide Tray into position over the Spacer and press firmly for a couple
seconds. This will allow the Spacer to cling to the Tray.
5. With your free hand, slide the 3/8-16 washers over the Housing Mounting
Bolts and tighten tray using the 2 3/8-16 Hex Jam Nuts. Finish tightening
the tray to the housing using a 9/16” open end or socket wrench.
Diagram B
Protective Backing
(peel off before use)
MADE IN USA
Diagram C
4
Attach Dual Tray to Ikelite Compact Housing featuring
12-24 or 1/4-20 Threaded Mounts
1. Determine the correct thread type for your housing mounts. Gently
thread a 12-24 screw into one of the housing mounts. If there is no
resistance and the screw does not seem loose or wobbly in the mount,
then you have the correct screw. A larger diameter 1/4-20 X 3/8” screw
will not thread into a smaller 12-24 size mount.
CAUTION: Using the incorrect screws could damage your housing
mounts.
2. Once the correct screws have been selected, place your Ikelite Compact
Housing upside down on a flat surface or on your lap.
3. Line up the 3/8” tray holes with the housing mounts. If the tray is
positioned properly, the “ikelite” logo will be facing forward toward the
front of the camera housing.
4. Place a shoulder washer in each 3/8” tray hole with the small end of the
washer facing down.
5. With your free hand, insert and rotate the correct screws clockwise until
threaded into the housing mounts. Finish tightening the tray to the
housing using a flathead screwdriver.
MADE IN USA
5
Attach Dual Tray to Ikelite ULTRAcompact Housing
featuring 12-24 Threaded Mounts
1. Place your Ikelite Compact Housing upside down on a flat surface or on
your lap.
2. Line up the 3/8” tray holes with the housing mounts. If the tray is
positioned properly, the “ikelite” logo will be facing forward toward the
front of the camera housing.
3. Place a shoulder washer in each 3/8” tray hole with the small end of the
washer facing down.
4. With your free hand, insert and rotate the 12-24 x 1/2” screws clockwise
until threaded into the housing mounts. Finish tightening the tray to the
housing using a flathead screwdriver.
MADE IN USA
6
Attach Dual Tray to Non-Ikelite Housing featuring a
1/4-20 Threaded Mount
1. Remove the protective backing from the Non-Ikelite Housing
Anti-rotational Pad, Diagram D, and place the adhesive side down on
the Tray as shown, Diagram E.
2. Line up the larger non-threaded center Tray hole with the housing mount
hole. If the tray is properly positioned, the “ikelite” logo will be facing
forward toward the front of the camera housing.
5. With your free hand, insert and rotate the 1/4-20 X 5/8” screw clockwise
until threaded into the housing mount. Finish tightening the tray firmly to
the housing using a flathead screwdriver.
Note: The Housing Tray is designed for Ikelite Housings, so excessive
pressure applied to either side of a Non-Ikelite housing may cause the
housing to rotate slightly on the Tray.
Diagram D
Protective Backing
(peel off before use)
MADE IN USA
Diagram E
7
Customer Support
Ikelite Underwater Systems
Service Department
50 West 33rd St.
Indianapolis, IN 46208 USA
Email: [email protected]
Phone: 317-923-4523
Limited Warranty
This Ikelite product is warranted against any manufacturing defects for a
period of one (1) year from the original date of purchase. Defective
products should be returned to Ikelite postage paid. Ikelite will, at its sole
discretion, repair or replace such products, and will return to customer
postage paid. All other claims of any nature are not covered. Except as
mentioned above, no other warranty expressed or implied applies to this
Ikelite product.
Ikelite Underwater Systems
50 West 33rd Street
Indianapolis, IN 46208 USA
www.ikelite.com
© 2015 Ikelite Underwater Systems
9523.64-tray-dual-handles_2_0215