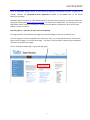
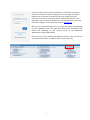
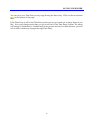
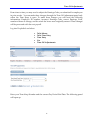
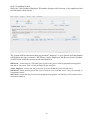
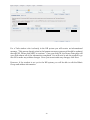
1
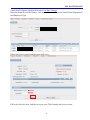
Time Entry & ePAF NAVIGATION Users of PeopleSoft HR gain access to this system by requesting a PeopleSoft account. To apply for an account, complete the PeopleSoft Account Application available on the Forms menu on the Human Resources homepage. PeopleSoft Human Resources is a web-based application and users login by opening an internet browser and typing the following URL: http://eserve.hr.tufts.edu into the browser's address box. This will bring you to the page below. Recent versions of all browsers including Chrome, Mozilla, and Safari will work. Use Internet Explorer version 8 or above. Save this page as a “favorite” for easy access to PeopleSoft. This page precedes the PeopleSoft login page and HR posts messages to the user community here. From this page you can access PeopleSoft (for Time Entry, ePAF, etc.), Employee Self Service, the HR Home Page or other HR pages, or the Tufts Home Page. "Tip sheets" with information about using the PeopleSoft HR system are posted on this page. . Click on ‘PeopleSoft HRMS Login’ to go to the login page. 2 Enter your Tufts Username and Tufts Password. If either the username or password is invalid, the system will display an error message. If you have forgotten your Username or password click on the ‘Forgot your Tufts Username or Password’ link and you will be redirected to the Tufts Tools page where you can reset your password. If you have questions contact the University IT Support Center at 617-627-3376 or [email protected]. Once you have successfully signed on, the system will display the home page for your PeopleSoft access. The page will include access to Employee SelfService and, depending on your security, access to the Department Administrators page (shown below). From here you can hire student and temporary workers, enter time off such as vacation and sick time, and submit hours to Tufts Time Entry. 3 On-Line Time Entry 4 OVERVIEW The Time Entry application was designed to meet the specific needs of the Tufts community. It allows for on-line entry of hours and allows for override of pay rate and Dept ID for non-exempt employees. This application is connected to PeopleSoft, the Human Resources/Payroll system. The system is designed to eliminate redundancies, increase speed, maintain a high level of security and reduce the opportunities for errors. ON LINE-TIME ENTRY Log into PeopleSoft and select: Tufts Menus Tufts Time Entry Time Entry Use Time Entry The following screen will open: 5 If you have access to only one Time Keep location you can hit enter and the program will default to that Time Keep number. If you have access to multiple Time Keeps, you will need to enter your Time Keep number. Enter the Pay Period End Date; this will always be a Saturday. There are three ways to input the date. You can: type in the date, i.e. 010100; you can click on the down arrow and bring up a calendar; or click on OK and bring up a list of all weeks of Time Entry, the most recent is on the top, click on the week you want to open 6 After selecting the week you want, you will see 2 tabs, one is named Time Entry the other is Roster of Employees. The Roster of Employees tab will list all the nonexempt employees in the Time Keep that was selected. 7 ENTERING DATA The top row of the Time Entry page has the Pay Period End Date, Time Keep number and the Status. The second row contains the ID number of the individual, Empl Rcd #, Name, and Pay Begin date. The next row has the department name and Pay Group. For student employees, the final row has the Regular Salary, Work Study Award and amount Used. The next section is where you do the inputting. 8 Be sure to click off Ok to Pay Verify hours The pre-planned distribution, Earnings Code, wages and hours are all defaulted. All hourly students are defaulted to 10 hours per week. Staff will be defaulted to the hours they are hired for each week, i.e. 21, 17.5, 35. To change the Earnings Code simply use the magnifying glass and all the Earnings Codes appropriate for the pay group will appear. Click on the one you want. Note: you can only use Earnings Codes appropriate to the person you are trying to pay, i.e. you cannot pay a student vacation time or a temp sick time. 9 To change the hours, place your cursor over the hours, highlight the hours and type in the new hours, Note: the total hours on the bottom of the page will change as you input hours. If you want to override either the pay rate or the dept id, click on the appropriate box and type in the override. This will only change for the hours attached to that row. Also, this will only override the one-week, if this is a permanent change you need to process a PAF for staff, or ePAF for students. Sometimes you need to have more than one Earnings Code on an individual, for example, if someone took one day of vacation, two sick days and the rest regular pay; or if the employee should receive overtime pay. To add another row you need to click on the plus sign To get the list of the appropriate Earnings Code click on the magnifying glass a search box (see below) for the appropriate Pay Group will appear. and You can insert up to twenty rows of earnings codes, although for most of us two to three rows are enough. If you have more than three Earnings Codes, to scroll through all that you have entered, you will need to navigate to the next page of Earnings Codes using the 2nd row of arrows. See 2nd red box in diagram below. If you added a row in error, you can delete the row, similar to adding a row, by using the minus button. The only other thing you need to do is click on OK TO PAY. The key to Time Entry is the ok to pay button on the bottom of the page. If you don't click on OK TO PAY, the employee will not get paid! 10 Once you have completed the first person, it is time to move on to the next. Use the scroll buttons, left and right arrows, and move on to the next employee. Notice the Status is listed as Data Entry while you are entering time. Move to next person Move to next earnings code Clicking View All will bring up a list of all non-exempt individuals in the Time Keep so instead of using the arrows to scroll from one individual to the next, you can view all of the employees in list form. If an employee did not work and you are not paying them, you need to leave the row in; the system will not allow you to delete it. Do not click on OK TO PAY and they will not get paid. REMEMBER: The key to time entry is the ok to pay button on the bottom of the page. If you don't click on OK TO PAY, the employee will not get paid! 11 SAVING YOUR WORK You can save your Time Entry at any stage during the data entry. Click on the save button at the bottom of the page. If the Time Keep is still in the Data Entry status you can go in and out as many times as you like. Save your changes each time you go in and out of the Time Entry System. The status will change to Submitted or Loaded later in the process and once in these statuses, you will not be able to make any changes through Time Entry. 12 Time Off Adjustments From time to time you may need to adjust the Earnings Code you submitted for employees in prior weeks. You can make these changes through the Time Off Adjustment panel only when the Time Keep is open. To make these changes you will need the following information: Employee ID number, incorrect Earnings Code, correct Earnings Code, number of hours to change, and the week the hours were originally entered. These changes will be processed with the next payroll. Log into PeopleSoft and select: Tufts Menus Tufts Time Entry Time Entry Use Time Off Adjustments Enter your Time Keep Number and the current Pay Period End Date. The following panel will open up. 13 Enter the Empl ID for the person you need to correct Enter the Earnings Code you entered incorrectly and want to reverse Enter the Earnings Code you should have entered and want the hours charged to Enter the number of hours to correct Enter the Pay Period ending day of the week that these hours were incorrectly reported to payroll. Use the magnifying glass to search any of these fields The above example will switch 14 hours that were originally entered as regular pay and should have been entered as vacation time. Vacation time will appear in Time Off Tracking and subtract from the employee’s balance. 14 ROSTER As mentioned earlier, within Time Entry, after you have entered your Time Keep and the Pay End date, there is a tab called Roster of Employees that lists the non-exempt employees in the Time Keep you are viewing. Once you have begun Time Entry and saved your work it will give you an overview of those employees marked off ok to pay. Individuals are listed alphabetically regardless of the Pay Group. You can also view all the employees in a Time Keep, including exempt employees, through the Inquire panel in Time Entry when you are not actually entering time for a week. Below is the path that will bring you to the Roster of Active Employees via Inquire. Tufts Menus Tufts Time Entry Time Entry Inquire Roster of Active Employees 15 Enter the Time Keep you have access to This is a list of all employees in this Time Keep, exempt and non-exempt. 16 SUBMITTING YOUR TIME ENTRY Once you have completed all your Time Entry and verified your entry, you need to submit it to Tufts Support Center (TSS). Go back to the Menu and select Tufts Time Entry Submit Time Entry Enter the Time Keep you want to submit and click on Search A list of those employees not marked OK to pay will appear. Scan this list to verify that you have marked off people appropriately. 17 Status will change to Submitted once the Time Entry is submitted. This puts it in a ready state for the payroll system. Once it is put into the Payroll system, the status will say Loaded. If this is okay Click on Submit Time Entry, the following dialog box will appear to tell you your time has been submitted to TSS. If there are people you should be paying you need to Cancel Time Submission go back to USE and correct the employee(s). Then save and submit again. If you need to make changes to your Time Entry after you have submitted it, call TSS, 7-000 and we can run a process to “unsubmit”. During the payroll process TSS will load the time entry into the payroll system. You will see the status change again to Loaded. On-line Time Entry is due into the TSS by 3:00 p.m. on Tuesday. Departments will be notified of any changes in the deadlines due to holidays, the Monday holidays do not affect the deadlines. The department is responsible for maintaining the timesheets for three ye ars. No time reports are sent to TSS. 18 There are timesheets available on the on the Forms menu on the Human Resources homepage: http://hr.tufts.edu/forms PRINTING REPORTS Printing in PeopleSoft To use this method, you will need to have Adobe Acrobat Reader installed on your computer. Step 1 After you have logged into PeopleSoft HRMS 8.0, navigate to Time Entry and click on the link called Report. Click on Report you need (Step 2) Step 2 You will be presented with a list of reports available to you (you might not have all the reports in this sample). Choose the report you want to print simply by clicking on the report name. For example: Time Keep Generate Time Slips Step 3 At this point, a page will appear asking for a Run Control ID. The first time you run a report, you will need to create a Run Control ID, at that time, you will select Add a New Value to create the new Run Control ID. Many users will use their initials or name as their Run Control ID. You can use the same Run Control ID for all your reports. If you already have a Run Control ID, you can use the search button to find it. 19 Enter your Run Control ID Step 4 After you enter your Run Control ID (and hit Enter). The page for your specific report will appear. To generate time slips you will need to enter the Pay Run ID. To find the appropriate Pay Run ID, you can use the magnifying glass to find the right week. You will also have to enter your Time Keep number. Click Run to continue Click Run Enter Time Keep Enter Pay Run ID 20 Step 5 The Process Scheduler Request page will appear. Do the following: 1. Make sure that the Server Name is PSNT 2. Make sure the box under Select is checked 3. Make sure Type is Web and Format is PDF 4. Click OK when done 1. Server Name is PSNT 2. Select Box is checked 3. Type is “Web” Format is “PDF” 4. Click “OK” when done Step 6 When you click OK, this page will appear. Click on Report Manager to continue. 21 Click on “Report Manager” Step 7 Go to the Administration tab. If the status does not say Posted, click on the Refresh button every few minutes until it does. Once the status says Posted, click on the View link and a new browser window, called the Report/Log View, will open. Click on the Administrator Tab When Status says “Posted” click on “Details” 22 Step 8 Click on the link that ends in .PDF to open the report in Adobe Acrobat reader. The report should then appear (see step 9) and you now should be able to print your report using your browser's default printer. Click on the link ending with “PDF” Step 9 Click to print as you normally would. It should print to your default printer, or select any other printer you have access to. Click on the printer icon to print the reports 23 There are several reports you can print: Time Keep Generate Time Slips: Enables you to print time slips each week. Time slips allow department to manually track the daily hours of each employee; the Time Entry system stores the weekly record. Each department is responsible for maintaining their own time slips for three years. This is a legal record. Time Keep Exception Report: Lists all employees who were paid for overtime, sick time, or any time other than regular hours. It also lists employees who did not work in a given pay period. Time Keep Earnings and Hours: lists all employees who were paid in a given pay period, including their hours and wages. It also includes any overrides of dept id or salary. Only employees not being paid are excluded from this report The following screen shots outline the specific information you will need to input for each report: TIME KEEP GENERATE TIME SLIPS Chose the Time Keep number you want to run time slips for. Fill in the appropriate Pay Run Id. Use the magnifying glass to pick the appropriate week. 24 TIME KEEP EXCEPTION REPORT Chose the Pay Period End Date Choose the Time Keep TIME KEEP EARNINGS AND HOURS REPORT Pick the Pay Period End Date Pick the sort order EXITING THE PROGRAM You exit the PeopleSoft program the same way you would any web-based application. Click on Sign Out DONE ALREADY! If you have any questions please call TSS at 7-7000. 25 ePAF: Student and Temporary Employees 26 OVERVIEW The Student and Temp ePAF was designed to meet the specific needs of the Tufts community. It allows for on-line entry of everything from hire to termination of Student employees and Temporary workers, including non-Tufts students. The application is a component of the PeopleSoft HR/Payroll system and is accessed through your PeopleSoft Id and password. The system is designed to maintain a high level of security and for ease of use and efficiency therefore reducing errors. GETTING INTO ePAF Click on Tufts Menus Tufts ePAF Actions Under the ePAF menu is a list of the actions that you can select Hire Employee Account Distribution Change Pay Rate Change Termination 27 EFFECTIVE DATES You cannot enter retroactive transactions. To complete retroactive transactions, notify TSS by email ([email protected]) with the specific information for the retroactive request. CREATE STUDENT JOB (Either new hire or additional job) Click on Tufts ePAF Actions Hire Employee Step 1: Choose the type of Employee you are hiring There are two employee types: Tufts Student or Temporary Worker (including Non-Tufts students). Tufts Student is a Tufts student in SIS (Student Information System), who may or may not already be hired into PeopleSoft. Temporary Worker is used for both Students from another institution, high school or college and for Non-Student Temporary workers. 28 Step 2: Candidate Search Enter the Tufts Student Employee ID number (begins with 1xxxxxx) or the employee first and last name, then Search. The system will list the results that are potential “matches” to your Search and checkmarks will indicate the type of match: HR Person, Active Employee, Job Record, Active Student, or SIS Person. Select the correct result and click Next. HR Person – means there is a Personal Data record for the person with biographical/demographic data but no job record. This is when the Empl ID gets assigned. Active Employee – means that the person has a job record and they are currently active. Job Record - means that the person has a job record but is not currently active. They are currently in a terminated status. SIS Person- means that the person has biographical/demographic information in SIS and may have student information) 29 [Type a quote from the document [Ty [Type a [Ty or the pe quote pe summary a from the a of an quo docume quo interesting te nt or the te point. You fro summar fro can m y of an m position the interesti the the text doc ng doc box um point. um anywhere ent You can ent in the For a Tufts student who is already in the HR system you will receive an informational or position or document. message, “This person already exists in the human be updated the resources the text system and shouldthe Use the through SIS. Please click NEXT to continue.” Once su you boxclick OK, the Person Data su page will Drawing m anywher m tab all of the information completed. You will need to ask the student open with Tools almost to go ma e in the ma to change into SIS to make any address changes. Since you cannot make any changes, click Next. ry docume ry the of nt. Use of formatting the you will be able to edit an the Ethnic However, of if the thepullstudent is not yet in the HR ansystem, inte Drawing inte quote text Group and address information. rest Tools rest box.] ing tab to ing poi change poi nt. the nt. Yo formatti Yo u ng of u can the pull can pos quote pos itio text itio n box.] n the the text text box box any any wh wh ere ere in in the the doc doc um um ent. ent. Us Us e e the the Dra Dra win win g g To To 30 ols ols tab tab to to Step 3: Person Data [Type a quote [Type a from quote [Type a quote [Typethe a quote from document or or the from the the document the summary documen document or summary of an of an tthe or summary the interesting point. interesting summary of an You can position point. of an interesting the textYou boxcan position interestin [Type point.a You quote can from anywherethe in the [Type a quote from text box Use the gposition point. the document the or the document. the document or the anywhere in tab summary of an You canof an summary text box Drawing Tools the document. position interesting interesting point. anywhere point. in to change the Use the of the the can text You document. position formatting You can position Drawing box the Use text thebox pull quoteTools text box.] the text box tab to change anywher anywhere Drawing in Tools the anywhere in the the formatting e in the document. tab to change Use the document. Use the of the pull documen Drawing the formatting Tools tab Drawing Tools tab quote text Use thethe tot. to change the ofchange the pull box.] Drawing formatting quote textof the formatting of the Tools tab pull box.] quote text box.] pull quote text box.] Step 4: Job Data to Regardless ofchange whether or not the student selected is already in either PeopleSoft HRMS or SIS, a page with the multiple blank fields will appear and you will need to complete all of the formattin with an asterisk. information indicated g of the pull quote text box.] 31 You need to fill out: 1. 2. 3. 4. 5. 6. 7. Effective Date (defaults to current date) Academic Career (school he/she is a student in) Home Dept (your department you are hiring him/her to) Job Code (selections will be based upon Academic Career chosen) Time Keep Tax Location Standard Hours (defaults to 10 for students). Remember that semimonthly students are paid automatically and you do not submit hours for them. 8. Compensation Rate 9. Department (Account distribution) with % After you have entered all of the data, make sure to click Save on the left and then Next. The student can have multiple hourly or contract jobs within the same department but cannot have a combination of hourly and contract in the same department. If you enter an Expected Job End Date for a contract (semi-monthly) student, the job will automatically terminate on the date entered and no further information will be requi red from TSS. If you opt not to enter an Expected Job End Date, you will still need to complete a separation PAF. The field Expected Job End Date is used for contract semi-monthly students only. It will not impact termination for hourly students. Step 5: Result You will receive a message that you have successfully hired the student. If the student has not worked for Tufts yet, or has not worked for Tufts in over one year, the student will need to recomplete the I-9 verification, Direct Deposit, and Tax Forms on eServe. 32 If there is already an I-9 on file and it is less than one year old, the message will appear as follows: Please check with the student to verify banking information has not changed. If there has been a change, have the student fill out new direct deposit information on eServe. 33 CREATE A TEMPORARY JOB (including Non-Tufts Student) (Either new hire or additional job) Click on Tufts ePAF Actions Hire Employee Step 1: Choose the type of Employee you are hiring: Select Temporary Worker (including Non-Tufts Students); hit Next. Step 2: Candidate Search Search by SSN Search by Name plus Date of Birth Search by Name Only (longer search and more results) 34 Fill in the just the social security number or the name and date of birth. The system will validate the social security number to establish if this employee already exists in the PeopleSoft Human Resources system. The system is looking to match the last four digits of the social security number and the date of birth, in order to avoid assigning a new employee ID number. Not all students in SIS have a social security number. Please be sure you are selecting the right student. If there is a match in the system, you will need to determine if this is the same person you are hiring. If yes, proceed with the hiring process by clicking the circle near his/her name and then Next. If no, you will need to click the circle next to “Add new employee” and then click Next. [Type a quote from the Step 3: Person Data document thesystem you will receive an For a Temp/Non-Tufts student who was already in or the summary informational message, “This person already exists in the human resources system and of an should be updated through HR Self Service. Please click NEXT to continue.” Once you click interesting OK, the Person Data page will open with almost all point. of the information completed. You will You can to make any changes to the need to ask the Temp/Non-Tufts student to go into eServe position Personal Data. Since you cannot make any changes,the click text Next. box anywhereas a new employee, you will However, if you had to Add the Temp/Non-Tufts student in the need to fill out all the information with an asterisk. document. Use the Drawing Tools tab to change the formatting of the pull quote text box.] 35 National ID Last Name First Name Gender Birth Date Email Address Permanent Address A Foreign National should have both a Permanent Address and a Local Address. Save your data! When you click Save, you will receive a message “Person has been created. Click next to assign job data.” WARNING: If you are searching SS # under the Temp/Non-Tufts student hire option, and it matches an active student in SIS, you will not be able to hire the student as a Temp/Non-Tufts student. You will receive a message that you must hire as a STUDENT. There are different tax implications for temporary/non-Tufts students and students enrolled at the university. You cannot hire a Tufts student as a TEMPORARY/NON-TUFTS STUDENT. Have them check with their Registrar’s Office to be sure that the correct Social Security Number is in SIS. 36 Step 4: Job Data Note that a Temp can only be hired as Hourly so there is no option for Temp Contract. You do have the option for non-Tufts Student Hourly and non-Tufts Student Contract/Semimonthly. For a Contract/Semimonthly non-Tufts student you have the option of filling in the Expected Job End Date and the job will automatically terminate on the date entered and no further information will be required from TSS. If you opt not to enter an Expected Job End Date, you will still need to complete a separation PAF. The field Expected Job End Date is used for Contract/Semi-monthly non-Tufts students only. It will not impact termination for hourly non-Tufts students nor for Temps. A non-Tufts student can have multiple hourly or contract jobs within the same department but cannot have a combination of hourly and contract in the same department. Temps can only be hourly. 37 Step 5: Result You will receive a message that you have successfully hired the Temp/Non-Tufts student. If he/she has not worked in over one year, he/she will need to recomplete the I-9 verification, Direct Deposit, and Tax Forms on eServe. 38 ACCOUNT DISTRIBUTION CHANGE Open the ePAF menu options, then select Account Distribution Change. Enter the Empl ID or First Name + Last Name. Filter further by the Tufts Home Department and Employee Type. [Type a quote from the document or the [Type a quote from the summary documentof oran the interesting summary ofpoint. an You can position the text interesting point. You box anywhere the can position theintext document. Useinthe box anywhere the Drawing Tools tab to document. Use the change the formatting Drawing Tools tab to of the pull text change the quote formatting box.] of the pull quote text box.] [Type a quote from the document the [Type a quote or from summary of anor the the document interestingofpoint. an You Select the summary correct record and this page will open. can position the text interesting point. You box anywhere in the can position the text document. Useinthe box anywhere the Drawing Tools tab to document. Use the change Drawingthe Tools tab to formatting change the of the pull quote text box.] formatting of the pull quote text box.] [Type a quote from the document or the summary of an interesting point. You can position the text box anywhere in the document. Use the Drawing Tools tab to change the formatting of the pull quote text box.] Click to insert an additional row 39 Fill in the effective date and the new DeptID and percent. If it is for a prior time period you will need to submit the change on a PAF and submit to TSS. To split your labor among several dept ids, fill in the first row and then insert another row. Use the plus sign button to insert a row. Click Submit and you are done. 40 PAY RATE CHANGE Open the ePAF menu options then select Pay Rate Change. Enter the Empl ID or First Name + Last Name. Filter further by the Tufts Home Department and Employee Type. [Type a quote from the document or the [Type a quote from the summary of document oran the interesting summary ofpoint. an You can position the text interesting point. You box position anywheretheintext the can document. Useinthe box anywhere the Drawing Tools tab to document. Use the change the formatting Drawing Tools tab to of the pull text change the quote formatting box.] of the pull quote text box.] [Type a quote from the document the [Type a quote or from summary of anor the the document interestingofpoint. an You Select the summary correct record and this page will open. can position the text interesting point. You box anywheretheintext the can position document. Use the box anywhere in the Drawing Tools tab to document. Use the change the Drawing Tools tab to formatting change the of the pull quote text box.] formatting of the pull quote text box.] Fill in the effective date, and the new pay rate. Click Submit and you are done. 41 TERMINATION Open the ePAF menu options, then select Termination. Empl ID or First Name + Last Name. Filter further by the Tufts Home Department and Employee Type. [Type a quote from the document or the [Type a quote from the summary documentof oran the interesting summary ofpoint. an You can position the text interesting point. You box anywhere the can position theintext document. Useinthe box anywhere the Drawing Tools tab to document. Use the change the formatting Drawing Tools tab to of the pull text change the quote formatting box.] of the pull quote text box.] [Type a quote from the document the [Type a quote or from summary of anor the the document interestingofpoint. an You Select the summary correct record and this page will open. can position the text interesting point. You box anywhere in the can position the text document. Useinthe box anywhere the Drawing Tools tab to document. Use the change Drawingthe Tools tab to formatting change the of the pull quote text box.] formatting of the pull quote text box.] Fill in the last day of work. This can be done for any day in the future. Click Submit. 42 INQUIRE DATA FROM PEOPLESOFT There are four ways to view data that exists in PeopleSoft: Student Employee Job Detail and Temp Employee Job Detail show Job Detail, Account Distribution and Address. Students from SIS (Employees) and Students from SIS (Non Empl) are very basic overviews of student information from SIS. One is for those students who are employed and the other is ALL Tufts students. The example below is for a Temporary employee. The Student Employee Job Detail pages are very similar. Search by either the Name or the Empl ID. Click on a job, if it is not the one you are looking for you can use NEXT IN LIST or RETURN TO SEARCH Click on one of the search results and the Job Detail Page will appear. 43 The Job Detail page will provide job information as indicated in the example below. Click on either View All or use the arrows to see additional rows of job data The PrePlan page will tell you the Account Distribution. 44 The address page shows the Permanent and Local Address. You can also search all students in SIS, whether employees or not. Students from SIS (Employees) can be used if they already are Employees. These students can also be found in Student Employee Job Detail, but this will show Academic Program . 45 Students from SIS (Non-Employees) are students who are not employees. You may need this to find out an EMPL ID in order to hire someone. Copyright 2015, Trustees of Tufts College All rights reserved. 46