1
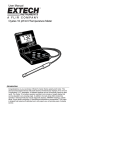
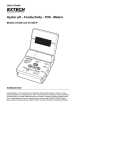
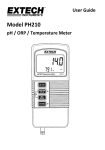
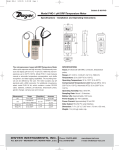
User’s Guide
Waterproof Palm pH Meter
Model PH220
Introduction
Congratulations on your purchase of the Extech PH220 waterproof pH/mV meter. This
microprocessor-based device with tactile buttons is battery operated and ideal for field
use. The PH220 simultaneously displays pH or ORP (mV) and temperature. The rubber
holster which protects the meter has a magnetic backing for convenient mounting.
Careful use of this meter will provide years of reliable service.
Specifications
mV (ORP)
Temperature
pH
Range (Resolution)
Accuracy
± 1999 mV DC (1 mV)
± 2mV
o
o
o
o
32.0 to 212.0 F (0.0 to 99.9 C)
± 0.5 F (0.3 C)
0.00 to 14.00pH (0.01pH)
± 0.02pH
o
o
Temperature Compensation
32 to 212 F (0-100 C) Automatic (ATC)
Power
9 volt battery
Display
Dual LCD display for simultaneous pH or mV and
temperature readings
Over-range or open indication Displays " ---- " for over-range or open input
pH Calibration points
4.00, 7.00, 10.00
Auto Power OFF
After 10 minutes
Low Battery Indication
The
Dimensions / Weight
4.25 x 3.00 x 1.18" (108 x 75 x 30mm) / 0.3 lbs (135g)
Accessories supplied with kit
Sample buffers, and battery.
Stick electrode for model PH220-S
Electrode with 39” cable for model PH220-C
icon displays no fill bars
2
Model PH220 Version 2.0
4/05
Meter Description
1.
Battery Compartment (under holster)
2.
Rubber Holster
3.
LCD Display
4.
Function buttons
5.
Electrode input
Display Description
3
Model PH220 Version 2.0
4/05
Calibration
pH electrodes are like batteries; they run down with time and use. Because the sensitivity
of a pH electrode degrades over time, it is very important to frequently calibrate the meter
to the electrode.
Calibration is performed using standard buffer solutions at room temperature (78°F, 25°C).
Buffer solutions are solutions of a know pH that have the useful property of resisting
changes in pH. These can be purchased already mixed or in capsule form and are usually
available in three pH values, pH 4.00, pH 7.00 and pH 10.00.
Calibration is always performed using the pH 7.00 buffer first, followed by a second
calibration. Select pH 4 buffer for the second calibration if typical measurements will be
less than pH7 or use a pH 10 buffer if typical measurements will be greater than ph 7.
In order to obtain the most accurate results possible, a pH meter should be
calibrated at least once a day.
2 Point Calibration Procedure
1.
Turn the meter on.
2.
Use the pH/mV button to select the pH mode. The unit of measure appears on the
LCD.
3.
Remove the electrode from its cap and rinse with distilled or deionized water
4.
Place the electrode in fresh pH 7.00 buffer solution and stir. Allow 30 seconds for
the electrode/ATC to reach thermal equilibrium with the buffer solution.
5.
Press and hold the CAL key for three (3) seconds to enter the calibration mode.
The ‘CAL’ display appears and then the pH value flashes on the LCD.
6.
When the pH stops flashing, ‘SA’ (save), and then ‘END’ will appear in sequence.
7.
Rinse the electrode with distilled or deionized water.
8.
Place the electrode into the second buffer (pH 4.00 or pH 10.00) ands stir. Allow 30
seconds for the electrode/ATC to reach thermal equilibrium with the buffer solution.
9.
Press and hold the CAL key for three (3) seconds to re-enter the calibration mode.
The ‘CAL’ display appears and then the pH value flashes on the LCD.
10. When the pH stops flashing, ‘SA’ (save), the Slope percentage, and then ‘END’ will
appear in sequence.
11. The meter is now calibrated and ready for use.
Note: The Slope percentage is an indication of the health of the electrode. Since pH
electrodes vary in performance from one to the next, this meter includes a
feature that displays the electrode’s slope in %. If the slope % is below 75% the
electrode should be replaced (a slope of 100% is ideal).
4
Model PH220 Version 2.0
4/05
PH Measurements
1.
Connect the pH electrode to the meter.
2.
Turn the meter on.
3.
Use the pH/mV button to select the pH mode. The unit of measure appears on the
LCD.
4.
Rinse the electrode with distilled or deionized water.
5.
Place the electrode in the solution. Allow 30 seconds for the electrode/ATC to
reach thermal equilibrium with the buffer solution.
6.
When the reading stabilizes, read the pH measurement on the main display.
An out of range reading is indicated by three dashes ( - - - ). The dashes will also
display if the electrode is not connected to the meter.
7.
When the test is complete rinse the electrode with distilled or deionized water.
Electrodes should always be rinsed before and between samples
with distilled or deionized water to remove all traces of storage
solution, process medium, or previous test solution..
Temperature Units
o
o
o
o
To change the unit of measure for temperature ( C to F or F to C), press and hold the
pH/mV button for 3 seconds. The LCD reflects the unit of measure.
mV (ORP) Measurements
1.
Connect the ORP electrode to the meter.
2.
Rinse the ORP electrode
3.
Turn the meter on.
4.
Use the pH/mV button to select the mV mode. The display will reflect the unit of
measure.
5.
Place it into a sample solution. When the LCD stabilizes it will read the redox
potential of the sample in millivolts (mV).
6.
When the test is complete rinse the electrode with distilled or deionized water.
5
Model PH220 Version 2.0
4/05
Temperature Compensation
Because the millivolt output of a pH electrode varies with temperature, the meter must
compensate for the variations to obtain accurate measurements. The PH220 automatically
compensates for solution temperatures that stray from room temperature using the
thermometer that is built-in to the electrode. Temperature is displayed on the lower LCD
line.
Battery Replacement
The 9V battery requires replacing when all three black bars inside the battery display icon
switch off. Replace the battery per the following:
1.
Remove the orange protective jacket holster that surrounds the meter by pulling it
over the top of the meter (ensure that the electrode is disconnected).
2.
Pull the battery compartment up from the top of the meter by the two indentations
using two fingers. If necessary, pry the ends of the cover with a coin to release the
watertight seal.
3.
Install a fresh 9V battery. Battery polarity is indicated on the battery compartment
cap.
4.
To reinstall the battery compartment, align the notch in the cover with the grove in
the meter and press.
5.
Reinstall the protective holster.
6
Model PH220 Version 2.0
4/05
Electrode Maintenance and Troubleshooting
Most pH measurement difficulties are caused by electrode problems. Careful handling and
proper storage of the electrode will increase measurement accuracy.
Electrodes should be rinsed to remove all traces of storage solution, process medium, or
previous test solution.
Electrode Storage
The electrode should be stored in a soaker bottle or wetting cap filled with pH4 buffer.
Never store an electrode in distilled or deionized water as this will cause migration of the fill
solution from the electrode.
Electrode Cleaning
The type of electrode coating that occurs over time will determine the cleaning method.
Soft coatings can be removed by vigorous stirring or by using a squirt bottle. Organic
chemical coating (hard coatings) should be chemically removed. Only in extreme cases
should the bulb be cleaned mechanically.
Troubleshooting an Electrode
Symptom
Long response time or
reading drift
Cause
Recommended Solution
Clogged Junction
Strong Alkaline measurement
Deteriorated Gel layer
Protein coating on electrode
surface
Oil, paint, dyes, suspended
solids on sensor
Organic solvents are coating
sensor
Dry Bulb
Static Charge
Dehydrated membrane
Long term storage without
wetting
Wiping electrodes
Same readings in different Cracked or broken bulb
buffers and samples
Erratic LCD display
Samples have low ionic
strength (lacks salt); e.g.
distilled, de-ionized, boiled,
lake water (high pressure)
7
Soak in 4.07 M Potassium Chloride (KCl)
@ 60oC for 30 minutes.
Soak in 0.1 M HCL overnight.
Replace electrode.
Soak in 1 gm Pepsin dissolved in 100ml of
0.1 m HCL for 30 mins. or as needed.
Rinse electrode alternately with a materials
solvent and a buffer 7.00.
Organic mole fraction has to be less than
50% to assure reasonable readings. Limit
time of measurement. Keep probe in the
7.0 buffer between readings.
Read solution for dry bulb below:
Soak electrode tip in wetting cap filled with
1ml 7.00 buffer for 24 to 48 hours
Rinse electrode in 7.0 buffer and blot. Do
no wipe electrode.
Replace electrode. Use bulb guard. Avoid
plunging electrode to bottom of container
and spinning bars. Wetting cap will protect
bulb between tests.
For each 50 ml of sample add 1 drop
(50uL) of SAT. KCl (No alteration in pH will
occur by inert KCl).
Model PH220 Version 2.0
4/05
Calibration and Repair Services
EXTECH INSTRUMENTS CORPORATION offers complete repair and calibration services
for all of the products we sell. For periodic calibration, NIST certification or repair on most
Extech products, call customer service for details on services available. Extech
recommends that calibration be performed on an annual basis to ensure calibration
integrity.
Warranty
EXTECH INSTRUMENTS CORPORATION warrants this instrument to be free of defects
in parts and workmanship for one year from date of shipment (a six month limited warranty
applies to sensors and cables). If it should become necessary to return the instrument for
service during or beyond the warranty period, contact the Customer Service Department at
(781) 890-7440 ext. 210 for authorization or visit our website www.extech.com for contact
information. A Return Authorization (RA) number must be issued before any product is
returned to Extech. The sender is responsible for shipping charges, freight, insurance and
proper packaging to prevent damage in transit. This warranty does not apply to defects
resulting from action of the user such as misuse, improper wiring, operation outside of
specification, improper maintenance or repair, or unauthorized modification. Extech
specifically disclaims any implied warranties or merchantability or fitness for a specific
purpose and will not be liable for any direct, indirect, incidental or consequential damages.
Extech's total liability is limited to repair or replacement of the product. The warranty set
forth above is inclusive and no other warranty, whether written or oral, is expressed or
implied.
Support line (781) 890-7440
Technical support: Extension 200; E-mail: [email protected]
Repair & Returns: Extension 210; E-mail: [email protected]
Product specifications subject to change without notice
For the latest version of this User’s Guide, Software updates, and other
up-to-the-minute product information, visit our website: www.extech.com
Extech Instruments Corporation, 285 Bear Hill Rd., Waltham, MA 02451
Copyright © 2005 Extech Instruments Corporation
All rights reserved including the right of reproduction in whole or in part in any form.
8
Model PH220 Version 2.0
4/05