1
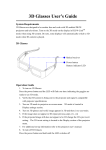
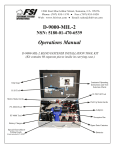
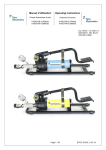
indicates the initial position with the hole control 4 closed to be prepared for the next blind rivet. Before inserting a new blind rivet make sure that the previous mandrel has been expelled. MAINTENANCEAND CLEANING. Figure F. The jaws must be cleaned and lubricated from time to time and remove the dusty material that could be deposit. For spar parts requirement you may use the piece number of the Figure F. And the references of the spare parts in http://www.rivedrill.com/operating-instructions/spareparts/. RiveDrill is is always disassembled the shaft portion releasing the spring washer as shown in photographs in http://www.rivedrill.com/operating Change the nosepieces. Figura G 1º Open the hole control operating the motor to the right. 2º Change the nosepiece and close the hole control operating to the left. IMPORTANT. Never remove the nosepiece with the hole control close, because the pressure of the jaws makes it very difficult to place the new nosepiece. Rivedrill doesnotnwork without nosepiece. BREAKDOWN, CAUSES AND SOLUTIONS ·If the rivet doesn't enter. Possible solution, the nosepieces 14, 15 or 16, Figure F is not chose correctly. Change the nosepiece. Possible mandrel of the blind rivet inside of RiveDrill. Before to be continued, dismount RiveDrill and expel the mandrel. Possible jaw 5, figure F with defect. Disassemble and change it. The blind rivet is in but it doesn't work. Possible mechanism in position as figure B3. Act to work as position B2. Possible that the mandrel of the blind rivet is too short. Check the sizes as C4. Possible that the jaws are wearing or break. Clean or change it. http://www.rivedrill.com/operating-instructions/spareparts/ ·RiveDrill set the rivet but does not expel the mandrel. Possible solution, the nosepieces 14, 15 or 16, Figure F is not chose correctly. Change the nosepiece. Possible that the jaws are wearing or break. Clean or change it. Possible than the mandrel is to thik. Check the rivet sizes C4. GUARANTEE. RiveDrill has a warranty against defects in material and workmanship. Attach the invoice or delivery note. If defective, replace or repair the unit, as deemed appropriate. Not covered by warranty for damage caused by natural wear, overloading or improper use. Claims can only be processed in an establishment providing RiveDrill authorized service. DECLARATION OF CONFORMITY. Declaration of the manufacture according to 93/37/EC. This product has been designed exclusively for being built into another machine, or mounted onto another machine or other machines. It is forbidden to put this product into operation before the conformity of the final product with the provisions of the regulation 98/37/EC has been fulfilled.The conformity is fulfilled, for example, if is this accessory is driven by a MAQUINAS ANDREA power tool RiveDrill according to the operating instructions or the pictogram instructions on the packing. CE 14 Riveter for drilling machine User manual MAQUINAS ANDREA, S.L. This book instruction is printed in Madrid (Spain) and all the property rights about texts, draws and pictures are owned of MAQUINAS ANDREA, S.L. Modifications can be produced with rights reservations to MAQUINAS ANDREA, S.L. It is forbidden the partial or total copy. Tools specifications for diferent models of RiveDrill riveter. MÁQUINAS ANDREA, S.L. Islas cíes, 61 28035 Madrid España. Tf. + 34 693215339 Fax +34 913 526 577 [email protected] Tutorial video. Operating instructions. Spare parts and more information: www.rivedrill.com www.rivedrill.net www.rivedrill.es Model RiveDrill HP RiveDrill E28 RiveDrill E20 RiveDrill E95H RiveDrill E10 RiveDrill R98 Recomended use Professional Professional Professional Z X F Bricolage D.I.Y. Bricolage D.I.Y. 10 mm 0.39 in 10 mm 0.39 in 10 mm 0.39 in 200 Kgs 2.000 Nw 30 mm 1 .18 in 28 mm 1.10 in . 20 mm 0.79 in Maximum Strength (F) 1000 Kgs 10.000 Nw 800 Kgs 8.000 Nw 650 Kgs 6.500 Nw 500 Kgs 5.000 Nw 300 Kgs 3.000 Nw Union thickness(X) All All All All Maximum stroke (Z) D Bricolage D.I.Y. Rivet Diameter (D) Telescopic body for the hand 2,4mm-3/32in 3,2mm-1/8 in 4,0mm-5/32 in 4,8mm-3/16 in 6,4 mm-1/4 in No All 2,4mm-3/32in 3,2mm-1/8 in 4,0mm-5/32 in 4,8mm-3/16 in Yes Steel and Polyamide glass fiber 2,4mm-3/32in 3,2mm-1/8 in 4,0mm-5/32 in 4,8mm-3/16 in Yes All 2,4mm-3/32in 3,2mm-1/8 in 4,0mm-5/32 in 4,8mm-3/16 in 2,4mm-3/32in 3,2mm-1/8 in 4,0mm-5/32 in 4,8mm-3/16 in 4,0mm-5/32 in Yes No No Steel and Polyamide glass fiber Polyamide glass fiber Polyamide glass fiber Plastic Body Material Steel - rubber Nosepieces included 4 4 4 3 3 1 Net weight (grams) 582 360 356 293 230 189 Gross weight (grams) 700 477 473 410 270 229 (box and nosepieces included) A A1 B i 6 ! GB 2 5 B2 1 4 3 B1 FOR YOUR SAFETY . Working safely with this machine is possible only when the operating and safely information are read completely and the instructions contained there in are strictly followed. B3 4 2 Attention with the reaction of the hand that hold the RiveDrill. Release RiveDrill if the reaction is strong. 4 4 Clac, clac... C D C2 7 D1 (Z) C1/C4 Blind Rivet Blind Rivet Diameter mm (in) Mandrel Material Stainless Steel Steel Aluminium Stainless Steel Steel Aluminium Stainless Steel Steel Aluminium Stainless Steel Steel Aluminium 6,4mm 1/4in 4,8mm 3/16in C3 4,0mm 5/32in ! In order to ensure that the machine functions safely, only use the blind rivets listed in the specifications together with the correctly matching nosepiece (nozzle) permitted with each model of the table of the first page. High forces can occur during the working procedure, use grooves in the hand that the RiveDrill is hold, and therefore hold RiveDrill tool firmly. Do not use bracelets or other objects that can be hooked. More information and tutorials videos in www.rivedrill.com 3,2mm 1/8in D2 RiveDrill Break Mandrel Diameter mm (in) Stop TOOLS SPECIFICATION. See in the Specifications of table of first page corresponding to your RiveDrill model you have. Special importance have the specifications in: Maximum stroke (Z) in charge riveting, and the maximum Strength (F) of riveting. The safety sizes for blind rivets must be observed in the graphic Figure C1, about diameter and material of blind rivets aluminum, steel or stainless steel. HP E28 E20 E95H E10 R98 E 3,85-3,6mm (0.151in) 3,1-2,65mm (0.114in) E2 2,4-2,2mm (0,095in) E1 Clac, clac... 2,1-1,8mm (0.076in) 1.1 Stop F Stainless Steel 1,5-1,45mm Steel (0,057in) Aluminium 2,4mm 3/32in Working stroke Z maximum mm (in) 30mm 28mm 20mm 10mm 10mm 10mm (1.18in) (1.10in) (0.79in) (0.39in) (0.39in) (0.39in) 1.2 With effort G Ø3,2mm Ø1/8” Ø4,0mm Ø5/32” Ø4,8mm Ø3/16” 3 4 5 5 1.4 4 5 1.5 Hole control open Each unit include several nosepieces. Select the nosepiece that matches with each diemater (Ø) of the rivet. USE AS INTENDED RiveDrill is a device that has been designed to be attached to a reversible drilling machine, reversible, cordless drill (12 vol. or more), to set blind rivets. ·The rivet is fixed in a single action. ·The mandrel of the rivet should be inserted completely in the RiveDrill. ·Before insert the next rivet in the RiveDrill be sure to expel the mandrel before. ·For damage caused by usage other than intended, the user is responsible. More information in www.rivedrill.com. Hole control close 1.3 How to change of the nosepieces. 1º Open the hole control, operating the motor to the right. 2º Change the nosepiece and close the hole control operating the motor to the left. IMPORTANT. Do NOT remove the nosepiece with the hole control close because the presure of the jaws very difficult placement of the new nosepiece. Without nosepiece the riveter do not work. Ref. 1 Rivedrill Dibujos. Derechos reservados. Prohibida reproducion total o parcial. Reservado el derecho a modificaciones. Maquinas Andrea, S.L. Madrid Spain OPERATING CONTROLS Figure A. Elements of the machine. The accessories described in the book instructions, are not always included in the given unit. Some elements are to get optional: (1) RiveDrill, (2) Drive Shank , (3) Nosepiece ; (4) Hole control, (5) Telescopic body for the hand ; (6) Drilling machine (7 fig. C) Rivet INITIAL OPERATION. Figure A. Installing RiveDrill. Insert the drive shank 2 into the chuck of the drill and tight strongly, Figure A1. Cover the chuck of drill with the telescopic body for the hand of RiveDrill, 5 Figure B. Working procedure. RiveDrill is hold with the hand by the telescopic body 5 to not turn; figure B. RiveDrill transform the rotatory movement, that is coming by the drive shank 2 Figure B1, from the drill, in a lineal movement that open or close the hole control 4, figure B1. When the drill turns to the right or to the left, the inside mechanism of RiveDrill advances toward, setting the rivet or backward expelling the mandrel respectively. Looking at the figure. B1 the black arrows are showing to open the hole 4, the white arrow is showing to close the hole 4. In the end and beginning, in both ways, is listened the sound clack, clack. Try the movement without rivet. Turning to the right, figure B2. Looking at how the hole control 4 is closed and listen the clack, clack, Turning to the left, figure B3. Looking at how the hole control 4 is opened and you hear the clack, clack. Tutorial Use and way of working in http://www.rivedrill.com/tutorial-videos/espa%C3%B1ol-videotutorial-rivedrill-e95h/. Initial position to start to set a rivet.Changing nosepiece (Fig. G) The hole control 4 must be closed, like in the figure. B2. If the hole 4 is open, like in the figure B3, close the hole 4 turning on to the left the drill until hearing clack, clack…. USE Figure C.Insert the blind rive . Insert the blind rivet 7, figure C, completely into the RiveDrill, with the Drill stopped. Caution. Don't use blind rivets with different sizes and materials that are indicated in figure. C1. Choose one of the nosepiece supplied (standard delivery) to fit the diameter of the blind rivet to be applied Fig. G. If the RiveDrill is used with a nosepiece inadequate it may cause that it works deficiently. Check the blind rivet that the measures of the mandrels of the blind rivet are between the minimum and the maximum of the chart of measures of the figure C4. Check the blind rivet that the hardness of the material of the blind rivets are inside of the capacity of the RiveDrill Riveting length (Z) should never be higher than indicated on the characteristics of each model on the first page. May riveting any material thickness to be bonded using the appropriate rivet length. If length (Z) recommended in the table of characteristics of the first page exceeds the rivet is defective and RiveDrill may be damaged. FigureD. Rivetting. Prepare the drill to turn to the right. Introduce the head of the blind rivet completely in the hole of the parts have to be joined, figure D1. While the drill is started to the right, Rivedrill must hold strongly with the hand on the telescopic body 5, figure D2. Stop the drill when the rivet has been fixed and the mandrel of the blind rivet has been broken. Caution The reaction in the hand that hold the RiveDrill can be increased depending on the material and the size of the blind rivets is been used. . Figure E. Expel the mandrel of the RiveDrill. Turning to the left and incline the RiveDrill to left the mandrel of the rivet falls while the RiveDrill is hold with the hand so that do not turn. Keep the drills turning to the left until the clack, clack, is listened that