1
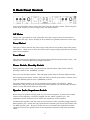
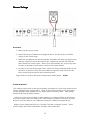
Tone King “Royalist 15”
User’s Manual
1.0
8/25/2015
Tone King Amplifiers
A division of Premier Builders Guild LLC
4401 Eastern Avenue, Bldg 46-3G, Box 38
Baltimore, Maryland 21224
www.toneking.com
[email protected]
Note from the Designer
Designer
Thank you for choosing Tone King’s “Royalist 15” guitar amplifier. The Royalist is a
genuine milestone for us, as it’s the first Tone King amp that delivers the best of the
vintage British sound.
The Royalist is inspired by the sound of the
early Marshall amps, and you will certainly
hear elements of the old Bluesbreaker, JTM45,
and JMP50 in the sound of this amp.
However, the Royalist is no mere clone of a
vintage amp. It is very much a new design
which captures the essence of those fine
vintage amps, but goes further as well.
I used the same approach to the design process
as I always have in the past. It all starts with
critical listening, in order to understand the
qualities - good and bad - that define the sound of these iconic vintage British amps.
Then, relying simply on engineering know-how and past experience, I developed circuit
designs to deliver more of the good and less of the bad qualities, for an idealized version
of those iconic tones we all know and love. I made no attempt to duplicate the design
or construction of the originals, since my goal was to go beyond the limitations of those
classis designs.
As always, half of the design effort went into the voicing of
the speaker cabinets. The goal was to capture the low-end
thump, chunk, and presence of a certain vintage
“basketweave” 4x12 which is a big part of that sound, but
do it in a smaller, lighter, more convenient package – 1x12
and 2x12. This was the most difficult design I’ve done in
several years, since it was so entirely different from the
Fender voicings I had been familiar with. Regardless, I am
delighted with the sound of the Royalist cabs, and I think
they are an excellent match for the amp.
To top it off, I added a number of additional useful features.
I developed a special version of the Ironman attenuator,
with a reactive load tuned specifically for this amp, as well
as an extremely transparent effects loop and a very useful line-out circuit.
I thank you for your purchase of the
Royalist, and I hope you enjoy playing
it as much as I do.
Best Regards,
Mark Bartel
Tone King Amplifiers, a division of
Premier Builders Guild LLC
1
Safety Instructions (Important !)
1. Please read these instructions, and keep them for reference.
2. Please follow all instructions described here.
3. Do not use this apparatus near water.
4. Clean only with a dry cloth.
5. Do not block any ventilation openings.
6. Do not operate near any heat sources such as radiators or heat registers.
7. Protect the power cord from being walked on or pinched, particularly at the plugs
and at the point where they exit from the apparatus.
8. Only use attachments/accessories specified by the manufacturer.
9. Unplug this apparatus during lightning storms or when unused for long periods of
time.
10. Refer all servicing to qualified service personnel. Servicing is required when the
apparatus has been damaged in any way. For example, if the power supply cord or
plug is damaged, liquid has been spilled or objects have fallen into the apparatus, the
apparatus has been exposed to rain or moisture, does not operate normally, or has
been dropped.
11. CAUTION: To disconnect the unit completely from the MAINS, unplug the unit.
Turning the power switch off does not disconnect the unit completely from the MAINS.
2
Contents
1. Front Panel Controls
4
Instrument Input
4
Volume and Tone Controls
4
Presence
4
Effects Loop Bypass
4
Attenuation Control
5
2. Dialing In Your Sound
6
Starting Point
6
The Marshall Trick
6
Fat, Warm Clean Sound
6
Volume and Attenuation
7
Notes on Using the Attenuator
7
3. Back Panel Controls
8
AC Power
8
Fuse (Mains)
8
Fuse (Plate)
8
Power Switch, Standby Switch
8
Speaker Jacks, Impedance Switch
8
Calibration (Test Jacks, Screen & Bias Adj)
9
Effects Loop (Send, Receive)
9
Line Out
9
4. Calibration
10
When and Why to Calibrate
10
Tools you will need
10
Bias Current
11
Screen Voltage
12
5. Tube Installation and Replacement
14
Preamp Tubes V1, V2, V3
14
Power Output Tubes V5, V6
14
Installing Tubes
15
Replacing Output Tubes
15
Tube Quality
15
6. Warranty
16
3
1. Front Panel Controls
(note: the illustration above shows the faceplate of the Royalist combo. The faceplate of
the head version is a mirror image of the one shown above)
Instrument Input
The guitar is to be plugged into the instrument input
Volume & Tone Controls (Treble, Mid, Bass)
These controls should be familiar, as they operate in the same way as most other guitar
amplifiers. The Treble knob adjusts the level of high frequencies. The Bass control
adjusts the level of low frequencies, and the Midrange control adjusts the level of
midrange frequencies.
The Royalist is a non-master-volume design, which means that overdrive and distortion
are generated by both the preamp and power amp in certain predetermined proportions.
This makes it relatively easy to dial in the amount of overdrive and distortion you want
– it’s all under control of the single Volume knob.
Presence
The Presence knob adjusts the level of very high frequencies (those above the range of
the Treble control), and does it in a way that is slightly different than the Treble control.
As you turn the Presence knob up, the level of those very high frequencies is increased,
as you would expect. But, the presence control has an effect on the “feel” of the amp as
well. At higher settings, the amp is punchier and more “raw” sounding, while at lower
settings is less “spiky”, with a more “compressed” feel.
It’s a good idea to get used to the specific effect of the Presence control, as it can really
help to dial in your sound for a particular room or setting. I generally set the presence
control higher in larger rooms, but keep it rather low at home.
Effects Loop Bypass
This switch allows you to bypass the effects loop. It’s always a good idea to use the
“bypass” position when you are not using the loop. If you have this switch set to
“enable”, then the signal will be passing through the effects loop circuitry in the amp,
even if nothing is plugged into the Send and Receive jacks. In the “bypass” position,
you are guaranteed that none of the effects loop circuitry touches the signal path.
4
Attenuation Control
The Royalist contains a built-in Ironman precision attenuator, designed specifically for
this model. The attenuator allows you to reduce the volume level of the amplifier while
retaining the natural overdrive sound and feel of the amplifier. The tone and feel that
this amplifier is designed for are best achieved by a certain proportion of preamp
distortion to power tube distortion, so an attenuator is the best way to control volume
level while preserving that balance.
This attenuator uses transformer coupling and a precision tuned reactive load to best
preserve the natural tone and feel of the amp, even at very low volume. This is the
same general approach used in the highly regarded Ironman standalone attenuator.
There are many different approaches that can be used to generate overdriven and
distorted tones as a low volume. For example, master volume circuits, or a power
reduction scheme such as London Power Scaling have both been used successfully on
various amp models of other brands. However, for the vintage British tones that the
Royalist is designed to achieve, a good quality attenuator such as the built-in Ironman
is the best way to preserve tone and feel at very low volume, because it allows the
output stage to operate the same way at any level of attenuation.
The attenuation control determines the amount of power sent to the speaker, but does
not affect the operation of the output stage of the amplifier itself. The attenuator
absorbs and dissipates any excess power generated by the output tubes that is not sent
to the speaker.
The attenuator is internally connected between the amplifier output and the speaker
jack – the same way an external attenuator would be connected. However, the input of
the attenuator is not accessible, so you cannot use the built-in Ironman attenuator to
attenuate the output of some other amplifier.
5
2. Dialing
Dialing In Your Sound
All of the previous Tone King models have been based more or less around the 1960s
Fender clean sound. The Royalist is a completely different amp. It is designed to
capture the magic of late 60’s / early 70s British amps. As such, the Royalist is nearly
completely unrelated to all previous Tone King amps, and should not be expected to
have the same voicing and tonal palette.
The Royalist is actually very simple to dial in. It doesn’t require precise tweaking of the
tone controls. In general, good tones can be found no matter how the tone controls are
set. Lets take a look at a few settings which display some of the Royalist’s best
characteristics.
Starting Point
The settings shown here are a great starting point, no matter what kind of guitar you
are using. In order to become familiar with the Royalist, I’d start with these settings,
and try changing each control, in turn, to note its effect.
Volume
Treble
Midrange
Bass
Presence
5
5
5
5
5
I find that I set the controls of the Royalist to the settings above almost all the time,
no matter what I’m playing. A setting like this is also quite versatile – try rolling down
the volume control on your guitar, and observe how the mildly overdriven tone cleans
up nicely to a well balanced clean tone.
The Marshall Trick
A common way to set up an old Marshall “plexi” for a great crunchy rock tone is like
this (below). It looks like an extreme setting, and it is. But, it just happens to sound
great with this kind of amp.
Volume
Treble
Midrange
Bass
Presence
10
10
10
2
2
Fat, Warm Clean Tone
Although the Royalist is very much centered on delivering vintage British tones, it’s
still possible to conjure up a nice warm, fat clean tone, reminiscent of the of the older
Tone King models. Here’s a setting that will get you started in this direction, though
you may want to tweak the treble and presence controls as necessary.
Volume
Treble
Midrange
Bass
Presence
2
3
1
8
6
6
Volume and Attenuation
The Royalist is a non-master-volume amp, just like an old JTM45. This means that
the volume control alone determines the signal level through the amplifier. This makes
it simple to dial in. You turn the volume control down for clean tones, and turn it up to
overdrive the amp and achieve distortion. Easy enough, but there is a limitation. In
this kind of design, overdrive and distortion are only possible when the amp is
generating its maximum output power (just like an old JTM45).
For most non-master-volume amps, this is a problem. It will only start to break up at
ear-splitting volume, which makes it less than useful at small clubs and at home. This
is why the Royalist includes the Ironman power attenuator. You can think of the
Ironman as being functionally equivalent to an external power attenuator connected
between the amplifier output and the speaker. It’s purpose is to allow the amplifier to
operate at full output power, while sending only a fraction of that power to the speaker.
By operating this way, the tone and feel of the amplifier is retained quite well even at
very low volume.
It’s important to understand how to use the Volume and Attenuation control in order
to get the sound you want at the volume level you need. In general, you can think of
them as serving two different functions. You would use the Volume control to adjust
the amount of overdrive and distortion you want, and then adjust the attenuator to get
the volume level you want.
For clean tones, there are some additional things to consider. You might start out by
setting the attenuator to 0db (bypassed), and dialing in the volume level you want with
the Volume control. This will certainly give you the most headroom. However, if you
are playing in a very small room, or need to keep the volume level down very low, you
might want to turn the attenuator down a few clicks so that you can turn the volume
control up a bit more for a slightly warmer, fatter sound.
Notes on using the attenuator
In the 0db position, the attenuator is completely bypassed, and the speaker is
connected directly to the output transformer secondary, with no additional circuitry
touching the signal path.
Although the Ironman attenuator does an excellent job of reducing output power
without changing the tone of the amp’s circuitry, there are other variables in play at
lower volume which do result in some apparent tone change. Here are a few factors
that you should be aware of Speaker breakup and compression is a big part of the tone and feel of the amp when
played at high volume. At low power settings, the speaker responds differently, and
does not break up and compress as it does at high power.
The ear’s natural response curve varies at different volume levels, which changes the
way you perceive sounds at different volume levels. Quieter sounds tend to give the
impression of having less bass content.
At lower volume, there is a tendency to hit the guitar strings harder and play more
aggressively than you would if the amp were tuned up very loud. It may take some time
to get used to maintaining your playing style at reduced volume.
7
3. Back Panel Controls
(note: the illustration above shows the back panel the Royalist combo. The back panel
of the head version is a mirror image of the one shown above)
AC Mains
Always use a grounded AC cord, and make sure that a proper ground connection is
supplied to the amp. Never attempt to lift or defeat the ground connection to the amp.
Fuse (Mains)
This fuse is inline with the AC power input, and protects the primary side of the power
transformer. Make sure to use a fuse of the same rating and type specified on the back
panel of the amplifier.
Fuse (Plate)
This fuse protects the amplifier if one of the output tubes develops a short circuit. You
should use a standard fast-acting 500mA fuse here.
Power Switch, Standby Switch
When powering up the amp, you should start with the Power switch OFF, and the
Standby switch in the "STANDBY" position.
First, turn on the Power switch. This will apply power only to the tube filaments only.
After turning on the Power switch, allow the tubes to warm up for about 1 minute, then
toggle the Standby switch to the “OPERATE” position.
The power-down sequence is not as important as the power-up sequence. When
turning the amp off, you may turn Power off before Standby, or turn Standby off before
Power, or turn them both off at the same time.
Speaker Jacks, Impedance Switch
When only one speaker is being used (e.g. the internal speaker, if yours is the combo
version of the Royalist), it must be plugged into the “Main” speaker jack. The
Impedance switch should be set to match the impedance of that speaker.
The Extension speaker jack may only be used if there is also a speaker plugged into the
Main speaker jack. Inside the amp, the Extension speaker jack is wired in parallel with
the Main speaker jack. Because of this, we have to consider the impedance of both
speakers connected in parallel, and set the impedance switch to that total combined
value.
8
For example, suppose you connect an 8-ohm speaker to the Main speaker jack, and
connect another 8-ohm speaker to the Extension speaker jack. When you connect two
8-ohm speakers in parallel, the total combined impedance is 4 ohms, so you would set
the Impedance switch to 4 ohms.
Calibration (test jacks, screen adj, bias adj)
The test jacks and calibration trimmers in this section of the back panel are used to
calibrate the screen grid voltage and the bias current of the output tubes. The
calibration procedure is described in detail in its own section of this manual
Effects Loop (Send, Receive)
The effects loop is a tube-buffered series loop. It is designed to be used with either
standard footpedals or rack mount effects. The front panel “FX Bypass” switch can be
used to bypass the loop, and should be set in the Bypass position if you are not using
the loop.
The “Send” jack should be connected to the Input of your effects device. The “Receive”
jack should be connected to the Output of your effects device. Both connections should
be made with a ¼” mono instrument cable.
For best results, you should only use effects such as (delay, chorus, phaser, reverb,
flanger) in the effects loop. Any type of overdrive or distortion effect will work best
when connected between the guitar and the Instrument input jack of the amp (not in
the loop).
Your chain of effects is expected to have unity gain (meaning that the output level is the
same as the input level). The effects devices must NOT add or subtract gain, or the
balance of gain within the amp will be changed, and the sound of the amp will be
compromised. When using the effects loop, try toggling the FX BYPASS switch on the
front panel back and forth, and adjusting your effects devices so that the signal level
remains the same when enabled as when bypassed.
Line Out (Output, Level)
The line-out signal is generated from the speaker output, and is conditioned so that the
signal level is appropriate for driving the a line level input such as a mixing board,
computer sound card, headphone amplifier, or the input of another guitar amplifier.
Because it is generated from the speaker output, it retains the sound of the amplifier
quite well.
It is possible to operate the amp without a speaker connected, and to use only the
signal coming from the line-out jack. In order to do this, simply turn the attenuation
control (on the front panel) to the –36db setting, and unplug all speakers from the
speaker jacks. It is perfectly safe to operate the amplifier like this. The output stage
will be properly loaded by the reactive load circuit of the attenuator, and there is no risk
of damaging the amplifier in any way.
9
4. Calibration
Both the screen voltage and bias current of the output tubes can be calibrated using
the test points and control trimmers on the back panel of the amp. Calibration of both
screen voltage and bias current can be performed without removing the chassis from
the cabinet. Calibration is not terribly difficult. Once you have the tools you need and
have been through the process once or twice, you’ll find that you can do it in a matter of
minutes.
When & Why To Calibrate
The Royalist is fully calibrated at the shop, so it is ready to play right out of the box.
However, calibration may become necessary in the future, so you should know about
what is needed, even if you intend to have the calibration performed by a technician or
guitar shop.
Screen Voltage
The screen grid supply voltage determines the operating point of the output tubes. The
Royalist provides you with the ability to measure and adjust the screen grid supply
voltage to help you tweak the amp for the sound and feel that you prefer.
The screen voltage is set at the shop to the voltage level I prefer. It’s a good idea to
check the screen voltage before setting the bias current, to ensure that it hasn’t drifted
from the value it was set at originally. You may also want to change the screen voltage
setting, to dial in a different feel and tone. Regardless, whenever you change the
screen voltage, you must set check and re-set the bias current after changing the
screen voltage.
Bias Current
The output tubes of the amplifier must draw a specific amount of plate current at idle
(with no signal going through the amp) in order for the amplifier to operate properly.
This current level is set with the Bias Adj control on the back panel of the amp.
Whenever you change output tubes, or adjust the screen voltage, you must calibrate the
bias current of the output tubes. This calibration procedure is explained in detail on
the following page.
Tools You Will Need
Small Screwdriver: you will need a small slotted screwdriver to make the
adjustments. The blade of the screwdriver should be around 1/8” wide. This is a very
small screwdriver, but not quite as small as a “jeweler’s” screwdriver (the type used to
fix eyeglasses).
Multimeter: you will need a multimeter capable of measuring voltage in the 0-200mV
range, and also the 0-20V range. You do not need an expensive or complex meter.
Something like this will do just fine:
http://www.harborfreight.com/7-function-multimeter-98025.html#.Ux5GSoVMpB4
10
Bias Current
Procedure:
1. Power up the amp as usual. Allow the amp to warm up for 5 minutes or so
before setting the bias current.
2. Attach the meter as shown in the diagram above. Set the meter to read DC
voltage (not current) in the 0-200mV range.
3. Insert the screwdriver into the hole shown, and make sure that it properly mates
with the adjuster screw of the trimmer pot. Adjust the trimmer until the meter
shows the correct value. This is a 10-turn trimmer pot, so you may have to
rotate it through several turns to arrive at the value desired.
Target Value (as read on the meter connected as shown above): 50mV
Technical Details:
Inside the Royalist, there is a 1-ohm resistor connected between the cathode of the
output tubes and ground. The bias test points on the back panel of the amp allow you
to measure the voltage across this resistor, and compute the combined cathode current
of both output tubes. Although the cathode current is actually the sum of the plate
current and screen current, the screen current is negligible at idle.
Because you are measuring the voltage across the 1-ohm resistor, you know that 1mV
across the resistor indicates 1mA of current through the resistor, and this 1mA of
cathode current. The value measured on the meter shows the combined cathode
current for both tubes.
I prefer to set the bias current to 25mA per tube. This adds up to 50mA total for both
tubes, which is indicated by a voltage reading of 50mV at the bias test points.
11
Screen Voltage
Procedure:
1. Power up the amp as usual.
2. Attach the meter as shown in the diagram above. Set the meter to read DC
voltage in the 0-20V range.
3. Insert the screwdriver into the hole shown, and make sure that it properly mates
with the adjuster screw of the trimmer pot. Adjust the trimmer pot until the
meter shows the correct value. This is a 10-turn trimmer pot, so you may have
to rotate it through several turns to arrive at the value desired.
4. As soon as you reach the target value, switch the amp to Standby mode, set up
the meter to perform a bias test, then switch to Operate mode and re-set the
bias current (as described in the previous section).
Target Value (as read on the meter connected as shown above): 2.08V
Technical Details:
The voltage you measure at the Screen Voltage test points is 1/100 of the actual screen
voltage supplied to the output tubes. Thus, if you measure 2.08V at the test points,
the screen grid voltage supplied to the output tubes is actually 208V. This voltage
division was done for safety reasons.
I prefer to set the screen voltage to 208V (which is a reading of 2.08V on the meter) –
it’s a “sweet spot” where the attack, feel, and harmonic content are ideal for my taste.
However, you may wish to use a different setting for a different sound and feel.
Higher screen voltage will give you a “harder” feel and a “sharper” attack. Lower
screen voltage will result in smoother overdrive and a softer feel.
12
Any setting available in the full range of the trimmer pot is safe to use. It isn’t possible
to set the screen voltage to a level that will be harmful to the amp. However, you need
to keep in mind that the bias current will increase as you increase the screen voltage,
so you will need to re-calibrate the bias current every time you change the screen
voltage.
If you are significantly increasing the screen voltage, keep in mind that the bias
current will increase as well, so you want to make sure not to let the amp sit running
for very long after adjusting the screen voltage, before you re-calibrate the bias voltage.
13
5. Tube Installation and Replacement
Choice of Tube Types
I currently recommend the following tube types:
No.
Type and Brand
Function
V1
TAD 12AX7A-C / Tung-Sol 12AX7
1st Gain Stage, FX Receiver
V2
TAD 12AX7A-C /Tung-Sol 12AX7
2nd Gain Stage, Cathode follower, FX driver
V3
TAD 12AX7A-C /Tung-Sol 12AX7
Phase Inverter
V4,V5 TAD EL84-STR
Power Output
Preamp Tubes V1 ,V2, V3
Both the TAD 12AX7A-C, and the Tung Sol 12AX7A are a great match for the Royalist.
Both have a nice balance of detail and warmth, with the Tung Sol having perhaps a bit
more transparency in the top end, and the TAD having a bit less glassiness but still a
nice presence in the upper mids.
EH 12AX7s are very similar to Tung Sol 12AX7s – both are very quiet with very low
microphonics and are a bit on the bright side, with an extended top end. Tung Sols
seem a bit warmer than EHs.
The Svetlana 12AX7, a short-plate tube, has nearly the clarity of the 12AX7EH, and
slightly more bottom end, but is a bit congested in the midrange. Years ago, I had
selected this brand as the brand of choice for the Meteor/II amp, but later changed to a
combination of the 12AX7EH and the 12AX7LPS.
Sovtek 12AX7LPS – this long-plate 12AX7 has a big, warm sound that comes close to a
good NOS long-plate 12AX7. However, this tube can tend to be microphonic.
Power Output Tubes V4 & V5
The Royalist is supplied with TAD EL84-STR tubes. For the Royalist amp, these are
my favorites of the current production EL84s. They have the signature glassiness and
crunch you expect from EL84s, but they compress a bit less than other types, and have
a thicker, more powerful sound (especially in the bottom end) that makes them sound
great clean as well as overdriven.
14
Alternate Tube Choices You May Want to Try
If the preamp is too gainy for your taste, and you find that you’re setting the volume
controls down quite low to get sufficient clean headroom, you may want to try swapping
in either a 12AU7 or 5751 in the V1 and/or V2 position. Either of these will reduce the
gain of the amp noticeably.
Installing Tubes
When installing tubes, you may find it helpful to lay the amp on its side on a table, and
shine a light directly into the back of the amp, to aid in locating the position of each
tube. Tubes must be installed in the correct orientation. Both 12AX7s and EL84s have
the sample base, with a blank space in the ring of pins which must line up with the
blank space in the ring of tube pins in the tube socket.
Replacing Output Tubes
When changing output tubes, I recommend using a matched pair, but if a matched pair
is not available, an unmatched pair will work fine.
Any time you change output tubes, you must re-set the bias current, by adjusting the
bias control on the back panel, while observing the bias current with a multimeter. This
process is described in detail in the Calibration section of this manual.
Tube Quality
Currently manufactured tubes are built in China, Russia, or the Czech Republic, and
are not built to the same quality standards as tubes manufactured in the “glory days” of
tube manufacturing.
We musicians choose to use to vacuum tubes because of their tone, but we need to
accept that the tubes available to us these days can be imperfect devices, and are most
certainly the least reliable component in the entire amplifier.
It would seem that the obvious solution would be to use new-old-stock tubes that were
made back in the “glory days”, when tubes were very well made. However, I’ve lately
been finding that much of the available stocks of such “new old stock” tubes are either
gassy, noisy, or unreliable – I do believe that we’ve reached the bottom of the barrel of
NOS tubes.
Tube problems generally reveal themselves as a crackling noise which can occur
continuously, sporadically, in response to mechanical vibration, or in response to your
playing (e.g. a crackling or other type of noise which occurs only when you hit a note).
We subject all tubes to a thorough burn-in and test procedure to ensure that they are
fully up to spec and operating perfectly. However, you must be aware that the majority
of tube failures occur early in their life, and may come about as a result of the jostling
and jarring that an amp can receive in shipping. In spite of the exhaustive testing we
perform at the shop, early-life tube problems cannot always be found in such testing.
The first two months or so are the most tenuous period for any set of tubes. Most
manufacturing defects will be revealed in the first two months of their life, but many are
not detectable in initial testing, even after a burn-in period.
If you notice any noises, cracking, or any other odd behavior of your amplifier in this
period, note that it is most likely to be the result of a defective tube, and should be
debugged as such.
15
Premier Builders Guild LLC
Limited Warranty
Premier Builders Guild LLC
201 S. Highland Avenue, Suite 204
Pittsburgh, PA 15206
This warranty gives you specific legal rights; you may also have other rights which vary from state to state. There are
no express warranties except those listed below.
Length of Warranty
This warranty shall remain in effect for five years from the date of sale of the product as shown on the original bill of
sale.
What is Covered
This warranty covers all defects in material and workmanship in this product, with the following exceptions:
1. Damage or deterioration of the cabinet, or any other cosmetic damage which occurs after delivery is not
covered by this warranty.
2. Damage after initial delivery resulting from accident, unreasonable use, or neglect, is not covered by this
warranty.
3. Damage resulting from the performance of repairs by someone other than the Tone King Amplifier
Company is not covered by this warranty.
4. Damage occurring during shipment or delivery of this product to the Tone King Amplifier Company
after initial delivery of the product is not covered by this warranty.
5. Vacuum tubes are considered a user-replaceable item, as they are expected to wear out and require
replacement over a reasonable period of time. Tubes are warranted to be serviceable for a period of 90
days from the date of sale.
6. The speaker(s) in this amplifier has(have) been selected for use only with this amplifier. If the
speaker(s) of this amplifier is(are) connected to an amplifier other than the intended amplifier, any
warranty of this speaker shall be deemed void.
What We Will Pay For
The Tone King Amplifier Company will pay for all labor and material expenses to fix or replace all items covered
under this warranty. The customer will pay shipping charges to return the product to the Tone King Amplifier
Company. If the necessary repairs are covered under this warranty, the Tone King Amplifier Company will pay any
shipping charges required to return the product to the customer.
Limitation of Implied Warranties
All express or implied warranties of merchantability and fitness for a particular purpose are limited in duration to the
length of this warranty, unless otherwise provided by state law.
Exclusion of Certain Damages
The Tone King Amplifier Company’s liability is limited to the repair or replacement, at our option, of any defective
product, and shall in no event include incidental or consequential damages of any kind. Some states do not allow
limitations on the length of an implied warranty and/or do not allow the exclusion of incidental or consequential
damages, so the above limitations and exclusions may not apply to you.
Obtaining Warranty Service
If your unit requires service, it should be returned to the Tone King Amplifier Company at the address listed above.
Before returning the unit, you must contact the Tone King Amplifier Company and obtain return authorization.
16
CE Declaration
17