1
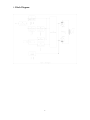
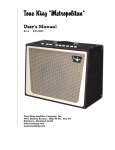
Tone King “Imperial”
Vacuum-Tube Guitar Amplifier
User’s Manual
R1.0
12/6/2007
Tone King Amplifier Company, Inc.
4401 Eastern Avenue, Bldg 45-2A, Box 38
Baltimore, Maryland 21224
Thank You
Thank you for purchasing this Tone King Imperial amplifier. Please read this user’s
manual in its' entirety before operating the amp. If you have any questions or concerns
not addressed here, please feel free to contact designer/builder Mark Bartel at
[email protected].
Contents
1. Basic Operation
Power Source
Power On, Power Off, Standby
Channel Switching
3
3
3
3
2. Rhythm Channel
Sample Setting
4
4
3. Lead Channel
Tone Control
Mid-Bite Control
Sample Settings
5
5
5
6
4.
6
Using Effects Pedals
5. Reverb
7
6. Tremolo
7
7. Tube Functions
8
8. Tube Choices
9
10
9. Block Diagram
2
1. Basic Operation
Power Source
Important ! Your Imperial amplifier MUST be plugged into a properly grounded outlet. Do not
attempt to defeat or “lift” the ground of the AC supply.
Power On, Power Off, Standby Mode
When powering up the amp, you should start off with both the POWER and STANDBY switches
in the "off" position. First, turn on the power switch. This will apply power only to the tube
filaments. After turning on the power switch, wait about a minute, and then turn on the
STANDBY switch. The amp will then be ready for use.
When turning off the amp, turn off both the POWER and STANDBY switches. The order that
you turn them off is not important.
When the amp is operating, turning off the STANDBY switch will put the amp in standby mode.
In this mode, the tubes will remain heated, but the power supply to all amplifier circuits will be
cut off, which disables the amp. You might find this mode useful if you only want to shut the
amp off for a brief period of time, and you don't want to wait for the tubes to heat up again, as
you would if you powered down the amp.
Channel Switching
You can switch between the Imperial's two preamp channels (Rhythm and Lead) by using either
the channel switch on the front panel or the channel switch on the footswitch. When using the
footswitch, however, you must leave the front panel Channel switch in the Rhythm position in
order for the footswitch to operate properly.
3
2. Rhythm Channel
The Rhythm channel is voiced a lot like a classic blackface Princeton or Deluxe,
and is best for clean tones and slightly overdriven tones of this variety. Its'
voicing isn't really appropriate for heavily distorted tones.
Sample Setting
Here's a good sample setting to get started with this channel:
Volume
3
Treble
Bass
4
7
4
3. Lead Channel
The Lead channel is not a distortion channel or even an overdrive channel. The lead
channel preamp itself cannot be driven into overdrive or distortion. Its' purpose is
to shape the tone of the signal driving the output stage so that the output stage is
driven into overdrive or distortion in a particular manner.
This fact must be understood in order to successfully use the lead channel.
You may find that the clean (undistorted) sound of this channel is a bit lacking in
bass, or a bit midrange-heavy at some settings of the mid-bite control. This is an
intentional design feature, as the tone will thicken, the bass will fill out, and the
overall tonal spectrum will even out as the volume control is turned up to allow the
output tubes to saturate and compress.
Tone Control
The Lead channel's Tone control is a simple treble roll-off type control, similar to that
used on early "tweed" amps.
Mid-Bite Control
The Mid-Bite control is not simply a midrange control. It affects several aspects of
the tone. When set all the way off (counterclockwise), this channel is voiced much
like a "tweed" amp - a "boxy" sort of sound with a lot of lower midrange and a
smooth top end. This is a good setting to use for “boxy” jazz tones with humbucker
equipped guitars (with the volume set fairly low). It's also great for honky-tonk
country/blues tones with a telecaster.
As you turn up the Mid-Bite control, you'll find that it tightens up the bass and
brings out more of the mid-to-upper midrange, which causes the output stage to
distort in a more "English"-sounding manner.
All the way up, you'll notice a sudden increase in gain between settings 9 and 10.
This allows you to push the amp into a thicker distortion tone without losing control
of the bottom end, or without excessive compression.
5
Sample Settings
Here are a few sample settings to get started with the Lead channel:
Description
Volume
Tone
Mid-Bite
Tweed Clean
2
4
0
70's Rock Distortion
4
6
5
Saturated Distortion
4
7
10
4. Using Effects Pedals
When using overdrive or distortion pedals, I suggest selecting the Lead channel, and
setting the controls for the “Tweed Clean” sound shown in the table above.
Overdrive and distortion pedals can tend to have a harshness which is nicely
rounded off by the Lead channel with this setting. Overdrive and distortion pedals
can sound harsh and buzzy when used with the Rhythm channel, because this
channel is voiced with more clarity and detail in the top end, which exaggerates any
buzziness created by these type of effects.
6
4. Reverb
The Imperial uses a tube-driven full-size 2-spring reverb pan, to create
an authentic 1960's reverb sound. Reverb is applied to both the Rhythm
and Lead channels. The single Reverb control on the front panel
determines the amount of the reverb signal which is mixed with the dry
signal for both the Rhythm and Lead channels.
5. Tremolo
The Imperial's tremolo circuit uses a very early method of
amplitude modulation. This method applies the tremolo
oscillator signal directly to the grids of the output tubes,
which varies the bias of the output tubes in response to
the oscillating tremolo signal. In doing this, the gain of
the output tubes is modulated, creating a tremolo effect.
This type of tremolo circuit was used on very early guitar
amplifiers by Fender, Gibson, and several other
companies.
More "modern" tremolo circuits use an opto-coupler to attenuate the signal under
control of the tremolo oscillator signal, and create a tremolo effect. This type of circuit can
be found in many of the "blackface" Fender amps.
I have chosen to avoid the opto-coupler approach, and instead implement the grid bias
modulation method, because it creates a rounder, softer, tremolo effect.
Controlling the Tremolo
When the footswitch is plugged in, you can turn the tremolo effect on or off with the
footswitch. When the footswitch is not plugged into the amplifier, the tremolo circuit is
always active, so you must turn the tremolo depth down all the way if you don't want a
tremolo effect.
7
9. Tube Functions
V1
1st gain stage (lead+rhythm), 2nd gain stage (lead)
Sovtek 12AX7WA
V2
2 gain stage (rhythm), 3rd gain stage (lead)
Sovtek 12AX7WA
V3
Reverb Driver
12AT7
V4
Reverb Receiver
Sovtek 12AX7WA
V5
Phase Inverter
Sovtek 12AX7WA
V6, V7
Output Tubes
6V6EH
V8
Rectifier
Sovtek 5AR4
nd
Alternate Tube Selections
The Imperial is delivered with the tube types shown in the chart above. These tube types are
used because they are the same types which have been used in the Imperial since it was first
built in 1993. However, this tube complement can sometimes develop too much gain and
sound a bit thin with some guitars. If you wish to decrease the gain (for more headroom), and
fatten up the sound, I suggest trying these alternate tube types:
V1
1st gain stage (lead+rhythm), 2nd gain stage (lead)
12AU7 (EH or NOS)
V2
2 gain stage (rhythm), 3rd gain stage (lead)
Sovtek 12AX7LPS
V5
Phase Inverter
Sovtek 12AX7LPS
nd
Replacing Output Tubes
The output tubes are cathode biased in the Imperial, so there is no bias adjustment. This type of
biasing scheme self-adjusts to a fairly wide range of tube characteristics. Because of this,
replacing the output tubes involves nothing more than pulling out the old tubes and plugging in
the new ones.
8
10. Tube Choices
At this point in time, I believe that genuine vintage tones can only be obtained by the use of
vacuum tubes. Although tubes sound great, there are very valid reasons why they were
abandoned by the electronics industry over 40 years ago. Tubes are fragile, generate a lot of heat,
are sensitive to mechanical vibration, and subject to manufacturing defects.
I have selected the particular tube types used in the Imperial because of their particular tonal
qualities. I feel that they provide the most well-balanced tone which works well with all guitars
and all settings. Many customers find that they wish to tailor the tone of their amp to their
particular tastes by using different brands of tubes.
If you are considering using NOS output tubes, I suggest using the old RCA 6V6GT (not the later
types 6V6GTA, 6V6GTB, or 6V6GTY). This tube has a fabulously smooth and organic sound
quality.
Currently available tubes are not of the same quality level as in the 1950's. Recently
manufactured tubes are built in China, Russia, or the Czech Republic, and are not built to the
same quality standards that, say, RCA used to manufacture tubes in the U.S., in the 1950s. It
would seem that the obvious solution would be to use new-old-stock tubes from these older
periods. However, I've found that some of these new-old-stock tubes have gone gassy or
developed other problems.
As a result, we musicians must recognize that, while we prefer to use vacuum tubes because of
their tone, they can be imperfect devices, and are most certainly the least reliable component in
the entire amplifier.
Tube problems generally reveal themselves as a crackling noise which can occur continuously,
sporadically, in response to mechanical vibration, or in response to your playing (e.g. a crackling
or other type of noise which occurs only when you hit a note).
I subject all tubes to a thorough burn-in and test procedure to ensure that they are fully up to
spec and operating perfectly. However, you must be aware that the majority of tube failures
occur early in their life, and may come about as a result of the jostling and jarring that an amp can
receive in shipping. In spite of the exhaustive testing I perform at the shop, early-life tube
problems cannot always be found in such testing. The first two months or so are the most
tenuous period for any set of tubes. Most manufacturing defects will be revealed in the first two
months of their life, but many are not detectable in initial testing, even after a burn-in period.
If you notice any noises, cracking, or any other odd behavior of your amplifier in this period, note
that it is most likely to be the result of a defective tube, and should be debugged as such.
9
9. Block Diagram
1
Premier Builders Guild LLC
Limited Warranty
Premier Builders Guild – Tone King Amplifiers Division
201 S. Highland Avenue, Box 204
Pittsburgh, PA 15206
This warranty gives you specific legal rights; you may also have other rights which vary from state to state. There are
no express warranties except those listed below.
Length of Warranty
This warranty shall remain in effect for five years from the date of sale of the product as shown on the original bill of
sale.
What is Covered
This warranty covers all defects in material and workmanship in this product, with the following exceptions:
1. Damage or deterioration of the cabinet, or any other cosmetic damage which occurs after delivery is not
covered by this warranty.
2. Damage after initial delivery resulting from accident, unreasonable use, or neglect, is not covered by this
warranty.
3. Damage resulting from the performance of repairs by someone other than the Tone King Amplifier
Company is not covered by this warranty.
4. Damage occurring during shipment or delivery of this product to the Tone King Amplifier Company
after initial delivery of the product is not covered by this warranty.
5. Vacuum tubes are considered a user-replaceable item, as they are expected to wear out and require
replacement over a reasonable period of time. Tubes are warranted to be serviceable for a period of 90
days from the date of sale.
6. The speaker(s) in this amplifier has(have) been selected for use only with this amplifier. If the
speaker(s) of this amplifier is(are) connected to an amplifier other than the intended amplifier, any
warranty of this speaker shall be deemed void.
What We Will Pay For
The Tone King Amplifier Company will pay for all labor and material expenses to fix or replace all items covered
under this warranty. The customer will pay shipping charges to return the product to the Tone King Amplifier
Company. If the necessary repairs are covered under this warranty, the Tone King Amplifier Company will pay any
shipping charges required to return the product to the customer.
Limitation of Implied Warranties
All express or implied warranties of merchantability and fitness for a particular purpose are limited in duration to the
length of this warranty, unless otherwise provided by state law.
Exclusion of Certain Damages
The Tone King Amplifier Company’s liability is limited to the repair or replacement, at our option, of any defective
product, and shall in no event include incidental or consequential damages of any kind. Some states do not allow
limitations on the length of an implied warranty and/or do not allow the exclusion of incidental or consequential
damages, so the above limitations and exclusions may not apply to you.
Obtaining Warranty Service
If your unit requires service, it should be returned to the Tone King Amplifier Company at the address listed above.
Before returning the unit, you must contact the Tone King Amplifier Company and obtain return authorization.
12