1
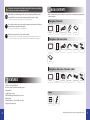
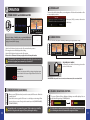
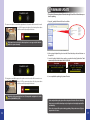
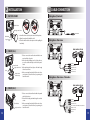
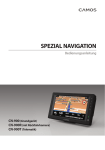
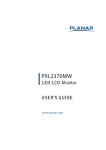
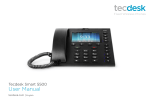
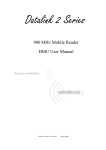
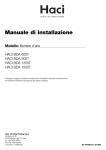
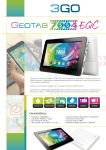
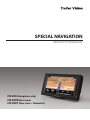
SPECIAL NAVIGATION
INSTRUCTION MANUAL
CN-900 (Navigation only)
CN-900R (Rear view)
CN-900T (Rear view + Telematics)
CONTENTS
SAFEGUARD INSTRUCTIONS ..................................................... 3
FEATURES .......................................................................................... 6
SAFEGUARD INSTRUCTIONS
Please read the “Safety Rules” carefully before using this product. Following the safety rules prevents users from damages related with the misuse of the product. It is very important to follow
these safety rules. We state “Caution” and “Warning” to clarify any potential risk for a damage associated with the misuse of the product.
This information is for user’s reference for better usability.
BOX CONTENTS .............................................................................. 7
NOTICE
FUNCTION OF EACH PART ........................................................... 8
CAUTION
This information is for preventing damage or shortening the life of the
product.
PREPARATION ................................................................................. 9
WARNING
This information is for preventing bodily harm or even death and use
should follow this safety rules.
OPERATION .................................................................................... 10
CONFIGURATION ......................................................................... 12
FIRMWARE UPDATE .................................................................... 17
CAUTION
INSTALLATION .............................................................................. 18
Do not connect the product directly to the battery, used switched ignition.
- It may cause battery discharge.
CABLE CONNECTION .................................................................. 19
Do not use the product with multi socket or extended adaptor.
- It may cause unexpected heating, fire and malfunction.
TROUBLESHOOTING .................................................................. 20
When product is not in use for an extended period of time - unplug
- It may case fire by short circuit due to heating.
SPECIFICATION ............................................................................. 22
Do not place near magnetic devices.
- It may cause malfunction and trouble.
Please ensure that the monitor is installed with enough room for heat emission.
The quality of the GPS signal depends on various factors. Please note that incidental variation of signal strength is normal.
This device uses a SD card. Treat this card with maximum care, otherwise you may risk
complete loss of data.
For cleaning of the screen do not use any liquids. A soft cloth is enough.
2
Sharp objects may damage the touch screen. Please operate it only with your finger tips
or special touch screen pen.
3
WARNING
Do not install product in direct sunlight, high temperature of humid areas.
- It may cause to electronic shock or malfunction.
Please use this product within the voltage range specified.
- It may cause to electronic shock or malfunction.
Power socket should be clean at all times.
- It may cause electronic shock and fire by bad connection.
Do not clean the exterior of the monitor using harsh abrasives or solvents.
- It may cause change of surface, fall of paint, malfunction and fire.
Do not locate this product in high vibration areas without appropriate mounting.
- It may cause damage or malfunction.
Do not put a pin or needle on the hole or crack in the body.
- It may cause electronic shock, fire and malfunction.
If the monitor is emitting smoke or a burning smell please disconnect immediately.
- It may cause fire. Stop to use and make inquiries to supplier.
When the power cable cord touches a metal case, cover it with a friction tape.
- Short circuit or disconnection of wire may cause a fire or accident.
After finishing the installation, please check that the break lamp, head lamp and wipers
operate properly.
Do not locate this product where airbag operation may occur.
- I t may cause malfunction of air bag or accident, injury due to hitting monitor by air
bag.
When disconnecting power socket please ensure that you disconnect holding each side
of the plug. (Not via the cable)
- It may cause cord malfunction, electronic shock and fire.
Do not disassemble, repair or remodel.
- It may cause malfunction and injury, void warranty.
- Make inquiries to agent for repair and checkup.
4
Please take care below notice for SD card. we do not have responsibility for data
loss or damage caused by not complying below rules.
Please use only authenticity SD card
- Manufacturer do not have a responsibility for not in usage of adulterated card.
Do not put a foreign substance in to SD card slot.
- It may cause a malfunction or SD card inserting problem.
Do not touch SD card with wet or oily hand.
- It may cause malfunction due to card damage.
Push the SD card fully.
- It may cause a malfunction.
Before pull SD Card out, please check the power off status.
- If you pull SD Card out during power on status, it may cause malfunction or data loss.
SD card is consumable. Please check the warranty period of SD Card.
Normally SD card has a life time for usage. (It is different from each manufacturer.)
- If you find data lose after long time usage, please replace new SD card.
Do not pull out SD card while working status such as data backup and format.
- It may cause a serious damage on SD card.
Please check and backup the data stored on SD card and we recommend format SD card
regularly. - The data my be lost for long time usage.
Do not disassemble or remodel SD card.
- It may cause a serious damage on SD card.
Do not drop or shock on SD card.
- It may cause a serious damage on SD card.
In case of storage SD card, please use case.
- The data may be damaged by a static while storage or moving.
- We do not have a responsibility for data lost caused by user’s mistake.
5
Please take care below notice for built-in battery. We do not have responsibility
for damage caused by not complying below rules.
Built-in battery is an auxiliary usage for safe saving recording image while the power is
not supplied. Please connect and use main power supply for normal recording.
- Unless connect main power supply, it does not work properly.
2 BOX CONTENTS
• Before use this products, please check below contents. If there is something missing parts, please
contact sales agent.
Navigation (Standard)
Do not put the product in place where sudden temperature increasing and should use on
optimum voltage, temperature and humidity.
- It may cause to electronic shock or malfunction.
Navigation
When it takes long time not in use, the battery may leak.
- If the leakage is covered on the skin, please wash it with running water. If it is in your
eyes, do not rub your eyes and go to the doctor after washing with running water.
Instruction
manual
Suction stand
Cigar cable
SD card
Multi cable(R)
Triggerline(x1)
Navigation + Rear view (cable)
Navigation
Instruction
manual
Suction stand
Power cable
SD card
Navigation + Rear view + Telematics (cable)
1 FEATURES
• 7” Wide screen Touch LCD panel
• Rear view system, Telematics interworking system
• Windows CE 6.0
• 1 Cable solution / option
• TMC(Traffic Message Channel) Receiver / option
• Built-in battery
• 3 Mode [Navigation - Rear view(PIP) - Rear view]
• 8 languages GUI supported
6
Navigation
Instruction
manual
Stand (CL-5)
Multi cable(T)
Triggerline(x1)
Power cable
Option
GPS antenna
Stand (CL-9)
* Design and Specifications are subject to change without notice.
7
3 FUNCTION OF EACH PART
4 PREPARATION
1. SD CARD
The SD card that included in the package contains map information. Before you use the monitor, please insert the SD
card to the slot.
2. BATTERY
Built-in type battery will work if the power supplying is off (turn the ignition off).
1. CHARGING BATTERY
If the power is connected, the battery is charging automatically with Red LED and it turns Green
when the charging is completed.
If the battery is fell down as at less than fixed
voltage, the pop-up screen will be showed up
as left photo. Please re-charge the battery when
the pop-up screen shows up.
2. BATTERY CHARGING TIME & USING TIME
1. 7” Wide Touch LCD panel
4. Function keys (5 keys)
7. External GPS antenna port
2. SD card slot (Navigation Map) 5. TMC port (mini USB type) 8. Speaker (Mono)
3. DC input (12~24V)
6. POWER switch
9. Multi cable port
Charging time
Using time
6 hours
2~3 hours
* The mentioned time means the standard using time and it could be different from environments or using custom.
In case the product is turned off completely due to battery discharge, please recharge the battery in advance so that it is avoided a hard on interior NAND Flash
memory.
3. EXTERNAL GPS ANTENNA (OPTION)
External GPS antenna (option)
This monitor has built-in GPS antenna however it may have a
problems to get GPS signal due to tinted window. You can use
external GPS antenna in this case.
8
9
5 OPERATION
1. POWER ON/OFF and RUN NAVIGATION
3. POWER ALERT
This monitor has built-in battery. When you turn the ignition off of the vehicle and switch on of the
monitor, it displays as below.
Please press [OK] if you want use the monitor
with battery.
In case of setting of initial booting or system initialization, it
showed up the setting window for coordinate value after booting logo screen.(refer to 14 page)
4. SCREEN SWITCH
The screen switches [MAP]-[MAP+CAMERA]-[CAMERA] by pressing [M] button shortly.
1. Switch on of the button located in rear side of the monitor then the power on.
2. The navigation screen will be displayed after loading.
3. Switch off of the button located in rear side of the monitor.
* Please refer to S/W manual of the map supplier for detailed map information.
If you switch off, the power is disconnected perfectly. If you do not use the
monitor for long time, we recommend you to switch off.
WINDOW CE
If there is an system error while you using navigation program,
touch a button of the bottom of right side then it back to navigation software.
2. STAND-BY MODE (SLEEP MODE)
When you press [S/B] button shortly on switch on status, the LCD screen is off and back
to stand-by mode.
If you shift into reverse gear, the LCD screen is on and display rear view image. When
move to other gear, screens off and get back to stand-by mode for [REAR VIEW MODEL],
[TELEMATICS MODEL].
10
In stand-by mode, it consumes the power. If the monitor stays stand-by
mode for a long time after engine-off, it may discharge the battery.
* PIP MODE [MAP + CAMERA]
In PIP mode, if you touch the rear view image, it moves the
position for 8 directions.
* NAVIGATION only model can not connect rear view camera, the screen turns black.
5. VOLUME / BRIGHTNESS CONTROL
If you press [S] button, [Volume - Brightness] adjusting screen will be displayed. You can
adjust the value by pressing [UP/DOWN] button.
It can be used more smoothly by controlling the volume with right button in condition of making the volume as maximum on the navigation software.
11
1. SYSTEM SETUP
6 CONFIGURATION
Press [M] button long (more than 3 seconds), then it goes to configuration mode.
1. SELECT STANDARD TIME ZONE
- Set the standard time zone of the country by touching [+],[-] button.
1. SYSTEM : General setting
- STANDARD TIME
- DAYLIGHT SAVING TIME
- LANGUAGES
- AUTO DIMMER
- POWER SAVING MODE
- SYSTEM INFORMATION
- DEFAULT FACTORY SETTING
2. CALIBRATION : Touch coordinate setting
2. DAYLIGHT SAVING TIME
- Set the daylight saving time
3. SELECT LANGUAGE
- Set the GUI language.
4. AUTO DIMMER
- If you set this function, it adjusts the brightness automatically by dimmer sensor.
5. POWER SAVING MODE
- If you set this function, it turns to stand-by mode automatically when the power off.
6. SYSTEM INFORMATION
- It displays current S/W version.
3. REAR CAMERA : Connected camera setting
- BRIGHTNESS
- MIRROR VIEW
- CONTRAST
- CAMERA MIC.
- COLOR
- DISPLAY REAR VIEW
- TINT
- PARKING GUIDE LINE
4. CLOSE : Screen close
12
7. DEFAULT FACTORY SETTING
- It turns to factory setting mode. The system will restart.
8. SAVE & CLOSE
- Save the setting and screen close.
13
2. CALIBRATION
If touch screen is not working well, please set up the “Calibration”.
Please touch the icon [CALIBRATION] to enter the touch coordinate setting. Please touch the cross
mark(+) exactly on the center of screen. When the cross mark is touched, it goes to the next step. If
all setting is finished, the system is going to restart automatically.
3. REAR CAMERA SETUP
1. BRIGHTNESS
- Please set up the brightness with touching the [<], [>] buttons.
2. CONTRAST
- Please set up the contrast with touching the [<], [>] buttons.
3. COLOR
- Please set up the depth of color with touching the [<], [>] buttons.
4. TINT
- Please set up the tint with touching the [<], [>] buttons.
5. MIRROR VIEW
- It reverses the camera image to the direction users want. Once it is pressed the button of right/
left, it shows up the reversed screen.
6. CAMERA MIC.
- It sets up the function of on/off at the connected camera’s internal microphone.
7. DISPLAY REAR VIEW
- AUTOMATIC : Once the trigger signal is detected, the rear view screen is going to show up automatically.
-M
ANUAL : Regardless of trigger signal, it shows up the rear view screen when it is only the rear
screen mode.
8. PARKING GUIDE LINE
- It shows up the parking guide line on the screen. (None - 1st Line - 2nd Line - 3rd Line)
14
9. SAVE & CLOSE
- Save the setting value and close the screen.
15
7 FIRMWARE UPDATE
* This product’s firm ware update will be made through SD card. Please follow below procedure for updating.
1. Copy the [_update] folder in the SD card’s root folder.
The camera microphone sound will be output when it is become the full screen mode in condition of “ON” at camera microphone. Also, the microphone volume
could be controlled by using the side button.
If the camera is not connected or the microphone is not supported, this function
will not be operated normally.
2. After copying all update files, please insert the SD card into the product and then turn on
the product.
3. Once the loading is finished, it shows up the pop up which is asking “Update Start?” with
automatically detected the update-files in the SD card.
The Navigation sound will be output to the speaker even it is become the full screen mode in con-
4. Once completed the updating, the system will restart.
dition of “OFF” at camera microphone. Also, the system volume
could be controlled by using the side button.
Regardless of Camera microphone’s on/off, it outputs the navigation voice at the
screen of [NAVIGATION] / [PIP].
* After completed the update, please delete the update files in the SD card. Otherwise,
the pop-up screen will be showed up every booting time as detecting the update files
automatically.
16
* Please do not turn off the product during updating. If the product turns off, please
inquire to the A/S center.
17
8 INSTALLATION
1. SUCTION STAND
9 CABLE CONNECTION
Navigation (Standard)
Stand bracket
Angle control lever
1. Assemble the monitor body and stand as like the picture.
2. Adjust the angle and fix it with the bolt.
3. Clean the window before absorption and fix it pulling the
lever firmly.
Bracket bolt
Angle control
lever
CIGAR CABLE
Navigation + Rear view
REAR CAMERA (OPTION)
2. STAND (CL-5)
Screw
1. Please connect the stand bracket with the downward and back of product.
2. After clean the installing space for Sand, please remove the double-sided tape at the below part of
Stand.
Stand bracket
3.
After attaching the Stand, please fix it with using
Angle control lever
the enclosed screws.
4. After connecting Stand with the Product in the arDouble-sided
row direction, please fix it firmly as spinning the
adhesive tape
Stand Rear Lever.
CAMERA
GREEN (TRIGGER)
FUSE 3A
WHITE (AUDIO OUT)
RED (DC 12V~24V)
BLACK (GROUND)
Navigation + Rear view + Telematics
REAR CAMERA (OPTION)
3. STAND (CL-9)
1. Please connect the stand bracket with the upward
and back of product
2. Please fix the ceiling stand with using the enclosed
screws.
3. After connecting Stand with the Product in the arStand bracket
row direction, please fix it firmly as spinning the
Angle control lever
Stand Rear Lever.
CAMERA
GREEN (TRIGGER)
WHITE (AUDIO OUT)
FUSE 3A
RS-232 : GRAY(TX) / ORANGE(RX) / BLACK(GROUND)
RED (DC 12V~24V)
BLACK (GROUND)
18
USB HOST
19
10 TROUBLESHOOTING
Q The screen does not turn on.
Q It doesn’t upgrade for product.
A - Please check the update file whether it is put correctly into the SD card.
- It should have update files inside “[__update]” folder of SD card.
A - Please check the power supply. (Please make sure the power switch is “ON”)
- Please check the status of Stand-by. (Please push the S/B button.)
- Please check the residual quantity of battery. (Please use the product after charge the
battery.)
Q It doesn’t operate the button & touch.
A - It could be a temporary error on product operating. Please turn off and connect the product after disconnecting the cable.
Q It doesn’t show up the screen for rear camera view.
A - The navigation only model is not supported the rear view camera system.
- Please check the connection with rear camera and product.
Q GPS doesn’t catch the current location
A - When the product is located inside building or basement garage, it wouldn’t catch the
location.
- It would be taken for a while to catch the location due to bad reception of GPS at the urban
environment where are located in many skyscrapers.
Q It doesn’t execute a navigation.
Q It doesn’t recognize the SD card.
A - Please check that the SD card is refined.
- Please check the inserting direction & status for SD card.
- Please check the virus status of SD card.
- Please check that the cable socket is contaminated.
-P
lease check the data locking mechanism of the left side at SD card as [LOCK]. Please make
sure the status as [UN-LOCK].
- The product could not operated when it is turned off or happened the error on it during
upgrade. please contact to the after service center.
A - Please check the status of SD card which has a map data whether it is put correctly into
the slot of not.
Q It doesn’t output the data in voice.
A Please check the status of volume.
Q The current location and location on the map are different widely.
A The phenomenon come from the bad reception of GPS. Once the reception of GPS is improved, it is revised the correct location automatically. The main causes which are influenced of the reception of GPS are as below,
- Near transmitting tower or deteriorating weather such as typhoon, lightning, thunder,
etc.
- Urban environment with concentrating skyscrapers, high-level load etc. (Obstacles of satellite receiver)
- Quick turning of vehicle.
Q It doesn’t operate the battery.
A Please use the battery after charging it fully. The battery service life will be decreased nor-
20
mally after 6 months but it depends on the status of use for it. Please replace the battery
through service center. (At a cost)
21
11 SPECIFICATIONS
MEMO
Navigation (Standard)
CPU
MEMORY
NAND FLASH
OPERATING SYSTEM
GPS CHIPSET
BATTERY
Core Logic CLG-7700 ARM11 800MHz
DDR II 256MB
128 MB
Windows CE 6.0 Core
GNS7560 Glonave Solution
Built-in
RESOLUTION
800x480px
SPEAKER
1W / mono
EXTERNAL
POWER
OPERATING TEMPERATURE
DIMENSION
WEIGHT
TMC port
DC 12~24V
-20˚C ~ +60˚C
201(W) x 117(H) x 34(D) mm
450g
Navigation + Rear view
CAMERA INPUT
1Vp-p, 75ohm
AUDIO OUT
Audio line out
Navigation + Rear view + Telematics
22
CAMERA INPUT
1Vp-p, 75ohm
AUDIO OUT
Audio line out
EXTERNAL
TMC port, USB host 2.0 / RS-232
If the start-up screen is operated at a lower temperature than specified,
the screen may blink for a 2~5 minutes. If the problem continues for more
than 5 minutes disconnect power for a period of 10 minutes.
23
INSTRUCTION MANUAL
PRINTED IN KOREA
ver. 1.0
* Design and specifications are subject to change without notice.