1
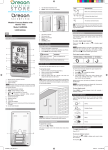
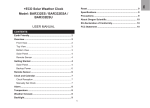
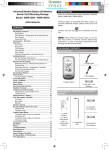
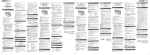
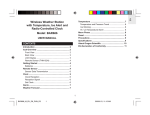
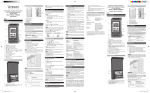
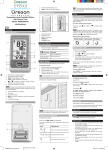
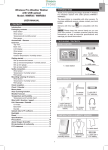
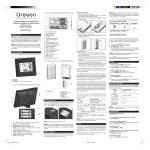
1.
2.
Artisan Weather Station
Model: BAR220 / BAR220A /
BAR220U
USER MANUAL
: set clock
/
: increase / decrease value of the selected
setting; enable / disable clock reception signal
3.
˚C / ˚F: select temperature units; display temperature
4.
RESET: Reset unit to default settings
5.
DIMMER HI·LO: select display brightness
6.
AUTO ON/OFF/DEMO: activate / deactivate colourdance effect; select pre-programmed colour-dance
demo
7.
Battery compartment
8.
AC adaptor socket / temperature sensor
•
Place the sensor in a location with a clear view to the
sky, away from metallic / electronic objects.
NOTE If you enter +1 in the time zone setting, this will give
you your regional time plus 1 hour.
•
Position the sensor close to the main unit during cold
winter months as below-freezing temperatures may
affect battery performance and signal transmission.
If you are in the US (BAR220A only) set the clock to:
The remote sensor reception icon will show the
following status:
ICON
EN
OVERVIEW
4
CHANGE DISPLAY
To activate / deactivate display auto-toggle function:
4
5
NOTE The main unit will search only for already registered
sensor or new sensor reset within the last 30 minutes. If unit
failed to synchronise with remote sensor, reset the sensor or
try selecting a different channel (and press RESET) before
manually forcing another search.
TIP The transmission range may vary depending on many
factors. You may need to experiment with various locations
to get the best results.
5
6
7
1
•
In auto-toggle mode, display will alternate between time,
indoor temperature and outdoor temperature.
•
Slide TOGGLE switch to DEMO.
Both the weather icons and the time / temperature displays
will auto-toggle.
IMPORTANT The colour-dance is only for aesthetic
reasons. The weather icons will be displayed in a loop
sequence, therefore, the displayed icons have no bearing on
actual weather conditions.
LED status indicator
2.
Wall mount hole
3.
Battery compartment
CLOCK RECEPTION
4.
RESET hole
5.
Channel switch
This product is designed to synchronise its clock automatically
with a clock signal.
CLOCK
•
Weather forecast icons
2.
ZONE: time zone offset
3.
4.
•
To change display brightness:
•
•
EU: DCF-77 signal: within 1500 km (932 miles) of
Frankfurt, Germany.
BAR220A:
1 adaptor
BAR220U:
Use the adaptor supplied to power the unit.
•
5.
To completely disconnect from power, unplug adaptor from
the mains.
: main unit batteries low / no battery
: signal reception indicator
•
US: WWVB-60 signal: within 3200km (2000 miles) of
Fort Collins Colorado.
UK: MSF-60 signal: within 1500 km (932 miles) of
Anthorn, England.
Slide DIMMER switch to HI / LO.
NOTE Auto toggle mode will be disabled if a button is
pressed, but will be enabled again if no button is pressed
for 5 seconds.
WEATHER FORECAST
This product forecasts the next 12 to 24 hours of weather
forecast within a 30-50 km (19-31 mile) radius.
To enable / disable signal reception:
Press and hold
reception.
to enable or
to disable signal
MEANING
NOTE Reception takes 2-10 minutes. If the signal is weak,
it can take up to 24 hours to get a valid signal.
Sunny
Clock signal reception indicator:
2 CR2032 batteries for memory backup
MEANING
To insert batteries:
PM: indicate PM
1.
Remove the battery compartment cover.
Continuous
Strong signal
7.
Clock / indoor temperature / outdoor temperature
2.
Insert the batteries, matching the polarities (+/ -).
Flashes
No signal
8.
IN: indoor temperature is displayed
3.
Press RESET after each battery change.
: remote sensor reception indicator / outdoor
temperature is displayed
Battery is low in power
NOTE The unit searches for a clock signal everyday at
01:00, 02:00 and 03:00, as well as 3 minutes after switching
on or resetting unit. During signal search:
No battery installed – only AC adaptor
1)
display (i.e., time and temperature) will be turned off
temporarily
2)
only flashing
3)
weather icon will remain lit however the colour will be
static.
MEANING
REAR VIEW
SET UP REMOTE SENSOR
The main unit can be connected to only 1 remote sensor.
1
1.
Slide open the battery door.
2.
Insert battery, matching the polarities (+ / -).
3.
Select channel then press RESET.
4.
Close the battery door.
Cloudy
3
4
5
6
7
8
Signal search may take approx. 10 minutes and display will
resume thereafter. To view display temporarily during signal
search, press any key.
If signal reception is unsuccessful, place your unit next to a
window, press and hold
to force another signal search.
DATA TRANSMISSION
To set the clock manually, disable the clock signal reception
first.
SENSOR
1.
Press and hold
The main unit will automatically search for sensor.
2.
Press
or
selected setting.
3.
Press
To search for a sensor manually:
+
together.
For best results:
•
Place the sensor within 30 m (100 ft) of the main unit.
•
Position the sensor so that it faces the main unit,
minimizing obstructions such as doors, walls and
furniture.
•
•
Placement of this product on certain types of wood
may result in damage to its finish for which Oregon
Scientific will not be responsible. Consult the furniture
manufacturer's care instructions for information.
•
The contents of this manual may not be reproduced
without the permission of the manufacturer.
•
Do not dispose old batteries as unsorted municipal
waste. Collection of such waste separately for special
treatment is necessary.
•
Please note that some units are equipped with a
battery safety strip. Remove the strip from the battery
compartment before first use.
NOTE The technical specifications for this product and the
contents of the user manual are subject to change without
notice.
NOTE Features and accessories will not be available in all
countries. For more information, please contact your local
retailer.
Place the sensor out of direct sunlight and moisture.
to confirm.
The settings order is: time zone offset, 12/24 hr format, hour,
minute.
Time zone offset sets the clock +/- 23 hours from the received
clock signal time. If you have deactivated the clock signal
reception, do not set a value for time zone.
DESCRIPTION
Dimensions
LxWxH
100 x 195 x 70 mm
(3.9 x 7.7 x 2.8 in)
Weight
296 g (10.4 oz) without
battery
Temperature range
-5°C to 50°C
(23°F to 122°F)
Power
AC/DC 6V adaptor
2 x CR2032 batteries (for
back-up)
TYPE
DESCRIPTION
Dimensions
LxWxH
50 x 23 x 95 mm
(1.97 x 0.9 x 3.74 in)
Weight
50 g (1.76 oz) without
battery
Temperature range
-20°C to 60°C
(-4°F to 140°F)
Signal frequency
433 MHz
Transmission range
30 m (100 ft) unobstructed
Transmission period
Approximately every 60
seconds
Number of channels
3
Power
1 x UM-3 (AA) 1.5V battery
Visit our website (www.oregonscientific.com) to learn more
about Oregon Scientific products.
TEMPERATURE
To display temperature or select temperature unit:
•
Press ˚C / ˚F.
NOTE Please keep the temperature sensor (adjacent to the
adaptor socket) away from electrical devices as heat from
these devices will affect the accuracy of indoor temperature
readings.
If you're in the US and would like to contact our Customer
Care department directly, please visit: www2.oregonscientific.
com/service/support.asp
For international inquiries, please visit:
www2.oregonscientific.com/about/international.asp
EU-DECLARATION OF CONFORMITY
RESET
Press RESET to return to the default settings.
to enter.
to increase / decrease values of the
TYPE
ABOUT OREGON SCIENTIFIC
will be displayed
NOTE Use alkaline batteries for longer usage and consumer
grade lithium batteries in temperatures below freezing.
Press and hold
When disposing of this product, ensure it is collected
separately for special treatment and not as normal
household waste.
Rainy
MANUALLY SET CLOCK
2
•
REMOTE THERMO SENSOR (THN132N)
Weather Forecast Area
ICON
6.
9.
Images shown in this manual may differ from the actual
display.
SPECIFICATIONS
Touch MODE.
BAR220:
Batteries serve as a back-up power supply. For continuous
use of weather icon colour effect and backlight, adaptor must
be installed.
NOTE The main unit and adaptor should not be exposed to
wet conditions. No objects filled with liquid, such as vases,
should be placed on the main unit and adaptor.
MODE: toggle between time / indoor temperature /
outdoor temperature displays
•
MAIN UNIT
Make sure the adaptor is not obstructed and is easily
accessible to the unit.
1.
Only use fresh batteries. Do not mix new and old
batteries.
Press
OR
POWER SUPPLY
2 3
•
Slide TOGGLE switch to ON/OFF.
To manually toggle display:
1.
GETTING STARTED
8
9
Do not tamper with the unit’s internal components. This
invalidates the warranty.
To play demo colour-dance:
1
3
+3 for Eastern time
DESCRIPTION
The sensor cannot be
found.
2
FRONT VIEW
+1 for Mountain time
+2 for Central time
Main unit is searching
for sensor(s).
A channel has been
found.
REMOTE SENSOR
0 for Pacific time
•
PRECAUTIONS
•
Do not subject the unit to excessive force, shock, dust,
temperature or humidity.
•
Do not cover the ventilation holes with any items such as
newspapers, curtains etc.
•
Do not immerse the unit in water. If you spill liquid over
it, dry it immediately with a soft, lint-free cloth.
•
Do not clean the unit with abrasive or corrosive
materials.
Hereby, Oregon Scientific, declares that this Artisan
weather station (model: BAR220 / BAR220A / BAR220U)
is in compliance with the essential requirements and other
relevant provisions of Directive 1999/5/EC. A copy of the
signed and dated Declaration of Conformity is available on
request via our Oregon Scientific Customer Service.
COUNTRIES RTTE APPROVAL COMPLIED
All EU countries,Switzerland CH
and Norway N
4
5
6
7
1
8
9
2 3
U
1
2
3
4
5
6
7
8
2010
300102617-00008-10