1
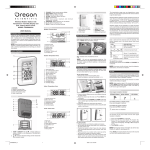
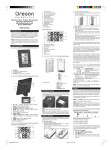
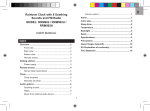
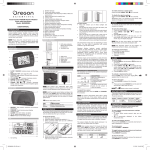
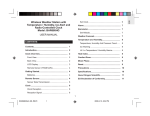
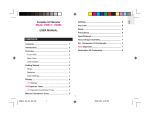
LCD DISPLAY
Wireless Weather Forecaster with
Temperature Display and Self-Setting
Atomic Clock
Model: BAR386A
�
�
�
��
�
��
��
��
��
��
��
��
��
��
��
�
�
�
�
�
USER MANUAL
Thank you for selecting this Oregon ScientificTM Wireless
Weather Forecaster with Temperature Display and
Self-Setting Atomic Clock (BAR386A). This clock is supplied
with a remote sensor (THN132N) and can support up to 3
sensors in total (additional sensors sold separately).
NOTE Please keep this manual handy as you use your
new product. It contains practical step-by-step instructions,
as well as technical specifications and warnings you should
know about.
CLOCK OVERVIEW
FRONT VIEW
�
For best results:
• Place the sensor out of direct sunlight and moisture.
• Do not place the sensor more than 30 m (100 ft) from
the main (indoor) unit.
• Position the sensor so that it faces the main (indoor)
unit, minimizing obstructions such as doors, walls, and
furniture.
• Place the sensor in a location with a clear view to the
sky, away from metallic or electronic objects.
• Position the sensor close to the main unit during cold
winter months as below-freezing temperatures may
affect battery performance and signal transmission.
�
�
�
1. SNOOZE
2. ALARM: View alarm status; set alarm
�
BACK VIEW
�
�
�
1. Wall mount
2. Battery compartment
3. Battery door
4. Table stand
5. RESET
6. CHANNEL switch
�
GETTING STARTED
�
BATTERIES
Insert batteries before first use, matching the polarity (+
and -). Press RESET after each battery change.
�
The transmission range may vary depending on many
factors. You may need to experiment with various locations
to get the best results.
Standard Alkaline batteries contain significant amounts of
water. Because of this they will freeze in low temperatures
of approximately -12°C (10°F). Disposable Lithium batteries
have a much lower threshold for temperature with an
estimated freezing range of below -30°C (-22°F).
Wireless ranges can be impacted by a variety of factors
such as extremely cold temperatures. Extreme cold may
temporarily reduce the effective range between the sensor
and the base station. If the unit's performance fails due to
low temperature, the unit will resume proper functioning
as the temperature rises to within the normal temperature
range (i.e. no permanent damage will occur to the unit due
to low temperatures).
ICON
A channel has been found
and sensor signal is being
received
The sensor cannot be found.
Search for the sensor or check
batteries
NOTE If the sensor is still not found, check the batteries,
obstructions, and remote unit location.
2:
3.
4.
5.
6.
7.
8.
indicates main unit batteries are low.
BAR386A_M_R6
NOTE Do not use rechargeable batteries. We recommend
that you use alkaline batteries with this product for longer
usage and lithium batteries in temperatures below
freezing.
REMOTE SENSOR
The sensor collects temperature readings approx. every
40 seconds and sends them to the main unit. The main
unit can collect data from up to 3 sensors.
1
NOTE The language options are (E) English, (D) German,
(F) French, (I) Italian, and (S) Spanish.
Press MODE to choose between the clock with seconds
and clock with weekday display modes.
ALARM
To set the alarm:
1. Press and hold ALARM for 2 seconds.
2. Press / to set hour / minute.
3. Press ALARM to confirm. indicates alarm is ON.
To enable / disable the alarm:
1. Press ALARM to display alarm time.
2. Press ALARM again to turn alarm ON / OFF.
To silence the alarm:
• Press SNOOZE to silence it for 8 minutes.
OR
• Press any key except SNOOZE to turn the alarm off
and activate it again after 24 hours.
WEATHER FORECAST
This product forecasts the next 12 to 24 hours of weather
within a 30-50 km (19-31 mile) radius based on barometric
pressure trend readings.
ICON
CLOCK
CLOCK RECEPTION
This product is designed to synchronize its date and time
automatically once it is within range of the WWVB-60
signal from the atomic clock in Fort Collins, Colorado.
The clock collects the radio signals whenever it is within
3219 km (2000 miles) of a signal.
DESCRIPTION
Clear
Partially Cloudy
Cloudy
DESCRIPTION
Main unit is searching
for the sensor(s)
To search for a sensor:
Simultaneously, press and hold MEM and CHANNEL for
2 seconds.
/
: Increase / decrease setting; activate /
deactivate clock reception signal
MODE: Change settings / display
CHANNEL: Switch remote sensor display
MEM: View current, maximum and minimum
temperature / humidity
°C / °F: Select temperature unit
TEMP HI / LO : Change settings or enable / disable
hi or lo temperature alarm for channel 1
RESET: Reset unit to default settings
Battery compartment
Press and hold MODE for 2 seconds.
Press or to change the settings.
Press MODE to confirm.
The settings order is: US time zone (Pacific (P), Eastern
(E), Central (C), and Mountain (M)), hour, minute, year,
month / day format, month, day and language.
SENSOR DATA TRANSMISSION
The sensor reception icon in the remote sensor area
shows the status.
and “- - . -“
(Outdoor
temperature area)
�
1:
NO SIGNAL
To disable the signal reception:
Press and hold for 2 seconds.
1.
2.
3.
4.
�
�
�
WEAK SIGNAL
SET CLOCK
If the clock signal reception is enabled and a signal is being
received the clock does not need to be manually set.
�
�
RECEPTION SIGNAL
Clock signal reception indicator:
To enable and force a signal search:
Press and hold for 2 seconds.
4. Close the battery compartment.
5. Secure the sensor in the desired location using the wall
mount or table stand.
REMOTE SENSOR (THN132N)
1. LED indicator
NOTE Initial reception takes 2-10 minutes for first set up
or when RESET is pressed. Once complete, the reception
icon will stop blinking. If the signal is weak, it can take up
to 24 hours to get a valid signal.
STRONG SIGNAL
��
1. Sensor battery low
2. Ice warning is active
3. Pressure trend
4. Weather forecast
5. Alarm set
6. AM / PM mode selected
7. Clock signal reception
8. Clock
9. Sensor reception icon
10. Hi / lo temperature alarm
11. Outdoor temperature trend
12. Outdoor temperature
13. Max / min icon
14. Main unit battery low
15. Indoor temperature trend
16. Indoor temperature
17. Max / min icon
18. Main unit sensor icon
19. Alarm mode
20. Moon phase
21. Day and month display
INTRODUCTION
To set up the sensor:
1. Slide open the battery door.
2. Insert the batteries, matching the polarity (+ / -). Reset
the sensor after each battery change.
3. Select a channel. Make sure you use a different channel
for each sensor.
Rainy
NOTE The maximum operating altitude for weather
forecast is 2500m (8202 ft).
TEMPERATURE
To toggle temperature unit:
Press °C / °F.
To view outdoor sensors temperature readings:
Press CHANNEL.
To auto-scan between sensors:
Press and hold CHANNEL for 2 seconds. Each sensor’s
data is displayed for 3 seconds.
To end auto-scan:
Press CHANNEL or MEM.
To toggle between current, minimum and maximum
records for the selected sensor:
Press MEM repeatedly.
To clear the records:
Press and hold MEM for 2 seconds.
2006.4.7, 4:37 PM
TEMPERATURE AND PRESSURE TREND
The temperature and pressure trend icons are based on
recent sensor readings.
RISING
STEADY
SPECIFICATIONS
TYPE
MAIN UNIT
LxWxH
FALLING
ICE WARNING
If the channel 1 sensor falls between 3°C to –2°C (37°F
to 28°F),
flashes to warn you that the temperature is
approaching freezing.
NOTE The warning will automatically stop if the temperature
goes outside the ice-warning range.
HI / LO TEMPERATURE ALARM
An alert can be set to sound if the sensor set to channel 1
records above or below a temperature of your choice.
To set alarm ON / OFF:
1. Press and hold TEMP HI / LO .
2. Use
and
to select high / low temperature alarm.
Press TEMP HI / LO
to confirm.
3. Press
/
to set alarm ON / OFF and press TEMP
HI / LO
to confirm.
4. If alarm has been activated, use and
to select the
temperature.
5. Press TEMP HI / LO
to confirm.
DESCRIPTION
•
Reorient or relocate the receiving antenna.
130 x 55 x 112 mm
(5.1 x 2.1 x 4.4 in)
•
Increase the separation between the equipment
Weight
Temperature unit
Temperature range
Resolution
Clock frequency
Synchronization
Signal frequency
Clock
Humidity range
Humidity resolution
Memory
176 g (6.2 oz) without batteries
°C / °F
-5°C to 50°C (23°F to 122°F)
0.1°C (0.2°F)
WWVB-60
Auto or disabled
433 MHz
Auto or manual (disabled)
25% - 95%
1%
Min / Max relative humidity and
temperature
•
Connect the equipment into an outlet on a circuit
Alarm duration
Snooze
Clock display
2 minutes
8 minutes
HH:MM:SS
HH:MM: Day of Week
12 / 24 hour format
MM / DD or DD / MM
language selectable:
E, F, D, I and S
3 x UM-3 (AA) 1.5 V batteries
Hour format
Calendar
Power
REMOTE UNIT
LxWxH
96 x 50 x 22 mm
(3.8 x 2.0 x 0.9 in)
Weight
62 g (2.22 oz)
without battery
Transmission range 30 m (100 ft) unobstructed
Temperature range -30°C to 60°C
(-22°F to 140°F)
Power
1 x UM-3 (AA) 1.5 V batteries
To silence the hi / lo temperature alarm:
Press any key. The alarm resets automatically and will
resound if the hi / lo temperature is exceeded again.
MOON PHASE
• When calendar is set press
or
to view the moon
phase for the next/previous day.
• Press and hold or to scan through the years
(2001 to 2099).
determined by turning the equipment off and on, the user
is encouraged to try to correct the interference by one or
more of the following measures:
and receiver.
different from that to which the receiver is
connected.
•
Consult the dealer or an experienced radio / TV
technician for help.
DECLARATION OF CONFORMITY
The following information is not to be used as contact for
support or sales. Please call our customer service number
(listed on our website at www.oregonscientific.com), or
on the warranty card for this product) for all inquiries
instead.
We
Name:
Address:
Oregon Scientific, Inc.
19861 SW 95th Ave.,Tualatin,
Oregon 97062 USA
Telephone No.:
1-800-853-8883
declare that the product
Product No.:
BAR386A
Product Name:
Wireless Weather Forecaster
with Temperature Display and
Self - Setting Atomic Clock
Manufacturer:
IDT Technology Limited
Address:
Block C, 9/F, Kaiser Estate,
Phase 1,41 Man Yue St.,
NOTE We recommend that you use alkaline batteries
with this product for longer usage and lithium batteries in
temperatures below freezing.
New Moon
Waxing Crescent
First Quarter
Waxing Gibbous
Full Moon
Waning Gibbous
Last Quarter
Waning Crescent
ABOUT OREGON SCIENTIFIC
Visit our website (www.oregonscientific.com) to learn more
about Oregon Scientific products such as digital cameras;
MP3 players; children’s electronic learning products and
games; projection clocks; health and fitness gear; weather
stations; and digital and conference phones. The website
also includes contact information for our Customer Care
department in case you need to reach us, as well as
frequently asked questions and customer downloads.
RESET
Hung Hom, Kowloon,
Hong Kong
is in conformity with Part 15 of the FCC Rules. Operation
is subject to the following two conditions: 1) This device
may not cause harmful interference. 2) This device must
accept any interference received, including interference
that may cause undesired operation.
We hope you will find all the information you need on our
website, however if you’re in the US and would like to
contact the Oregon Scientific Customer Care department
directly, please visit:
www2.oregonscientific.com/service/default.asp
Press RESET to return to the default settings.
PRECAUTIONS
This product is engineered to give you years of
satisfactory service if you handle it carefully. Here are a
few precautions:
• Do not subject the unit to excessive force, shock,
dust, temperature or humidity, which may result in
malfunction, shorter electronic life span, damaged
battery and distorted parts.
• Do not immerse the unit in water. If you spill liquid over
it, dry it immediately with a soft, lint-free cloth.
• Do not clean the unit with abrasive or corrosive
materials.
• Do not tamper with the unit’s internal components.
Doing so will invalidate the warranty on the unit and
may cause unnecessary damage. The unit contains no
user-serviceable parts.
• Only use fresh batteries as specified in the user’s
instructions. Do not mix new and old batteries.
• Due to printing limitations, the displays shown in this
manual may differ from the actual display.
• The contents of this manual may not be reproduced
without the permission of the manufacturer.
• Do not dispose this product as unsorted municipal
waste. Collection of such waste separately for special
treatment is necessary.
OR
Call 1-800-853-8883.
For international inquiries, please visit:
www2.oregonscientific.com/about/international.asp
FCC STATEMENT
This device complies with Part 15 of the FCC Rules.
Operation is subject to the following two conditions:
(1) This device may not cause harmful interference, and
(2) This device must accept any interference received,
including interference that may cause undesired
operation.
WARNING Changes or modifications not expressly
approved by the party responsible for compliance could
void the user's authority to operate the equipment.
NOTE This equipment has been tested and found to comply
with the limits for a Class B digital device, pursuant to
Part 15 of the FCC Rules. These limits are designed to
provide reasonable protection against harmful interference
in a residential installation.
NOTE The technical specifications for this product and
the contents of the user manual are subject to change
without notice.
This equipment generates, uses and can radiate radio
frequency energy and, if not installed and used in
accordance with the instructions, may cause harmful
interference to radio communications. However, there
is no guarantee that interference will not occur in a
particular installation. If this equipment does cause harmful
interference to radio or television reception, which can be
BAR386A_M_R6
2
© 2006 Oregon Scientific. All rights reserved.
P/N: 086L004391-011
2006.4.7, 4:37 PM