1
920-198-00
NOTE:
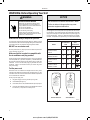
CAUTION
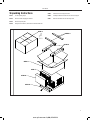
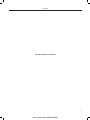
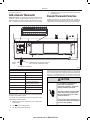
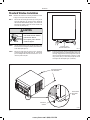
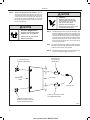
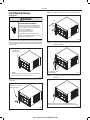
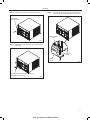
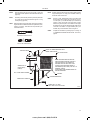
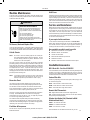
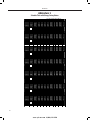
Remove Shipping Blocks
Prior to operating the unit remove
the foam shipping blocks.
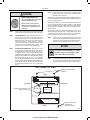
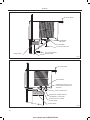
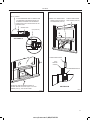
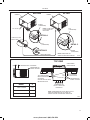
Adjust the support brackets to provide an inside-to-outside slope for excess
condensation drainage (Refer to Standard Window Installation, Figures 19
through 23). Tighten all screws.
Failure to do so may result in
damage to the unit which is not
covered by the manufacturer’s
warranty!
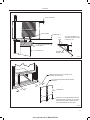
Alternate support method A: If you have a wide window sill which prevents
you from mounting the brackets as shown in Figure 22, try the following:
Using the elongated holes and different hole locations in the cabinet,
set the placement of the bracket to support the unit’s weight (Figure 22).
Tighten all screws.
STEP 5.
Check the window sill and frame to be sure they are in good
condition and firmly anchored to the wall. Repair if necessary.
STEP 6.
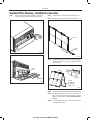
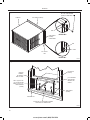
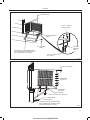
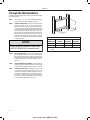
CABINET MOUNTING – Raise the lower window 1/4" more
than the height of the cabinet. Carefully slide the cabinet
through the opening until the lower sill plate channel rests
behind the window sill and the top angle rests against the
window (See Figure 18). Center the cabinet within the
opening. Drill three (3) 5/32" diameter pilot holes into window
sill using the holes in the cabinet sill plate as a guide. Install
three (3) #12 x 2" long screws (Item 4) (See Figure 18).
STEP 7.
DO NOT LEVEL the cabinet from front to back. Make sure there
is approximately 3/8” to 1/2” slope (1/8 to 1/4 bubble on level)
toward the outside of the house.
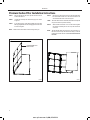
Alternate support method B: If the window ledge gap is narrow, try the
following. Bend the bracket end tab flat. Cut the bracket in two (2) places
as shown in Figure 23. Bend the short piece so it will be vertical when
installed. Adjust the placement as required. Tighten all screws.
STEP 8.
NOTICE
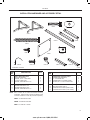
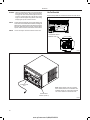
OUTSIDE SUPPORT MOUNTING – Refer to Figures 19 and
20. Assemble the support brackets (Item 1) to the bottom of
the cabinet with four (4) 10-24 1” long screws (Item 2) and four
10-24 flat nuts (Item 3). Adjust the support brackets, using a
combination of the elongated holes of the bracket and different
hole locations in the cabinet, to bring the bottom support bracket
pads in contact with the wall. A 1" x 4" or 2" x 4" SPACER
SHOULD BE USED BETWEEN THE WALL AND SUPPORT
THE BRACKETS WHEN INSTALLED ON ALUMINUM OR
VINYL SIDING. Drill 5/32" diameter pilot holes and secure
the brackets to the wall with two (2) 12A x 2" long screws
(Item 4).
Figure 16
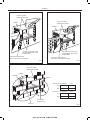
Measure and cut the wingboard panels (fit with about 1/8”
clearance) from the supplied Masonite (Item 8) to fit the space
between the window side channels and cabinet. (Figure 24).
Make sure you include the depth of the window channel.
For YOUR security and safety, YOU must
provide a means of preventing the upper
part of the window from opening.
STEP 9.
To assemble the wingboard panels, push on the "J" type speed
nuts (Item 9) and spring steel clips (Item 10) (See Figures 25)
on page 26. Secure each panel with two (2) screws (Item 11).
TOP VIEW OF UNIT
REMOVE AND DISCARD
SCREWS
BACK
LEFT SIDE
REMOVE AND DISCARD
FOAM BLOCKS
RIGHT SIDE
COMPRESSOR
FAN MOTOR
EVAPORATOR COIL
FRONT
REMOVE AND SAVE
SCREW FOR
RE-INSTALLATION
FRR045
21
wwww.sylvane.com
1 (800) 934-9194