1
StarView
User Manual
(for NovAtel
SUPERSTAR II-Based
Products)
OM-20000081
Rev 4
Proprietary Notice
StarView User Manual for SUPERSTAR II-Based Products
Publication Number:
OM-20000081
Revision Level:
4
Revision Date:
2005/05/16
Proprietary Notice
The software described in this document is furnished under a licence agreement or non-disclosure agreement.
The software may be used or copied only in accordance with the terms of the agreement. It is against the law to
copy the software on any medium except as specifically allowed in the license or non-disclosure agreement.
No part of this manual may be reproduced or transmitted in any form or by any means, electronic or
mechanical, including photocopying and recording, for any purpose without the express written permission of a
duly authorized representative of NovAtel Inc.
The information contained within this manual is believed to be true and correct at the time of publication.
NovAtel® is a registered trademark of NovAtel Inc.
All other brand names are trademarks of their respective holders.
© Copyright 2003-2005 NovAtel Inc. All rights reserved.
Unpublished rights reserved under International copyright laws.
2
StarView User Manual Rev 4
Table of Contents
Software License
Customer Service
Foreword
1 Getting Started
6
8
9
11
1.1 File/Port Menu ............................................................................................................................... 13
1.1.1 Serial Port ............................................................................................................................ 15
1.1.2 Save Data ............................................................................................................................ 15
1.1.3 Input Log File ....................................................................................................................... 15
1.1.4 Save Config.......................................................................................................................... 15
1.1.5 Restore Factory Config ........................................................................................................ 16
1.1.6 Parser Active........................................................................................................................ 16
1.1.7 Stop...................................................................................................................................... 16
1.1.8 Exit ....................................................................................................................................... 16
2 Binary Protocol
17
2.1 View ............................................................................................................................................... 17
2.2 Window .......................................................................................................................................... 18
2.2.1 Channel Assignment ............................................................................................................ 20
2.2.2 Received Messages............................................................................................................. 20
2.2.3 Display Messages ................................................................................................................ 21
2.2.4 Terminal (COM1) ................................................................................................................. 21
2.2.5 Terminal (COM2) ................................................................................................................. 22
2.2.6 DGPS Configuration............................................................................................................. 22
2.2.7 DGPS Data .......................................................................................................................... 23
2.2.8 DGPS Status........................................................................................................................ 23
2.2.9 LLH Position......................................................................................................................... 24
2.2.10 XYZ Position ...................................................................................................................... 25
2.2.11 Plot ..................................................................................................................................... 26
2.2.12 Satellites Status ................................................................................................................. 27
2.2.13 Satellites Position ............................................................................................................... 27
2.2.14 Satellites Health ................................................................................................................. 28
2.2.15 Satellites Almanac.............................................................................................................. 28
2.2.16 Ephemeris .......................................................................................................................... 30
2.2.17 Measurements ................................................................................................................... 30
2.2.18 SBAS Status ...................................................................................................................... 31
2.2.19 Base Status........................................................................................................................ 31
2.2.20 Receiver Configuration....................................................................................................... 32
2.2.21 Receiver Status.................................................................................................................. 32
2.2.22 Timing Information ............................................................................................................. 33
2.2.23 Automatic Log Summary .................................................................................................... 34
2.2.24 HW/SW Part Number ......................................................................................................... 34
2.3 Tool Setting.................................................................................................................................... 35
2.3.1 Almanac Data Transfer ........................................................................................................ 36
2.3.2 Clear NVM............................................................................................................................ 36
2.3.3 Deselect Channel................................................................................................................. 37
2.3.4 Deselect SVs........................................................................................................................ 37
2.3.5 Fixed Height ......................................................................................................................... 37
2.3.6 MSL Model Use.................................................................................................................... 38
2.3.7 Protocol ................................................................................................................................ 38
StarView User Manual Rev 4
3
Table of Contents
2.3.8 Restart System..................................................................................................................... 38
2.3.9 Set Configuration.................................................................................................................. 39
2.3.10 Set Date/Time and Force 1 Shot 1PPS.............................................................................. 40
2.3.11 Set Datum .......................................................................................................................... 40
2.3.12 Set Default Msg List ........................................................................................................... 41
2.3.13 Set DGPS Config ............................................................................................................... 41
2.3.14 Set Differential Msg Rate ................................................................................................... 42
2.3.15 Set Mask Angle .................................................................................................................. 42
2.3.16 Set Operating Mode ........................................................................................................... 43
2.3.17 Set Timing Parameters....................................................................................................... 47
2.3.18 Set Tropospheric/Ionospheric Model Use .......................................................................... 48
2.3.19 Track SV Request .............................................................................................................. 48
2.4 Send Messages ............................................................................................................................. 49
2.4.1 General Message Request................................................................................................... 51
2.5 Help ............................................................................................................................................... 51
3 NMEA Protocol
52
3.1 View ............................................................................................................................................... 52
3.2 Window .......................................................................................................................................... 53
3.2.1 GPS Fix Data ....................................................................................................................... 54
3.2.2 Geographic Position ............................................................................................................. 54
3.2.3 DOP & Active SVs................................................................................................................ 54
3.2.4 SVs in View .......................................................................................................................... 55
3.2.5 Recommended Minimum GPS............................................................................................. 55
3.2.6 Track & Speed...................................................................................................................... 55
3.2.7 Time & Date ......................................................................................................................... 56
3.2.8 Navigation Status ................................................................................................................. 56
3.2.9 Self-Test Results .................................................................................................................. 56
3.2.10 To Waypoint ....................................................................................................................... 57
3.2.11 User Position ...................................................................................................................... 57
3.2.12 Receiver Status .................................................................................................................. 58
3.2.13 Receiver Configuration....................................................................................................... 58
3.2.14 Received Messages ........................................................................................................... 59
3.2.15 Terminal (COM1)................................................................................................................ 59
3.2.16 Terminal (COM2)................................................................................................................ 59
3.3 Tool Setting.................................................................................................................................... 60
3.3.1 Clear NVM............................................................................................................................ 60
3.3.2 Define Waypoint ................................................................................................................... 61
3.3.3 Select Waypoint ................................................................................................................... 61
3.3.4 Protocol ................................................................................................................................ 62
3.3.5 Initialization Data .................................................................................................................. 63
3.3.6 Set Configuration.................................................................................................................. 63
3.3.7 Set Receiver Parameter ....................................................................................................... 64
3.3.8 Set Default Message List ..................................................................................................... 65
3.4 Send Messages ............................................................................................................................. 66
3.5 Help ............................................................................................................................................... 66
4
StarView User Manual Rev 4
Tables
1
2
3
4
5
6
7
8
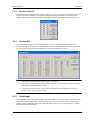
Related Publications ...................................................................................................................... 9
File/Port Menu .............................................................................................................................. 14
Window Menu .............................................................................................................................. 18
Tool Setting Menu ........................................................................................................................ 35
Transmit Messages (Xmit Msg) Menu ......................................................................................... 49
Message Modes ........................................................................................................................... 50
NMEA Window Menu ................................................................................................................... 53
Tool Setting Menu ........................................................................................................................ 60
StarView User Manual Rev 4
5
Software License
Software License
BY INSTALLING, COPYING, OR OTHERWISE USING THE SOFTWARE PRODUCT, YOU AGREE TO BE
BOUND BY THE TERMS OF THIS AGREEMENT. IF YOU DO NOT AGREE WITH THESE TERMS OF USE,
DO NOT INSTALL, COPY OR USE THIS ELECTRONIC PRODUCT (SOFTWARE, FIRMWARE, SCRIPT
FILES, OR OTHER ELECTRONIC PRODUCT WHETHER ON A CD OR AVAILABLE ON THE COMPANY
WEB SITE) (HEREINAFTER REFERRED TO AS "SOFTWARE").
1.
License: NovAtel Inc. ("NovAtel") grants you a non-exclusive, non-transferable license (not a sale) to, where
the Software will be used on NovAtel supplied hardware or in conjunction with other NovAtel supplied
software, use the Software with the product(s) as supplied by NovAtel. You agree not to use the Software for
any purpose other than the due exercise of the rights and licences hereby agreed to be granted to you.
2.
Copyright: NovAtel owns, or has the right to sublicense, all copyright, trade secret, patent and other
proprietary rights in the Software and the Software is protected by national copyright laws, international treaty
provisions and all other applicable national laws. You must treat the Software like any other copyrighted
material except that you may make one copy of the Software solely for backup or archival purposes (one copy
may be made for each piece of NovAtel hardware on which it is installed or where used in conjunction with
other NovAtel supplied software), the media of said copy shall bear labels showing all trademark and copyright
notices that appear on the original copy. You may not copy the product manual or written materials
accompanying the Software. No right is conveyed by this Agreement for the use, directly, indirectly, by
implication or otherwise by Licensee of the name of NovAtel, or of any trade names or nomenclature used by
NovAtel, or any other words or combinations of words proprietary to NovAtel, in connection with this
Agreement, without the prior written consent of NovAtel.
3.
Patent Infringement: NovAtel shall not be liable to indemnify the Licensee against any loss sustained by it as
the result of any claim made or action brought by any third party for infringement of any letters patent,
registered design or like instrument of privilege by reason of the use or application of the Software by the
Licensee or any other information supplied or to be supplied to the Licensee pursuant to the terms of this
Agreement. NovAtel shall not be bound to take legal proceedings against any third party in respect of any
infringement of letters patent, registered design or like instrument of privilege which may now or at any future
time be owned by it. However, should NovAtel elect to take such legal proceedings, at NovAtel's request,
Licensee shall co-operate reasonably with NovAtel in all legal actions concerning this license of the Software
under this Agreement taken against any third party by NovAtel to protect its rights in the Software. NovAtel
shall bear all reasonable costs and expenses incurred by Licensee in the course of co-operating with NovAtel in
such legal action.
Restrictions: You may not: (1) copy (other than as provided for in paragraph 2), distribute, transfer, rent, lease,
lend, sell or sublicense all or any portion of the Software; (2) modify or prepare derivative works of the
Software; (3) use the Software in connection with computer-based services business or publicly display visual
output of the Software; (4) transmit the Software over a network, by telephone or electronically using any
means; or (5) reverse engineer, decompile or disassemble the Software. You agree to keep confidential and use
your best efforts to prevent and protect the contents of the Software from unauthorized disclosure or use.
4.
6
Term and Termination: This Agreement and the rights and licences hereby granted shall continue in force in
perpetuity unless terminated by NovAtel or Licensee in accordance herewith. In the event that the Licensee
shall at any time during the term of this Agreement: i) be in breach of its obligations hereunder where such
breach is irremediable or if capable of remedy is not remedied within 30 days of notice from NovAtel requiring
its remedy; or ii) be or become bankrupt or insolvent or make any composition with its creditors or have a
receiver or manager appointed of the whole or any part of its undertaking or assets or (otherwise as a solvent
company for the purpose of and followed by an amalgamation or reconstruction hereunder its successor shall
be bound by its obligations hereunder) commence to be wound up; or iii) be acquired or otherwise come under
the direct or indirect control of a person or persons other than those controlling it, then and in any event
NovAtel may forthwith by notice in writing terminate this Agreement together with the rights and licences
hereby granted by NovAtel. Licensee may terminate this Agreement by providing 30 days prior written notice
to NovAtel. Upon termination, for any reasons, the Licensee shall promptly, on NovAtel's request, return to
NovAtel or at the election of NovAtel destroy all copies of any documents and extracts comprising or containing
the Software. The Licensee shall also erase any copies of the Software residing on Licensee's computer
equipment. Termination shall be without prejudice to the accrued rights of either party, including payments
due to NovAtel. This provision shall survive termination of this Agreement howsoever arising.
StarView User Manual Rev 4
Software License
5.
Warranty:
a. For 90 days from the date of shipment of new purchased product, NovAtel warrants that the media (for example, compact
disk) on which the Software is contained will be free from defects in materials and workmanship. This warranty does not
cover damage caused by improper use or neglect.
b. NovAtel does not warrant the contents of the Software or that it will be error free. The Software is furnished "AS IS" and
without warranty as to the performance or results you may obtain by using the Software. The entire risk as to the results
and performance of the Software is assumed by you.
6.
Indemnification: NovAtel shall be under no obligation or liability of any kind (in contract, tort or otherwise and
whether directly or indirectly or by way of indemnity contribution or otherwise howsoever) to the Licensee and
the Licensee will indemnify and hold NovAtel harmless against all or any loss, damage, actions, costs, claims,
demands and other liabilities or any kind whatsoever (direct, consequential, special or otherwise) arising
directly or indirectly out of or by reason of the use by the Licensee of the Software whether the same shall arise
in consequence of any such infringement, deficiency, inaccuracy, error or other defect therein and whether or
not involving negligence on the part of any person.
7.
For Software UPDATES and UPGRADES, and regular customer support, contact the NovAtel GPS Hotline at
1-800-NOVATEL (U.S. or Canada only), or 403-295-4900, Fax 403-295-4901, e-mail to [email protected],
website: http://www.novatel.ca or write to:
NovAtel Inc.
Customer Service Dept.
1120 - 68 Avenue NE,
Calgary, Alberta, Canada T2E 8S5
8.
Disclaimer of Warranty and Limitation of Liability:
a. THE WARRANTIES IN THIS AGREEMENT REPLACE ALL OTHER WARRANTIES, EXPRESS OR IMPLIED,
INCLUDING ANY WARRANTIES OF MERCHANTABILITY OR FITNESS FOR A PARTICULAR PURPOSE.
NovAtel DISCLAIMS AND EXCLUDES ALL OTHER WARRANTIES. IN NO EVENT WILL NovAtel's LIABILITY
OF ANY KIND INCLUDE ANY SPECIAL, INCIDENTAL OR CONSEQUENTIAL DAMAGES, INCLUDING LOST
PROFITS, EVEN IF NovAtel HAS KNOWLEDGE OF THE POTENTIAL LOSS OR DAMAGE.
b. NovAtel will not be liable for any loss or damage caused by delay in furnishing the Software or any other performance
under this Agreement.
c. NovAtel's entire liability and your exclusive remedies for our liability of any kind (including liability for negligence) for
the Software covered by this Agreement and all other performance or non-performance by NovAtel under or related to this
Agreement are to the remedies specified by this Agreement.
9.
This Agreement is governed by the laws of the Province of Alberta, Canada. Each of the parties hereto
irrevocably attorns to the jurisdiction of the courts of the Province of Alberta.
.
StarView User Manual Rev 4
7
Customer Service
Customer Service
Contact Information
If you have any questions or concerns regarding your SUPERSTAR II-based product, please contact NovAtel
Customer Service using any one of the following methods:
NovAtel GPS Hotline:
1-800-NOVATEL (Canada and the U.S.)
403-295-4900 (International)
Fax:
403-295-4901
E-mail:
[email protected]
Website:
www.novatel.com
Write:
NovAtel Inc. Customer Service Dept.
1120 - 68 Avenue NE
Calgary, Alberta, Canada
T2E 8S5
Before contacting NovAtel Customer Service regarding software concerns, please do the following:
1. Issue the NVM Reset command, Message ID# 99, with value 0 to reset all NVM. Your receiver
automatically resets after the NVM erase has been completed.
(For details on individual commands and logs, refer to the SUPERSTAR II Firmware Reference Manual)
2. Log the following data requests to a file on your PC for 30 minutes:
Receiver Status, ID# 49
Ephemeris Data, ID# 22
Measurement Block, ID# 23
Fault Log, ID# 57
HW/SW Identification, ID# 45
one shot
continuous
1 Hz
one shot
one shot
Navigation Data (ECEF), ID# 21
Navigation Data (User), ID# 20
Satellite Visibility, ID# 33
Channel Assignment, ID# 6
continuous
continuous
continuous
continuous
3. Send the file containing the log to NovAtel Customer Service, using the [email protected] e-mail
address.
Firmware Updates
Firmware updates are firmware revisions to an existing model, which improves basic functionality of the GPS
receiver. Refer also to the Firmware Updates section of the SUPERSTAR II Firmware Reference Manual,
Reference [4] on Page 9.
Firmware upgrades are firmware releases, which increase basic functionality of the receiver from one model to
a higher level model type. When available, upgrades may be purchased at a price, which is the difference
between the two model types on the current NovAtel GPS Price List plus a nominal service charge.
If you need further information, please contact NovAtel using one of the methods given above.
8
StarView User Manual Rev 4
Foreword
Foreword
This user manual is intended to help you install, test, gather information or perform maintenance using the
StarView graphical user interface (GUI) software on NovAtel’s SUPERSTAR II-based products. Results may
be displayed in real time or stored in a file.
The SMART ANTENNA and FlexPak-SSII are SUPERSTAR II-based.
User Manual Updates
The most up-to-date version of this manual can be downloaded from the Documentation Updates section on
our website at http://www.novatel.com/Downloads/docupdates.html.
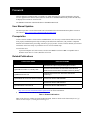
Prerequisites
As this reference manual is focused on the SUPERSTAR II, it is necessary to ensure that the GPS receiver has
been properly installed and powered up according to the instructions outlined in your product’s companion
hardware user manual before proceeding (references [5] to [6] in Table 1 below). In these manuals you will find
instructions on the basic setup of your GPS receiver as well as a DGPS setup.
You will also need:
A personal computer (PC) with a mouse, CD drive and Windows software: IBM or compatible 486 or
Pentium version NT 3.51 or later, Windows 95 or later
Related Publications
PUBLICATION NAME
PUBLICATION NAME
[1] ICD-GPS-200 Rev. B
NAVSTAR GPS Space Segment/Navigation Interface a
[2] RTCM-104 version 2.1, January 1994
Recommended Standards for Differential NAVSTAR GPS
Radio Technical Commission for Maritime Services (RTCM) a
[3] NMEA-0183 Rev 2.20
National Marine Electronics Association Standard for
Interfacing a
[4] SUPERSTAR II Firmware Reference Manual
NovAtel Part Number OM-20000086 b
[5] SMART ANTENNA User Manual
NovAtel Part Number OM-20000078 b
[6] SUPERSTAR II User Manual
NovAtel Part Number OM-20000077 b
a.
Refer to the Standards/References section of the GPS+ Reference Manual available on our website at
http://www.novatel.com/Downloads/docupdates.html for contact information.
b. See our website at the address shown in a above
Table 1: Related Publications
Many of the StarView windows are based on Message ID#s, details of which can be found in Reference [4]
above. See also Chapter 1, Getting Started on Page 13.
StarView User Manual Rev 4
9
Foreword
StarView Installation
Once the GPS receiver is connected to the PC, antenna, and power supply, install the StarView software. If a
StarView CD is not supplied, StarView is available on our website (see below).
From CD:
1. Start up the PC.
2. Insert the StarView CD in the CD-ROM drive of the computer.
3. Install the StarView software and follow the steps on the screen. If the setup utility is not
automatically accessible when the CD is inserted, select Run from the Start menu and press the
Browse button to locate Setup.exe on the CD drive. Click on the OK button to install the StarView
software and follow the steps on the screen.
From our website:
1. Start up the PC and launch your internet service program.
2. Go to our website at http://www.novatel.com/Downloads/fwswupdates.html and scroll down to the
Other Application Software section.
3. Download the StarView setup program and save it in a temporary directory (for example, C:\temp).
4. Use the setup program to install the StarView software by following the steps on the screen.
After installation, StarView also appears in the Windows Start menu at Start | Program Files | NovAtel L1
Software.
10
StarView User Manual Rev 4
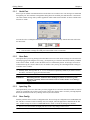
Chapter 1
Getting Started
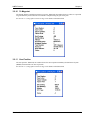
Once the StarView software is installed, see Page 10, double click the StarView icon:
. The StarView
window appears. The StarView window below shows some of the windows that you might typically have open.
These windows are opened from the Window menu. For example, select Window | Messages | Display
Messages to show the Display Messages window:
Before you can transmit, receive or view data however, you must use the File/Port menu to open a connection
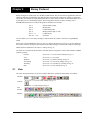
between your GPS receiver and the PC. For example, select File/Port | Auto Connect from the main menu:
StarView User Manual Rev 4
11
Chapter 1
Getting Started
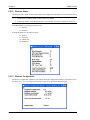
Select the COM port on your PC to which the GPS receiver is connected. Click on the Start button to activate
the connection. Wait until a message appears to tell you that the connection is successful and then click on the
Close button. If the connection is successful you will see the COM port displayed to the right of the status bar
at the bottom of the StarView window. StarView is now ready to use, see also Figure 1 on Page 13.
All menus are accessed from the main menu. The main menu is comprised of 6 menu items whether in NMEA
or Binary protocol: File/Port, View, Windows, Tool Setting, Xmit Msg and Help.
First change the StarView interface to either NMEA or Binary by clicking on one of these buttons:
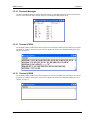
Click on the Protocol button,
, to display the Configure COM1 Port Mode edit window in order to change
the protocol and baud rate of the GPS receiver’s COM1 port:
1.
When you use the NMEA or BIN buttons, shown above, you are simply changing the StarView menus
and windows. You must use the Configure Port Mode dialog to change the configuration of your card.
The Configure Port Mode dialog is available using the Protocol button or by selecting Tool Setting |
Protocol from the main menu.
2.
Your receiver’s current settings must match those selected in the Current setting section of the dialog.
If they do not match the protocol can not change. If you do not know your receiver’s current settings,
use the Force to binary, 9600 BPS button and then use the Desired setting section.
3.
The minimum baud rate is 300 bps and the maximum is 19200 bps.
To save data to a file rather than only seeing it live on screen, select File/Port | Save Data | Automatic Logging
from the main menu.
12
StarView User Manual Rev 4
Getting Started
Chapter 1
When you select menu options that are followed by an arrow, a pull down menu appears. Most of StarView
binary functions are represented by a button as shown in Chapter 2, Binary Protocol starting on Page 17.
Chapter 3, NMEA Protocol starts on Page 52.
When you mouse over menu items in StarView, there is often information in the status bar:
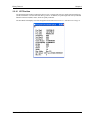
Receiver Status Window (ID49)
Figure 1: Status Bar
When an item is opened from the Window or Xmit Msg menus, the corresponding Message ID# may be shown
in the title of the open window:
Please refer to the SUPERSTAR II Firmware Reference Manual, Reference [4] on Page 9, for details on
individual messages.
1.1
File/Port Menu
The File/Port menu looks the same for both the NMEA and Binary protocols.
The File/Port menu, see Table 2 on Page 14, allows you to select the communication port of the PC, locate a
file for incoming data, save a configuration, stop communication between the PC and the GPS receiver, stop
logging data and exit the application.
StarView User Manual Rev 4
13
Chapter 1
Getting Started
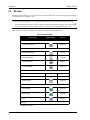
Table 2: File/Port Menu
Menu Option
Toolbar Button
Refer to
Serial Port a
Section 1.1.1, Serial Port on Page 15
Auto Connect
Chapter 1, Getting Started starting on Page 11
Save Data
COM1 Port b
COM2 Port b
Section 1.1.2, Save Data on Page 15
Automatic Logging
Playback Rate c
Section 1.1.3, Input Log File on Page 15
Input log file c d
Section 1.1.3, Input Log File on Page 15
Save Config
Section 1.1.4, Save Config on Page 15
Restore Factory Config
Section 1.1.5, Restore Factory Config on Page 16
Parser Active
Section 1.1.6, Parser Active on Page 16
Stop
Section 1.1.7, Stop on Page 16
Exit
Section 1.1.8, Exit on Page 16
StarView Interface d
Page 12
Baud Rate a d
Section 1.1.1, Serial Port on Page 15
COM Port a d
Section 1.1.1, Serial Port on Page 15
a. COM port of the PC
b. COM1/COM2 of the receiver
c. Available with the binary protocol and not NMEA
d. Not in the File/Port menu
14
StarView User Manual Rev 4
Getting Started
1.1.1
Chapter 1
Serial Port
Select a port to establish communication between the GPS receiver and StarView. I/O messages are transmitted
through this port. The Serial Port Configuration dialog shows the available ports and baud rates. Consider the
case where COM1 is being used by another application while COM2 is still available. To choose COM2 with a
baud rate of 19200:
You can also select a COM port and baud rate, or stop the connection, directly from the File Port tools below
the main menu:
1.
2.
1.1.2
Data flow has no effect in your application.
You can select or change the COM port on the toolbar to start a connection.
Save Data
This option allows you to log messages from the GPS receiver into a file. Ensure messages are selected before
activating logging mode using the Tool Setting | Set Default Msg List from the main menu in Binary or NMEA
mode. Choose COM1, COM2, or allow the GPS receiver to automatically decide. All messages received are
recorded in the log file. You are shown a Save As window. Give your log file a meaningful name to help you
remember what it contains.
In Binary mode, Message ID#s 20, 21, 22, 33, 45 and 49 are requested by default if you select File/Port |
Save Data | Automatic Logging from the main menu.
WARNING:
1.1.3
When using StarView, ensure the Power Settings on your PC are not set to go into
Hibernate or Standby modes. Data will be lost if one of these modes occurs during a
logging session.
Input Log File
This option allows you to view data from a previously logged file (it is not in the menu but available as a button
option). It is applicable only to binary protocol files. Choose how fast the data is viewed by selecting Playback
Rate from the File/Port menu or by clicking on the Playback Rate button.
1.1.4
Save Config
Window positions can be saved in a configuration file. StarView keeps its configuration in a STARVIEW.CFG
file. This file is created if it does not already exist, for example, when the application is launched for the first
time. Toolbar settings are saved in a STARVIEW.INI file, which is created and managed by Windows.
StarView saves the windows on display but does not save any settings on the receiver.
StarView User Manual Rev 4
15
Chapter 1
1.1.5
Getting Started
Restore Factory Config
This option sets the window positions and sizes to the default configuration.
1.1.6
Parser Active
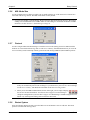
Keep this menu option checked to see information in StarView.
If you uncheck Parser Active, a message asking you to confirm that you only want to see information in the
Terminal window appears:
If you select Yes, a red Parser Inactive message appears in the main StarView window. See also Figure 2 below.
Figure 2: Parser Active (Left) Verses Parser Inactive (Right)
1.1.7
Stop
This option stops communication between your PC and the GPS receiver. File logging is also stopped.
1.1.8
Exit
The Exit menu option terminates the application session.
16
StarView User Manual Rev 4
Chapter 2
Binary Protocol
Binary messages are meant strictly as a machine readable format. They are also ideal for applications where the
amount of data being transmitted is fairly high. Because of the inherent compactness of binary as opposed to
ASCII data, the messages are much smaller. This allows a larger amount of data to be transmitted and received
by the GPS receiver’s communication ports. The message block structure of binary messages from a
SUPERSTAR II-based receiver follows the general conventions as noted here:
byte 1:
byte 2:
byte 3:
byte 4:
byte 5 .. n:
byte n+1 .. n+2:
Start of Header (SOH)
Message ID#
Complementary ID#
Message Data Length (0..255)
n-4 Data Bytes
Checksum
StarView allows you to view binary messages in ASCII format. Saved data is stored in its original Binary
format.
Please refer to the SUPERSTAR II Firmware Reference Manual, Reference [4] on Page 9, for more details on
the structure of binary messages and for details on individual messages associated with windows and settings.
NMEA protocol information is in Chapter 3 starting on Page 52.
All menus are accessed from the main menu. The main menu is comprised of 6 menu items whether in NMEA
or Binary protocol:
File/Port
View
Windows
Tool Setting
Xmit Msg
Help
2.1
See Section 1.1, File/Port Menu starting on Page 13
See Section 2.1, View below
See Section 2.2, Window starting on Page 18
See Section 2.3, Tool Setting starting on Page 35
See Section 2.4, Send Messages starting on Page 49
See Section 2.5, Help starting on Page 51
View
The View menu option allows you to select toolbars. Buttons are grouped by functionality in 4 toolbars:
File/Port:
See Section 1.1, File/Port Menu starting on Page 13.
General:
See Section 2.5, Help starting on Page 51.
Tool
Setting:
See Section 2.3, Tool Setting starting on Page 35.
Window:
See Section 2.2, Window starting on Page 18.
StarView User Manual Rev 4
17
Chapter 2
2.2
Binary Protocol
Window
The Window menu allows you to open one or more windows. Make sure you open the appropriate window(s)
corresponding to the message(s) sent.
The command message to be sent must be selected separately either from the Xmit Msg menu or by
clicking the right mouse button over the window selected. The right mouse button is active when the
icon is present in the window. Selected windows are updated after command messages are sent.
Table 3 shows the windows available when you select Window from the main menu.
Table 3: Window Menu
Menu Option
Toolbar Button
Refer to
Channel
Channel assignment
Page 20
Message
Received messages
Page 20
Display Messages
Page 21
Terminal (COM1)
Page 21
Terminal (COM2)
Page 22
DGPS
DGPS Configuration
Page 22
DGPS Data
Page 23
DGPS Status a
Page 23
Navigation
LLH Solution a
Page 24
XYZ Solution
Page 25
Plot
Page 26
Satellites
Continued on Page 19
18
StarView User Manual Rev 4
Binary Protocol
Chapter 2
Status
Page 27
Position
Page 27
Health
Page 28
Almanac
Page 28
Ephemeris a
Page 30
Measurements a
Page 30
Status
SBAS Status b
Page 31
Base Status c
Page 31
Receiver Status
Page 32
Receiver Configuration
Page 32
Timing Information
Page 33
Other
Automatic Log Summary
Page 34
HW/SW Part Number c
Page 34
a.
b.
c.
Use your right mouse button to request this message in Continuous
mode
You must have an SBAS-capable model in order to use SBAS
Use your right mouse button to request this message in One Shot
mode
StarView User Manual Rev 4
19
Chapter 2
2.2.1
Binary Protocol
Channel Assignment
The Channel Assignment window shows you the current satellites assigned to channels 1 through 12. It is
associated with Message ID#s 6 and 7.
2.2.2
Received Messages
The Received Message window shows messages received from the GPS receiver. It also shows the size of the
file used to save incoming data and protocol errors.
20
StarView User Manual Rev 4
Binary Protocol
2.2.3
Chapter 2
Display Messages
This window displays the input and output messages in hexadecimal format. The size and the number of the
message are shown in decimal format.
2.2.4
Terminal (COM1)
The Terminal (COM1) window shows the messages received from the COM1 port of the GPS receiver before
processing. If COM1 is not the active port, StarView displays the Serial Port Configuration dialog for you to
edit first, see Page 15.
StarView User Manual Rev 4
21
Chapter 2
2.2.5
Binary Protocol
Terminal (COM2)
The Terminal (COM2) window shows the messages received from the COM2 port of the GPS receiver before
processing. If COM2 is not the active port, StarView displays the Serial Port Configuration dialog for you to
edit first, see Page 15.
2.2.6
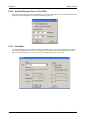
DGPS Configuration
The DGPS Configuration window shows the DGPS configuration of the GPS receiver. It is associated with
Message ID# 43, see also Page 41.
The Msg retransmitted fields shown in the window above are not available and should be ignored.
22
StarView User Manual Rev 4
Binary Protocol
2.2.7
Chapter 2
DGPS Data
The DGPS Data window shows the RTCM data received by the GPS receiver in hexadecimal format and some
message information in ASCII format. It is associated with Message ID# 83.
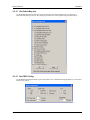
2.2.8
DGPS Status
The DGPS Status window shows DGPS messages received unless the GPS receiver is a BASE model. In this
case, it shows encoded DGPS messages. This window is associated with Message ID# 48.
1
2666
935
0
89
29
9
StarView User Manual Rev 4
23
Chapter 2
2.2.9
Binary Protocol
LLH Position
The Navigation Data (user coordinates) window contains the position (latitude, longitude and altitude
coordinates) and velocity (m/s) computed by the GPS receiver. It is associated with Message ID# 20. In
addition, it reports height and velocity Figures of Merit (FOMs) which are quality indicators.
Datum #0 in StarView is the WGS84 datum. See also Tool Setting | Set Datum on Page 40.
The Nav Mode field displays one of the following navigation modes:
Initialization Required
Initialized
NAV 3-D
NAV 2-D
Diff. 3-D
Diff. 2-D
Dead Reckoning
24
StarView User Manual Rev 4
Binary Protocol
Chapter 2
2.2.10 XYZ Position
The Navigation Data window contains the GPS receiver’s position and velocity in earth-centered-earth-fixed
(ECEF) coordinates. It is associated with Message ID# 21. In addition, it reports height and velocity FOM and
Dilution of Precision (DOP) values, which are quality indicators.
The Nav Mode field displays one of the navigation modes shown in Section 2.2.9, LLH Position on Page 24.
StarView User Manual Rev 4
25
Chapter 2
2.2.11
Binary Protocol
Plot
The navigation Plot window shows the position computed. You can compare it with the known position or with
another computed solution. The window has a zoom range of 1 to 1000 m. This window has its own menu that
includes options for viewing the coordinates or grid. Use the Dot Style and Dot Size menu to adjust the dot. See
also Section 2.2.9, LLH Position on Page 24, which is also associated with Message ID# 20.
26
StarView User Manual Rev 4
Binary Protocol
Chapter 2
2.2.12 Satellites Status
The SVs Status window shows the status of each satellite in view. It also gives the elevation and azimuth of the
satellites in the sky in degrees and the signal to noise ratio (SNR).
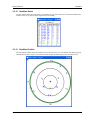
2.2.13 Satellites Position
The SVs Position window shows the satellites in view in the sky above you. The window also displays rings of
azimuth and elevation in degrees. The window can also display the mask angle used by the GPS receiver.
StarView User Manual Rev 4
27
Chapter 2
Binary Protocol
2.2.14 Satellites Health
The Satellites Health window shows the health of each satellite. It is associated with Message ID# 50. A
healthy satellite is shown with an ASCII H and binary indicator 00, otherwise it is unhealthy and is shown with
an ASCII U and binary indicator 11.
2.2.15 Satellites Almanac
This message window contains the decoded almanac parameters from subframes four and five as received from
the satellite with the parity information removed and appropriate scaling applied. It is associated with Message
ID# 76. For more information on Almanac data, refer to the GPS SPS Signal Specification. Contact
information is available in the GPS+ Reference Manual on our website at http://www.novatel.com/Downloads/
docupdates.html.
The L1 family of receivers automatically saves almanac information in their non-volatile memory (NVM),
therefore creating an almanac boot file is not necessary.
28
StarView User Manual Rev 4
Binary Protocol
StarView User Manual Rev 4
Chapter 2
29
Chapter 2
Binary Protocol
2.2.16 Ephemeris
The Ephemeris window shows ephemeris data for one satellite. It is associated with Message ID# 22. The data
is transmitted at a rate of one message per second until the ephemeris data list is complete, and then it is
transmitted only if there is new ephemeris data.
This data is received in ICD-GPS-200 format. Refer to the NAVSTAR GPS Space Segment/Navigation
Interface document ICD-GPS-200 Rev. B or later for specifics on the format of the ephemeris data. NAVSTAR
contact information may be found in the Standard/References section of the GPS+ Reference Manual available
on our website at http://www.novatel.com/Downloads/docupdates.html.
2.2.17 Measurements
The Measurements window shows raw data carrier phase and code phase data. It is associated with Message
ID# 23. Measurements data can be sent at 1, 2, 5 or 10 Hz depending on your receiver model.
Sending this message in One Shot mode, turns it off and does not return any data. To start or turn the
message back on, send it in Continuous Mode.
Refer also to the Measurements appendix of the SUPERSTAR II Firmware Reference Manual, Reference [4] on
Page 9, for details on raw code phase and carrier phase measurements.
This message is only available on GPS receiver models that have Carrier Phase Output capability (CP).
Refer also to the SUPERSTAR II Card Models appendix in the SUPERSTAR II Firmware Reference
Manual, Reference [4] on Page 9.
30
StarView User Manual Rev 4
Binary Protocol
Chapter 2
2.2.18 SBAS Status
The SBAS Status window shows the number of SBAS (for example WAAS and EGNOS) messages received
by the GPS receiver for specific SBAS satellites. It is associated with Message ID# 68. A global count of all
valid and erroneous messages is also displayed. You must have an SBAS-capable model in order to use SBAS.
To enable SBAS, select Tool Setting | DGPS Config, see DGPS Configuration on Page 22. Set the DGPS Type
to SBAS only or Automatic. The receiver then automatically tracks SBAS satellites in your coverage area.
2.2.19 Base Status
The Base Status window shows the position of the base station as received through RTCM messages. It is
associated with Message ID# 47. The window also has the time remaining in the survey, the status of the base
station, and the RTCM messages in use and their rates. This information is set at the base station using Set
Operating Mode and Set Differential Message Rate dialogs. See Page 43 and Page 42 respectively for details
on these commands.
In this example, the unit is in Base Station mode and the position is initialized.
StarView User Manual Rev 4
31
Chapter 2
Binary Protocol
2.2.20 Receiver Configuration
The Receiver Configuration window shows receiver configuration data. It is associated with Message ID# 30.
See also Section 2.3.9, Set Configuration on Page 39.
2.2.21 Receiver Status
The Receiver Status window shows the configuration of the GPS receiver. It is associated with Message ID#
49.
32
StarView User Manual Rev 4
Binary Protocol
Chapter 2
2.2.22 Timing Information
The Timing information window gives precise timing information. It is associated with Message ID# 113.
The clock bias and drift parameters are computed using the pseudorange measurements and the predicted true
range (using the known user position). A Time Figure Of Merit (TFOM) for the clock errors is derived using
the residuals of the least-square time solution. When using GPS measurements only, the TFOM does not take
into account any bias in the residuals that may be induced by the atmospheric errors. Therefore it provides a
relative accuracy estimate. When the SBAS channel is available, the clock bias estimate is virtually free of
systematic errors and the computed TFOM approximates an absolute accuracy of the 1PPS output by the GPS
receiver.
1.
This message is only available on GPS receivers models that have Precise Timing (T) capability. See
also the SUPERSTAR II Card Models appendix in the SUPERSTAR II Firmware Reference Manual,
Reference [4] on Page 9.
2.
You must have an SBAS-capable model in order to use SBAS. To enable SBAS, select Tool Setting |
DGPS Config, see DGPS Configuration on Page 22. Set the DGPS Type to SBAS only or Automatic.
The receiver then automatically tracks SBAS satellites in your coverage area.
StarView User Manual Rev 4
33
Chapter 2
Binary Protocol
2.2.23 Automatic Log Summary
This window appears if you start a log file using the File/Port | Save Data | Automatic Logging menu, see Page
15. It shows a summary of the information contained in an example log file in progress.
2.2.24 HW/SW Part Number
The HW/SW Configuration window provides hardware and software identification information. It is associated
with Message ID# 45.
Oper. SW Part No is the version of firmware loaded onto the receiver. Config #1 Part No is the model part
number that is loaded onto the receiver. Refer also to the SUPERSTAR II Card Models appendix in the
SUPERSTAR II Firmware Reference Manual, Reference [4] on Page 9.
34
StarView User Manual Rev 4
Binary Protocol
2.3
Chapter 2
Tool Setting
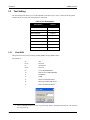
The Tool Setting menu allows you to send commands to the GPS receiver. Table 4 shows the menu options
available when you select Tool Setting from the main menu.
Table 4: Tool Setting Menu
Menu Option
Toolbar Button
Refer to
Almanac Data Transfer
Page 36
Clear NVM
Page 36
Deselect
Channels
Page 37
SVs
Page 37
Fixed Height
None
Auto
Page 37
MSL Model Use
Page 38
Protocol
Page 38
Restart System
Page 38
Set Configuration
Page 39
Set Date/Time + Force 1shot 1PPS
Page 40
Set Datum
Page 40
Set Default Msg List
Page 41
Set DGPS Config
Page 41
Set Differential Msg Rate
Page 42
Set Mask Angle
Page 42
Set Operating Mode
Page 43
Set Timing Parameters
Page 47
Set Tropospheric/Ionospheric Model Use
Page 48
Track SV Request
Page 48
StarView User Manual Rev 4
35
Chapter 2
2.3.1
Binary Protocol
Almanac Data Transfer
This dialog allows you to transfer a YUMA almanac to the receiver. It is associated with Message ID#s 78 and
79.
2.3.2
Clear NVM
This menu option erases the receiver NVM. It is associated with Message ID# 99.
The NVM Element options are
36
00
All
01-04
Reserved
05
Almanac
06-08
Reserved
09
TCXO parameters
10
IONO and UTC parameters
11
Position
12
Time
13
DGPS configuration
14
Default NMEA message list
15
RS232 configuration and default binary message list
16-19
Reserved
20
Ephemeris
StarView User Manual Rev 4
Binary Protocol
2.3.3
Chapter 2
Deselect Channel
The Channels Deselect dialog is used to deselect channels. If you are unsure about which channels have been
deselected, use the Clear button to clear all deselections followed by the Send button. Then deselect the
channels you want to deselect and click on the Send button. This dialog is associated with Message ID# 64.
2.3.4
Deselect SVs
The SV Deselection dialog is used to deselect satellites. If you are unsure about which SV have been
deselected, use the Clear button to clear all deselections followed by the Send button. Then deselect the SVs
you want to deselect and click on the Send button. It is associated with Message ID# 90.
1.
2.3.5
You must have an SBAS-capable model in order to use SBAS.
2.
If you wish to deselect GPS and SBAS satellites, you must send them separately (click on the Send
button after each satellite system selection).
3.
To reinstate a particular satellite, return to the SV Deselection dialog and uncheck, or clear, its
checkbox. Then, click on the Send button.
Fixed Height
This command is used to select a fixed height mode. When NONE is selected, the receiver can not go in 2-D
mode. When AUTO is selected, the receiver automatically tries to go in 2-D mode if only 3 satellites are
available. NONE is the default. This value is stored in NVM. See also Receiver Status on Page 32, which
shows the Navigation Mode value.
StarView User Manual Rev 4
37
Chapter 2
2.3.6
Binary Protocol
MSL Model Use
Use the Set Mean Sea Level dialog to enable (On) or disable (Off) the use of the mean sea level model. It is
associated with Message ID# 86. The MSL model mode is Off by default.
If you select Xmit Msg | General Message Request from the main menu and enter Message ID# 86 then
sending it in One Shot mode turns on MSL model use and sending it in Continuous mode turns off MSL
model use. See also Section 2.4, Send Messages on Page 49.
2.3.7
Protocol
Use the Configure Main Port Mode dialog to switch the receiver mode (binary protocol or NMEA) and the
baud rate. It is associated with Message ID# 110. The Force to Binary, 9600 BPS button allows you to set the
receiver in binary mode at 9600 bps in binary protocol and with message $PMCAG,000 in NMEA protocol.
1.
Your receiver’s current settings must match those selected in the Current setting section of the dialog.
If they do not match the protocol can not change. If you do not know your receiver’s current settings,
use the Force to binary, 9600 BPS button and then use the Desired setting section.
2.
When you use the NMEA or BIN buttons, shown on the right, you are simply changing
the StarView menus and windows. You must use the Configure Port Mode dialog to
change the configuration of your card. The Configure Port Mode dialog is available using the Protocol
button or by selecting Tool Setting | Protocol from the main menu.
2.3.8
Restart System
Select Tool Setting | Restart System to reset the GPS receiver and initiate a receiver cold start. This menu
option is associated with Message ID# 2.
38
StarView User Manual Rev 4
Binary Protocol
2.3.9
Chapter 2
Set Configuration
The characteristics defined here are not limits where the receiver stops functioning. They are rather limits
within which the receiver performance and behavior are optimal for the application. Exceeding these limits
causes receiver performance to degrade when used in the specified application:
Maximum
Velocity
(m/s)
Maximum
Acceleration
(m/s2)
Stand Still
Threshold
(m/s)
Man
10
3
0.2
Car
45
8
0.2
Tractor
20
7
0.2
Marine
20
7
0.1
Plane
100
20
0.2
Rocket
510
40
0.2
Preset
Configuration
The Configuration dialog is associated with Message ID# 30.
1.
SUPERSTAR II-based receivers are capable of a navigation rate of 1 Hz. If you have a model with 5
Hz PVT, select 5 Hz in the Navigation rate field above. Refer also to the SUPERSTAR II Card Models
appendix in the SUPERSTAR II Firmware Reference Manual, Reference [4] on Page 9.
2.
You must reboot your receiver for a new navigation rate to take effect.
3.
If you choose Auto in the Antenna fields, the receiver starts with a Passive setting and then switches to
Active if an active antenna is detected.
StarView User Manual Rev 4
39
Chapter 2
Binary Protocol
2.3.10 Set Date/Time and Force 1 Shot 1PPS
The Set Date/Time and Force 1 Shot 1PPS dialog is used to enter a date and a time into the GPS receiver and/or
request One Shot 1PPS output. It is associated with Message ID# 103.
2.3.11
Set Datum
Use the Datum dialog to select or define a datum for the GPS receiver. It is associated with Message ID# 88.
The position computed by the receiver is according to the set datum. Refer to the SUPERSTAR II Firmware
Reference Manual, Reference [4] on Page 9, to see a complete Datum Description table.
40
StarView User Manual Rev 4
Binary Protocol
Chapter 2
2.3.12 Set Default Msg List
Use the Binary Messages List dialog to select messages that you want the GPS receiver to output. It is
associated with Message ID# 105. The messages you select here will be generated by default at start-up.
2.3.13 Set DGPS Config
Use the DGPS Configuration dialog to specify the GPS receiver’s differential mode parameters. It is associated
with Message ID# 83.
StarView User Manual Rev 4
41
Chapter 2
Binary Protocol
2.3.14 Set Differential Msg Rate
Use the Set Differential messages dialog to specify which messages will be encoded by the GPS receiver and at
what rate. It is associated with Message ID# 91. The default message periods are set as follows: RTCM Type 1
every second and RTCM Type 3 every 10 seconds. Use the arrows in the Rate field to change the message rate.
1.
2.
This message is only available on SUPERSTAR II-based BASE models. See also the SUPERSTAR II
Card Models appendix in the SUPERSTAR II Firmware Reference Manual, Reference [4] on Page 9.
Use the Send Command button when you pick a message or rate from the RTCM Message section.
2.3.15 Set Mask Angle
Use the Set Mask Angle dialog to set the elevation angle below which your GPS receiver will not track
satellites. It is associated with Message ID# 81. You can input a mask angle value in the Angle field within the
range 0 to 90 degrees.
42
StarView User Manual Rev 4
Binary Protocol
Chapter 2
2.3.16 Set Operating Mode
Use the Operating Mode Setting dialog to switch a GPS receiver into a DGPS Base Station or to switch a
DGPS Base Station into a GPS receiver if your receiver is a BASE model. It is associated with Message ID#
80. The station ID, station health and survey time are also set by this dialog. Remember to use the Send button
before you exit this dialog.
In the Mode section, the Go in Base Mode options are only available on BASE model receivers. See also
the SUPERSTAR II Card Models appendix in the SUPERSTAR II Firmware Reference Manual, Reference
[4] on Page 9.
StarView User Manual Rev 4
43
Chapter 2
2.3.16.1
Binary Protocol
BASE STATION CONFIGURATION WITH KNOWN POSITION
Establish communication between the PC and the GPS receiver, see Page 12.
Select the Set Operating Mode button
and the Operating Mode Setting dialog box will appear. Select
the operating mode, Go in Base Mode (manual), from the Mode section:
Only the fields applicable to the chosen mode are active, the others appear gray.
Enter the Station ID and select the Health field to choose a health parameter:
The Station ID can be a number between 0 and 1023 and the station health parameters are described in the
RTCM specification.
Choose the LLH (user defined) or XYZ (ECEF) coordinates type and enter the coordinates.
Send information to the GPS receiver by clicking on the
button.
The board is now a DGPS Base Station and the information is saved in NVM. If the DGPS Base Station loses
power in this mode, it restarts in the same mode.
44
StarView User Manual Rev 4
Binary Protocol
2.3.16.2
Chapter 2
BASE STATION CONFIGURATION WITHOUT KNOW POSITION
Establish communication between the PC and the GPS receiver, see Page 12.
Select the Set Operating Mode button
, the Operating Mode Setting dialog appears.
Select the operating mode, Go in Base Mode (self survey), from the Mode section:
Only the fields applicable to the chosen mode are active, the others appear gray.
Enter the Station ID and select the Health field to choose a health parameter:
The Station ID can be a number between 0 and 1023 and the station health parameters are described in the
RTCM specification.
Enter a Survey Time:
The Survey Time can be in fractions of hours, for example 12.5 hours. The Survey Time is limited to 48
hours.
Send the information to the GPS receiver by clicking on the
button.
The board is now a DGPS Base Station and the information is saved in NVM. If the DGPS Base Station loses
power in this mode, the Survey Time is not saved. When this occurs, the receiver is in Self Survey mode but the
position is not initialized until you click on the Get Survey Position button.
Use the
button to set the DGPS Base Station position with the current position computed
by itself. This functionality is useful when the entered Survey Time is too long or if the DGPS Base Station has
reset during the Survey Mode.
The DGPS Base Station starts to encode differential messages when the Survey Time is completed or when you
use the Get Survey Position button.
StarView User Manual Rev 4
45
Chapter 2
2.3.16.3
Binary Protocol
ROVER CONFIGURATION
Establish communication between the PC and the GPS receiver, see Page 12.
Select the Set Operating Mode button
, the Operating Mode Setting dialog appears.
Select the operating mode, Go in Rover Mode, from the Mode section:
Only the fields applicable to the chosen mode are active, the others appear gray.
Use the
button to send the information to the receiver.
The board is now a rover receiver and the information is saved in NVM. If the rover receiver loses power, it
restarts in the same mode.
46
StarView User Manual Rev 4
Binary Protocol
Chapter 2
2.3.17 Set Timing Parameters
Use the Set Timing Parameters dialog to configure timing parameters. It is associated with Message ID# 69.
There are 3 operating modes:
Constant: aligned on GPS time continuously
Free-Running: free-running or not-aligned
One Shot: aligns with GPS time on power up
Refer to the Time Mark Output 1PPS section in your product’s hardware manual for more details on these
modes and timing parameters. Refer also to the Precise Timing appendix of the SUPERSTAR II Firmware
Reference Manual, Reference [4] on Page 9, for details on precise timing.
This message is only available on GPS receivers models with Precise Timing (T) capability. See also the
SUPERSTAR II Card Models appendix in the SUPERSTAR II Firmware Reference Manual, Reference [4]
on Page 9.
The default operating mode for GPS receiver models without T capability is Free-Running.
StarView User Manual Rev 4
47
Chapter 2
Binary Protocol
2.3.18 Set Tropospheric/Ionospheric Model Use
Use the Set Tropospheric/Ionospheric Model Use dialog to enable (On) or disable (Off) the use of tropospheric
and ionospheric models. It is associated with Message ID# 84. The default is On.
1.
The Set Tropospheric/Ionospheric command should only be used by advanced users of GPS. Turning
off this model will seriously affect your results.
2.
If you select Xmit Msg | General Message Request from the main menu and enter Message ID# 84
then sending it in One Shot mode turns on tropospheric model use and sending it in Continuous mode,
not recommended, turns off the model use. See also Section 2.4, Send Messages on Page 49.
2.3.19 Track SV Request
Use the Track SV Request dialog to track a specific satellite. It is associated with Message ID# 95. This dialog
allows you to track an SV# on any available channel that is not currently tracking or that has not been
deselected. It starts the search at a given Doppler frequency offset to the carrier (Doppler Center Freq field).
The search window option can be specified from 0 to 100 kHz in 1 kHz increments. Enter an SV# using the
following guidelines (you must have an SBAS-capable model in order to use SBAS):
GPS
SBAS
1 to 32
120 to 138
By default, the receiver tracks the SV only if it is not already being tracked. If you select the Manual check box,
the receiver is forced to track the SV on an idle channel.
In the dialog above, the satellite is directly above the user.
48
StarView User Manual Rev 4
Binary Protocol
2.4
Chapter 2
Send Messages
Send specific messages to your GPS receiver by selecting them from the Xmit Msg menu. To see the content of
a requested message, open the corresponding window from the Window menu. See also the Window section
starting on Page 18.
Table 5: Transmit Messages (Xmit Msg) Menu
Menu Option
Toolbar Button
Refer to
Channel
Channel Assignment
DGPS
DGPS Status
Navigation
LLH Solution
XYZ Solution
Satellites
Almanac Data Request
GPS - One Shot
GPS - Continuous
SBAS a - One Shot
SBAS a - Continuous
Ephemeris
Page 49
Measurement Block
1 Hz
2 Hz
5 Hz
10 Hz
One Shot
Status
Receiver Status
SBAS Status a
Base Status
Initlink
Timing Information
Other
HW/SW Part Number
General Message Request
Page 51
Request All (ID#s 20, 21, 22, 23, 65) b
a.
You must have an SBAS-capable model in order to use SBAS.
b. Appears as a button only and is not in the Xmit Msg menu
StarView User Manual Rev 4
49
Chapter 2
Binary Protocol
When you select a message from the Xmit Msg menu, a rate dialog appears. Consider the case where you have
selected Xmit Msg | Status | Receiver Status. The following dialog appears:
Select One Shot or Continuous. The table below indicates Message ID#s where using One Shot (Normal) or
Continuous (Special) does not send the message out in One Shot or Continuous mode but rather as in Table 6
below.
Table 6: Message Modes
Message ID#
Description
Normal Mode
Special Mode
2
Reset Receiver
Reset
N/A
The information does not
change so this is
unnecessary - to
continuously reset the
receiver is not
recommended
23
Request Measurement Block Data
Off
Turns off Continuous mode
and does not give a One
Shot output
On (default)
45
HW/SW Identification Number
Identify
N/A
The information does not
change unless you update
your software so this is
unnecessary
83
Set DGPS Configuration
Set
N/A
Once set, the DGPS mode
does not need to be updated
continuously
84
Ionospheric/Tropospheric Model Use
On (default)
Off
It is not recommended that
you turn off the use of this
model - for advanced users
of GPS only
86
Mean Sea Level Model Use
On
Off (default)
87
Set Fixed Height Mode
Auto
The receiver automatically
goes in 2-D mode if only 3
satellites are available
None (default)
The receiver can not go in
2-D mode
Set
N/A
Once set, the date and time
do not need to be updated
continuously
103
Set Date and Time
Please refer to the Message Modes table in the Messages chapter of the SUPERSTAR II Firmware Reference
Manual, Reference [4] on Page 9, for more examples. See also the Menu Option column of Table 5, Transmit
Messages (Xmit Msg) Menu on Page 49 for a list of the available messages.
50
StarView User Manual Rev 4
Binary Protocol
2.4.1
Chapter 2
General Message Request
Use the General Message Request dialog to request a specific message.
2.5
Help
Select Help | About StarView... from the main menu or use the General toolbar button to view the About
StarView information box.
Menu Option
Toolbar Button
Help
About StarView
StarView User Manual Rev 4
51
Chapter 3
NMEA Protocol
An explanation of the supported NMEA protocol and its field definitions is provided in the Message Formats
section of your product’s hardware manual. Please refer to the SUPERSTAR II Firmware Reference Manual,
Reference [4] on Page 9, for details on individual NMEA commands and logs.
For further details on the NMEA message structure and formats, please refer to NMEA 0183 specification.
Contact information may be found in the Standards/References section of the GPS+ Reference Manual
available on our website at http://www.novatel.com/Downloads/docupdates.html.
Binary protocol information is in Chapter 2 starting on Page 17.
All menus are accessed from the main menu. The main menu is comprised of 6 menu items whether in NMEA
or Binary protocol:
3.1
File/Port
See Section 1.1, File/Port Menu starting on Page 13
View
See Section 3.1, View below
Windows
See Section 3.2, Window starting on Page 53
Tool Setting
See Section 3.3, Tool Setting starting on Page 60
Xmit Msg
See Section 3.4, Send Messages starting on Page 66
Help
See Section 3.5, Help starting on Page 66
View
This menu option allows you to select toolbars. Buttons are grouped by functionality in 4 toolbars: File/Port,
General, Tool Setting and Window. See also Chapter 2, Binary Protocol starting on Page 17.
These are the toolbar buttons that can be used with the NMEA protocol:
Window:
General:
52
See Page 59.
See Page 51.
StarView User Manual Rev 4
NMEA Protocol
3.2
Chapter 3
Window
Window menus allow you to open one or more windows. Make sure you open the appropriate window(s)
corresponding to the message(s) sent.
The command message to send must be selected separately either from the Xmit Msg menu or by clicking
the right mouse button over the window selected. The right mouse button is active when the
icon is
present in the window. Selected windows are updated after command messages are sent.
Table 7 shows the windows available when you select Window from the main menu.
Table 7: NMEA Window Menu
Menu Option
Toolbar Button
Refer to
$GPGGA
GPS Fix Data
Page 54
$GPGLL
Geographic Position
Page 54
$GPGSA
DOP & Active SVs
Page 54
$GPGSV
SVs in View
Page 55
$GPRMC
Recommended Minimum GPS
Page 55
$GPVTG
Track and Speed
Page 55
$GPZDA
Time and Date
Page 56
$PMCAG, 900
Navigation Status
Page 56
$PMCAG, 902
Self-Test Results
Page 56
$PMCAG, 906
To Waypoint
Page 57
$PMCAG, 907
User Position
Page 57
$PMCAG, 908
Receiver Status
Page 58
$PMCAG, 912
Receiver Configuration
Page 58
Received messages
Page 59
Messages
Display Messages
Shows binary messages only.
Terminal (COM1)
Page 59
Terminal (COM2)
Page 59
StarView User Manual Rev 4
53
Chapter 3
3.2.1
NMEA Protocol
GPS Fix Data
The GPS system fix data - $GPGGA window shows the position, the time, the number of satellites used in the
solution and information about differential corrections.
3.2.2
Geographic Position
The Geographic position - $GPGLL window shows the position in latitude and longitude of the present
solution, the time of position and the status.
In the Status row:
A = Data Valid
B, V = Data Invalid
3.2.3
DOP & Active SVs
The DOP and active satellites - $GPGSA window shows the satellites used by the GPS receiver for navigation,
the DOP values and the position mode. The Operation Mode field is reserved.
54
StarView User Manual Rev 4
NMEA Protocol
3.2.4
Chapter 3
SVs in View
The GPS satellites in view - $GPGSV window shows the number of satellites in view, the satellite PRN
numbers, their azimuth and SNR values.
3.2.5
Recommended Minimum GPS
The Recommended minimum specific GPS data - $GPRMC window shows the time, the date, the position, the
course and the speed. See Section 3.2.2, Geographic Position on Page 54 for details on the Status field.
3.2.6
Track & Speed
The Track made good and ground speed - $GPVTG window shows the actual track made good and the speed
relative to the ground.
StarView User Manual Rev 4
55
Chapter 3
3.2.7
NMEA Protocol
Time & Date
The Time and date - $GPZDA window shows the UTC time and date. Local zone is a reserved field that is not
currently in use.
3.2.8
Navigation Status
The Navigation status - $PMCAG, 900 window shows the current navigation mode and GPS fix quality
indicator where:
L = Low, navigation solution is computed from less than 5 satellite measurements
H = High, navigation solution is computed from at least 5 satellite measurements
3.2.9
Self-Test Results
The Self-test results - $PMCAG, 902 window shows the results of the GPS receiver self-test.
56
StarView User Manual Rev 4
NMEA Protocol
Chapter 3
3.2.10 To Waypoint
The bearing, distance and delta-elevation to waypoint - $PMCAG, 906 window shows its values to a specified
waypoint from the present solution. The solution is computed along the great circle path.
See Section 3.2.2, Geographic Position on Page 54 for details on the Status field.
3.2.11
User Position
The User position - $PMCAG, 907 window shows the current position in Military Grid Reference System
(MGRS) format and the UTC time of position.
See Section 3.2.2, Geographic Position on Page 54 for details on the Status field.
StarView User Manual Rev 4
57
Chapter 3
NMEA Protocol
3.2.12 Receiver Status
The Receiver status - $PMCAG, 908 window shows the configuration of the GPS receiver and the data it uses.
1.
2.
You must have an SBAS-capable model in order to use SBAS.
In StarView, Datum 0 is the WGS84 datum. See Tool Setting | Set Receiver Parameter on Page 64.
In the MSL Model Use and Tropo Model Use rows:
E = Enabled
D = Disabled
In the DGPS Mode row, the following apply:
D = Disable
E = Automatic
W = SBAS only
B = DGPS only
3.2.13 Receiver Configuration
The Receiver configuration - $PMCAG, 912 window shows the configuration parameters of the GPS receiver.
See also Section 2.3.9, Set Configuration starting on Page 39 for applications and their limits.
58
StarView User Manual Rev 4
NMEA Protocol
Chapter 3
3.2.14 Received Messages
The Received NMEA Messages window shows the number of each NMEA message received from the GPS
receiver. It also shows the size of the file used to save incoming data and protocol errors.
3.2.15 Terminal (COM1)
The Terminal (COM1) window shows the messages received from the COM1 port of the GPS receiver before
processing. If COM1 is not the active port, StarView displays the Serial Port Configuration dialog for you to
edit first, see Page 15.
3.2.16 Terminal (COM2)
The Terminal (COM2) window shows the messages received from the COM2 port of the GPS receiver before
processing. If COM2 is not the active port, StarView displays the Serial Port Configuration dialog for you to
edit first, see Page 15.
StarView User Manual Rev 4
59
Chapter 3
3.3
NMEA Protocol
Tool Setting
The Tool Setting menu allows you to send commands to the GPS receiver. Table 8 shows the menu options
available when you select Tool Setting from the main menu.
Table 8: Tool Setting Menu
Menu Option
3.3.1
Refer to
Clear NVM
Page 60
Define Waypoint
Page 61
Select Waypoint
Page 61
Protocol
Page 62
Initialization Data
Page 63
Set Configuration
Page 63
Set Receiver Parameter
Page 64
Set Default Msg List
Page 65
Clear NVM
This option erases the receiver NVM by sending NMEA message $PMCAG,007.
The options are:
1.
60
00
ALL 1
01-04
Reserved
05
ALMANAC
06-08
Reserved
09
TCXO PARAMETERS
10
IONO & UTC PARAMETERS
11
POSITION
12
TIME
13
DGPS CONFIGURATION
14
DEFAULT NMEA MSG LIST
15
RS232 CONFIGURATION 1
These commands force the receiver to go into binary mode at the default baud rate for your model on
the next power-up.
StarView User Manual Rev 4
NMEA Protocol
3.3.2
Chapter 3
Define Waypoint
Use the Define waypoint dialog to define waypoints in MGRS format.
If the Square Column field (latitude band) is X, then the Zone number field should not be set to 32, 34 or
36. These zones were incorporated into other zone numbers and do not exist. Refer also to NMEA message
$PMCAG,009 in the SUPERSTAR II Firmware Reference Manual, Reference [4] on Page 9.
3.3.3
Select Waypoint
Use the Select waypoint dialog to choose an active waypoint to use in subsequent requests.
StarView User Manual Rev 4
61
Chapter 3
3.3.4
NMEA Protocol
Protocol
Use the Configure Main Port Mode dialog to switch the GPS receiver mode (binary protocol or NMEA) and
the baud rate. The Force to Binary, 9600 BPS button allows you to set the GPS receiver in binary mode at 9600
bps. This option is associated with Message ID# 110 in binary protocol and with message $PMCAG, 000 in
NMEA protocol.
62
1.
Your receiver’s current settings must match those selected in the Current setting section of the dialog.
If they do not match the protocol can not change. If you do not know your receiver’s current settings,
use the Force to binary, 9600 BPS button and then use the Desired setting section.
2.
When you use the NMEA or BIN buttons, shown on the right, you are simply changing
the StarView menus and windows. You must use the Configure Port Mode dialog to
change the configuration of your card. The Configure Port Mode dialog is available using the Protocol
button or by selecting Tool Setting | Protocol from the main menu.
StarView User Manual Rev 4
NMEA Protocol
3.3.5
Chapter 3
Initialization Data
Use the Initialization Data dialog to set the GPS receiver with reference UTC date, UTC time and your
position.
3.3.6
Set Configuration
Use the Configuration dialog to set the GPS receiver configuration. If Tool Setting | Set Configuration in the
main menu appears gray, you can access this dialog by right clicking in the Receiver Configuration window
from the Window menu, see Page 32. See also Section 2.3.9 on Page 39 for more details on this dialog.
StarView User Manual Rev 4
63
Chapter 3
3.3.7
NMEA Protocol
Set Receiver Parameter
Use the Set receiver parameter dialog to set the GPS receiver configuration. This dialog is associated with
many commands.
In the Set receiver parameter dialog, the maximum position resolution is 5 digits.
64
StarView User Manual Rev 4
NMEA Protocol
3.3.8
Chapter 3
Set Default Message List
Select Tool Setting | Set Default Msg List to display the NMEA Messages dialog. The window allows you to
request NMEA messages (in One Shot or Continuous mode) and to update the NMEA NVM Message List.
To change the requested data rate, select the row containing the message, highlight the row and then click once
on its Rate field. To stop messages, set the Rate to 0 and select Continuous.
If you have a 5 Hz model, enter 999 for the rate. The NMEA messages that can be output at 5 Hz are GGA,
GLL, GSA, RMC, VTG and 906. Refer also to the SUPERSTAR II Card Models appendix in the SUPERSTAR
II Firmware Reference Manual, Reference [4] on Page 9.
When you click on the Send button, StarView requests all messages that are checked at their specified rates.
StarView User Manual Rev 4
65
Chapter 3
3.4
NMEA Protocol
Send Messages
Send specific messages to your GPS receiver by selecting them from the Xmit Msg menu. To see the content of
a requested message, open the corresponding window from the Window menu. See also the Window section
starting on Page 53.
Menu Option
$GPGGA
GPS Fix Data
$GPGLL
Geographic Position
$GPGSA
DOP & Active SVs
$GPGSV
SVs in View
$GPRMC
Recommended Minimum GPS
$GPVTG
Track and Speed
$GPZDA
Time and Date
$PMCAG, 003
Initiate Self Test
$PMCAG, 900
Navigation Status
$PMCAG, 902
Self-Test Results
$PMCAG, 906
To Waypoint
$PMCAG, 907
User Position
$PMCAG, 908
Receiver Status
When you select a message from the Xmit Msg menu, a rate dialog appears.
Consider the case where you have selected Xmit Msg | $GPGSV SVs in View. The following dialog appears:
Select One Shot or Continuous.
3.5
Help
Select Help | About StarView... from the main menu or use the General toolbar button to view the About
StarView information box. See also Section 2.5, Help starting on Page 51.
Menu Option
Toolbar Button
Help
About StarView
66
StarView User Manual Rev 4
Index
1, 2, 5 or 10 Hz rate, 39, 49, 65
1PPS, 33
2-D Or 3-D Mode, 24, 37, 50
A
About StarView..., 51, 66
Accuracy, 33
Almanac, 19
Data, 35–36, 49
Message, 28
Save, 28
Scaling, 28
Automatic Log Summary, 19, 34
B
Base Status, 19, 31, 49
Binary Protocol, 17
Block, Measurement, 49
C
Car, 39
CD, 10
Channel, 18, 20, 35, 48–49
Clear NVM, 36, 60
Clock, 33
COM port, 18, 53
Configuration, Receiver, 19
Connector, 10
Customer Service, 8
D
Data
Almanac, 35–36, 49
DGPS, 18, 22–23
GPS Fix, 54
Initialization, 60, 63
Date, 50
Datum Number, 24, 40, 64
Define Waypoint, 60–61
Deselect, 35, 37
DGPS, 18, 49
Configuration, 18, 22
Data, 18, 23
Status, 18, 23, 49
Display Messages, 18, 21
DOP & Active SVs, 25, 54
StarView User Manual Rev 4
E
Earth-Centred-Earth-Fixed (ECEF), 25
Ephemeris, 19, 30, 49
Exit, 16
F
Factory Configuration, Restore, 16
Figure of Merit (FOM), 25, 33
File/Port Menu, 13
Firmware Update, 8
Fix Data, GPS, 54
Fixed Height Mode, 37
Force 1 Shot 1PPS, 35
G
General Message Request, 49, 51
Geographic Position, 54
Getting Started, 11
GPS Fix Data, 54
H
Health, 19
Height, 25, 37
HW/SW Number, 19, 34, 49–50
I
ICD-GPS-200 Rev. B, 9
Identify, 50
Initialization Data, 60, 63
Initlink, 49
Ionospheric Model Use, 35, 48
L
L1 GPS Firmware Reference Manual, 9
LLH Position Solution, 18, 24, 49
Log Summary, Automatic, 19, 34
M
Man, 39
Marine, 39
Mean Sea Level Model Use, 35, 38, 50
Measurements, 19, 30, 33, 49
Memory, 28
Message, 18
Display, 18, 21
Received, 18, 20, 53, 59
Request, 49–51
67
Index
Mode, Binary or NMEA, 60
Model Use
Mean Sea Level, 35, 50
Tropospheric/Ionospheric, 35, 48,
50
N
Navigation, 18, 49
NAVSTAR Interface, 9, 30
Status, 56
NMEA-0183 Rev 2.20, 9, 52
Non-Volatile Memory (NVM), 28, 35–
36, 60
P
Parity, 28
Parser, 16
Plane, 39
Plot, 18, 26
Port, 15
Position, 19
Base Station, 31
Coordinates, 25
Geographic, 54
In Time Solution, 33
LLH, 24
User, 57
XYZ, 25
Prerequisites, 9
Protocol, 17, 35, 38, 52, 60, 62
Pseudorange, 33
R
Received Messages, 18, 20, 53, 59
Receiver
Configuration, 19, 32, 58
Status, 19, 32, 49, 58
Recommended Minimum GPS, 55
Request, Message, 49–51
Reset, 50
Restart System, 35, 38
Restore Factory Configuration, 16
Result, Self-Test, 56
Rocket, 39
RTCM-104 version 2.1, 9, 31
S
Satellite, 18, 49
68
Almanac, 28
Ephemeris, 30
Health, 28
Position, 27
Status, 27
Tracking, 48
Save
Almanac, 28
Config, 15
Data, 15
SBAS, 19, 31, 33, 49
Scaling, Almanac, 28
Scope, 9
Select Waypoint, 60–61
Self-Test Result, 56
Serial Port, 15
Set, 50
Configuration, 35, 39, 60, 63
Date/Time, 35, 40, 50
Datum, 35, 40
Default Message List, 35, 41, 65
DGPS Configuration, 35, 41
Differential Message Rate, 35, 42
Force 1 Shot 1PPS, 40
Mask Angle, 35, 42
Operating Mode, 35, 43
Receiver Parameter, 60, 64
Timing Parameters, 35, 47
Tropospheric/Ionospheric Model
Use, 35, 48
SMART ANTENNA User Manual, 9
Solution, Position, 18, 49
Square Column field, 61
Standard for Interfacing, National
Marine Electronics Association, 9
Standard Positioning Service (SPS), 28
Standards for Differential NAVSTAR
GPS Radio Technical Commission for
Maritime Services, 9
Status, 19, 49
Base, 19, 31, 49
DGPS, 18, 23, 49
Receiver, 19, 49
SBAS, 19, 49
Stop, 16
Subframe, 28
StarView User Manual Rev 4
Index
Summary, Automatic Log, 19, 34
SUPERSTAR II User Manual, 9
SVs, 35, 54–55
System, Restart, 35, 38
T
Terminal (COM), 18, 21–22, 53, 59
Time, 50
& Date, 56
Information, 19, 33, 49
Solution, 33
To Waypoint, 57
Track
& Speed, 55
SV Request, 35, 48
Tractor, 39
Tropospheric/Ionospheric Model Use,
35, 48, 50
U
Update Firmware, 8
User Position, 57
V
Velocity, 25
View, 17, 52
W
Waypoint
Define, 60–61
Select, 60–61
To, 57
X
XYZ Position Solution, 18, 25, 49
Y
YUMA almanac, 36
Z
Zone Number, 61
StarView User Manual Rev 4
69
OM-20000081
Rev 4
2005/05/16