1
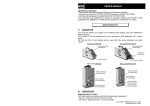
Declaration of compliance...............................................................2
Precautions before use....................................................................3
Air supply ........................................................................................3
Getting started .................................................................................. 3
Use .................................................................................................... 3
Maintenance ....................................................................................... 3
Composition ....................................................................................3
Operating instructions ....................................................................3
Recommandation ................................................................................ 3
Description ......................................................................................... 3
Setting ...............................................................................................4
Use of the Swan neck clamp................................................................ 4
Technical specifications ..................................................................4
160412 – D8
www.gys.fr
DECLARATION OF COMPLIANCE:
GYS certifies that the Gyspot DRILL is manufactured in compliance with the directive 89/392/CEE, amended
2006/42/CEE.
PRECAUTIONS BEFORE USE
In order to avoid risks of injuries, any person who operates, installs, services or changes accessories, as well as any person
working in the area of this tool, must read and understand the following instructions.
Air supply
• Compressed air can cause serious injuries.
• Always turn off the air supply and disconnect it before installing, removing or adjusting any accessory on this machine, or
before performing any maintenance on this machine.
• Do not point the jet of compressed air at other people or yourself; keep bystanders away while operating the tool.
• Whiplashing hoses may cause serious injuries; check carefully the hoses and fittings for leaks and deteriorations.
• Do not fit quick change couplings onto the machine as vibration can cause the coupling to fail.
• Read the instructions for a proper assembly of the tool
• In case swivel connectors are used, secure them with locking pins.
• Operate the tool at the air pressure indicated in order to ensure maximum durability of the tool
• Manipulate hoses and fittings carefully. Do not force the hose off the air inlet. Keep air hoses away from heat sources,
lubricants and sharp materials. Do not use damaged, frayed or deteriorated air hoses and fittings. Be sure all fittings are
tightly secured.
Personal safety
• Operators and service personnel must be able to physically manage the tool and follow the appropriate instructions.
• Keep body stance balanced and firm. Vibrations, repetitive motions or uncomfortable positions may be harmful to your
hands. If discomfort, tingling feeling or pain occurs; stop using any machine and seek medical advice.
• Use protective equipment such as glasses, gloves, safety shoes as well as acoustic protection.
• This machine has not been designed to be used in an explosive atmosphere environment. Do not lubricate tools with
flammable or volatile liquids such as kerosene, diesel or petrol.
• Avoid direct contact with the parts in motion when using the tool, to prevent cuts.
• The splitting of a pneumatic tool casing in use may cause serious injuries. The smallest debris can cause eye injuries and
lead to blindness.
• Always stay at a suitable distance from the cutters, blades, tools in motion, etc…
Tool use and care
• Do not carry the machine by the hose
• Do not wear watches, ring bracelets or loose clothing when using the tool, and keep long hair away from moving parts.
• For safety, top performance and maximum durability, operate the tool at the recommended air pressure.
• Cutters heat up while in use. Let them cool down before seizing them. Disconnect air supply before changing the cutters.
• Operate the Gyspot DRILL with care to prolong its efficiency in time.
• Do not modify the tool or its accessories
2/4
AIR SUPPLY
Getting started:
The compressed air network must be perfectly purged and adapted to the tool’s consumption. A filter-lubricatorregulator unit must be installed at a maximum distance of 10m before the tool (except for tools designed for use
without lubrication). Its regulating pressure must be set at 7.5 bars and the oil flow at about 1 drop every 30 seconds
for 100L/mn airflow. Warning ! The air consumption of the tool must absolutely be superior to the minimum priming
airflow of the lubricator. A shut-off valve must be installed upstream.
The connection between the filter-lubricator-regulator unit and the tool must be made with a special air supply flexible
hose made of rubber or PVC, with a maximum length of 10m and a minimum inside diameter of 8 mm. It must be
equipped with a semi-automatic self-closing coupling close to the tool, in order to unplug it easily.
Use:
Exclusively use accessories in perfect condition and matching the specifications of the tool.
Disconnect the tool from air supply before changing the cutters. Check that the cutter is perfectly tightened before
using the tool again.
Regularly check the air supply pipes. In case deteriorations or leaks are noticed, proceed to the repair immediately.
Broken pipes may cause serious injuries.
Maintenance:
Every day, before use, disconnect the tool from the air line and pour a few of suitable oil through the air intake.
Do not use flammable or volatile liquids such as kerosene, diesel or petrol.
Regularly proceed to check the level of the lubricator, and to bleed the filter and pipes.
Ensure that the air supply fittings, air pipes and hoses, and accessories are in perfect condition.
Regularly bleed the pipes and the tank of the compressor.
Use only genuine spare parts to ensure the maintenance of the tool.
GYS will not be liable it the tool is modified and if general safety instructions regarding air tools are not observed.
Filter-lubricator-regulator unit
quick connector
COMPOSITION OF THE GYSPOT DRILL REF.050464
• 1 spot weld drill
• 1 swan neck-clamp
• 2 cutters:
Ø 8mm ref. 053069
Ø 10mm ref. 053076
• 1 maintenance wrench
• 2 air flow quick connectors
• 1 user manual
OPERATING INSTRUCTIONS
Recommandations :
Not recommended
Do not use the spot weld
cutters included with another
drill; they would be damaged.
Description
Optimal:
Using the GYSPOT Drill will
guarantee the longevity of your
spot weld drills.
Swan neck -clamp
Support jaws
Drill position adjustment wheel
(forward / backwards)
Push arm
Throttle trigger
3/4
Setting:
1- Remove the Swan neck-clamp 2- Insert the drill and tighten it using the provided wrench
3- Setting the depth of cut:
a. Apply a pressure on the support jaws (a) with your fingers in order to retract them
- +
b. Adjust the depth of the cutter with the wheel (b) so that the difference (∆) between
the jaws and the extremity of the cutter match the thickness of the material
4- Re-install the swan neck-clamp
5- Position the Gyspot Drill perpendicularly to the material to be removed.
6- Apply pressure to the push arm to bring the cutter to make contact with the material
7- Pull the throttle trigger to start cutter rotation
8- Once the cut is through, release pressure from the push arm, then release the throttle trigger to stop rotation
Use of the Swan neck-clamp
With the swan neck-clamp
Without the swan neck - clamp
TECHNICAL SPECIFICATIONS
A- Gyspot DRILL
Diameter
8 mm
Rotation speed
800 RPM
Power
400 watt
Length
349 mm
Weight
2,3 kg
Operating noise level
85 dba
Air consumption
Air pressure
140 L/Min
6,5 Bar
B-High-quality cutters (Ø 8 / Ø10)
The quality of the steel sheets on car body is characterised by their resistance
and hardness. The resistance is measured with the effort required for
bending, tearing, or rupture, and is expressed in MPa. The hardness is
measured by the resistance to wear and abrasion, and is expressed in Vickers
HV. The great majority of HSS (High Strength Steels) drill bits have similar
hardness than these steels, hence causing issues to drill through high
resistance steels.
The bits delivered with the Gyspot drill are made of tungsten carbide, which
gives them a hardness superior to the modern steels’, which is 600 to 800 HV.
In addition, a specific coating is added to improve the longevity, hardness up
to 3000 HV, and protect against high temperatures (up to 900°C).
4/4