1
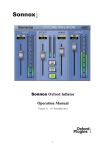
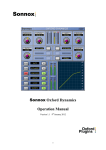
OXF-R3 EQ Plug-in Manual
1
Sonnox EQ Plug-in Operation Manual
1 Introduction.
Congratulations on acquiring the OXF-3 EQ plugins. This application draws on the considerable
experience of the Oxford Team in professional audio and studio systems, the team that designed the
OXF-R3 console system. The Oxford EQ plug-in is based on the OXF-R3 EQ section and provides a
truly professional EQ processor for the VST and Audio Units user. The DSP quality of your plugin is
actually even better than that on the OXF-R3 console because of the increased resolution of the DSP
formats.
It is a fully functional 5-band application with selectable shelf settings on LF and HF sections.
Additionally, separate variable slope low pass and high pass filters are provided. The EQ also features
4 different selectable EQ types that cover most of the EQ styles currently popular amongst professional
users, including some legacy styles, which are renowned for their artistic capability. The use of novel
coefficient generation and intelligent processing design provides unparalleled performance that
surpasses analogue EQ in both sound quality and artistic freedom.
2 Supported Platforms
Digidesign Pro Tools (TDM and LE)
TC PowerCore
VST
Audio Units
See supplement for platform specific data.
3 Revision History
•
1st April 2007 - Generic Sonnox version
2
4 Control list and functions.
The Plug-in user interface consists of two sections for EQUALISATION and FILTERING functions.
The filter section controls, included in the EQ GUI, are greyed out when the filter is not in use, and
vice versa. Note that placing the pointer over any rotary control will indicate the current value without
parameter change.
1. About.
Click the Sonnox logo to display registration and version information.
2. Response display.
Displays current active EQ and filter response curves. The graph will rescale to match the current
sample rate.
3. LF and HF (19.) SLOPE button.
Selects LF and HF filter Slopes 6dB – 36dB/oct in 6dB/oct steps.
4. / LF and HF \ (17.) button.
Switches low pass and high pass filters in/out.
5. LF and HF (15.) FILTER FREQ controls.
Sets LF and HF filter turnover frequencies.
3
6. FREQ controls.
Sets the centre frequencies or turnover frequencies for shelf curves.
7. Q controls.
Sets bandwidth of EQ curves. Sets amount of overshoot function in shelving sections.
8. LF and HF (14.) Shelving buttons.
Select shelving function for high and low EQ sections.
9. +/- controls.
Sets Boost or cut gains. New for VST Native version: If your host supports scroll-wheel operation to
the knob controls, then each increment or decrement of the scroll wheel will inc/dec the gain value by
exactly 0.5dB, thus allowing for an accurate incremental step.
10. IN buttons.
Allow individual EQ sections to be switched in/out.
11. A & B (13.) buttons.
Two complete EQ / filter settings can exist simultaneously. The A&B buttons allow toggling between
them for comparison purposes.
12. Gain control.
Sets the attenuation level to the EQ section to avoid clipping signals when in boost.
13. A & B buttons (as 10.)
14. LF and HF Shelving buttons (as 8.)
15. LF and HF FILTER FREQ controls (as 5.)
16. +/- buttons
Selects EQ function types. Four types are offered on the Oxford R3 EQ plug-in.
18. IN button.
Applies the EQ function type selected by +/- push buttons in (22.) The IN button light will go out if
another EQ type is selected, indicating that the EQ remains unchanged until the IN button is depressed.
20. 8 Character display.
Displays the graph type selected by +/- buttons in (22.).
21. Overload indicator.
Displays signal overload at the output of the EQ and Filter sections. The default mode for this function
is latching, requiring a click to reset. Clicking and holding on the overload area produces a pop-down
menu that enables selection of either 2 or 5 second time out settings to facilitate initial EQ adjustment.
No Latency mode
No Latency mode can be switched on or off from the menu which appears when the top left of a plugin
is clicked.
Mouse rate control
In linear mode (see below), fine adjustments to any control setting can be achieved by pressing the
‘Apple command’ (Macintosh version) or ‘Shift’ (PC version) key before clicking on the control to be
adjusted and holding this key down during the operation.
This rescales the control rate with the mouse movement so that very fine adjustments can be made.
4
Knob control modes
If your host application supports it, all plugins can support three modes of control for knobs: Circular
(the control is set to the value at which it is first clicked, and the value then increases or decreases with
circular mouse movement), Relative Circular (the control’s value increases or decreases with circular
mouse movement relative to its initial value), and Linear (the control’s value increases or decreases
with up and down mouse movements respectively).
At this time, Cubase and Nuendo are known to support this feature. For example, in Cubase 5.x, select
the ‘Edit’ menu, and choose ‘General...’ from the ‘Preferences’ submenu. You may then choose the
mode from the ‘Knob Mode’ drop down box in the Preferences dialog. In Nuendo or Cubase SX,
select the ‘File’ menu, and click ‘Preferences’. When the dialog box appears, click the ‘Controls’ item;
you can then choose the mode from the ‘Knob Mode’ drop down box.
If you are using any other host, please consult your user manual for more information.
5 Oxford EQ Specifications and Control ranges.
Section
Gain
Frequency
LF Filter
LF Peak/Shelf
LMF
MF
HMF
HF Peak/Shelf
HF Filter
6dB/Oct steps
+/-20dB
+/-20dB
+/-20dB
+/-20dB
+/-20dB
6dB/Oct steps
20Hz - 500Hz
20Hz - 400Hz
30Hz - 600Hz
100Hz - 6KHz
900Hz - 18KHz
2KHz - 20Khz
1KHz - 20KHz
Total dynamic range
Harmonic Distortion
Control induced noise
Q/Slope
> 138dB* (RMS
unweighted)
Undetectable
< -95dBr (peak)
0 –36dB/Oct
0.5 – 16
0.5 – 16
0.5 – 16
0.5 – 16
0.5 – 16
0 –36dB/Oct
Overshoot
0 – 50% (Q adjust in Shelf)
0 – 50% (Q adjust in Shelf)
For any single section, including filters
Using FFT analysis down to –160dBr
During adjustment of any single control
* Excluding excess noise produced by the EQ applying gain to a 24bit dithered but silent input, or cascaded EQ applying gain to
previous sections.
6 EQ types included in the Oxford Plug-in.
Programme equalisers have expanded, beyond their original use as distance correction devices for film
and vision, into highly creative tools that represent a leading part of the sound engineer’s artistic
palette. A great many EQ designs have been developed over the years that have been attributed with
qualities that lend themselves to particular uses and sounds. The Oxford EQ plug-in is designed to be
flexible enough to address as many of these generic types as possible from a single application, by
presenting a variety of types to the user. The following pages are presented as a general explanation of
many of the factors that affect EQ performance and to illustrate how we have addressed these issues
with the Oxford EQ plug-in.
Many types of EQ exist with many areas where they differ. One of the most important areas is the issue
of control ranges and interaction. Whilst it is true that with a parametric unit with continuous controls
(i.e. not quantised) any response could be obtained by matching their curves, many of the popular EQs
have control dependencies that err towards specific application. One of the main areas where EQs
differ is Gain / Q dependency. Most analogue EQ has Gain / Q dependency as a result of the circuits
5
used. This factor can greatly affect the artistic style that an EQ presents by facilitating certain
parameter settings and encouraging particular uses when the unit is operated.
In the Oxford EQ plug-in we have covered this situation by providing 3 different styles of EQ that take
account of Gain / Q dependency as well as overall control ranges. The following section describes
these options.
6.1
Bandpass sections.
EQ type 1
This style has minimal Gain / Q dependency, smaller amounts of boost or cut still have relatively high
Q and it is therefore precise and well defined in use.
However it is sometimes difficult to obtain overall EQ fill on combined sources and subtle EQ on
vocals and the like, as the user needs to adjust the Q control to maintain an effect when the gain is
changed. Failure to understand this fact has often added to the reputation of this type of EQ for
sounding ‘hard’ or ‘harsh’. However, because the user retains separate control of all its parameters,
this EQ is still the most flexible for users that have the time and patience to spend when using it.
It is most like the original 4000 series SSLs, and other ‘clinical’ styles of EQ that became popular in
the 1980’s.
6
EQ type 2
The type 2 EQ is exactly similar in boost as the type 1, but has constant Q responses in cut. This is the
only type of EQ offered in the Oxford plug-in that has unsymmetrical curves. Therefore EQ done in
boost cannot be readily reversed by cut afterwards. The EQ resembles some speciality legacy units and
lends itself well to resonance control for percussion instruments such as drums, since relatively high Q
is available at low gain settings, whilst fairly subtle ‘fill EQ’ can be achieved in boost settings at the
same time.
7
EQ type 3
This style of EQ has a moderate amount of Gain / Q dependency whereby the Q reduces with gain.
This provides the EQ with a softer characteristic as EQ is progressively applied and since the effective
bandwidth is increased for low gain settings, it sounds louder and more impressive when used at
moderate settings. The gentler Q curve also lends itself better to overall EQ fills and more subtle
corrections in instrument and vocal sources. Turning the Gain control seems to produce the effect that
the ear is expecting without needing to adjust the Q control too often. Therefore EQs of this type are
often dubbed as ‘more musical sounding’.
This EQ most resembles the older and well-loved Neve types, their modern derivatives and later SSL
G series. Also many of the more popular outboard EQs have this dependency to some extent.
8
EQ type 4
EQ type 4 builds on the type 3, using a far greater Gain / Q dependency which maintains an almost
equal area under the curve in the boosted region with gain control operation. It is extremely soft and
gentle in use and is most suited to overall EQ fill and character modification for mixed parts (and
completed mixes) where subtle changes in overall impressions are required. Therefore it will also
prove useful in mastering situations where there is requirement to match the sounds of tracks from
different sources on a common production release.
6.2
Shelving sections.
In the Oxford EQ, the highest and lowest bandpass sections can be independently switched to shelving
functions. Although shelving functions are often considered elementary, they are by no means all the
same and their importance to the sound engineer should not be underestimated. Various types in
common use are considered to favour certain types of use or are considered preferable by users of
differing persuasions.
Our analysis of common shelving EQs has shown that one of the most important differences in the
sound of the shelving EQ is the response around the band immediately below the HF section (and
above the LF section). Many of the most loved classical EQs have a degree of ‘undershoot’ in this
region (when in boost), either by design or as a result of circuit limitations in legacy units. Therefore
most units can be characterised by control within this region of the frequency response. In appreciation
of the importance of this parameter, the Oxford EQ provides the facility to modify the response in this
region to provide differing styles of shelving EQ.
9
Shelving overshoot control
(HF shelf Q control)
When the HF shelving function is selected, the Q control provides control of the ‘overshoot’ function.
With the Q control set to minimum (yellow plot) the section has no overshoot and performs a basic and
accurate shelving function. This is most like the responses provided by the original SSL 4000 EQs and
many other outboard units often described as ‘clean’ EQs. Although these are still very popular units,
some engineers complain that they can sound harsh and overbearing in comparison with legacy EQs
As the Q control is increased the overshoot factor is also increased. For instance the red plot shows the
slight dip in the response at around 1.5KHz for a boosted HF setting of 6KHz. This has the effect of
suppressing the perceived mid range boost that occurs with the previous ‘clean’ variety, reducing the
apparent ‘hardness’ of the sound. This, along with the increased slope rate, provides more apparent
definition to the EQ in the band of interest.
The purple plot shows the effect of the Q control in mid position. This produces a gain loss of around
10% (of the boost gain) in the overshoot region and further defines the effect described above. This
setting provides a response most like the legacy Neve designs and their derivatives and the later SSL G
series EQs. This response produces an optimum effect by providing what the ear expects to hear as the
gain control is operated and can explain the enduring popularity and renowned musical qualities
attributed to EQs of this type.
At maximum (blue plot), the Q control provides for an overshoot of half the total boosted gain, i.e. for
+20dB total HF boost the maximum loss in the overshoot region will be –8dB. The curves are
symmetrical in cut and boost gain settings.
10
7 Copyright and acknowledgements
Trademarks and content copyright © 2007 Sonnox Ltd. All rights reserved.
This Product is manufactured and supplied by Sonnox Ltd. under licence from Sony UK Ltd.
The following patents protect this Product:
GB2330747, GB2350505, GB2350956, US6581080
DIGIDESIGN, AVID, and PRO TOOLS are trademarks or registered trademarks of Digidesign and / or Avid Technology, Inc.
All other trademarks are the property of their respective owners.
TC PowerCore, the TC PowerCore Logo and all TC product names are trademarks or Registered Trademarks of TC
ELECTRONIC.
VST is a Trademark of Steinberg AG.
All other product and company names are Trademarks or Registered Trademarks of their respective holders.
11
Platform Specific Supplement
1
Available Platforms
Digidesign Pro Tools (TDM and LE)
TC PowerCore
VST
Audio Units
2
Included Plugins (Pro Tools TDM and PowerCore).
Three separate plug-in types are provided to the ProTools TDM and Powercore user in this package to
enable the user to optimise processing load depending on requirements during session:
•
5 band EQ with Filters.
•
5 band EQ without Filters
•
3 band EQ (no LMF or HMF sections (TDM)
•
Filter section only.
•
Mono-only variants of the above. (PowerCore)
•
Backward-compatibility variants of the above (PowerCore if required – comes as a
separate installer)
For PowerCore, each type of plug-in has 4 variants – a new one which automatically detects whether
mono or stereo is required, a mono-only version (placed in the Sony/Mono sub-directory) plus
replacement backward-compatibility stereo-only and mono-only versions (placed in the
Sony/Backward-Compatibility sub-directory).
For the ProTools LE, VST and AU Native user, there is just one fully functional plug-in with both EQ
and Filters.
3
System Requirements.
For latest System requirements, please see www.sonnoxplugins.com
Pro Tools
•
Approved Digidesign CPU and configuration
•
Pro Tools HD or Mix system (TDM version).
•
Pro Tools LE system (LE version)
•
iLok USB Key
12
PowerCore
VST Native
•
Approved TC Powercore CPU and hardware configuration
•
Macintosh version: OSX 10.4 (Tiger) or higher with a VST or Audio Units
compliant host application (Nuendo, Cubase, Logic, AU Lab, Digital Performer, etc).
•
Windows version: Windows XP with a VST compliant host application (eg Nuendo,
Cubase, Ableton Live, etc)
•
800x600 minimum display
•
A VST or Audio Unit compliant host application (e.g. Cubase / Logic / Nuendo /
Spark / Digital Performer)
•
One or more TC Powercore devices (PowerCore PCI mkII, FireWire, Compact,
Element, Unplugged, and soon PowerCore Express) with driver version 2.0 or
higher.
•
iLok USB key, loaded with the appropriate authorisations.
•
Windows XP with a VST compliant host application (eg Nuendo, Cubase, Ableton
Live, etc)
•
800x600 minimum display
•
iLok USB key, loaded with the appropriate authorisations.
Audio Units
.
• Approved Apple CPU and OS X 10.4 or higher.
• Audio Unit Host application.
• iLok USB key required.
4
Installation and Authorisation.
All versions
You will need to authorize your software by transferring the asset for your product to your iLok before
use.
CD purchases: you can do this by following the instructions on the inlay card supplied with your CD.
Online purchases: you can do this by following the instructions sent in your order confirmation email
after purchase.
4.1
Pro Tools (Macintosh)
Double click the installer icon for your product to begin. Follow the onscreen prompts.
The installer will search for the ‘DAE:Plugins’ folder (OS9), or ‘/Library/Application
Support/Digidesign/Plug-Ins’ folder (OSX). If found, the plugin will be installed to this location;
otherwise, an error will be reported.
13
You will need your authorised iLok plugged into a free USB port on your machine at all times when
using the plug-in.
4.2
Pro Tools (Windows)
Begin installation using the setup menu (CD purchases), or double click the installer icon for your
product. Follow the onscreen prompts.
The installer will place your plugins into ‘<X>:\Program Files\Common Files\Digidesign\DAE\PlugIns\’, where <X> is the drive containing your Windows directory.
You will need your authorised iLok plugged into a free USB port on your machine at all times when
using the plug-in.
4.3
PowerCore (Macintosh)
Double click the .dmg installer file or icon for your product installation to begin. Follow the onscreen
instructions.
When you install your plugins, they will be placed into the ‘/Library/Audio/PlugIns/VST/PowerCore/Sony’ folder, and you have the option of registering them for use as Audio Units
compatible plugins. The new mono-only versions will be installed into a sub-directory of the above
path called “Mono”. The new replacement backward-compatibility versions will be placed into a subdirectory of the above called “Backward-Compatibility”.
Please note: In the past there have been unreliability problems with the process of wrapping Oxford
plugins for Audio Units compatibility. To improve this situation, the downloaded installer .dmg
volume now contains the latest “TCAU Patcher” installer supplied by TC Electronic. Use this if you
wish to be sure that your plugins are wrapped correctly for Audio Units compatibility.
4.4
PowerCore (Windows)
If any older versions of the plugins are installed, move them to a safe storage location outside of the
VSTPlug-ins directory so that hosts will not find them. If you do not do this, the loading of old
sessions may fail to find the new plugins correctly and there may be conflicts that lead to crashes.
Double click the installer icon for your product to begin, and follow the onscreen instructions.
When the plugins are installed, the setup program will attempt to detect your shared ‘VST Plug-ins’
directory. However, you may also select another location if desired. The default installation location is
…\VstPlugins\PowerCore\Sony for all the new combined auto-mono-stereo versions, and
…\VstPlugins\PowerCore\Sony\Mono for the new mono-only versions, and
…\VSTPlugins\PowerCore\Sony\Backward-Compatibility for the new replacement versions of the
old mono-only or stereo-only plugins (applies only to Oxford EQ and Oxford EQ plugins.)
4.5
VST Native (Windows)
Double click the installer icon for your product to begin, and follow the onscreen instructions.
When the plugins are installed, the setup program will attempt to detect your shared ‘VSTPlugins’
directory. However, you may also select another location if desired. The default installation location is
…\VstPlugins\Native\Sony.
4.6
Audio Units (Macintosh)
Double click the installer icon for your product to begin. Follow the onscreen prompts.
You will need your authorised iLok plugged into a free USB port on your machine at all times when
using the plug-in.
14
5
GML8200 option (TDM and RTAS only)
The GML8200 emulation is available as a cost option for TDM and RTAS versions only and the
applications replace the Sonnox Oxford EQ with new applications that include the GML8200
emulation.
The EQ plug-in equipped with this option works in exactly the same way and includes all the features
of the Sonnox Oxford EQ and Filter section. The extra GML8200 response curves are available as an
additional selection in the Type field of the +/- buttons (22).
When the GML-EQ type is selected the Q controls of the LF and HF sections (13.) are inoperative
when in shelving function. Any previous setting of the Q controls will be restored when the EQ is reset
to any of the appropriate GML8200 band pass or Sonnox Oxford EQ selections.
5.1
GML8200 option Specifications and Control ranges.
When the GML option is selected, the EQ control ranges change to accurately match those available on
the outboard unit.
Section
Gain
LF Peak/Shelf
LMF
MF
HMF
HF Peak/Shelf
Total dynamic range
Harmonic Distortion
Control induced noise
+/-20dB
+/-20dB
+/-20dB
+/-20dB
+/-20dB
Frequency
Q/Slope
15Hz - 800Hz
15Hz - 800Hz
120Hz - 8KHz
400Hz - 26KHz*
400KHz - 26Khz*
0.4 – 10
0.4 – 10
0.4 – 10
0.4 – 10
0.4 – 10
> 138dB (RMS unweighted)
Undetectable
< -95dBr (peak)
For any single section, including filters
Using FFT analysis down to –160dBr
During adjustment of any single control
* When the Pro Tools system is operated at 44.1KHz or 48KHz sampling rates the highest signal frequency is limited to around
20KHz. However when centre frequencies above 20KHz are selected, the EQ maintains a response that is accurate for any
portion of the curve that lies within the legal bandwidth limit of the system.
15
5.2
GML8200 responses.
The responses of the emulation are very accurately matched to the out board analogue unit, giving all
the character of the original GML8200 EQ, but with the added bonus of full +/-20dB gain ranges.
Also, the Sonnox Oxford EQ filter sections may be run whilst in GML mode for additional processing
effects.
GML8200 Shelving sections.
Characteristically gentle GML8200 shelving curves with frequency range to 26KHz and with full +/20dB boost and cut gain ranges.
GML8200 Band pass sections.
GML8200 band pass section responses, showing full frequency ranges from 15Hz to 26KHz with +/20dB gain ranges.
16
6
6.1
Preset Manager (PowerCore and VST).
Onboard Presets Manager.
This plug-in comes equipped with its own on-board Presets Manager, which is displayed at the top of
the plug-in window, as if it were created by the host. The reasoning behind this is to allow increased
portability of your plug-in presets across all the host applications that support PowerCore or VST,
while also providing a consistent and versatile interface. While most host platforms allow creation and
loading of presets, these host-created preset files are not portable between different platforms. With the
new presets manager for Oxford plug-ins, you can create a named preset on one platform and load it on
a different platform.
On Windows XP, the default directory for the factory presets provided with the Sonnox Oxford EQ is
located at:
C:\Program Files\Sony\Oxford Plugins\Presets\PowerCore\Oxford EQ
On Mac OS-X systems, the default directory for the factory presets provided with the Sonnox Oxford
EQ is located at:
/Library/Application Support/Sony/Oxford Plug-Ins/Presets/PowerCore/Oxford EQ
…and the presets are also written to the user-domain equivalent (in case more than one user requires
private presets) at:
/Users/username/Library/Application Support/Sony/Oxford PlugIns/Presets/PowerCore/Oxford EQ
…see section below “Organising Presets for Multiple Users” for more information on this.
For VST Native plugins, replace “PowerCore” in the above directory paths with “Native”.
It is recommended that you create a sub-directory within this factory preset directory to store your own
presets. You can do this when you save your first preset, or by using a window browser in WinXP. If
you wish, you can re-organise the factory presets along with your own presets into any hierarchical
directory structure that reflects the way you work. It is recommended that you adopt a convention to
help you navigate more intuitively, such as giving directory names all upper case letters. Either way,
when you click the “Load” button of the presets manager, you will be presented with an
alphabetically-sorted hierarchical menu of the available presets that reflects the directory structure you
have chosen, and you can navigate the menu to choose which one to load. Once a preset is loaded, its
name will appear in the large text display window in the middle to remind you where the current
settings originated.
The Load Next and Load Prev buttons, labelled as “+” and “-”, will step forwards or backwards
through the hierarchy of presets, loading them. This allows quick comparisons, or quick stepping.
Successive clicking of the load next button will step through every preset in every directory beneath
the current directory (see “Browse” below for selecting the current directory.)
The “Save” button allows you to create a new preset from the current settings of the plug-in, and
allows you to select where in the directory structure you wish to save it. The name of the preset is the
same as the file name you give it. Clicking on the save button brings up a menu allowing you options
17
either to overwrite the current preset now, overwrite the current preset with a query request, or create a
new preset:
The “Browse” button allows you to set the current directory to look in for presets. By default this will
be the factory presets directory, but you can temporarily change it to anywhere you want. The current
directory is regarded as the top of the directory structure, so when “Load” is clicked, the menu
presented will include every preset in every subdirectory beneath the current directory.
The “Delete” button allows you to delete a preset. By default, the factory presets are created as read
only files, thereby preventing accidental deletions of factory presets.
The “A/B” button allows you to compare two sets of settings with a single click. Whenever this button
is clicked, the current settings are saved into a backup store, and the contents of the backup store
moved to the current settings. Initially, the backup store is loaded with the default state of the plug-in
on start-up, so use of the A/B button will compare whatever plug-in settings you have created to the
default settings, which will usually be equivalent to comparing the audio with and without the plug-in
affecting the sound. However, if you switch to the default settings and change them, this is what the
other settings will be swapped or compared against. Thus the A/B button allows you to quickly
compare the audio with and with out the plug-in, or compare one setting against another.
The “A/B” button also has a menu beneath it that is accessed by clicking on the A/B button and
holding the click for half a second. This submenu allows you to copy the current settings over into the
backup store so that you can sync the two together before making some changes for careful
comparison of sounds:
The displayed Preset Name is fully linked into the VST program name so that saving and restoring the
project on the host platform will save and restore the preset name. When a project is restored, the
preset manager will attempt to find the preset name given to it in the preset directories so that “+” and
“-” will work from that point on.
By default, the displayed Preset Name will include a path down from the current directory so that you
can tell which sub directory a preset comes from. You can turn this option off using the main plug-in
menu option “Display Preset Path Names”. You may wish to do this, for example, if you have deeply
nested directories of presets, and there is not enough room on the plugins display to fit both the path
and the name.
The Preset Name displays a “*” at the end if the settings have been altered in anyway over the original
loaded settings.
18
6.2
Organising Presets with Multiple users.
If multiple users will be using the plugins installed on a single computer, then the best idea is to copy
the factory presets into a place belonging to the individual user, and set the root directory of the presets
manager to point to this new directory. This root directory will be saved uniquely for each user, so
usage by other users will not disturb the preferences of an individual user. Personal presets can then be
made in a subdirectory of the root directory. This way, each user has their own copy of the factory
presets, and their own private presets.
7
Mono, Stereo and Mono->Stereo Versions (PowerCore).
The Sonnox Oxford EQ version for TC Powercore automatically detects whether Stereo or Mono
operation is called for by requesting the number of input and output audio channels from the host.
With one in one out, mono operation is selected. With two in two out, stereo operation is selected.
With one in and two out, stereo operation is selected and the single input is automatically duplicated to
both DSP channels.
The Oxford EQ comes as 6 DLL’s (Windows) or 6 Bundles (Mac). The two main ones to use are
“Oxford EQ” and “Oxford EQ Direct”. These will work in both Stereo and Mono mode. The other
four are provided to maintain backward compatibility so that projects saved with the old mono-only or
stereo-only versions will continue to work.
On Windows XP, the stereo-only and mono-only DLL’s are contained in directory
…\VSTPlugins\PowerCore\Sony\Backward-Compatibility, and the new stereo or mono versions
are contained in …\VSTPlugins\PowerCore\Sony (the new location for Oxford plugins for
PowerCore.)
8
Integrated Native-PowerCore Versions (VST-only)
The VST PowerCore plugins for Mac/Intel-Mac (and WinXP soon) have a major new feature – the
Native DSP code is now included and integrated seamlessly.
Project Portability, Upgrade-ability and Fail-Safe Working
This allows for a whole new set of freedoms when it comes to working with Powercore. For example:
Imagine working in your studio using a Powercore-accelerated system. Some of your Oxford
Powercore plugins are in Powercore mode, and some in Native mode, to allow you to balance your
resources. You save your project and copy it to your laptop (which has no Powercore hardware), and
the project runs error free on your laptop because your Oxford Plugins automatically and quietly revert
to native processing mode if they do not find any Powercore hardware. So you can continue to work on
your mix as you travel on the train or bus or while on tour. When you return to your studio, you can
copy your project back in, and your plugins will automatically revert back to Powercore, if they were
originally set to Powercore mode. Effectively, this means your Powercore-accelerated system will run
with less CPU burden than your non-powercore-accelerated one, but your project is completely
portable between the two.
This allows an unprecedented level of portability when using Oxford Plugins. You no longer have to
change the Oxford Powercore plugins to Native plugins or vice versa. You simply click on the switch
and it is done, with the settings preserved.
19
Now imagine being a Native plugin user who is running out of CPU power. What you want is to use a
hardware accelerator to free your CPU of some of its burden, but without the hardware accelerator
taking over your system and the way you work, without having to swap out Native plugins and replace
them with Powercore versions. With the new combination Native-PowerCore plugins, this is exactly
what you can do. You can work in Native mode until you run out of CPU. Then you can begin
switching some of your plugins over to using hardware acceleration (with Powercore cards), and they
will run in Powercore mode if the hardware is available, and in Native mode if not. If there is any
problem with the hardware that would otherwise cause you to be unable to run the plugins, they simply
revert to native mode. Thus the inbuilt native mode acts as a safe-guard against hardware failure, or
as a safe-guard against running out of hardware resources.
Finally, forward thinking individuals can purchase or upgrade to the Powercore plugins as an insurance
against running out of CPU, long before they even have any Powercore hardware. If or when the
individual decides they need hardware acceleration, they can purchase it, and their old projects will
continue to work on the new hardware.
How it works.
The new Powercore plugins have some new menu options and indicators to allow you complete
control over the way this new feature is handled.
Firstly, on the top right of the plugin in the title bar, there is a new icon that shows the current
processing mode that the plugin is actually using, either Powercore or VST Native, like this:
Clicking on this icon brings up a new menu, one that allows you to set which mode you want the
plugin to run in, your desired mode of operation: either “Use PowerCore hardware if it is available”,
or “Use Native DSP”. If you select Native mode, this instance of this plugin will run in Native mode
from this moment forward. If you select Powercore mode, this instance of this plugin will use
powercore hardware if it is available, or it will automatically switch to native mode if there is no
Powercore hardware available, or if there is a problem while loading onto Powercore (such as there are
no more hardware resources left, or there is a problem with the fire-wire connection).
Your desired mode of operation is saved with the project so that when you load your project back
in, the desired mode returns back to what it was, on a plugin by plugin basis. When you load presets
using the on-board preset manager, this desired mode data in the preset is ignored, so your desired
mode stays as you set it when trying out different presets. However, when you load presets with the
host, or load a project, this mode is acted on so that a project load restores your plugins exactly as you
left them.
When using a desired mode of “Use powercore if available”, it is quite normal for the icon to display
“VST”, rather than “Powercore”. This shows the actual mode is currently Native mode, for one reason
or another.
Switching between Native and Powercore mode can be done at any time, even while playing.
However, since switching while playing will cause a temporary discontinuity in the sound, it is wiser
to switch while stopped.
By default, the automatic switch over from Powercore to Native (for example because the plugin failed
to find any powercore hardware) occurs without error messages being displayed. The menu that pops
up when you click on the above icons also has an option that allows you to know about any messages
that occur. This is useful, for example, if you are wondering why your plugins are reverting to Native
mode when you are expecting them to stay in Powercore mode. In this mode, all error messages will be
20
displayed except for the case where there is no hardware, or there are no powercore drivers (in which
case it is obvious why the plugin is running in native mode.)
Lastly, there is now a new preference in the main menu under the Sonnox button that allows you to
specify what your default desired mode is for this plugin type. If you prefer your plugin to come up in
Native mode when you insert a new plugin, then set this option. If you prefer it to come up in
powercore-if-available mode, then leave this preference not set.
Native versus Powercore
Generally speaking the Native version of the DSP is identical to the Powercore DSP in terms of the
algorithm and order of processing. However, in plugins involving dynamic gain changes such as the
Oxford Dynamics, Oxford TransMod and Oxford Limiter, the gain calculations are done in the
logarithmic domain. The Native DSP uses a true logarithm/anti-logarithm whereas, by necessity, the
Powercore DSP versions have to use a very close approximation. This means that for the Dynamics,
TransMod and Limiter, the sound of the Powercore DSP is not 100% exactly the same as the sound of
the Native DSP. Neither one sounds better nor worse; it is just that if you try to cancel them out by
putting one in anti-phase, they will not quite cancel all the way.
Native mode is best for recording since the inherent delay is smaller. For mixing, when the number of
inserts can climb to being very large, this is when using hardware acceleration such as Powercore can
really help to relieve the burden on the CPU so that you can still listen in real time.
When changing from one mode to another it is important that you are aware that the delay also
changes, and this will upset the delay compensation that your host has arrived at. Although the plugin
does re-export the new delay, and tell the host that the delay has changed, you may need to save your
project and reload it in order for the host to set up the delay compensation correctly. Indeed, in
Cubase/Nuendo, this has always been true for the Oxford Powercore Plugins regardless of this new
feature. This is because the delay is dependent on the sample rate and block-size, and so cannot be
determined correctly by the plugin until the plugin is fully loaded, by which time the host has already
set up the delay compensation.
One final contrast is that some of the plugins have slight functionality differences when in Native
mode. For example, the Limiter and Dynamics plugins have the option of not applying dither when in
Native mode. This means that if your plugin is set to the “no dither” option and you switch to
powercore mode, it will have to revert to using 24 bit dithering, because when using Powercore it is
imperative that the signal is properly dithered to preserve sonic integrity.
Other examples of differences occur in the preferences menus. For example, when in Native mode, the
“No Latency” option has no meaning, and is either greyed out or replaced with a preference that is
Native specific such as “Enable 24 bit dithering”.
Presets
With regards to presets, the installer installs the factory-supplied presets into two locations – firstly, as
VST presets into the default place for the on-board presets manager to see (/library/Application
Support/Sonnox/Oxford Plugins/Presets/Powercore), and secondly, as Audio Units presets into the
default place for Logic to see (/library/Audio/Presets/Sonnox (AU Poco)). This allows you to use
either of these mechanisms for loading factory presets.
There is one important purposeful difference between loading a preset with the on-board preset
manager, and using the host mechanism: Loading with the on-board preset manager will leave the
Native-Mode/PowerCore-Mode switch as is, where as loading with the Host mechanism will force the
mode switch to be as stored in the host preset data. The reason for this is so that loading a project in
any Host will return the project exactly as you left it, especially in terms of your Native/Powercore
mode setting. However, when using the on-board preset manager, you will be able to step through
many presets using +/-, without affecting your current mode.
21
9
Plug-in Sizes (Pro Tools TDM and PowerCore)
The table below shows the number of plugin instantiations possible rate in a single chip at the three
most common sample rates for each platform.
Instantiations per chip per sample rate
ProTools HD
5 band
EQ Filters
5 band
EQ
3 band
EQ
Filters
only
Mono
Stereo
Mono
Stereo
Mono
Stereo
Mono
Stereo
48 kHz
2
2
5
2
8
4
5
2
Mono
Stereo
Mono
Stereo
Mono
Stereo
Mono
Stereo
48 kHz
6
3
12
6
18
9
12
6
Filters
EQ and
Filters
Mono
Stereo
Mono
Stereo
Mono
Stereo
44.1 kHz
6
3
5
3
3
1
Filters
EQ and
Filters
Mono
Stereo
Mono
Stereo
Mono
Stereo
192kHz
1
2
1
4
2
2
1
48kHz
5
3
5
2
3
1
96kHz
2
1
2
1
1
1*
Instantiations per chip per sample rate
PowerCore Firewire
EQ
96kHz
3
1
6
3
8
4
5
2
Instantiations per chip per sample rate
PowerCore PCI
EQ
192kHz
1
1
1
-
Instantiations per chip per sample rate
ProTools Accel
5 band
EQ Filters
5 band
EQ
3 band
EQ
Filters
only
96kHz
1
2
1
3
1
2
1
44.1 kHz
5
3
5
3
3
2
48kHz
5
3
5
3
3
2
96kHz
2
1
2
1
1
1*
*Too large to fit in one chip; plugin is therefore split over two.
22
10
Graphical Control (Audio Units)
There is added control of the Graphic window area for the Audio Units version.
10.1
‘Sonnox’ Options Button.
Clicking on the Sonnox button produces a pop down menu where the operation of the plug-in user
interface can be customised.
Graph.
These options allow you to turn off the drag handles on the graph display, change the visual
appearance of the EQ bands or set the default vertical scale of the graph.
Knob Mode.
This option sets the operation of the mouse to be either ‘Linear’ – meaning the value increases
or decreases by moving the mouse horizontally or vertically, or ‘Circular’ meaning the knob
value is changed by moving the mouse in a circular motion around the knob.
Over Duration.
This sets the approximate time that the over light will stay on for when the plug-in has
detected a full-level sample at either it’s input or output. ‘Clicked’ means the light will stay lit
until the user clicks on it with a mouse. The other two options will set the length of time in
seconds before the over light goes out after a full-level sample is detected.
Copy A to B & Copy B To A.
These options allow you to copy the two complete settings of the EQ (A and B) to and from
each other.
10.2
Response display.
Displays current active EQ and filter response curves.
The graph can be used to control the EQ if the ‘drag handles’ option is selected via the Sonnox options
button (1). By default the drag handles are shown on the graph. Each drag handle corresponds to the
EQ band or filter section that matches the colour of the drag handle. So, the dark blue drag handle
controls the LF section, the red the MF section, the dark grey the low filter, etc.
Each band or filter can be toggled between it’s in and out state by double clicking on the drag handle
the corresponds to that band or filter. Dragging the handle to the left or right will change the centre
frequency of the band or filter. Dragging horizontally with the ‘alt’ key pressed down will change the
Q for the parametric EQ band sections. Moving the drag handle vertically up or down will boost or cut
the gain of the EQ sections. For the filter sections dragging the handle vertically will increase or
decrease the slope of the filter.
If the drag handles are moved vertically with the ‘shift’ key pressed down then the centre frequency is
fixed and is not allowed to change. This allows you to change the amount of boost or cut without
accidentally changing the centre frequency of the EQ band. It can also be useful for cutting annoying
frequencies that you have to first find by boosting.
The vertical scale of the graph display defaults to +/- 20 dB. The ‘+’ and ‘-‘ buttons on the left edge of
the graph can be used to increase or decrease the scale of the graph. The default graph scale can be
changed by clicking on the ‘Sonnox’ button (1) and changing the option under the graph menu.
23
11
New R3 EQ GRAPH (VST)
Available initially for the VST Native EQ plugins, this will shortly be available for the powercore
versions too.
The new R3 EQ active graph is designed to be an intuitive and accurate tool for making enhancements
or corrections to audio.
New features include:
1.
2.
3.
4.
5.
6.
7.
Adjustable vertical scales from +/-6dB up to +/-80dB, thus allowing finer resolution for small
tweaks, or courser resolution for extreme corrections.
Option to enable/disable auto-scaling of the vertical scales.
Active “handles” on the graph which can be dragged with the mouse pointer to adjust the
shape. All section parameters can be adjusted on the graph without recourse to the knob
controls or the keyboard.
The “Hover” values of all controls in a section activate when the corresponding handle is
being used.
Option to fill the area under the graph, or not.
Option to display graph handles, or not.
Graph setup is saved and restored across instantiations.
Adjusting the Vertical Scale
By default the Vertical Scale automatically adjusts itself to contain the yellow line or all active handles,
which-ever is the bigger. However, this option can be disabled in the menu beneath the “Sonnox”
button, and you can manually adjust the scales as follows:
To the left of the graph there is a “+” button and a “-” button. The “+” button increases the scale…so
successive clicks of the “+” button will take the scale from +/- 6dB to +/-20dB to +/- 40dB to +/-80dB.
Likewise, the “-” button decreases the scale. Below shows the scale at 6dB:
The scale can also be adjusted from the menu under the Sonnox button, where there are 4 new options:
24
The scale is automatically saved between instantiations of the plugin.
Using the Graph Handles
The graph handles are designed to be as intuitive as possible, but the following is a complete list of
what controls cause what affect:
To Drag a Handle:
Click on a handle to move it.
This means to click on the handle with the left mouse button, drag the handle with the pointer, and then
unclick. Moving a handle will automatically enable the corresponding section.
If the handle you want to use is hidden behind another handle, use click + Control Key to grab
the hidden handle ready for dragging it.
Whenever a handle is being used, the hover values of the corresponding section will activate to give
you immediate feedback of which section is being used, and the precise values. For example dragging
on the green handle could show this:
Switching a Section In or Out:
Double clicking on a graph handle will toggle the section IN button.
You can double click and drag without having to click a third time.
Double clicking with the Control Key down will apply the toggle to the handle hidden behind the top
one, if there is one.
Notice that when a section is taken out, the handle remains true to the gain position of the control as
shown below:
25
IN:
OUT:
Note that moving a handle will automatically enable the section, i.e. switch the section In button on.
Changing the Frequency:
Drag the handle right or left to increase or decrease the frequency.
For finer resolution on VST systems, use drag + Shift Key.
Changing the Gain or Slope:
Drag the handle up or down to increase or decrease the gain.
For finer resolution on VST systems, use drag + Shift Key.
On the Low filter and high filter sections, dragging the handle down increases the slope, and dragging
the handle up decreases the slope.
Changing the Q or Overshoot:
There are three ways to do this.
1. If there is a scroll wheel on your mouse, scroll up or down to broaden or tighten the Q or
overshoot. For finer resolution on VST systems, use scroll + Shift Key.
2. If there is a right button on your mouse, drag the handle up or down with the right button.
For finer resolution use Right button drag + Shift Key.
3. Otherwise, use left button drag + Alt Key up or down to broaden or tighten the Q or
overshoot. For finer resolution use drag + Shift Key + Alt Key.
To Default the Entire Section:
To set all controls in a section back to their default values (except for the IN button), use click +
Control Key + Alt Key + Shift Key. You can remember this by thinking of 3 keys for the 3 controls in
the section.
Configuring the Graph for your Preferred Way of Working.
There are two new options in the menu under the Sonnox button that allow you to configure the graph
display to your preferred way of working:
You can disable the graph handles for a cleaner look if you prefer to use the more traditional knob and
button controls and don’t want to be tempted to use the handles:
26
You can also disable the filling in of areas under each section:
12
Troubleshooting and host notes (PowerCore)
In general, all issues that apply to the PowerCore and PowerCore plugins in general apply to the
Oxford plugins. It is always worthwhile consulting the PowerCore user manual first if you are
experiencing problems not discussed in this manual, and also TC Electronic’s support database at
http://www.tcelectronic.com/.
For example, if your host supports delay compensation (as current versions of Logic Audio, Cubase,
and Nuendo do), you should ensure this option is enabled to ensure that no additional latency is added
to audio processed by the Oxford plugins. At the time of writing, latency compensation is unsupported
by some hosts, and it is necessary to use the TC Compensator plugin. These topics are discussed at
length in the PowerCore manual, so it is suggested the user refer to this for further information.
Latency in general can be reduced by lowering your soundcard’s buffer size, but usually at the expense
of increased CPU usage. This is normally achieved from the soundcard’s control panel when no host
applications are running, but consult your user manual for more details.
In general, if you do experience problems which may be of a general nature, it is always worth doing
the following:
•
•
•
checking to see if the same issue arises with the included TC plugins;
updating your host software to the latest release;
downloading the latest drivers for your hardware;
27
13
New Features VST Native Feb/March 2007 (VST)
1.
Auto-enabling of EQ sections. On the Oxford EQ, the bands now automatically enable
themselves if you drag their corresponding graph handle. Previously, the user had to double click
the graph handle to enable the section if it was not enabled. Double clicking still works to turn
on/off the section without moving the handle.
2.
Auto-scaling of the EQ Graph. On the Oxford EQ, the graph now auto scales itself by default,
but you can resort to manual scaling if you wish by setting the new menu option. The auto-scaling
seeks to contain all active handles, or the main yellow line, which ever is bigger, but excluding the
influence of the filters. The auto scaling option is saved as a preference for future sessions. Each
range now has a unique coloured border around the graph to give a more intuitive perception of
which range is currently active.
3.
Right Button drag Adjusts Q. On the Oxford EQ, the graph handles now respond to the right
mouse button to alter the Q of the section. So there are now three ways to adjust the Q, not all of
which will be available, depending on your mouse, and host: 1) alt+left-click and drag, 2) mouse
scroll-wheel, and 3) right click and drag.
4.
EQ Gain controls +/0.5dB jog. On the Oxford EQ, the gain controls respond slightly differently
now to the use of the mouse’s scroll wheel, if there is one, and if the host allows these movements
through to the plugin (which many hosts do not). Now, use of the scroll wheel on the gain knobs
causes a precise increment or decrement of 0.5dB, so providing a quick way to adjust by 0.5dB.
5.
Editable Hover values on EQ. On the Oxford EQ, the knobs hover values are now editable by
clicking directly on them. Because we do not want an editable scribble to interfere with the
process of grabbing the knob handle to turn it, the area of the knob that causes the hover value to
come up has been reduced, and there is a slight (400ms) delay between the pointer entering the
knob control and the hover value coming up. On the other hand, clicking on the knob to grab the
handle causes the hover value to come up instantly. Hover values now disappear 1 second after
leaving the knob area, rather than instantly.
6.
Consistent “Bypass” display. All plugins now show “Byp” in the Sonnox button when the plugin
is bypassed, rather than “Byp” or “Bypass”, depending how much room was available.
7.
A “*” is added to the displayed preset name if any controls have been moved after loading it. It
is not a very simple implementation; for example, if you just toggle a button twice to restore the
settings back to the original, the “*” remains. Also, if you then load a different preset using the
hosts mechanism, rather than the onboard preset manager, and then switch back, the “*” will be
lost.
8.
Over Light is Orange. The Red Over light has been changed to orange to downgrade the warning
level since in Native mode there is no clipping.
9.
Disabling of Over Light. Some people prefer to work without the Over light active because in
Native mode there is no clipping and in many cases there is no reason why the plugin should not
have an output level over 0dB. A new menu option has been added to achieve this.
10. New Bitmaps. The EQ, Dynamics, and TransMod all have new background bitmaps that are less
grainy, and new knob bitmaps that are properly anti-aliased giving a more professional, less
ancient, look.
11. TransMod Name Change. The TransMod DLL name has been changed to Oxford TransMod
Native.dll. to make its name consistent with other oxford plugins.
12. Preset Save Functionality. You now have the option to either to over write the current preset, or
to save to a new preset. When clicking on the “Save” button, a small menu appears that offers
these options.
28
13. Linear/Circular Knob Mode. The Mac VST versions (and shortly the WinXP versions) now
includes the option to use linear or circular mode for operating the knob controls. This option is
accessed from the Menu under the Sonnox button, and was added so that you can use your
preferred mode when the host does not include this as a preference. In Linear Mode, the after
grabbing the control, movement is relative to the starting point. Some subtle changes have been
made to the dynamics controlling the editable hover-values to refine operation. For example, the
hover value us delayed by 1second from coming up when hovering over the centre spindle of the
knob in order to make sure you have time to grab the knob from any point on its surface. This
means you editable value displays will not interfere with the process of grabbing and moving. IN
circular mode, on the other hand, this delay is not needed since you always need to grab the skirt
of the knob rather than the spindle.
29