1
4. How to use
Smartphone Ready Whiteboard ‘MTG Sync’ - User’s Manual
Thank you for your purchase of Smartphone Ready Whiteboard ‘MTG Sync’. Please read through this User’s Manual carefully to
ensure correct usage of the product. Please keep this manual in a safe place.
1. Please read and follow the directions below for proper and safe use.
Warning
• Dispose of this product properly. Do not incinerate. If incinerated, the product may release toxic gas.
Caution
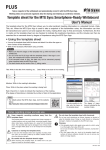
Do not dirty or peel away or otherwise obscure the PLUS logo on the template sheet. Furthermore, do not
attach the pen tray where it will cover part of the template sheet when the image is captured.
Failure to adhere to the above will prevent the smartphone function from working.
• Attaching
the template sheet
• Attaching the pen tray
Attach the template sheet by pressing its magnetic back up
against either the top or the bottom of the whiteboard
frame.
Attach the pen tray (magnetic) to the bottom edge of the
whiteboard.
Template sheet
Caution
• Do not remove the PLUS logo sticker. Doing so may render the product inoperable and will void the warranty.
• Setup the product in accordance with the Setup Instructions found in the back of this manual. Incorrect setup may lead
to damage or injury.
• Do not disassemble or modify the product. Doing so could lead to damage or injury.
Pen tray
5. Specifications
2. Cautions on usage
1. Do not set the product in hot locations, areas near a heating device or in direct sunlight. Doing so may lead to discoloration or warping.
2. Do not set the product in places exposed to dust or humidity. Doing so may lead to discoloration, warping or corrosion.
3. If water or other liquids are spilled on the product, wipe it dry immediately. Otherwise discoloration or warping may occur.
4. The template sheet and pen tray are attached to the whiteboard with magnets. Avoid close proximity with magnetic
storage devices such as bank cards and train passes. There is a risk that the memory data could be damaged if such
devices are brought within around 10 cm (4 inches) of the product. Do not place objects other than the markers and
eraser in the pen tray. They may fall and lead to damage or injury.
5. Refrain from using the product outdoors or places where it may come in contact with water. It may lead to rust or damage.
6. Do not use thumbtacks, nails, ballpoint pens or other metal objects on the whiteboard as any damage they may cause is
irreparable.
7. Avoid using tape or adhesive agents on the whiteboard.
8. Do not drop or hit hard objects on/against the whiteboard or frame. Doing so could lead to damage.
9. Mount this product on a flat wall so that it is level with the wall. If it is mounted at an angle, it could lead to damage or
injury.
10. Do not use the product in a rough manner or for any other purpose than that which it is intended. It could lead to malfunctions, damage or accidents.
11. Use the dry-erase markers and the included eraser to write on the whiteboard or erase.
12. Do not leave writing on the whiteboard for an extended period of time as it may become difficult to erase.
13. Make sure you do not use oil-based markers or paint markers as they cannot be erased. Always use dry-erase markers.
Main unit size
(Excluding protruding parts)
Order code
Product no.
Specifications
423-353
SWB-1812SW
Steel plate / Plain
423-354
SWB-1209SW
Steel plate / Plain
Weight
Mounting brackets
(QTY)
Long side x short side
Width
Height
Thickness
1800 mm
1200 mm
20 mm
14 kg
2x0
(70.87 inches) (47.25 inches) (0.79 inches) (30.84 lb)
1200 mm
20 mm
7.1 kg
900 mm
(47.25 inches) (35.43 inches) (0.79 inches) (15.64 lb)
2x0
Material: Frame and mounting brackets – aluminum, corner parts – ABS, core – cardboard, pen tray – ABS/magnet, board
– coated steel sheet
* Please note that specifications and design of this product may change without prior notice.
Note
Recommended marker : MARKER-BK black [Order code 423-283] Recommended eraser : ER-44369[Order code 44-369]
MARKER-RD red [Order code 423-284]
6. For enquiries relating to product specifications
Please direct enquiries relating to this product to the store of purchase or Authorized Dealer/Distributor as shown below. Please
have the product number and serial number ready. These are found on the the product label.
3. Cleaning
1. Avoid using benzene, thinner, petroleum, acid, polishing powder, scouring pads, hot water and so on when cleaning as it
will damage the surface of the whiteboard.
2. If the whiteboard becomes dirty, wipe it with a water dampened, well-wrung out clean cloth. Writing can become difficult
to erase if the whiteboard is dirty.
If the whiteboard is notably dirty, wipe using a mild detergent diluted more than 10 times, then wipe with a well-wrung out
cloth to remove all detergent. Afterwards, wipe with a dry, soft cloth.
3. If the eraser becomes covered in a significant amount of marker ink, replace it with a new one. If not replaced, it will dirty
the whiteboard and not erase writing properly.
The sponge of the eraser that comes with the main unit can be removed from the case and turned over for further use
(double-sided).
A four-sided replacement eraser (ER-44369) is also available.
See the below website for details on how to use MTG Sync.
http://www.plus-vision.com/en/product/mtgsync/index.html
34-4616-13A
Mounting Method for Various Materials
Smartphone Ready Whiteboard ‘MTG Sync’ - Setup Instructions
• Be sure to setup the product in accordance with the instructions below. Incorrect setup may lead to damage.
• When mounting the whiteboard, make sure the mounting brackets are securely set on the screws to prevent damage or injury.
1. Confirm the type of material that the wall is made of and select the suitable plug and anchor
types from the below table.
2. Use screws with a nominal diameter of 3 to 5 and a head diameter of 6 to 14 mm (0.23 to 0.55 inches).
3. Mount the selected plugs and anchors using the indicated mounting method.
Wall material
1. Check product contents
Suitable plug & anchor mounting method
Wood screws
Whiteboard (with mounting brackets)
Wooden wall
Template sheet
Screw in the wood screw,
leaving a distance between
the head of the screw and
the wall of between 4 to 8
mm (0.16 to 0.31 inches).
Use an auger or
similar sharp tool to
make a starter hole
of the suitable size.
4 to 8 mm
(0.16 to 0.31 inches)
Hook the mounting brackets on
the screws.
Hollow wall anchors Hollow wall anchors designed to open up into an umbrella shape for secure attachment.
Pen tray
User’s Manual with Setup Instructions x1
(this document)
• Selection based
on wall thickness
Template Sheet User’s Manual x1
Markers (black x1, red x1)
Eraser x1
* Note: This product does not come with screws for mounting it to a wall.
2. Attach components
Veneer board
Plaster board
Gypsum board
(Gypsum lining)
Toggle anchors
Tools Needed:
Screwdriver.
This tasks requires 2 or more people.
Wall
Pilot hole Screw
thickness
dia.
dia.
TA
3-5
TB or TH 9 - 12
8
3.5 - 6
TC
16 - 18
Name
Caution
The product mounting method differs depending on the wall material. Please carefully read the section of this manual tilted
"Mounting Methods for Various Materials." Make sure you select the appropriate type of screws for your mounting material and
make sure that the wall is strong enough to support the total weight of the main unit. If the wall is not strong enough, the board
or wall may be damaged.
1. Place the screws in the wall in a level, horizontal manner and
in the designated positions (one on the left, one on the right).
Be sure to leave 4 to 8 mm (0.16 to 0.31 inches) of distance
between the head of the screws and the wall in order to fit
the mounting brackets.
4 to 8 mm
(0.16 to 0.31 inches)
Mounting
bracket
Mounting
bracket
U-plugs
[Rear face]
2. Set the two mounting brackets in the top section on the back side of the whiteboard. Slide the mounting brackets to the left and right in order to align them
with the two screws.
Caution
Make sure the mounting brackets holes are firmly hooked into the screws. It
is possible for the underside of the mounting brackets to catch on the screws,
which may lead to the whiteboard falling. To ensure that the board is properly
anchored, carefully move it left and right and forwards and backwards.
[Side face]
Insert the legs into the hole and
open them on the inside of the
hollow wall using a pin-like
object. Wood screws or tapping
screws with diameters of 3.5 to
6 mm (0.14 to 0.23 inches) can
be used.
Hook the mounting
brackets on the
screws.
Hook the mounting brackets on
the screws.
Name Total plug Pilot hole
length
dia.
U-5
25
5
U-6
30
6
U-8
40
8
U-10
50
10
U-12
60
12
Screw
dia.
2.6 - 4
3.5 - 5
4.5 - 6
6-8
8 - 10
Open a pilot hole
in the wall using
an appropriate
drill.
Set the screws and Tighten with a screwinsert the U-plug.
driver, leaving a distance
between the head of the
screw and the wall of
between 4 to 8 mm (0.16
to 0.31 inches).
Make a hole with a drill of the
suitable diameter.
Screw in the tapping screw, leaving a distance
between the head of the screw and the wall of
between 4 to 8 mm (0.16 to 0.31 inches).
Hook the mounting brackets on the screws.
Mounting bracket
Leave a distance between
the head of the screw and
the wall of between 4 to 8
mm (0.16 to 0.31 inches).
Mounting method
Check that the wall is reinforced
behind the partition joint.
Steel walls
(Partitions, etc.)
Once the umbrella has
opened by tightening
the screw, bring the
screw back 4 to 8 mm
(0.16 to 0.31 inches)
from the wall.
Hook the mounting brackets onto the screws.
Cross-head tapping screws (pan head)
3. Firmly hook the holes of the mounting brackets into the 2 screws on the wall.
Insert the selected
hollow wall anchor
into the wall and
tighten with a
screwdriver.
Suitable for all concrete types
Concrete wall
Brick
Block tiles
Marble
Rock
Select a drill of
the appropriate
size and drill a
hole.
Mounting method
Fold up the
legs.
Two screws with a nominal diameter of 3 to 5 mm (0.12 to 0.2 inches) and a head diameter of 6 to 14 mm
(0.23 to 0.55 inches). Be sure to select the appropriate screws for your wall material. Refer the section in
the instructions, “Mounting Methods for Various Materials.”
Mounting method
Strong anchorage for wooden walls.
• Can be mounted
even if the hollow
portion is small, as
is the case for the
gypsum lining.
1. Attach the template sheet to the board using its magnetic back.
2. Attach the pen tray to the board using its magnet.
3. Mount on a wall
Wall Pilot hole
Name thickness dia.
4 · XS 1.6 - 5
4·S
6 - 12
4 · SL
12 - 18
8.0
4·L
18 - 22
4 · XL
32 - 38
6 · XS 1.6 - 5
6 · MS 1.6 - 9.5
6·S
9 - 16
10.0
6·L
14 - 32
4 · XL
35 - 45
8·S
9 - 16
8·L
14 - 32
12.0
8 · XL
35 - 45
AxB
Pilot hole
AxB
Pilot hole
dimensions
dia.
dimensions
dia.
3x13
4x20
3x16
4x25
2.0
3x20
4x30
3.2
3x25
4x35
3.5x13
4x40
3.5x16
4x50
3.0
3.5x20
5x20
3.5x25
5x25
4.2
3.5x30
5x30
4x13
5x40
3.2
4x16
5x50