1
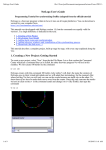
Lesson 2
Getting to Know Patches
In the first lesson you were introduced to turtles. You wrote a script and the turtles
followed your directions. In this lesson you will get to know the “stage” on which your plays
can take place. The stage is the background environment - a grid of patches. In the first lesson
that background was so boring that you could hardly tell it was there. The patches were nothing
more than a black background. However, as you will discover later, patches may not be able to
move around, but their impact on the life of turtles does not need to be static or boring. In some
models they may well be the only or the most important actors. Apart from learning about
patches, in this lesson we also want to take the time to learn how to use buttons to call
procedures. Buttons can make our models easier to interact with.
Here is the task. Set up NetLogo so that can use it to play checkers with your friends!
Create a board like the one below. The checkers are turtles and the board is made of patches. The
turtles have numbers as labels so that you can easily move them around the board.
1
Inspecting Patches and the Patch Monitor
How can we start learning about patches? Open NetLogo and right or control click on any
part of the stage. A menu window opens. Move the cursor until it is over the “inspect patch”
(followed by two numbers) menu item. A square outline is shown at the top left of the menu
window. That is the outline of a patch. The two numbers that are given are the x and y
coordinates of that patch. The x coordinate tells you how far the patch is to the left or right of
the center, and the y coordinate tells you how much above or below you are from the center.
Using trial and error right or control click until you find patch 10 -12. It is 10 steps from the right
of center, and 12 steps below the center.
When you select the inspect patch menu item a patch monitor opens that shows all the
properties associated with that patch. You should be able to make sense of these properties. The
first two are called pxcor and pycor. Those stands for the patch-x-coordinate and the patch-ycoordinate. The next property is called pcolor and stands for the patch-color. A number is given
rather than a color. To see which colors refer to which numbers in NetLogo, open the menu tools
> color swatches. Can you change these properties? Sure. Type red in the box to the right of
pcolor and hit return. Two things happened when you hit return. The word red was replaced by
the NetLogo number equivalent for colors (15), and the patch turned red.
The last two properties are plabel which allows you to associate a label with that patch,
and plabel-color, or patch label color. To see how they can be useful, enter a number like 5, or a
word in quotes, like “grass”, to see how patches can have labels associated with them. We
should mention one thing at this point so that it does not lead to confusion later. We are calling
pcolor or pxcor a property of a patch. That is a reasonable way to think of it. Pxcor and pcolor
help to define a patch - give it an identity. However, when we are thinking about the
programming environment it will be helpful to call them variables rather than properties.
Variables are like boxes that can contain values. The box contains the value of the variable. For
example, pcolor is a variable. The variable can have different values like 15. NetLogo has 5
variables (or properties) associated with patches, and each of those variables can take on many
different values.
Creating a new patch variable
Are we limited to the properties that NetLogo has set up for us? No! If we need them in
our model we can simply create our own. For example, in lesson 3 you will be asked to create a
model to simulate how variations in the food supply can influence rabbit mortality. In such a
model you may want a green patch to represent a patch of grass that can be eaten by a rabbit.
But not all grass is equally nutritious. How could your model keep track of or change the
nutritional level of the grass? - By creating a variable for it. Let’s try it. In the procedure editor
define a new variable that is available for all patches with the keyword patches-own followed by
the name of the variable in square brackets. Try it. Type patches-own [ nutritionlevel] on the first line of the procedure editor (always place variable definitions before any
procedure definitions). Now look at the patch monitor window. It should include the new
variable.
2
Making sense of the variables pxcor and pycor
You are probably familiar with making graphs with x and y coordinates in your math
class. If so, you might feel a bit confused about pxcor and pycor. What makes them confusing?
When you draw a graph in math class you use graph paper. The paper is divided up into a set of
squares. When you were introduced to the idea of patches, you probably imagined the NetLogo
screen divided up into a grid of patches in the same way that graph paper is divided up into a grid
of squares. That is almost right, but there is a difference. On a piece of graph paper the x y
coordinates refer to points at the corners of the squares, but in NetLogo they refer to the center
of the patches. They also refer to the center of any turtles on the screen.
To see how this works open Lesson_2.1.nlogo. Click on setup. This shows you the
familiar math grid. Now click on color-x-axis. Each patch has a different color so that you can
easily see its location on the grid. Try these questions to help you explore how the screen is set
up.
1. What is the distance from the center to the right edge of the screen?
2. Create a turtle. Right or control click the turtle and use the turtle monitor to change its
shape to circle and size to 0.2. Use the turtle to check your answer to question 1. Notice
that fd 5.5 places the turtle with its center at 5.5 and that half of its body is at the bottom
of the screen.
3. Return to the center with setxy 0 0. Use setxy to place the turtle at the top
corner of the dark blue patch. Then try to place it at the bottom corner of the yellow
patch. Return to (0,0).
4. Where will the turtle end up if you type fd 11? fd 6? Slow the movement down so
that you can watch this carefully.
5. Click on the edit button at the top of the screen. Change the screen edge x and y values
from 5 to 10, and set the patch size to 20. Click on the setup and color-x-axis and colory-axis. Now how far is it from the center to the edge of the screen?
Setting variables from procedures
The patch and turtle monitors are easy to use, but if we want the turtles and patches to
influence each other in our models we need a way to change the value of variables as part of our
procedures. It is easy to do. For example, create a turtle and then set its color red with the turtle
command
set color red
Open the turtle monitor to see which variables are defined for turtles. Play around with the set
command to see what these variables mean.
Create 10 turtles, have them move forward 10 steps and then give the same set color red
command.
Using what you learned from setting variables for turtles, what do you think will happen
3
if you give the following patches command?
set pcolor red
No surprises here. We told each patch, one patch at a time, to set its color to red, just like we
told each turtle to do the same earlier. Clear the screen and start over. What will happen if we run
the same command, set pcolor red, but this time as a turtle command? You turn the patch
that the turtle is standing on red, not all of the patches.
Turtles and patches can change each other. Turtles, patches and the observer can run the
following commands to change individual actors.
set pcolor-of patch 10 -12 red
set color-of turtle 0 green
If you want to change he values for a set of actors you need to find a way to refer to that set. For
example, if pxcor > 0 [set pcolor green] turns any patch with an x coordinate
greater than 0 green. Try the following exercises to get a better feel for these concepts.
Exercises
1. Turn the top half of the screen yellow.
2. Create a vertical line of patches in some color.
3. Make a set of stripes on the screen out of patches.
Making Buttons
In the previous lesson you were probably wondering if there is an easier way to give
commands than type them in the command center. There is! Once you have defined a procedure
you can “call it” or give the command from a button. Lets try it.
In a new NetLogo document write a procedure called setup that clears everything on the
screen, creates 50 turtles, asks them to move forward 5 steps, puts the pen down and then
moves the turtles forward another 5 steps. Test that it works by typing setup in the command
center.
Now lets create a button that does the same thing as entering the command in the
command center. Click on Button in the toolbar at the top of the main window. Now click
anywhere on white space next to your screen. Three things happen. A button is created in the
white space with 8 black boxes which can be used to resize your button, a small window opens
called “Button”, and the edit button on the toolbar is dark to show that you are editing the
button.
Take a minute to become familiar with the button. Close the button window. Without
clicking anything move your mouse around the main window. When you move your mouse
around the cursor shape changes. How many shapes did you see? You should have found four
cursor shapes; an arrow when you are over the black screen or a button, cross hairs when you are
over the white space next to the black screen, a prompt when you are over a text box, and a
double arrow which can use to resize the command center window. With the cursor as a cross
4
hair click and drag to select the button you just created. Play around with resizing it. When you
are done, click on the edit button in the toolbar or double-click the button itself to edit the button.
The Button window has a box where you place the commands you want it to run. This
works just like the command center box. First, select which actor should run the command, and
then, type the command in the box. In our example, select Observer, and type setup in the box.
Below the “Commands” box is another box called “Display name”. You can type the name you
want to have displayed on your button here. If you leave it blank the name of the button will be
the name of the procedure you typed into the “Commands” box. (It is usually best to just leave
this box blank. However, since procedure names, like setup, cannot contain spaces, you may
want to add a display name to make it easier to understand what the button does.)
Next to where you select which actor runs the command there is a “Forever” check box.
This is something new. Up until now if we wanted to repeat a command we used repeat in our
procedures. If you select the Forever option, the procedure that you call by pressing the button
keeps getting called until you press the button again. We will try this out later. For now just
leave it alone.
Below the “Display name” box there is another box called “Action key”. This allows you
to select a key on the keyboard which calls the procedure. Type “s” in this box and close the
window. Try out your new button. (It helps to slow down the speed with the slider so that you
can see what is taking place on the screen.) Click on it and then try the “s” key.
Activity
We have now learned enough about the NetLogo patches (environment) to work on the
main activity for the lesson. See if you can write a procedure that is called by a setup button that
creates a checkerboard with all of the pieces in place. Once you have, ask a friend to play ! You
will have to explore the User Manual to get some ideas for using new commands. (Look under
Primitives Dictionary that is part of NetLogo by clicking on the Help menu > User manual. The
link to the dictionary is on the frame to the left. )
I used only two primitive commands that you have not yet seen 1. sprout followed by a number which creates a turtle on the current patch.
2. remainder followed by two numbers, which reports the result you obtain when the
first number is divided by the second. I use this to check if a number is even or odd. A number is
even when its remainder is 0 when you divide by 2.
I also grouped my turtles into breeds - red and black turtles. Look under breeds in the
manual to see how that works.
5