1
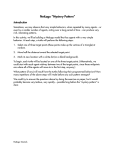
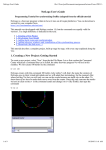
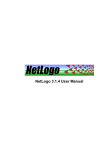
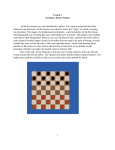
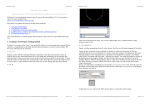
Ant Patterns with NetLogo Introduction One condition which can sometimes produce complexity is that of high throughput. This throughput can be the product of a large number of agents operating simultaneously, and interacting with each other; a large amount of some physical material or property (e.g. electrical charge, fluid, gas molecules) acting in a constrained space or medium; etc. It can also be due to a smaller number of agents, repeating simple behaviors a large number of times, with feedback i.e. the agents' current actions affect the future state of the system, which in turn affects the agents' future actions. In this activity, well build a NetLogo model inhabited by ants1 that follow a simple rule. At each time step (tick), an ant will perform the following actions: 1. Move forward one space. 2. If the space on which the ant is now standing is black, then … a) Paint the space the same color as the ant itself. b) Turn left 90º. Otherwise … a) Paint the space black. b) Turn right 90º. We'll begin with a single ant, starting at the center of the NetLogo world. Then, we'll extend the model with additional ants at different initial positions. 1. What pattern (if any) will result from a single ant following the programmed behavior described above? 2. How many repetitions of the above steps do you think will it take a pattern to emerge? 3. Will the behavior described above be sufficient to produce what you would describe as complexity? 4. Will it be sufficient to produce results you would describe as chaotic? 5. Do your answers to any of the above questions change if there are two ants (or three, or more), instead of one? We could try to answer the above questions by doing the exercise on paper, but it would probably become very tedious, very quickly possibly long before the result is clear. 1 Although the ants in this model behave nothing like real ants, we'll call them that for now. NetLogo agents that can move are referred to generically as turtles; we'll use ants and turtles more or less interchangeably in this exercise. NetLogo Tutorials Concept: The NetLogo Coordinate System In building our model it will be useful to know a little bit about the coordinate system used by NetLogo. This diagram, and the explanations that follow, illustrate some important points to remember: Y+ (max-pxcor, max-pycor) world-height patch 3 2 origin (0, 0) (3, 2) X+ X- patch -5 -8 turtle at (-4.6, -8.3) (min-pxcor, min-pycor) Yworld-width Ant Patterns with NetLogo Page 2 1. Like the Cartesian coordinate system traditionally used in algebra, analytic geometry, and calculus, the NetLogo world has X and Y axes. The center of the coordinate system is the origin (which is usually but not always located in the physical center of the NetLogo world, as well), where X and Y have values of zero (0). 2. Overlaid on the coordinate system is a grid of patches (squares). Each patch has a color, and an optional label; a NetLogo program can also define additional variables for a patch. 3. The center of a patch is a point in the coordinate system where the X and Y values are integers; these coordinates are used to refer to the patch. For example, patch 3 2 in the diagram is a square with its center at (3, 2); this square is the region where 2.5 ? X < 3.5 and 1.5 ? Y < 2.5. 4. A patchs coordinates are always integer values, but that's not necessarily the case for a turtle. In the diagram, there is a turtle located at (-4.6, -8.3), which is on the patch centered at (-5, -8). Though a turtle may be drawn so that it looks like it is on two or more patches at once, the turtles center point is what matters: this center point is treated as the actual location of the turtle, and the patch in which the center point falls is considered to be the patch on which the turtle is standing. 5. The user can change the width or height of the NetLogo world at any time (in fact, we will do that very thing in a few minutes); however, a NetLogo program can always use world-width and world-height to get the current values of the height and width. 6. The patches on the extreme right-hand side of the NetLogo world have an X value of max-pxcor; those on the top of the canvas have a Y value of max-pycor. Similarly, min-pxcor and min-pycor are the X and Y coordinates (respectively) of the patches on the extreme left-hand side and bottom (respectively) of the NetLogo world. These variables are related to the overall size of the canvas by the formulas world-width = (max-pxcor - min-pxcor) + 1 and world-height = (max-pycor - min-pycor) + 1. Concept: NetLogo Angles and Directions All angles in NetLogo are specified in degrees, and directions are based on compass headings, with 0º being “upward” (i.e. north), 90º being towards the right (i.e. east), etc. When instructing a turtle to face a particular direction, we can do so by setting the heading of the turtle to the desired compass heading, or by telling the turtle to turn right or left by the number of degrees required to orient the turtle as desired. Ant Patterns with NetLogo Page 3 Task 1: Getting Started 1. From the Macintosh Applications folder, or from the Windows Start/All Program/NetLogo menu, launch the NetLogo v4.0.2 application (not NetLogo 3D). 2. Because we want to give our ants lots of room to maneuver, and because NetLogo colors an entire patch at once (i.e. no matter how large a patch is, we can't split it into different-colored regions), let's set up the NetLogo world with a large number of very small patches. To do this, click the Settings button, near the top of the NetLogo window, and make these changes: a) Leave Location of origin set to center. b) Set the max-pxcor value to 250. c) Set the max-pycor value to 250. d) Make sure the World wraps horizontally checkbox is checked. e) Make sure the World wraps vertically checkbox is checked. f) Set the Patch size value to 1.0. g) Make sure the Turtle shapes checkbox is checked. (Often, when using very small patches, it is pointless to display turtle shapes, since turtles are the same size as patches by default. In this case, however, we'll be making our ants much larger than the patches, so we might as well show turtle shapes.) Ant Patterns with NetLogo Page 4 The World & View window should now look like this: 3. Click the OK button; we now have a world that is 501 patches tall and 501 patches wide, with each patch displayed on a single pixel. (Adjust the size and position of the NetLogo application window, as necessary, to display the entire world.) 4. Save your model using the File/Save menu option (it is strongly recommended that you do this after completing each task in this activity). Ant Patterns with NetLogo Page 5 Concept: NetLogo Topology Notice that we can specify that the NetLogo world should wrap horizontally, vertically, both horizontally and vertically, or not at all. When wrapping is turned on horizontally (for example), a turtle moving off the right edge of the world will reappear on the left edge, and vice versa. If horizontal wrapping is not enabled, a turtle will be unable to move off the right or left edge. 1. What is the logical shape of the NetLogo world, if wrapping is turned on horizontally, but not vertically? 2. What is the shape of the NetLogo world, if wrapping is turned on vertically, but not horizontally? 3. What is the shape of the NetLogo world, if wrapping is turned on both vertically and horizontally? Concept: Programming as Teaching the Computer Although computers (more precisely, the processors inside computers) are capable of manipulating data very efficiently, and though modern processors include floating-point processing units that can perform impressive arithmetic, trigonometric, and logarithmic calculations, they are also quite simple-minded: they are generally incapable of performing almost any task the average user would consider meaningful until they are taught to do these meaningful tasks. We teach computers to do this through programming: encoding an algorithm into a form that the computer can understand, for which it will take specified inputs, and from which it can present a meaningful result as output. Fortunately for us, virtually every modern, commercially-available computer comes with millions of lines of these algorithmic instructions already written, and pre-loaded on hard drives, programmable memory chips, etc. These instructions make up the operating system (which lets us create and manipulate files), drivers (which tell the computer how to connect to and make use of hardware devices such as video display adapters, disk drives, printers, external memory devices, etc.), applications (special files which can be executed on demand by the user, for more specific functionality), etc. We can augment this further by installing or writing new programs for the computer to execute; when we do this, we are quite literally teaching the computer to perform new operations. Some computer programs have the interesting property of being instruction translators: they allow users to write new programs, without the users having to understand much (or sometimes anything at all) of the internal workings of the computer; these translators then convert the instructions the user has written into a form that the computer can execute. NetLogo is one such program: it allows us to write programs in a specialized language, which we use to describe the behaviors of agents; NetLogo then converts these programs (or Ant Patterns with NetLogo Page 6 models) we have written into a form that the computer can execute2, without our having to know anything about how that conversion takes place. Nonetheless, we can still think of the NetLogo models we write as being sets of instructions that we teach to the computer; possibly more usefully, we can think of our task, when building NetLogo models, as being that of teaching NetLogo itself. Task 2: Setting Up the Model Since we typically run a model several times in a single session, without closing and reopening the model (or closing and re-opening NetLogo itself), we need a way to prepare a model for execution, and clean out anything left over from the previous execution (if any). By convention, when building NetLogo models, we refer to this cleanup & preparation operation as the model setup; our immediate task is to teach NetLogo how to do this setup for our ant model. To teach NetLogo to perform an operation, we instruct it in much the same way we would a very literal-minded human being: To do X, first do A, then do B, then … with each step spelled out unambiguously. In this case, the first thing we will tell NetLogo to do, as part of the setup operation, is to clear the NetLogo world of any previously-created ants, and reset all of the patches to the color black. Then, we tell it to create a single ant, in the middle of the NetLogo world. 1. In NetLogo, click on the tab or button labeled Procedures. You will see a blank area for writing the instructions that NetLogo will use to execute the various parts of the model. 2. Write the following in the space provided: to setup clear-all create-turtles 1 [ set color red set shape "bug" set size 15 set heading 0 ] end This code tells NetLogo that, in order to perform the operation called setup (which it didn't previously know how to do, and which we are teaching it to do), it must perform the following steps: a) Execute the clear-all command (which is one of the instructions NetLogo already knows how to do, and which among other things removes any turtles that might have already been created, and sets the color of all the patches to black). 2 This is actually a slight over-simplification. NetLogo is built on top of Java, so it converts models into instructions which the Java Virtual Machine can understand. The JVM then translates those into instructions the computer hardware and operating system can execute directly. Ant Patterns with NetLogo Page 7 b) Create a single turtle (eventually, we'll learn how to teach NetLogo that our turtles are really ants, people, cells, etc.; for now, we'll just stick with the generic term in our code). In the create-turtles command, the numeric value following the command is the number of turtles to be created, and the subsequent set of square brackets is a list of commands that the newly-created turtles(s) are asked to execute. In this case, we are asking our single turtle to do the following: i. Set its color to red. (NetLogo uses a spectrum in which each color is identified by a number from 0 to 139.9; however, there are some symbolic constants such as red which are pre-assigned to the correct number value, so we don't always have to remember the numbers themselves. To see the entire NetLogo color spectrum, select the Tools/Color Swatches menu option.) ii. Set its shape to the one called bug in the shapes library. (To see all of the standard shapes which we can add to, as needed select the Tools/ Turtle Shapes Editor menu option.) iii. Set its size to 15 times the default size (otherwise, we won't be able to see the cool bug shape, since we've configured the NetLogo world to use only only pixel for each patch). iv. Sets its initial heading to 0 (i.e. north - the increasing Y direction, in the NetLogo coordinate system). Note that we didn't include any instructions for setting the initial location of the ant. We'll learn how to do that soon enough for now, we'll take advantage of the fact that NetLogo initially places turtles at the (0, 0) coordinates. We now need to create a button that will execute the new setup command when it is clicked: 1. Click on the Interface tab/button, so that the NetLogo world is visible again. 2. On the toolbar at the top of the Interface pane, click on the button labeled Add, and select Button from the pull-down menu (next to Add); then click on the white space to the left of the NetLogo world. 3. In the button properties dialog that appears, make the following changes (as necessary): a) From the pull-down menu labeled Agent(s), select Observer. b) Make sure that the Forever checkbox is not checked. c) In Commands, type setup. d) If desired, type the text that you want to appear as the button title in Display name (by default, whatever you have typed in Command will be used as a button title). Ant Patterns with NetLogo Page 8 e) If desired, specify in Action key a shortcut key that can be used to “press” the button using the keyboard. You should now have something like this: 4. Click the OK button; you will now see the button you created in the NetLogo interface. 5. To test your work so far, click the button you created; you should see a single ant (ok, so it doesn't look that much like an ant) created in the middle of the NetLogo world. Concept: Different Kinds of Agents in NetLogo Note that when we created our Setup button, we specified that the command we specified in the button (setup, in this case) should be performed by the Observer agent. There are three types of agents in NetLogo; each is capable of different kinds of following different kinds of instructions, and thus serves a different purpose in a NetLogo model: 1. Observer There is always exactly one of this kind of agent; we can think of this as being NetLogo itself. This agent is not displayed on the NetLogo world, but it is the only agent that can perform certain global operations in a model (e.g. clear-all). 2. Patches These are stationary agents, and there is exactly one such agent per square in the grid of the NetLogo world. They cannot be displayed with different shapes, but the color of a patch can be modified. 3. Turtle These are agents that can move about the NetLogo world, and can be displayed with different shapes and colors. 4. Links These are agents which connect one turtle to another. There are no instructions to move links around; a link moves when one or both of the turtles at the endpoints move. Ant Patterns with NetLogo Page 9 (A link can also be configured as a tie, where motion of one endpoint turtle will force movement of the other endpoint turtle.) Link and turtles are the only agents which can be created or destroyed by the instructions contained within the model itself. Also, links and turtles are the only agents which can be organized into breeds. Turtles can interact with other turtles, by reading and writing the attributes of those turtles, and/or asking those turtles to execute instructions; they can also interact with patches in the same ways. Patches can interact with turtles, and other patches. Links generally interact with their endpoint turtles, but they can also be made to interact with other links, turtles, and patches. Obviously, the observer can ask turtles to perform specified operations (in fact, that is what is happening in the instruction list following create-turtles, in our setup procedure); the observer can do the same with patches and links. On the other hand, turtles, patches, and links cannot interact directly with the observer, in the sense that they cannot ask the observer to perform any actions. However, models have global variables (some predefined by NetLogo, as well as others we might define); in general, patches, links, and turtles can modify the values of these variables and the observer's actions might be affected by such changes. In the next task, we'll create a procedure containing the rule that our ant will follow, and a button that will tell the ant to execute that procedure (and continue doing so, until we tell it to stop). Task 3: Teaching Our Ant How to Behave Let's write a procedure containing the ant behavior described at start of this document. By convention, we often call the procedure containing the main behavior(s) of our turtles the go procedure. 1. Click the Procedures tab/button, so that you can add more instructions to the model. 2. Below the end that marks the end of the setup procedure, add the following lines of code (as a rule, you might also want to leave a blank line between the end of one procedure, and the start of the next): to go forward 1 ifelse (pcolor = black) [ set pcolor color left 90 ] [ set pcolor black right 90 ] end (Be sure to put a space before and after the equals sign in the line that begins with ifelse – those spaces, like many in NetLogo, are essential!) Ant Patterns with NetLogo Page 10 The code we've just written tells NetLogo that, in order for a turtle to execute the go procedure, the turtle must do the following: a) Move forward a distance of 1. b) Test to see if the color of the patch (pcolor) on which the turtle is now standing is black (or more precisely, equal to the color value referred to by the predefined constant black). If so, then … i. Set the color of the patch to be the same as the color of the turtle (color). ii. Turn left 90º. Otherwise, … i. Set the color of the patch to black. ii. Turn right 90º. (Note that NetLogo automatically knows that this procedure is only valid for execution by turtle agents, since neither the observer nor the patches can move or turn. If we try to tell NetLogo to have patches, links, or the observer execute this procedure, it will display an error message.) Now that we have a procedure containing the steps that we want our ant to follow, let's create a button that will tell the ant to execute that procedure: 1. Switch back to the Interface pane. 2. Follow the same steps as those you previously followed to create the Setup button; this time, we'll create a Go button. 3. In the button definition dialog that appears, make the following changes (as necessary): a) Select Turtles from the Agent(s) pull-down menu. b) Select/check the Forever checkbox. (This tells NetLogo to hold the button down when it is pressed, and to ask the specified agents to execute the specified commands repeatedly, as long as the button is down.) c) In Commands, type go. d) If desired, type the text that you want to appear as the button title in Display name. e) If desired, specify in Action key a shortcut key that can be used to press the button using the keyboard. Ant Patterns with NetLogo Page 11 You should now have something like this: 4. Click the OK button to place your Go button in the NetLogo interface. Task 4: A Final Check Before Running the Model If the titles of either of the buttons you have created are displayed in red text, then NetLogo is informing you that there is an error in the button definition, or that the procedure(s) being invoked by the button are not valid for the type of agent specified. Similarly, if there is a yellow bar displayed at the top of the Procedures pane, this means that one or more procedures has an error. Pay very close attention to spelling: computers are very poor at recognizing that you meant “turtles”, when you wrote “trutles” (for example). Also, note that square brackets and parentheses are not interchangeable in NetLogo; the same goes for dashes, underscores, and spaces (e.g. NetLogo understands clear-all, but not clear_all, nor clear all). If you have any such errors, try to use the displayed error messages to locate the problem. If you can't find the problem, or don't know how to fix it, please don't hesitate to ask for help. Task 5: The Moment of Truth Running the Model 1. Click the Setup button you created, to prepare your model for execution. 2. Click the Go button to execute the model. (You may want to use the speed slider, located at the top of the NetLogo world, to slow execution down, so that you can see more clearly what is happening.) Ant Patterns with NetLogo Page 12 Discussion: What Happened? 1. Are the results what you expected? 2. How would you characterize the results? 3. Could you identify different kinds of patterns in the result? In other words, did the ant behavior seem to be more orderly at some times than at others? 4. Did knowing exactly what the ant is doing in each iteration help you to predict what the accumulated effect of thousands of iterations would be? 5. We have configured the NetLogo world as a torus; given that, what do you think would change in the aggregate behavior if the ant were to start in a different initial position, or face a different direction? 6. Do you think adding a second ant to the model would make the aggregate behavior more predictable, or less so? Task 6: Adding a Second Ant to the Model Now that your Ant Patterns NetLogo model is running, we'll make some changes but this time, the specific code to write (and even the steps to follow) will be mostly left up to you. Let's begin by placing the new ant on a patch which is as far from the first ant as possible. Even with a torus topology, it is fairly easy to see that the patches located at the four corners of the NetLogo world are as far as it is possible to get from the center patch. Pick any one of these patches, and referring to the information previously given on the NetLogo coordinate system figure out what the X and Y coordinates of the selected patch are. Now, can you figure out what additions should be made to the setup procedure, so that after creating the first ant in the center, another one (of a different color, and located in the corner you selected) will be created? (Hint: NetLogo includes a setxy command, which instructs a turtle to move to the specified coordinates. Details on that command as well as all of the other commands, variables, and reporters built in to NetLogo can be found by selecting the Help/NetLogo Dictionary menu option.) Do your best to make the necessary changes to the setup procedure; don't forget that you can use your Setup button to see if the modified procedure is doing what you expect it to do. As always, if you get stuck, feel free to ask for help. Remember that the rules followed by the second ant are identical to those followed by the first. Given that, do you think we need any changes to the go procedure? Do we need a second procedure with the same instructions? Review the definition of the Go button by clicking and extending a selection rectangle around the button, and then double-clicking on the selected button. Does it appear that when Ant Patterns with NetLogo Page 13 this button is pressed, only the first ant will be instructed to execute the go procedure, or will all ants be so instructed? Task 7: Running the Model with Two Ants Once you've completed the necessary changes to the model (and ensured that two ants are created correctly when you click the Setup button), run the modified model. Observe the model for several minutes (if necessary), until you are reasonably confident that you can describe the aggregate behavior you have observed. Discussion: What Happened This Time? 1. Were the results what you expected? 2. Did the overall aggregate behavior differ from that observed with only one ant? If so, in what way(s) did it differ? 3. Do you think the aggregate behavior would be affected by the relative position and facing directions of the two ants? Optional Tasks If you have time, try one or more of the following: 1. Read (in the NetLogo user manual) about the NetLogo reporters (a reporter is simply an instruction that returns a value that can be used in your code) that generate random numbers. Then, incorporate one or more of these reporters in your model, to place the second turtle at a random initial position, and facing a direction chosen at random from the four basic compass directions. 2. As it turns out, with two ants taking turns moving, always in the same order, the ants will always draw for a while, and then erase what was previously drawn, returning to their starting positions but trading places in the process of doing so! Even without taking turns in an orderly fashion, this will often but not always happen. Normally, NetLogo shuffles agents each time there is an ask statement, so that the order in which the agents move is always changing. However, we can use lists of agents to make them move in the same order each time. Review the documentation of the sort and foreach statements, and use them to create a list of ants (during setup), and iterate over this list at each tick, to make the ants always take turns in the same order when moving. 3. Add a third ant (of a new color, of course and in a new location) to the model; see what changes (if anything) in the aggregate behavior. 4. Add a slider to allow the user to set the number of ants that will appear. Be sure that when the ants are created, they all have distinct colors. Ant Patterns with NetLogo Page 14