1
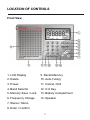
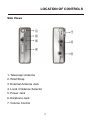
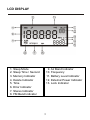
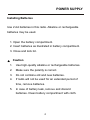
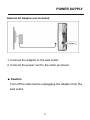
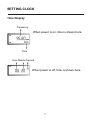
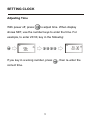
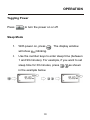
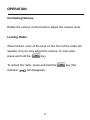
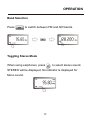
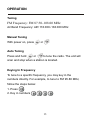
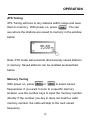
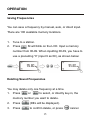
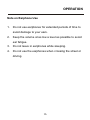
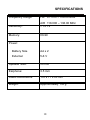
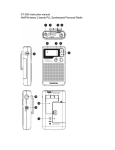
KA11AIR Receiver
PLL FM Stereo/Aircraft Synthesized Receiver
Operation Manual
WARRANTY INFORMATION
The KA11AIR receiver is warranted for one year from the
date of purchase by Gleim Publications Inc. to be free of
defects in materials and workmanship.
In the event of such defect, this product will be repaired
promptly and without charge, or at our option replaced with
a new product of equal or greater value if delivered to
Gleim Publications Inc., pre-paid, together with the sales
receipt or other proof of purchase date.
Prior approval from Gleim Publications Inc. is required
for return. This warranty excludes defects due to normal
wear, abuse, shipping damage, or failure to use product in
accordance with instructions. This warranty is void in the
event of unauthorized repair, modification, or removal or
defacement of label.
For return approval and shipping information, please
contact Gleim Publications at [email protected].
WHAT’S INCLUDED WITH THE KA11AIR?
√ KA11AIR Radio
√ User Manual
√ Stereo Earphones
√ External Antenna
√ 2 AA Batteries
i
TABLE OF CONTENTS
Location of Controls
Front View................................................................ 1
Side Views............................................................... 2
LCD Display......................................................................3
Power Supply
Installing Batteries.....................................................4
Changing Batteries....................................................5
Battery Level............................................................. 5
External AC Adaptor (not included)........................... 6
Setting Clock
Time Display..............................................................
7
Clock Mode...............................................................
8
Adjusting Time........................................................... 9
Operation
Toggling Power..........................................................10
Sleep Mode............................................................... 10
Controlling Volume....................................................
11
Locking Radio...........................................................
11
Band Selection..........................................................
12
Toggling Stereo Mode...............................................
12
ii
TABLE OF CONTENTS
Tuning...................................................................................
13
Manual Tuning...................................................
13
Auto Tuning........................................................
13
Keying In Frequency..........................................
13
ATS Tuning.........................................................
14
Memory Tuning..................................................
14
Saving Frequencies..................................................
15
Deleting Saved Frequencies.....................................
15
Note on Earphone Use.............................................. 16
Troubleshooting................................................................17
Specifications................................................................... 18
iii
LOCATION OF CONTROLS
Front View
1. LCD Display
9. Recall Memory
2. Delete
10. Auto-Tuning
3. Power
11. Cancel / Exit
4. Band Selector
12. 0~9 Key
5. Memory Save / Lock
13. Battery Compartment
6. Frequency Change
14. Speaker
7. Stereo / Mono
8. Enter / Confirm
1
LOCATION OF CONTROLS
Side Views
1. Telescopic Antenna
2. Wrist Strap
3. External Antenna Jack
4. Local / Distance Selector
5. Power Jack
6. Earphone Jack
7. Volume Control
2
LCD DISPLAY
1. Sleep Mode
2. Sleep Time / Second
3. Memory Indicator
4. Delete Indicator
5. Time
6. Error Indicator
7. Stereo Indicator
8. FM Band Indicator
9. Air Band Indicator
10. Frequency
11. Battery Level Indicator
12. External Power Indicator
13. Lock Indicator
3
POWER SUPPLY
Installing Batteries
Use 2 AA batteries in this radio. Alkaline or rechargeable
batteries may be used.
1. Open the battery compartment.
2. Insert batteries as illustrated in battery compartment.
3. Close and lock lid.
Caution
▲
1.
Use high-quality alkaline or rechargeable batteries.
2.
Make sure the polarity is correct.
3.
Do not combine old and new batteries.
4.
If radio will not be used for an extended period of
time, remove batteries.
5.
In case of battery leak, remove and discard
batteries. Clean battery compartment with cloth.
4
POWER SUPPLY
Changing Batteries
When the battery sign
blinks, the battery is low. This
may lead to poor sound quality and increased distortion. If
you do not change the batteries, the radio will power off
automatically.
▲
Caution
1.
Turn off radio before changing batteries.
2.
Replace the batteries within 30 seconds to preserve
clock settings.
Battery Level
The battery level is shown with the following signs:
Auto Power Off
Low Power
Half Power
Full Power
5
POWER SUPPLY
External AC Adaptor (not included)
1. Connect the adaptor to the wall outlet.
2. Connect the power cord to the radio as shown.
▲ Caution
Turn off the radio before unplugging the adaptor from the
wall outlet.
6
SETTING CLOCK
Time Display
Frequency
When power is on, time is shown here.
Time
Hour Minute Second
When power is off, time is shown here.
7
SETTING CLOCK
Clock Mode
This radio can be set in two modes, 12 or 24 hours. In
power-off mode, press
to select.
12 hour mode
24 hour mode
8
SETTING CLOCK
Adjusting Time
With power off, press
to adjust time. When display
shows SET, use the number keys to enter the time. For
example, to enter 20:30, key in the following:
If you key in a wrong number, press
correct time.
9
, then re-enter the
OPERATION
Toggling Power
Press
to turn the power on or off.
Sleep Mode
1.
With power on, press . . The display window
will show
2.
blinking.
Use the number keys to enter sleep time (between
1 and 99 minutes). For example, if you want to set
sleep time for 30 minutes, press
in the example below.
10
as shown
OPERATION
Controlling Volume
Rotate the volume control knob to adjust the volume level.
Locking Radio
When locked, none of the keys on the front of the radio will
operate, but you may adjust the volume. To lock radio,
press and hold the
key.
To unlock the radio, press and hold the
indicator
will disappear).
11
key (the
OPERATION
Band Selection
Press
to switch between FM and AIR bands.
Toggling Stereo Mode
When using earphones, press
to select stereo sound.
STEREO will be displayed. No indicator is displayed for
Mono sound.
12
OPERATION
Tuning
FM Frequency: FM 87.50~108.00 MHz
Air Band Frequency: AIR 118.000~138.000 MHz
Manual Tuning
With power on, press
or
.
Auto Tuning
Press and hold
or
to tune the radio. The unit will
scan and stop when a station is located.
Keying In Frequency
To tune to a specific frequency, you may key in the
numbers directly. For example, to tune to FM 95.80 MHz,
follow the steps below:
1. Press
.
2. Key in numbers
.
13
.
OPERATION
ATS Tuning
ATS Tuning will tune to any stations within range and save
them to memory. With power on, press
. You can
see where the stations are saved to memory in the window
below:
Note: ATS mode will overwrite all previously saved stations
in memory. Saved stations can be recalled as described
below.
Memory Tuning
With power on, press
or
to select saved
frequencies. If you want to tune to a specific memory
location, use the number keys to input the memory number
directly. If the number you key in does not match a valid
memory number, the radio will skip to the next saved
frequency.
14
OPERATION
Saving Frequencies
You can save a frequency by manual, auto, or direct input.
There are 100 available memory locations.
1.
Tune to a station.
2.
Press
. M will blink on the LCD. Input a memory
number from 00-99. When inputting 00-09, you have to
use a preceding “0” (input 9 as 09), as shown below:
Deleting Saved Frequencies
You may delete only one frequency at a time.
1.
Press
or
to select, or directly key-in, the
memory number you want to delete.
2.
Press
(DEL will be displayed).
3.
Press
to confirm delete, or press
15
to cancel.
OPERATION
Note on Earphone Use
1.
Do not use earphones for extended periods of time to
avoid damage to your ears.
2.
Keep the volume at as low a level as possible to avoid
ear fatigue.
3.
Do not leave in earphones while sleeping.
4.
Do not use the earphones when crossing the street or
driving.
16
TROUBLESHOOTING
Q:
I don't hear any communication between the tower and the
pilot.
A:
Verify that the volume control knob has been turned up. Also,
verify that AIR band is selected. If problem continues, you
may be tuned to an unused frequency. Use the tuning keys to
scan for an active frequency.
Q:
I can't find the frequencies that pilots use.
A:
This information can be found in the FAA’s Airport Facility
Directory (A/FD) booklet, available at most bookstores.
Q:
The LCD display is working, but I can't control the radio.
A:
The LOCK function may be enabled. Check the LCD display.
If the LOCK icon is displayed, press and hold the Lock button
to clear the hold.
Q:
After I turn on the power, the LCD display blinks once and
then goes blank.
A:
The batteries may be dead. Please change the batteries as
directed on page 5.
17
SPECIFICATIONS
Frequency Range:
FM 87.5.00 – 108.00 MHz
Sensitivity:
AIR 118.000 – 138.00 MHz
> 10 µV
Memory:
00-99
Power:
Battery Size
AA x 2
External
5-6 V
Speaker Size:
50 mm
Earphone:
3.5 mm
Radio Dimensions:
110 x 71 x 23 mm
Weight:
Approximately 155 g
18
KA11AIR Receiver
Gleim Publications
P.O. Box 12848
4201 NW 95th Blvd.
Gainesville, FL 32606
Phone:
(800) 87-GLEIM
(352) 375-0772
Fax:
(888) 375-6940
Email:
[email protected]
[email protected]
This radio has been manufactured by Kaito Electronics Inc.
for Gleim Publications, to be used by aviation enthusiasts
to listen to pilot communication in the vicinity of airports.