1
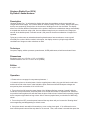
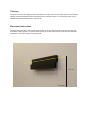
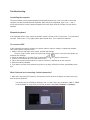
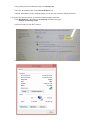
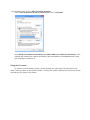
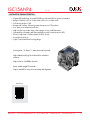
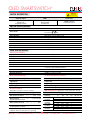
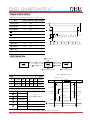
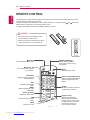
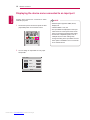
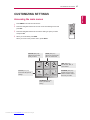
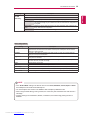
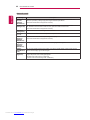
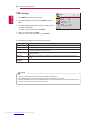
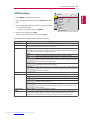
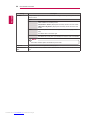
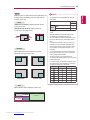
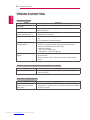
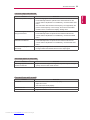
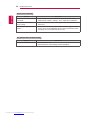
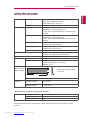
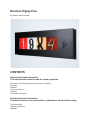
Nineteen Eighty-Four
By Rafael Lozano-Hemmer
CONTENTS
General important information
This short section must be read for proper operation
Description (including technique, dimensions and edition)
Operation
Software
Component layout
Cleaning
Placement Instructions
Detailed technical information
A technical reference for preservation, maintenance and troubleshooting
Troubleshooting
Support (contact us)
Appendix
General important information
Nineteen Eighty-Four (2014)
By Rafael Lozano-Hemmer
Description
“Nineteen Eighty-Four,” is an interactive display that shows house address numbers extracted from
Google Street View images. The numbers have an immense variety of fonts, colours, textures and styles,
as they were scanned by Google from the front doors of buildings from all over the World. The display
writes over 22 billion different combinations of the number 1984; these combinations change automatically
at a speed that can be set using a dial, from one different image every ten seconds to ten images per
second. At the default speed, it will take around 1,000 years for the same combination of images to be
repeated.
Typing any number onto an onboard animated keyboard starts a fast count-down or count-up until
eventually the number 1984 is reached. At that point, the display resumes cycling through different
combinations of images to make variations on 1984.
Technique
Computer, display, arduino processor, potentiometer, OLED pushbuttons, aluminium and steel frame.
Dimensions
Equipment: 44.5 cm x 133.5cm x 13.5 cm (HxWxD)
Crate dimensions: 156 cm x 72 cm x 35 cm (LxWxH)
Edition
6 copies + 1AP
Operation
** Please refer to next page for components placement. **
1.Connect the piece to electrical power. Use the supplied power cable, plug one side into the wall outlet
and the other side to the electric outlet behind the piece. Both American and European voltages are
accepted as piece can handles 110V to 230V volts.
2. To turn the piece ON, press the power button of the Windows Surface computer, located inside the
round hole on top of the frame, all the way down for a second then release it. Important note: Please do
not push the button again as this will shut down the piece. Wait at least 2 minutes before pressing it again
as the computer might take that long to boot. After 2 minutes (maybe faster), we should see 1984 being
shown.
3. To turn the piece OFF, press the power button all the way down until you’ve seen the “Shutting down.”
screen appearing and disappearing to a black screen.
4. If the piece doesn’t start within 30 seconds, try to turn on the piece again. If it’s still doesn’t turn on,
then hold the power button all the way down for 10 seconds. Then, wait at least 3 seconds then press the
power button all the way down for 1 second and you should be up and running again.
5. The buttons from the keypad are affecting the display in different ways. They send a signal to the
display on release, so not when we press the button, but when we remove our finger from it. To send the
button signal to the software, you need to press it for at least half a second, otherwise the number might
not be received by the software and shown on display.
6. To change the number displayed, press any digit on the keypad: pressing “5” will add a 5 on the right
side of the number; if we were displaying 1984, the number will change to 9845.
7. When a different number than 1984 is entered with the keypad, we have an approximate delay of 4
seconds before seeing a countdown (up or down). This countdown should last approximately 8 seconds.
When entering a number, if we press on the “+” button, the delay would be canceled and the countdown
will start on release of the button.
8. When a different number than 1984 is entered with the keypad and we want to correct a digit, we can
press on the “-“ button. Let say we entered 5847, by pressing the “-“ key, we’ll remove the 7 and show
4584. If we press on the “-“ button several times, we will eventually show back 1984.
9. The potentiometer controls the duration of digits display on monitor, when the number 1984 is shown.
When completely at the left, the digits are updating in rotation every 8 seconds: so the 1 image is
changing to another one, then 8 seconds after the 9 is changed, then 8 seconds after the 8 is changed,
then 8 seconds and the 4 is changed, then 8 seconds and the 1 is changed… etc.
Component layout
Windows Surface Pro
Piece’s power connector
OLED Switches
keypad
Arduino
Windows Surface
power supply
Display port and IR
sensor connectors
Power button
(embedded inside the cylinder)
Monitor and Windows Surface power plugs
Monitor power cord
Cleaning
Please do not clean the display surface with Windex or soap. Use a lint-free cloth and LCD screen liquid
cleaner, such as Kensington Screen Guardian found in computer stores. The aluminium frame can be
cleaned with a wet cloth and a bit of liquid soap.
Placement Instructions
The piece should be hung with the horizontal center at 150 cm (59 inches) from the ground, using the
provided mounting system. In order to achieve that, the screws that hold the mount in place should be
screwed at 170 cm (67 inches) from the ground.
170 cm
To ground
Troubleshooting
Controlling the computer
The piece includes custom-made software that automatically starts up. If you ever need to control the
computer, use the provided Bluetooth keyboard. While the piece is displayed, keys 1 to 9, “-“ and “+”
will do exactly like the ones the buttons keypad on the frame itself, while the “Escape” key will quit the
software.
Bluetooth keyboard
If the keyboard doesn’t react, ensure the ON/OFF switch is turned to ON. Press on the “1” key and wait 3
seconds. Press on the “1” key again and the piece should react. If not, replace the batteries.
To connect to Wifi
In the eventuality we need to access the computer, either to control it, debug it or update the software,
we’ll need to put the computer online:
1. Swipe in from the right edge of the screen, and then tap Settings.
(If you’re using a mouse, point to the lower-right corner of the screen, move the mouse pointer up,
and then click Settings.)
2. Check the network icon. It’ll show if you’re connected and how strong the connection is.
3. If you’re not connected, tap or click the network icon (
or
).
4. Tap or click the name of the network you want to connect to, and then tap or click Connect.
5. Enter the network password.
6. If you want to connect to this network every time it’s in range, select the Connect automatically check
box.
What if Internet isn’t connecting - limited connection?
1. Rare case, where the WiFi network is set-up with a security level like in Airports or Hotels, where you
have to enter a password.
You need to get into a Windows “Desktop” view. For that, do the key combination “ALT” + “TAB”
on the keyboard as many times you need to get back to the piece’s software or “Desktop”.
If you get into the piece’s software, press on the Escape key.
Then click, at the bottom left, on the Internet Explorer icon.
It should, automatically, load a webpage where you can put your username and password info.
2. If you still can’t access Internet, go check the network adapter properties:
Press Windows Key + w to bring up the Settings search box and type:
network and sharing center
Click on the name of your Wi-Fi network.
Click the Properties button in the lower left corner under.
In the Wi-Fi Properties window click the Configure button.
Then pick the last tab called Power Management and you’ll see this option: “Allow the computer to
turn off this device to save power”. Uncheck it, click OK twice, click Close and then restart your
computer to confirm the fix.
3. If it still doesn’t work, check in WiFi connection properties
Click on Internet Protocol Version 4 (TCP/IPv4) then click on Properties.
Select Obtain an IP address automatically and Obtain DNS server address automatically, or the
opposite (with entering your network informations), then click OK twice, click Close and then restart
your computer to confirm the fix.
Using the LG remote
To use the LG remote with the monitor, you should target the center part of the metal frame, from
under it, when you press on the remote’s buttons. That way, the signals emitted byt the remote wille be well
received by the IR sensor of the monitor.
Support
If you would like support for the piece please feel free to call Lozano-Hemmer’s studio in Canada:
Antimodular Research
4060 St-Laurent, studio 107
Montréal Québec H2W 1Y9 Canada
Tel 1-514-597-0917 Fax 1-514-597-2092
[email protected]
www.antimodular.com
Appendix I - NKK SmartSwitches (OLED pushbuttons)
ISC15ANP4
Version (1)
DISTINCTIVE CHARACTERISTICS
•
•
•
•
•
•
•
•
•
•
Organic LED technology; now with 30,000 hours life and 30% less power consumption
Range of 65,536 colors in 16 bit mode, 256 colors in 8 bit mode
Full viewing angle of 180°
Exceptional contrast: 50 times greater than previous LCD products
Four times more enhanced resolution
High resolution provides sharp, clear images of very small characters
Operated by commands and data supplied via serial communications (SPI)
Distinct, long travel of 4.5mm (same as KP01 Series)
Dust tight construction
Stylish, translucent black housing design
Viewing area: 15.5mm x 11.6mm (horizontal x vertical)
High reliability and long life of three million actuations
minimum
High resolution of 64RGB x 48 pixels
Epoxy sealed straight PC terminals
Snap-in standoff for easy, secure mounting and alignment
Actual Size
NKK Switches • email: [email protected] • Phone (480) 991-0942 • Fax (480) 998-1435 • www.nkksmartswitch.com
2
OLED SMARTSWITCH
TM
SWITCH DESCRIPTION
ATTENTION
ELECTROSTATIC
SENSITIVE DEVICES
Switch Description
OLED
Pixel Format
SPST, Momentary ON
Gold Contacts
Straight PC Terminals
Color OLED
Display Module
65,536 Colors
64RGB x 48 Pixels
Horizontal x Vertical
SWITCH SPECIFICATIONS
Circuit
SPST normally open
Contact Position
Leave actuator: 1 – 2 OFF
Push actuator: 1 – 2 ON
Electrical Capacity (Resistive Load)
100mA @ 12V DC
Contact Resistance
200 milliohms maximum @ 20mV 10mA
Insulation Resistance
100 megohms minimum @ 100V DC
Dielectric Strength
125V AC for 1 minute minimum
Mechanical Endurance
3,000,000 operations minimum
Electrical Endurance
3,000,000 operations minimum
Operating Force
2.0 ± 0.5 Newtons
Total Travel
4.5mm (.177”)
OLED SPECIFICATIONS
Characteristics of Display
Display Device
Color OLED display module
Display Mode
Passive matrix
Viewing Area
15.5mm x 11.6mm (horizontal x vertical)
Pixel Format
64RGB x 48 pixels (horizontal x vertical)
Pixel Size
0.21mm x 0.20mm (horizontal x vertical)
Interface
Serial (SPI) interface
Number of Colors
65,536 Colors (16bit: R 5bit/G 6bit/B 5bit)
or 256 Colors (8bit: R 2bit/G 3bit/B 3bit)
Operating Temperature Range
–20°C ~ +70°C (–4°F ~ +158°F)
Storage Temperature Range
–30°C ~ +80°C (–22°F ~ +176°F)
Operating Life (Display)
30,000 hours (at 40% pixels ON)
Absolute Maximum Ratings
Recommended Operating Conditions
Items
Symbols
Items
Ratings
Symbols Minimum
Typical
Maximum
2.4V
2.8V
3.5V
VCC
15.0V
16.0V
17.0V
VI H
0.8 x VDD
––
––
VI L
––
––
0.2 x VDD
–0.3V to +4.0V
Supply Voltage for
Logic/Interface
VDD
VCC
–0.0V to +19.0V
Supply Voltage for Drive
VI
–0.3V to VD D +0.3V
Input High Level Voltage
Input Low Level Voltage
Supply Voltage for
Logic/Interface
VDD
Supply Voltage for Drive
Input Voltage
Current Consumption
Optical Characteristics (Temperature at 25°C, Initial Value: 87 x 0F)
(Temperature at 25°C, VDD = 2.8V, VCC = 16.0V)
Items
Symbols Min Typical
Max
Items
All-Pixels-On Mode
*Drive System Power Current
I CC1
––
All-Pixels-On Mode
*Logic/IF System Power Current
I DD1
–– 0.16mA 0.19mA
White Color
Coordinate
Sleep Mode
**Drive System Power Current
I CC2
––
––
10μA
Red Color
Coordinate
Sleep Mode
**Logic/IF System Power Current
I DD2
––
––
10μA
3.8mA
4.6mA
* All pixels shall be turned on with the maximum level gray scale
** All pixels shall be turned off (while chip is operating)
Luminosity
Green Color
Coordinate
Blue Color
Coordinate
Contrast Ratio
(x)
(y)
(x)
(y)
(x)
(y)
(x)
(y)
Min
Typical
Max
Unit
Remarks
75
100
125
cd/m2
White
(All pixels on)
0.26
0.32
0.63
0.29
0.19
0.61
0.10
0.14
100
0.30
0.37
0.67
0.33
0.23
0.65
0.14
0.20
––
0.34
0.42
0.71
0.37
0.27
0.69
0.18
0.26
––
––
––
––
––
––
––
––
––
––
NKK Switches • email: [email protected] • Phone (480) 991-0942 • Fax (480) 998-1435 • www.nkksmartswitch.com
3
OLED SMARTSWITCH
TM
SWITCH BLOCK DIAGRAM & PIN CONFIGURATIONS
Color OLED Panel
64RGB x 48
SR1,SG1,SB1......SR64,
SG64,SB64
COM1....COM48
Segment Driver
Common Driver
OLED Driver
with Controller
VDD
3
VCC
9
RES
5
SEG/COM
Driving Block
Gray Scale
Decoder
SCK
7
SS
4
SDI
8
D/C
6
Oscillator
Graphic Display
Data
RAM
96 x 64 x 16 Bit
Display Timing
Generator
Command Decoder
MCU Interface
OLED SMARTSWITCHTM
GND 10
SW
Pin No.
Symbol
1
2
2
1
Name
Function
3
4
SW
SW
VDD
SS
Terminal of Switch
Terminal of Switch
Power
Slave Select
Normally open
Normally open
Power source for logic circuit
Slave select for SPI. This line is active low.
5
RES
Reset
Reset signal input. When pin is low, initialization of chip is
executed.
6
D/C
Data/Command
7
8
SCK
SDI
VCC
GND
Serial Clock
Serial Data In
Power
Ground
9
10
Data/Command Control. When pin is pulled low, data will
be interpreted as Command; when pulled high, data will be
interpreted as Data.
Clock line for SPI that synchronizes command and data
Data input line for SPI
Power source for drive circuit
Connect to Ground
TYPICAL SWITCH DIMENSIONS
See
Pixel Detail
Terminal numbers are not on the switch.
(3.3)
.130
(13.41)
.528
(18.0)
.709
Standoff 1
Standoff 2
(0.6) Typ
.024
(20.59)
.811
(9.57)
.377
(16.0)
.630
(0.4) Typ
.016
(0.74)
.029
See Standoff
Detail
(15.5)
.610
(23.0)
.906
(23.13)
.911
Pixel Detail
(0.03) Typ
.0012
(1.0) Typ
.039
2
(11.6)
.457
(0.20) Typ
.0079
SW
(0.21) Typ
.0083
(0.03) Typ
.0012
See Pixel
Detail A
Pixel Detail A
(0.20)
.0079
(0.17)
.0067
(0.04) Typ
.0016
(0.07) Typ
.0028
(0.2)
.008
R
9
4
1
Standoff 1
(0.3) Typ
.012
(8.0)
.315
(1.25)
.049
(2.0) Dia
.079
Dimension A
Standoff 1 = (2.7) Standoff 2 = (2.3)
.091
.106
(0.2) Typ
.008
(2.0)
.079
(7.05)
.278
2x (0.9) Dia
.035
(18.0)
.709
Footprint
A
(7.0)
.276
3
Standoff 2
R G B R
(0.21)
.0083
(7.62)
.300
(3.4)
.134
Standoff Detail
10
(1.0) Typ
.039
(7.0)
.276
9
3
2
10
(7.62)
.300
4
1
8x (0.75) Dia
.029
(2.0)
.079
(7.05)
.278
(8.0)
.315
(16.0)
.630
4x (1.3) Dia
.051
Landless
NKK Switches • email: [email protected] • Phone (480) 991-0942 • Fax (480) 998-1435 • www.nkksmartswitch.com
4
OLED SMARTSWITCH
TM
TIMING SPECIFICATIONS
AC Characteristics (Temperature at 25°C), VDD = 2.4V ~ 3.5V)
Items
Symbols Minimum
Typical
Maximum
Clock Cycle Time
t c yc le
150ns
––
––
D/C Setup Time
t AS
40ns
––
––
D/C Hold Time
t AH
40ns
––
––
SS Setup Time
t CSS
75ns
––
––
SS Hold Time
t CSH
60ns
––
––
Write Data Setup Time
t DSW
40ns
––
––
Write Data Hold Time
t DHW
40ns
––
––
SCK Low Time
t CLK L
75ns
––
––
SCK High Time
t CLK H
75ns
––
––
SCK Rise Time
tR
––
––
15ns
SCK Fall Time
tF
––
––
15ns
D/C
SS
tA S
tA H
tC S S
tC S H
tR
tC L K H
tc y c l e
SCK
tC L K L
tF
tD S W
tD H W
D7
SDI
D6
D5
D4
D3
D2
D1
D0
STATE TRANSITION
7 : Initialization
1 : Power ON, 7 : Initialization
State 0
Power OFF
(VCC, VDD O F F )
2 : Power OFF
State 1
Display OFF
(Sleep Mode)
3 : Display ON
4 : Display OFF
8 : Changing the Display
State
Number
State
VC C
VD D
Changing the
Display
0
Power OFF
OFF
––
OFF
OFF
Disable
1
Display OFF
OFF
ON
ON
ON
Enable
2
Display ON
ON
OFF
ON
ON
Enable
Display Sleep
Transition
1
Power ON
2
Power OFF
Refer to
3
Display ON
"Power ON/OFF Sequence"
4
Display OFF
7
Initialization
Initialize Setting of Command/Data
Image Rewriting
Send Display Data
Display Settings
Dimmer, Scroll, etc.
8
8 : Changing the Display
Power ON/OFF Sequence
Initialization Setting
State 0
Power ON
State 1
State 2
Power OFF
State 0
Minimum 0µs
Minimum 0µs
VDD
State Transition
State 2
Display ON
0V
Index
Reset low pulse width Trw
(minimum 3µs)
RES
“L” or “Hi-z”
“L” or “Hi-z”
Minimum 3µs
Minimum 0µs
VCC
D/C
SS
“L” or “Hi-z”
SCK
SDI
VDD level (due to ESD protection
circuit between VDD and VCC)
“H” or “L”
“L” or “Hi-z”
Note: Refer to Application Notes on web site.
NKK Switches • email: [email protected] • Phone (480) 991-0942 • Fax (480) 998-1435 • www.nkksmartswitch.com
5
OLED SMARTSWITCH
TM
PRECAUTIONS FOR HANDLING & STORAGE OF OLED DEVICES
ATTENTION
ELECTROSTATIC
SENSITIVE DEVICES
Handling
1. The IS Series OLED devices are electrostatic sensitive. To avoid damage to IC, do not touch terminals unless
properly isolated from static electricity.
2. Signal input under conditions not recommended may cause damage to the OLED unit or deterioration of the
display. Follow directions regarding supply sequences of power and signal voltages.
3. If the OLED panel is broken, avoid touching the contents. Wash off any contact to the skin or clothing.
4. Limit operating force to switch keytop to 100.0N maximum, as excessive pressure may damage the OLED.
5. Recommended soldering time and temperature limits:
11 seconds maximum @ 270°C maximum; avoid temperatures exceeding 80°C at the OLED.
6. The IS series OLED devices are not process sealed.
7. Pixels acquire diminished brightness over time and use, and those most frequently habituated have greater
reduction of brightness than those less used. To minimize this difference, operate OLED unit so that all pixels
are used as consistently as possible.
8. Clean cap surface with dry cloth. If further cleaning is needed, wipe with dampened cloth using
neutral cleanser and dry with clean cloth. Do not use organic solvent.
Storage
1. Store in original container and away from direct sunlight.
2. Keep away from static electricity.
3. Avoid extreme temperatures, high humidity, gaseous substances, and all forms of chemical contamination.
NKK Switches • email: [email protected] • Phone (480) 991-0942 • Fax (480) 998-1435 • www.nkksmartswitch.com
6
Appendix II - LG Monitor
ENG
ENGLISH
OWNER’S MANUAL
MONITOR SIGNAGE
Please read this manual carefully before operating your set and retain it
for future reference.
MONITOR SIGNAGE MODELS
38WR50MS
www.lg.com
Downloaded from www.Manualslib.com manuals search engine
10
REMOTE CONTROL
ENGLISH
ENG
REMOTE CONTROL
Thedescriptionsinthismanualarebasedonthebuttonsoftheremotecontrol.Pleasereadthismanual
carefullyandusetheMonitorsetcorrectly.
Toreplacebatteries,openthebatterycover,replacebatteries(1.5VAAA)matching and endstothe
labelinsidethecompartment,andclosethebatterycover.
Toremovethebatteries,performtheinstallationactionsinreverse.
CAUTION
Donotmixoldandnewbatteries,asthis
yy
maydamagetheremotecontrol.
Makesuretopointtheremotecontroltothe
yy
remotecontrolsensorontheMonitorset.
POWER
ENERGY
MONITOR
INPUT
OFF
ON
1
4
7
.,!
GHI
PQRS
1/a/A
2
5
8
0
SAVING
TUV
3
6
9
-*#
CLEAR
ABC
JKL
DEF
MNO
WXYZ
MARK
ARC
PSM
P
BRIGHT A
NESS G
E
MUTE
MENU
AUTO
S.MENU
OK
BACK
TILE
EXIT
ID
ON
(POWER)
ENERGY SAVING( )
Adjuststhebrightnessof
thescreentoreduceenergy
consumption.
TurnstheMonitorsetonoroff.
Monitor On / Off
Turnoffthemonitorandthen
turnitbackon.
POWER
ARC
SelectstheAspectRatio
Mode.
MARK
Selectsaspecificfileinthe
USBmode.
INPUT
Selectstheinputmode.
INPUT
OFF
.,!
GHI
PQRS
1/a/A
SAVING
TUV
-*#
CLEAR
ABC
JKL
Number and Alphabet buttons
Entersnumericaloralphabetical
charactersdependingonthe
setting.
DEF
MNO
WXYZ
CLEAR
Deletestheenterednumerical
oralphabeticalcharacter.
MARK
ARC
Volume Up / Down
Adjuststhevolumelevel.
PSM
SelectsthePictureStatus
Mode.
ENERGY
MONITOR
ON
1/a/A Button
Togglesbetweennumerical
andalphabetical.
OFF
PSM
P
BRIGHT A
NESS G
E
MUTE
MENU
AUTO
S.MENU
MUTE
Mutesallsounds.
OK
Downloaded from www.Manualslib.com manuals search engine
BACK
TILE
ID
ON
OFF
EXIT
Brightness Key
Adjustthebrightnessby
pressingtheUpandDown
buttonsontheremotecontrol.
InUSBmode,theOSDmenu
hasthePagefunctionto
movetothenextfilelist.
11
REMOTE CONTROL
ENG
ENGLISH
POWER
ENERGY
MONITOR
INPUT
OFF
ON
1
4
7
.,!
GHI
PQRS
1/a/A
2
5
8
0
SAVING
TUV
3
6
9
-*#
CLEAR
ABC
JKL
DEF
MNO
WXYZ
MARK
ARC
PSM
POWER
P
BRIGHT A
NESS G
E
MUTE
MENU
AUTO
BACK
TILE
S.MENU
OK
ENERGY
MONITOR
MENU (Seep.37)
Accessesthemainmenus
orsavesyourinputandexit
menus.
.,!
GHI
PQRS
1/a/A
TUV
-*#
CLEAR
ABC
JKL
DEF
MNO
WXYZ
ARC
Navigation buttons
Scrollsthroughmenusor
options.
PSM
OK
Selectsmenusoroptionsand
confirmsyourinput.
Downloaded from www.Manualslib.com manuals search engine
P
BRIGHT A
NESS G
AUTO
Automaticallyadjustspicture
positionandminimizesimage
instability.(RGBinputonly)
E
MUTE
MENU
ID ON/OFF
WhenthenumberofPicture
IDisequaltoSetIDyoucan
controlthemonitorwhich
youwantinthemultidisplay
condition.
OFF
SAVING
MARK
BACK
Allowstheusertomoveback
onestepinuserinteraction
function.
EXIT
ID
ON
OFF
ON
INPUT
AUTO
S.MENU
S.MENU
(SuperSignMenuKey)
Thisbuttonselectionisnot
applicable.
OK
BACK
TILE
ID
ON
OFF
EXIT
EXIT
Clearsallon-screendisplays
andreturnstoMonitorset
viewingfromanymenu.
TILE
Thecurrentmodeldoesnot
supportthisfunction.
USB Menu control buttons
Controlsmediaplayback.
SAVING
SAVING
12 REMOTE CONTROL
1/a/A
1/a/A
CLEAR
CLEAR
Displaying the device name connected to an input port
.,!
ABC
DEF
.,!
ABC
DEF
GHI
JKL
MNO
GHI
JKL
MNO
PQRS
TUV
WXYZ
PQRS
TUV
WXYZ
-*#
-*#
MARK
MARK
ARC
ENGLISH
ENG
PSM
ARC
BRIGHT
NESS
P
A
G
E
MUTE
Display which devices are connected to which
externalinputports.
MENU
AUTO
S.MENU
1 AccesstheInputlistscreenandpresstheblue
OK
(inputlabel)buttonontheremotecontrol.
BACK
TILE
EXIT
ID
ON
OFF
2 Youcanassignaninputlabelforeveryinput
exceptUSB.
InputLabel
HDMI
DVI-D
DisplayPort
Close
Downloaded from www.Manualslib.com manuals search engine
PSM
P
BRIGHT A
NESS G
E
MUTE
NOTE
MENU
AUTO
S.MENU
Externalinputssupported:HDMI,DVI-D,
yy
DisplayPort
Labelsavailable:DTV,PC
yy
OK
TheinputlabelsaredisplayedontheInput
yy
Labelscreenoratthetopleftofthescreen
whenyouchangetheexternalinputsetting.
EXIT
BACK
TILE
ForDTV/PC-compatiblesignals,suchas
yy
ID
1080p60Hz,thescreensettingsmay
OFF
ON
changeaccordingtotheinputlabel.TheJust
ScanoptionisavailableifaPCisconnected
asanexternaldevice.
CUSTOMIZING SETTINGS
Accessing the main menus
MARK
ARC
PSM
1 PressMENUtoaccessthemainmenus.
P
BRIGHT A
NESS G
E
MUTE
MENU
2 PresstheNavigationbuttonstoscrolltooneofthefollowingmenusand
pressOK.
S.MENU
OK
BACK
3 PresstheNavigationbuttonstoscrolltothesettingoroptionyouwant
andpressOK.
AUTO
TILE
EXIT
ID
ON
OFF
4 Whenyouarefinished,pressEXIT.
Whenyoureturntothepreviousmenu,pressBACK.
PICTURE (Seep.38)
Adjuststheimagesize,
quality,oreffect.
PICTURE
OPTION (Seep.43)
Customizesthegeneral
settings.
OPTION
AUDIO(Seep.41)
Adjuststhesoundquality,
effect,orvolumelevel.
AUDIO
NETWORK
NETWORK(Seep.47)
Setsupthenetwork
setting.
Downloaded from www.Manualslib.com manuals search engine
TIME
MY MEDIA
TIME(Seep.42)
Setsthetime,date,or
Timerfeature.
MY MEDIA(Seep.23)
Displayandplaymovie,
photoandmusiccontent
storedonyourUSB.
ENG
ENGLISH
CUSTOMIZING SETTINGS
37
38
CUSTOMIZING SETTINGS
PICTURE settings
PICTURE
ENGLISH
ENG
•AspectRatio
1 PressMENUtoaccessthemainmenus.
•
2 PresstheNavigationbuttonstoscrolltoPICTUREand
pressOK.
EnergySaving
Move
:16:4
OK
ꔋ
:Off
•SmartEnergySaving :Off
•PictureMode
:Standard
•Backlight
•Contrast
•Brightness
50
•Sharpness
50
-Toreturntothepreviouslevel,pressBACK.
•Color
60
•Tint
0
R
G
4 Whenyouarefinished,pressEXIT.
Whenyoureturntothepreviousmenu,press
BACK.
•ColorTemp.
0
W
C
•AdvancedControl
•PictureReset
3 PresstheNavigationbuttonstoscrolltothesettingor
optionyouwantandpressOK.
70
100
•Screen
Theavailablepicturesettingsaredescribedinthefollowing:
Setting
Aspect Ratio
Description
Changestheimagesizetoviewimagesatitsoptimalsize(Seep.18).
Energy Saving Setstoautomaticallyadjustthescreenbrightnesscorrespondingtothesurroundings.
Level
Smart Energy
Saving
Picture Mode
Off
DisablesEnergySavingfunction.
Minimum/
Medium/
Maximum
Selectsthebrightnesslevelofthebacklight.
ScreenOff
Thescreenturnsoffin3seconds.
Adjuststhebacklightandcontrastdependingonthescreenbrightness.
Level
On
EnablestheSmartEnergySavingfunctiontosavepowerconsumptionasmuch
asthevaluesetinthesmartenergysavingrate.
Off
DisablestheSmartEnergySavingfunction.
SelectsoneofthepresetimageorcustomizesoptionsineachmodeforthebestMonitorsetscreen
performance.Youarealsoabletocustomizeadvancedoptionsofeachmode.
TheavailablepresetpicturemodesvarydependingontheMonitorset.
Mode
Vivid
Adjuststhevideoimagefortheretailenvironmentbyenhancingthecontrast,
brightness,Color,andsharpness.
Standard
Adjuststheimageforthenormalenvironment.
Cinema
Optimizesthevideoimageforacinematiclooktoenjoymoviesasifyouareina
movietheater.
Sport
Optimizesthevideoimageforhighanddynamicactionsbyemphasizingprimary
Colourssuchaswhite,grass,orskyblue.
Game
OptimizesthevideoimageforafastgamingscreensuchasPCsorgames.
Downloaded from www.Manualslib.com manuals search engine
CUSTOMIZING SETTINGS
Setting
Description
CustomizesthePCdisplayoptionsinRGBmode.
Option
Resolution
Selectsaproperresolution.See“CustomizingPCdisplayoptions”.
AutoConfigure
Setstoadjustthescreenposition,clock,andphaseautomatically.
Thedisplayedimagemaybeunstableforafewsecondswhiletheconfigurationis
inprogress.
Position/Size/
Phase
Adjuststheoptionswhenthepictureisnotclear,especiallywhencharactersare
shaky,aftertheautoconfiguration.
Reset
Restorestheoptionstothedefaultsetting.
Basic image options
Setting
Description
Backlight
djuststhebrightnessofthescreenbycontrollingtheLCDbacklight.Ifyoudecreasethe
A
brightnesslevel,thescreenbecomesdarkerandthepowerconsumptionwillbereduced
withoutanyvideosignalloss.
Contrast
Increasesordecreasesthegradientofthevideosignal.YoumayuseContrastwhenthe
brightpartofthepictureissaturated.
Brightness
Adjuststhebaselevelofthesignalinthepicture.YoumayuseBrightnesswhenthedarkpart
ofthepictureissaturated.
Sharpness
Adjuststhelevelofcrispnessintheedgesbetweenthelightanddarkareasofthepicture.
Thelowerthelevel,thesoftertheimage.
Color
Adjustsintensityofallcolors.
Tint
Adjuststhebalancebetweenredandgreenlevels.
Color Temp .
SettowarmtoenhancehotterColorssuchasred,orsettocooltomakepicturebluish.
Advanced Control
Customizestheadvancedoptions.RefertotheAdvancedimageoptions.(Seep.40).
Picture Reset
Restorestheoptionstothedefaultsetting.
NOTE
Ifthe'Picture Mode'settinginthePicturemenuissettoVivid, Standard, Cinema, SportorGame
yy
thesubsequentmenuswillbeautomaticallyset.
YoucannotadjustcolorandtintintheRGB-PC/DVI-D-PC(DTV)/HDMI-PCmode.
yy
WhenusingtheSmartEnergySavingfunction,thescreenmaylooksaturatedinthewhiteareaofa
yy
stillimage.
IfEnergySavingissettoMinimum,Medium,orMaximum,theSmartEnergySavingfunctionis
yy
disabled.
Downloaded from www.Manualslib.com manuals search engine
ENG
ENGLISH
SCREEN
(In RGB
Mode Only)
39
40
CUSTOMIZING SETTINGS
Advanced Control
ENGLISH
ENG
Setting
Dynamic
Contrast
(Off/High/
Medium/Low)
Description
Adjuststhecontrasttokeepitatthebestlevelaccordingtothebrightnessofthescreen.The
pictureisimprovedbymakingbrightpartsbrighteranddarkpartsdarker.
(Thecurrentmodeldoesnotsupportthisfunction.)
Dynamic Color AdjustsscreenColorssothattheylooklivelier,richerandclearer.Thisfeatureenhances
(Off/High/Low) hue,saturationandluminancesothatred,blue,greenandwhitelookmorevivid.
(Thecurrentmodeldoesnotsupportthisfunction.)
Clear White
(Off/High/Low)
Makethewhiteareaofscreenbrighterandmorewhite.
Skin Color
(-5 to 5)
Itdetectstheskinareaofvideoandadjustsittoexpressanaturalskincolor.
Noise
Reduction
(Off/High/
Medium/Low)
Reducesscreennoisewithoutcompromisingvideoquality.
(Thecurrentmodeldoesnotsupportthisfunction.)
Digital Noise
Reduction
(Off/High/
Medium/Low)
Thisoptionreducesthenoiseproducedwhilecreatingdigitalvideosignals.
Gamma
(High/Medium/
Low)
Setyourowngammavalue.Onthemonitor,highgammavaluesdisplaywhitishimagesandlow
gammavaluesdisplayhighcontrastimages.
Black Level
(High/Low)
Low:Thepictureofthescreengetsdarker.
High:Thepictureofthescreengetsbrighter.
Setblacklevelofthescreentoproperlevel.
(Functionworksinthefollowingmode-HDMI-DTV)
Downloaded from www.Manualslib.com manuals search engine
CUSTOMIZING SETTINGS
AUDIO settings
AUDIO
1 PressMENUtoaccessthemainmenus.
Move
: Off
• Balance
2 PresstheNavigationbuttonstoscrolltoAUDIOandpress
• Sound Mode
OK
ꔋ
0
L
R
: Standard
• Infinite Sound: Off
OK.
3 PresstheNavigationbuttonstoscrolltothesettingor
• Treble
50
• Bass
50
• Reset
optionyouwantandpressOK.
• Digital Audio Input : Audio In
-Toreturntothepreviouslevel,pressBACK.
• Speaker
: Off
4 Whenyouarefinished,pressEXIT.
Whenyoureturntothepreviousmenu,pressBACK.
Theavailableaudiooptionsaredescribedinthefollowing:
Setting
Description
Clear Voice ll
Bydifferentiatingthehumansoundrangefromothers,ithelpsusersmakedialogmoreclear.
Balance
Adjustsbalancebetweentheleftandrightspeakersaccordingtoyourroomenvironment.
Sound Mode
Thebestsoundtonequalitywillbeselectedautomaticallydependingonthevideotypethatyou're
currentlywatching.
Mode
Standard
Themostcommandingandnaturalaudio.
Music
Selectthisoptiontoenjoytheoriginalsoundwhenlisteningtothemusic.
Cinema
Selectthisoptiontoenjoysublimesound.
Sport
Selectthisoptiontowatchsportsbroadcasting.
Game
Toenjoydynamicsoundwhenplayingagame.
NOTE
Ifsoundqualityorvolumeisnotatthelevelyouwant,itisrecommendedtouseaseparate
hometheatersystemoramplifiertocopewithdifferentuserenvironments.
Option
InfiniteSound
LG'sInfinitySoundoptionprovides5.1channelstereosoundfromtwo
speakers.
Treble
Controlsthedominantsoundsintheoutput.Whenyouturnupthetreble,it
willincreasetheoutputtothehigherfrequencyrange.
Bass
Makestheoutputsoundsofter.Whenyouturnupthebass,itwillincrease
theoutputtothelowerFrequency.
Reset
Resetsthesoundmodetothedefaultsetting.
Digital Audio
Input
HDMI/DisplayPort:OutputsthesoundofdigitalsignalfromHDMIanddisplayportsthroughthe
monitorspeaker.
Audio In:OutputsthesoundthroughthemonitorspeakerbyconnectingHDMIanddisplayports
totheAudioInport.
Speaker
ON:Enablessoundtothemonitorspeaker.(*Themonitorspeakerissoldseparately.)
OFF:Disablessoundtothemonitorspeaker.Usethisoptionwhenusinganexternalsounddevice.
Downloaded from www.Manualslib.com manuals search engine
ENG
ENGLISH
• Clear Voice II
41
42
CUSTOMIZING SETTINGS
TIME settings
TIME
Move
ENGLISH
ENG
1 PressMENUtoaccessthemainmenus.
• Clock
• Off Time
: Off
2 PresstheNavigationbuttonstoscrolltoTIMEandpress
• On Time
: Off
• Sleep Timer
: Off
• Power On Delay
: Off
• Auto Off
: 15 min.
OK.
3 PresstheNavigationbuttonstoscrolltothesettingoroption
youwantandpressOK.
OK
ꔋ
• Automatic Standby : 4hours
-Toreturntothepreviouslevel,pressBACK.
4 Whenyouarefinished,pressEXIT.
Whenyoureturntothepreviousmenu,pressBACK.
Theavailabletimesettingsaredescribedinthefollowing:
Setting
Clock
Description
Setsthetimefeature.
On/Off Time
SetsthetimetoturnonorofftheMonitorset.
Sleep Timer
SetsthelengthoftimeuntiltheMonitorsettoturnsoff.WhenyouturntheMonitorsetoffandturn
itonagain,theSleepTimerwillbesettooff.
Power on delay
Whenconnectingmultiplemonitorsandturningthepoweron,themonitorsareturnedonindividually
topreventoverload.
Auto off
IfAutooffisactiveandthereisnoinputsignal,thesetswitchestooffmodeautomaticallyafter15
minutes.
Automatic
Standby
Ifyoudonotusethemonitorformorethan4hours,itwillbeinstandbymodeautomatically.
NOTE
yyOncetheonorofftimeisset,thesefunctionsoperatedailyatthepresettime.
yyThescheduledpower-offfunctionworksproperlyonlywhenthedevicetimeissetcorrectly.
yyWhenthescheduledpower-onandpower-offtimesarethesame,thepower-offtimehaspriorityoverthepower-ontime
ifthesetisturnedon,andviceversaifthesetisturnedoff.
Downloaded from www.Manualslib.com manuals search engine
CUSTOMIZING SETTINGS
OPTION settings
OPTION
Move
2 PresstheNavigationbuttonstoscrolltoOPTIONandpress
• ISM Method
: Normal
• DPM Select
: On
• Fail Over
: Off
OK
ꔋ
• Power Indicator
OK.
3 PresstheNavigationbuttonstoscrolltothesettingoroption
youwantandpressOK.
• Factory Reset
• Set ID
:1
• PIP/PBP
• Key Lock
-Toreturntothepreviouslevel,pressBACK.
• Product/Service Info.
4 Whenyouarefinished,pressEXIT.
Whenyoureturntothepreviousmenu,pressBACK.
Theavailableoptionsettingsaredescribedinthefollowing:
Setting
Description
Language
Tochoosethelanguageinwhichthecontrolnamesaredisplayed.
Power Indicator
UsethisfunctiontosetthepowerindicatoronthefrontsideoftheproducttoOnorOff.
(Thepowerindicatorislocatedonthebottomoftheproduct.)
ISM Method
AfrozenorstillpicturefromaPC/Videogamedisplayedonthescreenforprolongedperiods
couldresultinaghostimageremainingevenwhenyouchangetheimage.Avoidallowingafixed
imagetoremainonthescreenforalongperiodoftime.
Setting
DPM Select
Fail Over
Normal
Leaveonnormalifyoudon'tforeseeimageburninbeingaproblem.
Orbiter
May help prevent ghost images. However, it is best not to allow any fixed
imagetoremainonthescreen.Toavoidapermanentimageonthescreen,
thescreenwillmoveevery2minutes.
Inversion
This function inverts the panel color of the screen. The panel color is
automaticallyinvertedevery30minutes.
WhiteWash
White wash fills the screen with solid white.This helps removes permanent
imagesburnedintothescreen.Apermanentimagemaybeimpossibletoclear
entirelywithwhitewash.
Ausercanchoosetoturnthepowersavingmodeon/off.
Ifthereisnoinputsignal,itautomaticallyswitchestoanotherinputwithsignal.
Setting
Off
Stopsautoswitchoftheinputsource.
Auto
Switchestoanotherinputsourcewithvideosignalifnovideosignalcomes
fromthecurrentinputsource.
Manual
Selectsthepriorityofinputsourceforautoswitch.
Whenseveralinputsourcesarefound,theinputsourcewithahigherpriority
willbeselected.
Factory Reset
Selectthisoptiontoreturntothedefaultfactorysettings.
Set ID
YoucanassignauniqueSetIDNO(nameassignment)toeachproductwhenseveralproducts
areconnectedfordisplay.Specifythenumber(1to255)usingthebuttonandexit.Usethe
assignedSetIDtoindividuallycontroleachproductusingtheProductControlProgram.
Downloaded from www.Manualslib.com manuals search engine
ENG
ENGLISH
1 PressMENUtoaccessthemainmenus.
• Language
43
44
CUSTOMIZING SETTINGS
Setting
ENGLISH
ENG
PIP/PBP
Description
DisplaysvideosorphotosstoredintheUSBdeviceonasinglemonitorbydividingitintothemain
andsubscreens.
Option
Mode
Setsthetypeofsecondaryscreen.
*OFF:Disablesthesecondaryscreen.
*PIP (Picture In Picture):Displaysthesecondaryscreeninthemainscreen.
*PBP (Picture By Picture):Displaysthesecondaryscreennexttothemain
screen.
Position
Adjuststhepositionofthesubscreen(topleft,bottomleft,topright,bottom
right)
Thedefaultvalueisthebottomright.
Size
Adjuststhesizeofthesubscreen(Size0to10).
ThedefaultsizeofPIP(Size:0)is480x240;themaximumsize10is960x540.
NOTE
yyThePositionandSizeoptionsareenabledonlyinPIPmode.
Key Lock
Keyinputdoesnotwork.Thispreventsinvalidkeyinput.
Product/Service
Info.
Displaysthemodelname,softwareversion,serialnumber,IPaddress,MACaddressandhome
page.
Downloaded from www.Manualslib.com manuals search engine
CUSTOMIZING SETTINGS
PIP/PBP
NOTE
yyThesubscreenisonlysupportedwhenusingthe
USBdevice.
Sub
Mode
*PIP(Picture In Picture):DisplaystheSubscreen
inthemainscreen.
*PBP(Picture By Picture):DisplaystheSub
screennexttothemainscreen.
Sub
screen
Main
screen
PBP
PIP
Position
Adjuststhepositionofthesubscreen(topleft,
bottomleft,topright,bottomright)
top left
top right
bottom left
bottom right
Size
Adjuststhesizeofthesubscreen(Size0-10).
10 : 420x250
PIP
0 : 180x120
< 1920x502 >
Downloaded from www.Manualslib.com manuals search engine
PBP
960x502
USB
Main
RGB
O
HDMI/DVI-D/Display Port
O
yyYoucanonlychangethesizeandpositioninPIP
mode.
yyWithPBPselected,theAspectRatiooptioninthe
PICTUREmenuisdisabled(Fixedas16:4).
yyYoumustselecttheoutputsoundbeforerunning
thePIPorPBPfunctions.(SelecteitherMainor
Sub.)
yyIfyoufailtoselectMainorSubfromthesound
selectionbox,andiftheOSDdisappearsafter
eitheraperiodoftimeorwhentheExitorBack
keyispressed,thePIP/PBPsubscreenisnot
activated.
yyYoucannotchangethesoundwhilerunningthe
PIPorPBPfunctions.Ifyouwanttochangethe
sound,pleaserestartPIP/PBP.
yyThepicturequalityofthesubscreenisset
accordingtothevaluesselectedinthemainmenu,
nottheUSBdevice.
yyIfyouplayvideosyouselectedinPIP/PBPmode,
thevideoswillplaybackrepeatelyinsuccession.
yyThebuttonsbelowworkinPIPmode.
Button
Photo
Movie
ENG
ENGLISH
DisplaysvideosorphotosstoredintheUSBdeviceon
asinglemonitorbydividingitintothemainandsub
screens.(Seep.36)
45
52
TROUBLESHOOTING
ENGLISH
ENG
TROUBLESHOOTING
No image is displayed
Problem
Resolution
Istheproductpowercord
connected?
y Seeifthepowercordisproperlyconnectedtotheoutlet.
Isthepowerindicatorlighton?
y Seeifthepowerswitchisturnedon.
y Mayneedservice.
y Adjustbrightnessandcontrastagain.
y Backlightmayneedrepair.
y Iftheproductisinpowersavingmode,movethemouseorpressany
key.
y Turnbothdevicesoffandthenbackon.
owerisonbutthescreen
P
appearsextremelydark.
Thepowerindicatoramber?
oesthe'InvalidFormat'
D
messageappear?
y ThesignalfromthePC(videocard)isoutoftheverticalorhorizontal
frequencyrangeoftheproduct.Adjustthefrequencyrangeby
referringtotheSpecificationsinthismanual.
*Maximumresolution
RGB:1920x1080@60Hz
HDMI/DVI/DP:1920x1080@60Hz
oesthe'Nosignal'message
D
appear?
y ThesignalcablebetweenPCandproductisnotconnected.Check
thesignalcable.
y Pressthe'INPUT'menuintheremoteControltochecktheinput
signal.
'Unknown Product' message appears when the product is connected.
Problem
Didyouinstallthedriver?
Resolution
y Seeiftheplug&playfunctionissupportedbyreferringtothevideo
cardusermanual.
'Key Lock On' message appears.
Problem
The'KeyLockOn'message
appearswhenpressingthe
Menubutton.
Downloaded from www.Manualslib.com manuals search engine
Resolution
y TheLockfunctionpreventstheOSDsettingsfrombeingchanged
inadvertently.Toreleasethelock,gotoMenuandOptionanddisable
theKeyLockoption.
TROUBLESHOOTING
53
The screen image looks abnormal.
Resolution
y D-Subanalogsignal-Pressthe"AUTO"buttonintheremotecontrol
toautomaticallyselecttheoptimalscreenstatusthatfitsintothe
currentmode.Ifadjustmentisnotsatisfactory,usethePositionOSD
menu.
y Seeifthevideocardresolutionandfrequencyaresupportedbythe
product.Ifthefrequencyisoutofrange,settotherecommended
resolutionintheControlPanel"Display"Settingmenu.
Dothinlinesappearonthe
backgroundscreen?
y D-Subanalogsignal-Pressthe"AUTO"buttonintheremotecontrol
toautomaticallyselectanoptimalscreenstatusthatfitsintothe
currentmode.Ifadjustmentisnotsatisfactory,usetheClockOSD
menu.
Horizontalnoiseappearsorthe y D-Subanalogsignal-Pressthe"AUTO"buttonintheremotecontrol
characterslookblurred.
toautomaticallyselectanoptimalscreenstatusthatfitsintothe
currentmode.Ifadjustmentisnotsatisfactory,usethePhaseOSD
menu.
Thescreenisdisplayed
y Theproperinputsignalisnotconnectedtothesignalport.Connect
abnormally.
thesignalcablethatmatcheswiththesourceinputsignal.
After-image appears on the product.
Problem
After-imageappearswhenthe
productisturnedoff.
Resolution
y Ifyouuseafixedimageforalongtime,thepixelsmaybedamaged
quickly.Usethescreen-saverfunction.
The audio function does not work.
Problem
Nosound?
Soundistoodull.
Soundistoolow.
Downloaded from www.Manualslib.com manuals search engine
Resolution
y Seeiftheaudiocableisconnectedproperly.
y Adjustthevolume.
y Seeifthesoundissetproperly.
y Selecttheappropriateequalizesound.
y Adjustthevolume.
ENG
ENGLISH
Problem
Isthescreenpositionwrong?
54
TROUBLESHOOTING
Screen color is abnormal.
ENGLISH
ENG
Problem
Resolution
Screenhaspoorcolorresolution y Setthenumberofcolorstomorethan24bits(truecolor)Select
(16colors).
ControlPanel-Display-Settings-ColorTablemenuinWindows.
creencolorisunstableor
S
mono-colored.
y Checktheconnectionstatusofthesignalcable.Or,re-insertthePC
videocard.
Doblackspotsappearonthe
screen?
y Severalpixels(red,green,whiteorblackcolor)mayappearonthe
screen,whichcanbeattributabletotheuniquecharacteristicsofthe
LCDpanel.ItisnotamalfunctionoftheLCD.
The operation does not work normally.
Problem
Thepowersuddenlyturnedoff.
Downloaded from www.Manualslib.com manuals search engine
Resolution
y Isthesleeptimerset?
y Checkthepowercontrolsettings.Powerinterrupted.
SPECIFICATIONS
LCDPanel
VideoSignal
ScreenType
961.5mmWide(37.9inch)TFT(ThinFilmTransistor)
LCD(LiquidCrystalDisplay)Panel.
Visiblediagonalsize:961.5mm
PixelPitch
0.4845mm(H)x0.4845mm(V)
Max.Resolution
RGB:1920x1080@60Hz
HDMI/DVI/DP:1920x1080@60Hz
-ItmaynotbesupporteddependingontheOSorvideo
cardtype.
RecommendedResolution RGB:1920x502@60Hz
HDMI/DVI/DP:1920x502@60Hz
-ItmaynotbesupporteddependingontheOSorvideo
cardtype.
HorizontalFrequency
RGB:30kHzto68kHz
HDMI/DVI/DP:30kHzto68kHz
VerticalFrequency
RGB:56Hzto75Hz
HDMI/DVI/DP:56Hzto60Hz
SynchronizationType
SeparateSync,Composite(AV)Sync,Digital,SOG
15-pinD-Subtype(RGB),HDMI/DVI/DP(digital),
RS-232C,LAN,USB,PCAudio,IRReceiver
RGB,DVI,RS-232C,SpeakerOutL/R
RatedVoltage
PowerConsumption
AC100-240V~,50/60Hz1.3A
OnMode:90WTyp.
SmartEnergySavingMode:80WTyp.
OffMode:≤1W
InputConnector
OutputConnector
Power
Dimensions
(WidthxHeightx
Depth)/Weight
W
Environmental
conditions
*WallBracketavailableVESA
400x200
H
D
973.6mmX287.8mmX59mm/12.5Kg
OperatingTemperature
0°Cto40°C
OperatingHumidity
10%to80%
StorageTemperature
-20°Cto60°C
StorageHumidity
5%to95%
* Applicable only for models that support the speakers
Audio
RMSAudioOutput
InputSensitivity
SpeakerImpedance
10W+10W(R+L)
0.7Vrms
8Ω
Productspecificationsshownabovemaybechangedwithoutpriornoticeduetoupgradeofproduct
functions.
Downloaded from www.Manualslib.com manuals search engine
ENG
ENGLISH
SPECIFICATIONS
55
56
SPECIFICATIONS
DTV Mode
RGB (PC) supported mode
ENGLISH
ENG
Resolution
Horizontal
Vertical
Frequency(kHz) Frequency(Hz)
720x400
31.468
Resolution
HDMI
Display Port
70.8
480i
x
x
576i
x
x
640x480
31.469
59.94
800x600
37.879
60.317
480p
o
o
832x624
49.725
74.55
576p
o
o
1024x768
48.363
60
720p
o
o
1280x720
44.772
59.855
1366x768
47.7
60
1280x1024
63.981
60.02
1920x502
31.25
59.981
1920x1080
67.5
60
1080i
o
o
1080p
o
o
Power Indicator
Mode
Product
OnMode
SleepMode
OffMode
Red
Amber
-
HDMI/DVI/Display Port(PC) supported mode
Resolution
Horizontal
Vertical
Frequency(kHz) Frequency(Hz)
640x480
31.469
59.94
800x600
37.879
60.317
1024x768
48.363
60
1280x720
44.772
59.855
1366x768
47.7
60
1280x1024
63.981
60.02
1920x502
31.25
59.981
1920x1080
67.5
60
NOTE
PCresolutionsavailableastheinputlabel
yy
optioninRGBandHDMI/DVIinputmode:
640x480/60Hz,1280x720/60Hz,1920
x1080/60HzandDTVresolutions:480p,
720p,1080p.
NOTE
Verticalfrequency:Toenabletheuserto
yy
watchtheproductdisplay,screenimage
shouldbechangedtensoftimesevery
secondlikeafluorescentlamp.Thevertical
frequencyorrefreshrateisthetimesof
imagedisplaypersecond.TheunitisHz.
Horizontalfrequency:Thehorizontalinterval
yy
isthetimetodisplayoneverticalline.When
1isdividedbythehorizontalinterval,the
numberofhorizontallinesdisplayedevery
secondcanbetabulatedasthehorizontal
frequency.TheunitiskHz.
Downloaded from www.Manualslib.com manuals search engine
To obtain the source code under GPL, LGPL,
MPL and other open source licenses, that is
contained in this product, please visit http://
opensource.lge.com.
In addition to the source code, all referred
license terms, warranty disclaimers and
copyright notices are available for download.
LG Electronics will also provide open source
code to you on CD-ROM for a charge covering
the cost of performing such distribution (such
as the cost of media, shipping and handling)
upon email request to [email protected].
This offer is valid for three (3) years from the
date on which you purchased the product.
Make sure to read the Safety Precautions
before using the product.
Keep the Owner's Manual(CD) in an accessible
place for future reference.
The model and serial number of the SET is
located on the back and one side of the SET.
Record it below should you ever need service.
MODEL
SERIAL
Downloaded from www.Manualslib.com manuals search engine
E N E RGY STA R i s a s et of p owe rsaving guidelines issued by the U.S.
Environmental Protection Agency(EPA).
As an ENERGY STAR Partner LGE U. S. A.,Inc. has
determined that this product meets the ENERGY
STAR guidelines for energy efficiency.
TemporarynoiseisnormalwhenpoweringONor
OFFthisdevice.