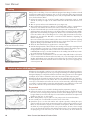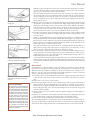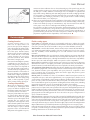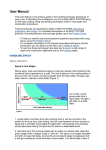
1
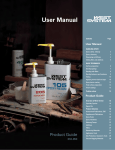
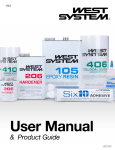
FREE
User Manual
®
BRAND
Contents
Page
User Manual
HANDLING EPOXY
Epoxy safety, Cleanup
2
Epoxy chemistry
3
Dispensing and Mixing
4
Adding fillers and additives
5
BASIC TECHNIQUES
Surface preparation
6
Bonding (gluing)
7
Bonding with fillets
8
Bonding fasteners and hardware
8
Fairing
10
Applying woven cloth and tape
10
Epoxy barrier coating
12
Final surface preparation
12
Finish coatings
13
Problem solver
14
Product Guide
Product Guide
002-950
Product Selection
16
Instructional Publications, DVD
17
Supplemental Publications
17
Epoxy Resin
18
Epoxy Hardeners
19
Metering Pumps
20
Repair Packs
21
Specialty Epoxies
21
Fillers
22
Additives
24
Reinforcing Materials
25
Application Tools
26
Skin Protection, Cleaners & Tools
27
Vacuum Bagging Materials
28
Index
29
User Manual
Product Guide
WEST SYSTEM Brand epoxy is a versatile, high-quality,
two-part epoxy that is easily modified for a wide
range of coating and adhesive applications. It is used
for construction and repairs requiring superior moisture resistance and high strength. It bonds to fiberglass, wood, metal, fabrics, and other composite
materials, and is especially suited for marine
applications.
This manual is designed to help you become familiar
with WEST SYSTEM products and use them effectively.
• The User Manual provides information about
safety, handling and the basic techniques of epoxy
use. Understanding these basic techniques will allow you to tailor WEST SYSTEM products to your exact repair and construction needs. These
techniques are used in a wide range of repair and
building procedures such as those described in detail in WEST SYSTEM instructional publications and
DVD’s (page 17).
• The Problem Solver will help you identify and prevent potential problems associated with using
epoxy.
• The Product Guide gives you complete descriptions of WEST SYSTEM products, including selection
and coverage guides to help you choose the most
appropriate products and product sizes for your
project.
WEST SYSTEM products are
available from quality
marine chandleries and
hardware outlets in
many areas. For the name
of the WEST SYSTEM products dealer nearest you,
or for additional technical, product, or
safety information
contact Gougeon
Brothers Inc. or visit
our website.
Why WEST SYSTEM Brand epoxy?
All epoxies are not created equal. Epoxy brands can vary widely in their
formulations, quality of raw materials and their suitability for marine environments. It’s easy to market an off-the-shelf industrial epoxy product
as a marine epoxy, or formulate an epoxy with one or two favorable characteristics, while sacrificing other important characteristics.
It’s much more difficult balancing all of
the physical and mechanical
properties necessary for a
versatile, high-quality marine epoxy. Defining an
epoxy’s performance
criteria, and designing a
formula to meet those
criteria requires good
chemistry, rigorous test
programs, skillful shop
work and direct experience
with today’s high-performance
boats and other composite structures.
Reliability and performance
WEST SYSTEM epoxy was created by Gougeon Brothers—sailors, builders
and formulators who know the engineering and the chemistry required
for high-performance composite structures. We have maintained that
performance driven development of marine epoxies since the company
was founded in 1969, continually formulating, testing and improving
WEST SYSTEM resin and hardeners to produce the most reliable and
well-balanced epoxy system available.
Potential resin and hardener formulas, ingredients and combinations are
tested to compare fatigue strength, compression strength, glass transition
temperature, and peak exotherm. Additionally, qualified samples are
tested for hardness, tensile strength, tensile elongation, tensile modulus,
flexural strength, flexural modulus, heat deflection temperature, impact
resistance and moisture exclusion effectiveness. Thorough testing such
as this insures that any change in a formula will improve one or more of a
product’s characteristics without diminishing any characteristics.
WEST SYSTEM User Manual & Product Guide
Comprehensive testing
Good science and comprehensive testing are essential not only for the development of improved epoxy formulations, but also for the development of better construction and repair methods. In addition to the tests
conducted to support in-house product development, the materials test
lab also conducts testing to support outside builders, designers, and government organizations in the engineering of epoxy composite structures.
Aside from performing a battery of standard ASTM tests, we have developed new testing methods to evaluate adhesives and composites. Some of
these tests, like our patented Hydromat Panel test, have become industry
standards. This test uses a special fixture in one of the lab’s MTS™ test
machines to simulate the pressure loads a section of a hull would endure
in a lifetime on the water. In 1999, the American Society for Testing and
Materials approved the Hydromat test as an official ASTM standard
(D6416). This unique testing program is used by designers and builders
around the world to evaluate various combinations of sandwich composite materials and epoxy formulations and ultimately build lighter,
stronger, safer structures.
The information provided by a comprehensive test program, along with
our own building experience, and feedback from our customers contributes to a data base on epoxies and epoxy composites that has been growing for over thirty-five years. This knowledge is invaluable, not only for
achieving the proper balance of properties required for a versatile,
high-quality marine epoxy, it assures that the building and repair information provided by Gougeon Brothers is up-to-date and reliable .
Technical support
To help you make the most of WEST SYSTEM epoxy’s balanced performance and versatility, Gougeon Brothers provides you with one other
important ingredient—knowledge. Whether your project is large or
small, WEST SYSTEM technical publications and videos offered in this
guide provide detailed procedures and instructions for specific repair
and construction applications. Further assistance can be obtained by
writing or calling our technical staff.
We are always interested in your views and welcome suggestions about
our products and service. We encourage you to call or write with comments on WEST SYSTEM Brand products and their use.
Gougeon Brothers Inc.
P.O. Box 908
Bay City, MI 48707 USA
866-937-8797 (toll free)
fax 989-684-1374
www.westsystem.com
Because Gougeon Brothers Inc. cannot control how its products will be
used, it makes no warranties, either expressed or implied, including no
warranties of merchantability and fitness for purpose intended. Gougeon
Brothers Inc. will not be liable for incidental or consequential damages.
WEST SYSTEM User Manual & Product Guide
1
User Manual
HANDLING
EPOXY
This section explains the fundamentals of epoxy safety, curing and the steps for
proper dispensing, mixing and adding fillers to assure that every batch cures to a
useful high strength solid.
Epoxy safety
Epoxies are safe when handled
properly. To use WEST SYSTEM epoxies safely, you must understand
their hazards and take precautions
to avoid them.
Precautions
1. Avoid contact with resin, hardeners, mixed epoxy and sanding dust from epoxy that is
Hazards
The primary hazard associated with
epoxy involves skin contact. WEST
SYSTEM Resins may cause moderate
skin irritation. WEST SYSTEM Hardeners are corrosive and may cause
severe skin irritation. Resins and
hardeners are also sensitizers and
may cause an allergic reaction similar to poison ivy. Susceptibility and
the severity of a reaction varies with
the individual. Although most people are not sensitive to W EST
SYSTEM Resins and Hardeners, the
risk of becoming sensitized increases
with repeated contact. For those
who become sensitized, the severity
of the reaction may increase with
each contact. These hazards also apply to the sanding dust from epoxy
that has not fully cured. These hazards decrease as resin/hardener mixtures reach full cure. Refer to
product labels or Material Safety
Data Sheets (MSDS) for specific
product warnings and safety information.
2.
3.
4.
5.
not fully cured. Wear protective gloves and clothing whenever you handle WEST SYSTEM
epoxies. Barrier skin creams provide additional protection. If you do get resin, hardener
or mixed epoxy on your skin, remove it as soon as possible. Resin is not water soluble—use a waterless skin cleanser to remove resin or mixed epoxy from your skin. Hardener is water soluble—wash with soap and warm water to remove hardener or sanding
dust from your skin. Always wash thoroughly with soap and warm water after using epoxy. Never use solvents to remove epoxy from your skin.
Stop using the product if you develop a reaction. Resume work only after the symptoms
disappear, usually after several days. When you resume work, improve your safety precautions to prevent exposure to epoxy, its vapors and sanding dust. If problems persist,
discontinue use and consult a physician.
Protect your eyes from contact with resin, hardeners, mixed epoxy, and sanding dust by
wearing appropriate eye protection. If contact occurs, immediately flush the eyes with
water under low pressure for 15 minutes. If discomfort persists, seek medical attention.
Avoid breathing concentrated vapors and sanding dust. WEST SYSTEM epoxies have low
VOC content, but vapors can build up in unvented spaces. Provide ample ventilation
when working with epoxy in confined spaces, such as boat interiors. When adequate
ventilation is not possible, wear a NIOSH (National Institute for Occupational Safety
and Health) approved respirator with an organic vapor cartridge. Provide ventilation
and wear a dust mask when sanding epoxy, especially partially cured epoxy. Breathing
partially cured epoxy dust increases your risk of sensitization. Although epoxy cures
quickly to a sandable solid, it may take up to two weeks at room temperature, or elevated
temperature post-curing, to cure completely.
Avoid ingestion. Wash thoroughly after handling epoxy, especially before eating. If epoxy is swallowed, drink large quantities of water—DO NOT induce vomiting. Because
hardeners are corrosive, they can cause additional harm if vomited. Call a physician immediately. Refer to First Aid procedures on the Material Safety Data Sheet.
KEEP RESINS, HARDENERS, FILLERS AND SOLVENTS OUT OF THE REACH OF CHILDREN.
For additional safety information or data, write to:
EPOXY SAFETY, Gougeon Brothers Inc., P.O. Box 908, Bay City, MI 48707 USA n
Cleanup
Contain large spills with sand, clay or
other inert absorbent material. Use a
scraper to contain small spills and collect
as much material as possible. Follow up
with absorbent towels. Uncontaminated
resin or hardener may be reclaimed for
use.
DO NOT use sawdust or other fine cellulose materials to absorb hardeners.
DO NOT dispose of hardener in trash
containing sawdust or other fine cellulose materials—spontaneous combustion can occur.
2
Clean resin or mixed epoxy residue with
lacquer thinner, acetone or alcohol. Follow all safety warnings on solvent containers. Clean hardener residue with
warm soapy water.
Dispose of resin, hardener and empty
containers safely. Puncture a corner of
the can and drain residue into the appropriate new container of resin or
hardener.
DO NOT dispose of resin or hardener in
a liquid state. Waste resin and hardener
can be mixed and cured (in small quantities) to a non-hazardous inert solid.
WEST SYSTEM User Manual & Product Guide
WARNING! Large pots of curing
epoxy can get hot enough to ignite
surrounding combustible materials and
give off hazardous fumes. Place pots of
mixed epoxy in a safe and ventilated
area, away from workers and combustible materials. Dispose of the solid mass
only when cure is complete and the mass
has cooled. Follow federal, state or local
disposal regulations. n
User Manual
Epoxy chemistry
Epoxy’s cure stages
Epoxy Temperature
Mixing epoxy resin and hardener
begins a chemical reaction that
transforms the combined liquid ingredients to a solid. This period of
transformation is the cure time. As it
cures, epoxy passes from the liquid
state, through a gel state, before it
reaches a solid state (Figure 1).
Liquid—Open time
Open time (also working time or
wet lay-up time) is the portion of the
cure time, after mixing, that the
resin/hardener mixture remains a
liquid and is workable and suitable
for application. All assembly and
clamping should take place during
the open t im e t o a ssure a
dependable bond.
Gel—Initial cure phase
The mixture passes into an initial
cure phase (also called the green
stage) when it begins to gel, or
“kick-off.” The epoxy is no longer
workable and will progress from a
tacky, gel consistency to the firmness of hard rubber, which you will
be will be able to dent with your
thumbnail.
The mixture will become tack free
about midway through the initial
cure phase. While it is still tacky
(about like masking tape), a new application of epoxy will still chemically link with it, so you may still
bond to or recoat the surface without special preparation. However,
this ability diminishes as the mixture
approaches the final cure phase.
Solid—Final cure phase
The epoxy mixture has cured to a
solid state and can be dry sanded.
You will no longer be able to dent it
with your thumbnail. At this point
the epoxy has reached most of its ultimate strength, so clamps can be removed. A new application of epoxy
will no longer chemically link to it,
so the surface of the epoxy must be
properly prepared and sanded before
recoating to achieve a good mechanical, secondary bond. See Surface
preparation—page 6.
The mixture will continue to cure
for the next several days to two
weeks at room temperature, becoming an inert plastic solid.
Figure 1 As it cures, mixed
Liquid
Open time
Gel
Initial cure
phase
Tacky
RECOAT
Solid
Finalcure
phase
Tack free
epoxy passes from a liquid state,
through a gel state, to a solid
state.
ßCure time is shorter when the
epoxy is warmer.
CURE & PREPARE SURFACE
Minimum Recommended Temperature
ßCure time is longer when the
epoxy is cooler.
Cure time after mixing
Controlling cure time
Open time and overall cure time govern much of the activity of building and repairing with
epoxy. Open time dictates the time available for mixing, application, smoothing, shaping, assembly and clamping. Cure time dictates how long you must wait before removing clamps, or
before you can sand or go on to the next step in the project. Two factors determine an epoxy
mixture’s open time and overall cure time—hardener cure speed and epoxy temperature.
1. Hardener cure speed
Each hardener has an ideal temperature cure range. At any given temperature, each
resin/hardener combination will go through the same cure stages, but at different rates. Select the hardener that gives you adequate working time for the job you are doing at the temperature and conditions you are working under. The product guide (page 19) and container
labels describe hardener pot lives and cure times.
Pot life is a term used to compare the cure speeds of different hardeners. It is the amount of
time a specific mass of mixed resin and hardener remains a liquid at a specific temperature
(a 100g-mass mixture in a standard container, at 72°F). Because pot life is a measure of the
cure speed of a specific contained mass (volume) of epoxy rather than a thin film, a hardener’s pot life is much shorter than its open time.
2. Epoxy temperature
The warmer the temperature of curing epoxy, the faster it cures (Figure 1). The temperature of curing epoxy is determined by the ambient temperature plus the exothermic heat
generated by its cure.
Ambient temperature is the temperature of the air or material in contact with the epoxy. Air
temperature is most often the ambient temperature unless the epoxy is applied to a surface
with a different temperature. Generally, epoxy cures faster when the air temperature is
warmer.
Exothermic heat is produced by the chemical reaction that cures epoxy. The amount of
heat produced depends on the thickness or exposed surface area of mixed epoxy. In a
thicker mass, more heat is retained, causing a faster reaction and more heat. The mixing
container’s shape and the mixed quantity have a great affect on this exothermic reaction. A
contained mass of curing epoxy (8 fl oz or more) in a plastic mixing cup can quickly generate enough heat to melt the cup and burn your skin. However, if the same quantity is spread
into a thin layer, exothermic heat is dissipated, and the epoxy’s cure time is determined by
the ambient temperature. The thinner the layer of curing epoxy, the less it is affected by
exothermic heat, and the slower it cures.
Adapting to warm and cool temperatures
In warm conditions, gain open time by using a slower hardener, if possible. Mix smaller
batches that can be used up quickly, or pour the epoxy mixture into a container with greater
surface area (a roller pan, for example), thereby allowing exothermic heat to dissipate and
extending open time. The sooner the mixture is transferred or applied (after thorough mixing), the more of the mixture’s useful open time will be available for coating, lay-up or
assembly.
In cool conditions use a faster hardener, or use supplemental heat to raise the epoxy temperature above the hardener’s minimum recommended application temperature. Use a hot
air gun, heat lamp or other heat source to warm the resin and hardener before mixing or after the epoxy is applied. At room temperature, supplemental heat is useful when a quicker
cure is desired. NOTE! Unvented kerosene or propane heaters can inhibit the cure of epoxy
and contaminate epoxy surfaces with unburned hydrocarbons.
WEST SYSTEM User Manual & Product Guide
3
User Manual
CAUTION! Heating epoxy that has not gelled will lower its viscosity, allowing the epoxy
to run or sag more easily on vertical surfaces. In addition, heating epoxy applied to a porous
substrate (soft wood or low density core material) may cause the substrate to “out-gas” and
form bubbles or pinholes in the epoxy coating. To avoid out-gassing, wait until the epoxy
coating has gelled before warming it. Never heat mixed epoxy in a liquid state over 120°F
(49°C). Regardless of what steps are taken to control the cure time, thorough planning of
the application and assembly will allow you to make maximum use of epoxy’s open time
and cure time. n
Post curing
You c an improv e e poxy’ s th ermal
performance and reduce the potential for
fabric “print-through” by applying modest
heat to the epoxy after it has cured to a solid
state. Contact Gougeon Brothers for more
information about post curing epoxy.
Dispensing and Mixing
Careful measuring of epoxy resin and hardener and thorough mixing are essential for a
proper cure. Whether the resin/hardener mixture is applied as a coating or modified with
fillers or additives, observing the following procedures will assure a controlled and thorough chemical transition to a high-strength epoxy solid.
Dispensing
Figure 2 Dispense the proper proportions of resin and hardener.
With Mini Pumps—Pump one full
pump stroke of resin for each one full
pump stroke of hardener.
scrape corners
Dispense the correct proportions of resin and hardener into a clean plastic, metal or
wax-free paper container (Figure 2). Don’t use glass or foam containers because of the potential danger from exothermic heat buildup.
DO NOT attempt to adjust the epoxy cure time by altering the mix ratio. An accurate ratio
is essential for a proper cure and full development of physical properties.
Dispensing with Mini Pumps
Most problems related to curing of the epoxy can be traced to the wrong ratio of resin and
hardener. To simplify dispensing and reduce the possibility of errors, we recommend using
calibrated WEST SYSTEM Mini Pumps to metering the correct working ratio of resin to
hardener.
Pump one full pump stroke of resin for each one full pump stroke of hardener. Depress each
pump head fully and allow the head to come completely back to the top before beginning
the next stroke. Partial strokes will give the wrong ratio. Read the pump instructions before
using pumps.
Before you use the first mixture on a project, verify the correct ratio according to the instructions that come with the pumps. Recheck the ratio anytime you experience problems
with curing.
Dispensing without Mini Pumps—Weight/volume measure
To measure 105 Resin and 205 or 206 Hardener by weight or volume, combine 5 parts
resin with 1 part hardener. To measure 105 Resin and 207 or 209 Hardener by volume,
combine 3 parts resin with 1 part hardener (by weight, combine 3.5 parts resin with 1 part
hardener).
First time users
If this is the first time you have used WEST SYSTEM epoxy, begin with a small test batch to
get the feel for the mixing and curing process, before applying the mixture to your project.
This will demonstrate the hardener’s open time for the temperature you are working in and
assure you that the resin/hardener ratio is metered properly. Mix small batches until you
are confident of the mixture’s handling characteristics.
Mixing
Figure 3 Stir resin and hardener to-
gether thoroughly—at least 1 minute,
longer in cooler temperatures.
More information
If you have any questions about selecting or
using WEST SYSTEM products that are not answered in this manual, you are encouraged
to contact the Gougeon Brothers technical
staff. Call 866-937-8797 toll free or visit
www.westsystem.com, where you can fill
out a form and receive an emailed response
to your question.
4
Stir the two ingredients together thoroughly—at least 1 minute—longer in cooler temperatures (Figure 3). To assure thorough mixing, scrape the sides and bottom of the pot as you
mix. Use the flat end of the mixing stick to reach the inside corner of the pot. If you are using a power mixer, occasionally scrape the sides and corners of the mixing pot while mixing. If you are going to be using the mixture for coating, quickly pour it into a roller pan to
extend the open time.
WARNING! Curing epoxy generates heat. Do not fill voids or cast layers of epoxy
thicker than ½"—thinner if enclosed by foam or other insulating material. Several
inches of mixed epoxy in a confined mass (such as a mixing cup) will generate enough heat
to melt a plastic cup, burn your skin or ignite combustible materials if left to stand for its full
pot life. For this reason do not use foam or glass mixing containers or pour into confined
spaces. If a pot of mixed epoxy begins to exotherm (heat up), quickly move it outdoors.
Avoid breathing the fumes. Do not dispose of the mixture until the reaction is complete and
has cooled. n
WEST SYSTEM User Manual & Product Guide
User Manual
Adding fillers and additives
Fillers
Throughout this and other WEST SYSTEM manuals, we refer to epoxy or resin/hardener
mixture, meaning mixed resin and hardener without fillers added; and thickened mixture
or thickened epoxy, meaning mixed resin and hardener with fillers added. Fillers are used to
thicken epoxy for specific applications such as bonding or fairing.
After selecting an appropriate filler for your job (see Filler Selection Guide—page 23), use it
to thicken the epoxy mixture to the desired consistency. The thickness of a mixture required for a particular job is controlled by the amount of filler added. There is no strict formula or measuring involved—use your eye to judge what consistency will work best. Figure
4 gives you a general guide to the differences between neat (unthickened) epoxy and the
three consistencies referred to in this manual.
CONSISTENCY
Unthickened mixture.
Slightly thickened.
Moderately thickened.
Maximum thickness.
SYRUP
CATSUP
MAYONNAISE
PEANUT BUTTER
Drips off vertical
surfaces.
Sags down vertical
surfaces.
Clings to vertical
surfaces,
peaks fall over.
Clings to vertical
surfaces,
peaks stand up.
Coating, “wetting-out”
before bonding, applying
fiberglass, graphite and
other fabrics.
Laminating/bonding flat
panels with large
surface areas, injecting
with a syringe.
General bonding,
filleting, hardware
bonding.
Gap filling, filleting,
fairing, bonding uneven
surfaces.
GENERAL
APPEARANCE
CHARACTERISTICS
USES
Figure 4 Epoxy can be
thickened to the ideal consistency needed for a particular job. The procedures in this manual refer
to four common consistencies: syrup, catsup,
mayonnaise and peanut
butter.
Always add fillers in a two-step process:
1. Mix the desired quantity of resin and hardener thoroughly before adding fillers. Begin
with a small batch—allow room for the filler.
2. Blend in small handfuls or scoops of the appropriate filler until the desired consistency is
Figure 5 Stir in small handfuls of filler
until the desired consistency is
reached.
reached (Figure 5).
For maximum strength, add only enough filler to completely bridge gaps between surface
without sagging or running out of the joint or gap. A small amount should squeeze out of
joints when clamped. For thick mixtures, don’t fill the mixing cup more than 1/3 full of epoxy before adding filler. When making fairing compounds, stir in as much 407 or 410 as
you can blend in smoothly—for easy sanding, the thicker the better. Be sure all of the filler
is thoroughly blended before the mixture is applied.
Spread the mixture into a thinner layer, either around the inside of the mixing cup or onto a
flat non-porous surface or palette, to extend its working life.
Additives
Additives are used to give epoxy additional physical properties when used as a coating. Although additives are blended with mixed epoxy in the same two-step process as fillers, they
are not designed to thicken the epoxy. Refer to the Additive descriptions on page 24. Follow the mixing instructions on the individual additive containers. n
Removing epoxy
Removing uncured or non-curing epoxy. Uncured
epoxy is removed as you would spilled resin. Scrape
as much material as you can from the surface using a
stiff metal or plastic scraper—warm the epoxy to
lower its viscosity. Clean the residue with lacquer
thinner, acetone, or alcohol. (Follow safety warnings
on solvents, and provide adequate ventilation.) Allow
solvents to dry before recoating. After recoating
wood surfaces with epoxy, it’s a good idea to brush
the wet epoxy (in the direction of the grain) with a
wire brush to improve adhesion.
Removing fiberglass cloth applied with epoxy. Use
a heat gun to heat and soften the epoxy. Start in a
small area a near a corner or edge. Apply heat until
you can slip a putty knife or chisel under the cloth
(about 250°F). Grab the edge with a pair of pliers and
slowly pull up on the cloth while heating just ahead of
the separation. On large areas, use a utility knife to
score the glass and remove in narrower strips. Resulting surface texture may be coated or remaining epoxy
may be removed as follows.
Removing cured epoxy coating. Use a heat gun to
soften the epoxy (about 250°F). Heat a small area and
use a paint or cabinet scraper to remove the bulk of
the coating. Sand the surface to remove the remaining material. Provide ventilation when heating epoxy.
WEST SYSTEM User Manual & Product Guide
5
User Manual
BASIC
TECHNIQUES
The following basic techniques are common to most repair or building projects,
regardless of the type of structure or material you are working with.
Surface preparation
Figure 6 Clean the surface. Use a sol-
vent, if necessary, to remove all contaminates.
Figure 7 Dry the surface. Allow wet
surfaces to dry thoroughly or use heat
or a fan to speed drying.
Figure 8 Sand non-porous surfaces.
Provide a texture for epoxy to key
into.
Primary/secondary bonding
Primary bonding relies on the chemical linking of adhesive layers such as the wet lay-up
of fiberglass laminate in a mold. All the layers of adhesive cure together in a single
fused layer. Epoxy applied over partially
cured epoxy will chemically link with it and
is considered a primary bond. The ability to
chemically link diminishes as the previous
layer of epoxy cures. You must then prepare
the cured surface for a secondary bond.
Secondary bonding relies on mechanical,
rather than chemical, linking of an adhesive
to a material or cured epoxy surface. The adhesive must ”key” into pores or scratches in
the surface—a microscopic version of a
dovetail joint. Proper surface preparation
provides a texture that will help link the
cured epoxy to the surface. Except for bonding to uncured or partially cured epoxy surfaces, all epoxy bonds are secondary bonds.
6
Whether you are bonding, fairing or applying fabrics, the success of the application depends not only on the strength of the epoxy, but also on how well the epoxy adheres to the
surface to which it is being applied. Unless you are bonding to partially cured epoxy, the
strength of the bond relies on the epoxy’s ability to mechanically “key” into the surface.
That is why the following three steps of surface preparation are a critical part of any secondary bonding operation.
For good adhesion, bonding surfaces should be:
1. Clean—Bonding surfaces must be free of any contaminants such as grease, oil, wax or
mold release. Clean contaminated surfaces with lacquer thinner, acetone or other appropriate solvent (Figure 6). Wipe the surface with paper towels before the solvent dries. Clean
surfaces before sanding to avoid sanding the contaminant into the surface. Follow all safety
precautions when working with solvents.
2. Dry—All bonding surfaces must be as dry as possible for good adhesion. If necessary, accelerate drying by warming the bonding surface with a hot air gun, hair dryer or heat lamp
(Figure 7). Use fans to move the air in confined or enclosed spaces. Watch for condensation
when working outdoors or whenever the temperature of the work environment changes.
3. Sanded—Sand smooth non-porous surfaces—thoroughly abrade the surface (Figure 8).
80-grit aluminum oxide paper will provide a good texture for the epoxy to “key” into. Be
sure the surface to be bonded is solid. Remove any flaking, chalking, blistering, or old coating before sanding. Remove all dust after sanding.
Special preparation for various materials
Cured epoxy—Amine blush can appear as a wax-like film on cured epoxy surfaces. It is a
byproduct of the curing process and may be more noticeable in cool, moist conditions.
Amine blush can clog sandpaper and inhibit subsequent bonding, but it is water soluble and
can easily be removed. It’s a good idea to assume it has formed on any cured epoxy surface.
To remove the blush, wash the surface with clean water (not solvent) and an abrasive pad,
such as Scotch-brite™ 7447 General Purpose Hand Pads. Dry the surface with paper towels
to remove the dissolved blush before it dries on the surface. Sand any remaining glossy areas
with 80-grit sandpaper. Wet-sanding will also remove the amine blush. If a release fabric is
applied over the surface of fresh epoxy, amine blush will be removed when the release fabric is peeled from the cured epoxy and no additional sanding is required.
Epoxy surfaces that are still tacky may be bonded to or coated with epoxy without washing
or sanding. Before applying coatings other than epoxy (paints, bottom paints, varnishes,
gelcoats, etc.), allow epoxy surfaces to cure fully, then wash and sand.
Hardwoods—Sand with 80-grit paper
Teak/oily woods—Wipe with acetone 15 minutes before coating. Solvent removes the oil
at the surface and allows epoxy to penetrate. Be sure solvent has evaporated before coating.
Porous woods—No special preparation needed. If surface is burnished, possibly by dull
planer or saw blades, sand with 80-grit paper to open pores. Remove dust.
Steel, lead—Remove contamination, sand or grind to bright metal, coat with epoxy then
(wet) sand freshly applied epoxy into surface. Re-coat or bond after first coat gels.
Aluminum—Remove contamination, sand to a bright finish and prepare with 860 Aluminum Etch Kit before oxidation occurs. Follow kit directions.
Polyester (fiberglass)—Clean contamination with a silicone and wax remover such as
DuPont Prep-Sol™ 3919S. Sand with 80-grit paper to a dull finish.
Plastic—Adhesion varies. If a plastic is impervious to solvents such as acetone, epoxy generally will not bond to it. Soft, flexible plastics such as polyethylene, polypropylene, nylon
and Plexiglas fall into this category. Hard, rigid plastics such as PVC, ABS, polycarbonate
and styrene provide better adhesion with good surface preparation and adequate bonding
area. After sanding, flame oxidizing (by quickly passing the flame of a propane torch over
the surface without melting the plastic) can improve bonding in some plastics.
It’s a good idea to conduct an adhesion test on any plastic (or any other material) that you
are uncertain about. n
WEST SYSTEM User Manual & Product Guide
User Manual
Bonding (gluing)
This section refers to two types of structural bonding. Two-step bonding is the preferred
method for most situations because it promotes maximum epoxy penetration into the
bonding surface and prevents resin-starved joints. Single-step bonding can be used when
joints have minimal loads and excess absorption into porous surfaces is not a problem. In
both cases, epoxy bonds best when it is worked into the surface with a roller or brush.
Before mixing epoxy, check all parts to be bonded for proper fit and surface preparation
(Surface preparation—page 6), gather all the clamps and tools necessary for the operation,
and cover any areas that need protection from spills.
Figure 9 Apply resin/hardener mixture
to the bonding surfaces.
Two-step bonding
1. Wet-out bonding surfaces—Apply an unthickened resin/hardener mixture to the sur-
Figure 10 Apply thickened epoxy to
one of the bonding surfaces.
Figure 11 Clamp components in place
before the epoxy gels.
faces to be joined (Figure 9). Wet out small or tight areas with a disposable brush. Wet
out larger areas with a foam roller or by spreading the resin/hardener mixture evenly
over the surface with a plastic spreader. You may proceed with step two immediately or
any time before the wet-out coat becomes tack free.
2. Apply thickened epoxy to one bonding surface. Modify the resin/hardener mixture by
stirring in the appropriate filler until it becomes thick enough to bridge any gaps between the mating surfaces and to prevent “resin-starved” joints. Apply enough of the
mixture to one of the surfaces, so that a small amount will squeeze out when the surfaces
are joined together with a force equivalent to a firm hand grip (Figure 10).
Thickened epoxy can be applied immediately over the wet-out surface or any time before the wet-out is no longer tacky. For most small bonding operations, add the filler to
the resin/hardener mixture remaining in the batch that was used for the wet-out. Mix
enough resin/hardener for both steps. Add the filler quickly after the surface is wet out
and allow for a shorter working life of the mixture.
3. Clamp components. Attach clamps as necessary to hold the components in place. Use
just enough clamping pressure to squeeze a small amount of the epoxy mixture from the
joint, indicating that the epoxy is making good contact with both mating surfaces (Figure 11). Avoid using too much clamping pressure, which can squeeze all of the epoxy
mixture out of the joint.
4. Remove or shape excess adhesive that squeezes out of the joint as soon as the joint is secured with clamps. An 804 mixing stick is an ideal tool for removing the excess (Figure
12). Allow to cure thoroughly before removing clamps.
Single-step bonding
Figure 12 Remove or shape excess
epoxy that squeezes out of the joint.
Structural bonding
Joint strength—the ability to adequately
transfer a load from one part to another—depends on the combined effects of three
factors.
GLUE STRENGTH—
Careful metering and
thorough mixing will
assure the epoxy mixture
cures to full strength.
ADHESION—For the best adhesion and load
transfer, the joint’s bonding surfaces must
be properly prepared.
JOINT AREA—The bonding area of the joint
must be adequate for the load on the joint
and materials being joined. Increased overlap, scarf joints, fillets and reinforcing fibers
can be used to increase joint bonding area.
Single-step bonding is applying the thickened epoxy directly to both bonding surfaces without first wetting out the surfaces with neat resin/hardener. We recommend that you thicken
the epoxy no more than is necessary to bridge gaps in the joint (the thinner the mixture, the
more it can penetrate the surface) and that you do not use this method for highly-loaded
joints, especially when bonding end grain or other porous surfaces.
Laminating
The term “laminating” refers to the process of bonding numbers of relatively thin layers,
like plywood, veneers, fabrics or core material to create a composite. A composite may be
any number of layers of the same material or combinations of different materials. Methods
of epoxy application and clamping will differ depending on what you are laminating.
Because of large surface areas and limitations of wet lay-up time, roller application is the
most common method for applying epoxy. A faster method for large surfaces is to simply
pour the resin/hardener mixture onto the middle of the panel and spread the mixture
evenly over the surface with a plastic spreader. Apply thickened mixtures with an 809
Notched Spreader.
Using staples or screws is the most common method of clamping when you laminate a solid
material to a solid substrate. An even distribution of weights will work when you are laminating a solid material to a base that will not hold staples or screws, such as a foam or honeycomb core material.
Vacuum bagging is a specialized clamping method for laminating a wide range of materials.
Through the use of a vacuum pump and plastic sheeting, the atmosphere is used to apply
perfectly even clamping pressure over all areas of a panel regardless of the size, shape or
number of layers. For detail information on vacuum bagging, refer to 002-150 Vacuum Bagging Techniques. n
WEST SYSTEM User Manual & Product Guide
7
User Manual
Bonding with fillets
Figure 13 Shape and smooth the fillet
with a rounded filleting tool.
Figure 14 Clean up the excess epoxy
outside of the fillet margin.
Wet out
Pre-coating porous surfaces with neat (unthickened) epoxy before applying a thickened epoxy adhesive or fairing compound
improves adhesion. Neat epoxy penetrates
and “keys” into surface pores and end grain
better than thicker epoxy.
A fillet (fil’it) is a cove-shaped application of thickened epoxy that bridges an inside corner
joint. It is excellent for bonding parts because it increases the surface area of the bond and
serves as a structural brace. All joints that will be covered with fiberglass cloth will require a
fillet to support the cloth at the inside corner of the joint.
The procedure for bonding with fillets is the same as normal bonding except that instead of
removing the squeezed-out thickened epoxy after the components are clamped in position,
you shape it into a fillet. For larger fillets, add thickened mixture to the joint as soon as the
bonding operation is complete, before the bonding mixture becomes tack free, or any time
after the final cure and sanding of exposed epoxy in the fillet area.
1. Bond parts as described in Bonding (page 7).
2. Shape and smooth the squeezed-out thick epoxy into a fillet by drawing a rounded
filleting tool (mixing stick) along the joint, dragging excess material ahead of the tool
and leaving a smooth cove-shaped fillet bordered on each side by a clean margin. Some
excess filleting material will remain outside of the margin (Figure 13). Use the excess material to refill any voids. Smooth the fillet until you are satisfied with its appearance. A
mixing stick will leave a fillet with about a 3 8 " radius. For larger fillets, an 808 Plastic
Spreader, cut to shape or bent to the desired radius, works well.
Apply additional thickened epoxy to fill voids or make larger fillets. Apply the mixture
along the joint line with the rounded mixing stick, using enough mixture to create the
desired size of fillet. For longer or multiple fillets, empty caulking gun cartridges or disposable cake decorating bags can be used. Cut the plastic tip to lay a bead of thickened
epoxy large enough for the desired fillet size. Heavy duty, sealable food storage bags
with one corner cut off may also be used.
3. Clean up the remaining excess material outside of the margin by using a mixing stick or a
putty knife (Figure 14). Fiberglass cloth or tape may be applied over the fillet area before
the fillet has cured (or after the fillet is cured and sanded).
4. Sand smooth with 80-grit sandpaper after the fillet has fully cured. Wipe the surface
clean of any dust and apply several coats of resin/hardener over the entire fillet area before final finishing. n
Bonding fasteners and hardware
Installing screws and other threaded fasteners with WEST SYSTEM epoxy dramatically improves load carrying capacity by spreading the fastener’s load into a greater area of the substrate. There are several methods or levels of hardware bonding depending on the loads on
the hardware.
Basic fastener bonding
Figure 15 Wet out a standard pilot
hole and install the fastener.
a
Advanced fastener bonding
b
2/3
1/3
x
x + ¼"
Epoxy Annulus
Figure 16 Drill oversized holes to in-
crease the exposed substrate area
and the amount of epoxy around the
fastener.
8
For improved pullout strength and waterproof connections, the easiest fastener bonding
method is to simply wet out stripped fastener holes and new pilot holes before installing the
screws. Epoxy penetrates the fiber around the hole, effectively increasing the fastener diameter. Epoxy also provides a stronger interface with the fastener threads than wood fiber
and keeps out water.
1. Wet out a standard-size pilot hole. Work the mixture well into the hole with a pipe
cleaner or syringe (Figure 15). Thicken a second coat of epoxy as necessary for stripped
or oversized holes.
2. Insert the fastener in the hole and allow the epoxy to cure.
For greater strength and stability, drill oversized holes to increase the exposed substrate
area and the amount of epoxy around the fastener.
1. Drill oversized holes 2/3–3/4 the depth of the fastener. The hole diameter is ¼" larger
than the fastener diameter (Figure 16-a).
2. Drill a normal sized pilot hole at the bottom of the oversized hole to the full length of the
fastener. The normal sized pilot hole serves to hold or clamp the hardware in position
until the epoxy cures. If the fastener/hardware can be clamped by other means, the oversized hole can be extended to the end of the fastener.
3. Wet out the holes and the fastener with epoxy. Allow the epoxy to thoroughly soak into
the exposed end grain of the wood.
WEST SYSTEM User Manual & Product Guide
User Manual
4. Fill the hole with thickened epoxy/adhesive filler. Use 404 High-Density (preferred) or
406 Colloidal Silica.
5. Install the fasteners with just enough force to hold the hardware in place. Allow the ep-
oxy to cure thoroughly before applying load to the hardware (Figure 16-b).
Bonding hardware
Figure 17 Coat the hardware bottom
and the fastener threads with thickened epoxy.
Backing Plate
Figure 18 Tighten fasteners until a
small amount of epoxy squeezes from
the joint.
a
c
Bonding hardware goes a step beyond bonding the fasteners only. By bonding the hardware
base directly to the surface you further increase hardware load capacity and provide a solid
bearing surface for the hardware. It also seals the wood underneath, and is a stronger, longer lasting attachment than bonding the fasteners only. It is especially useful to mount hardware on curved, uneven or unlevel surfaces.
1. Prepare the mounting surface and the hardware base for good adhesion (Surface preparation—page 6).
2. Wet out the oversized hole with epoxy. Allow the epoxy to soak into the exposed end
grain of the wood (as with faster bonding).
3. Coat the bottom contact surface of the hardware with unthickened epoxy. Wire brush
or sand the wet epoxy into the surface with 50-grit sandpaper.
4. Inject a non-sagging epoxy/404 or 406 mixture into the hole. Use enough mixture so
there are no voids in the hole after inserting the fastener. Coat the bottom of the hardware and the fastener threads with thickened epoxy (Figure 17).
5. Place the hardware in position. Insert and tighten fasteners until a small amount of the
mixture squeezes out of the joint (Figure 18).
6. Remove excess epoxy or shape into a fillet. Allow the epoxy to cure at least 24 hours before applying load to the hardware. Allow more time in cool weather.
Casting a base
b
Figure 19 Support the base in position
with blocking. Fill the void with thickened epoxy.
Use the thickened epoxy to cast a base under the hardware when mounting hardware to a
curved or uneven surface, or mounting hardware at an angle to the surface.
1. Prepare the fasteners, holes, substrate and base as described above.
2. Bond small blocks to the substrate to support the base at the desired height and position
(e.g., winch base, Figure 19-a).
3. Apply enough thickened epoxy to cover the blocks. If the gap between the base and the
surface is over ½", fill the gap in two separate layers to avoid exotherm.
4. Place the hardware in position, resting on the blocks (Figure 19-b) and install the
fasteners.
5. Smooth the excess epoxy into the desired fillet shape around the base (Figure 19-c). Allow the epoxy to cure fully before loading. Protect exposed epoxy from UV.
Bonding studs
Figure 20 Bond threaded rods or
studs into the substrate as an alternative for easily removable hardware.
Clamping
Any method of clamping is suitable as long as
there is no movement between the parts being
joined. Common methods include spring
clamps, “C” clamps and bar clamps, rubber
bands, packaging tape, applying weights, and
vacuum bagging. If necessary, cover clamp
pads with tape, or use polyethylene sheeting
or release fabric under the clamps so they
don’t inadvertently bond to the surface. Staples, nails or drywall screws are often used
where conventional clamps will not work. In a
corrosive environment, any fasteners left in
should be a non-corroding alloy such as
bronze. In some cases the thickened epoxy or
gravity will hold parts in position without
clamps. Avoid excessive clamping pressure.
Bond threaded rods or studs into the substrate (instead of bolts or screws) and attach the
hardware with nuts. This variation is appropriate for many engine, motor or machine installations. Coat the base with wax/mold release to make the hardware removable. Although the hardware is not “bonded” to the substrate, the epoxy still provides a bearing
surface that perfectly matches and supports the base of the hardware.
1. Prepare the studs/threaded rods by waxing the upper ends (above the surface) and cleaning the lower ends (below the surface).
2. Place a nut and washer on the studs, wet out the lower ends and push them into the epoxy filled holes. Allow the epoxy to cure thoroughly before attaching hardware and
tightening the nuts (Figure 20).
Removing fasteners
If you know that you will want to remove the fastener, you can coat the threads with wax or
mold release (contaminating the surface enough to prevent a good bond).
Remove a permanently bonded fastener by applying heat to the head of the fastener with a
soldering iron or propane torch. Use a heat shield to protect the surrounding area. Heat will
travel down the fastener, softening the epoxy in contact with it. At about 250°F the epoxy
should soften enough to allow the fastener to be backed out. Allow more time for heat to
travel down longer or larger diameter fasteners. n
WEST SYSTEM User Manual & Product Guide
9
User Manual
Fairing
Figure 21 Wet out porous surfaces before applying fairing compound.
Figure 22 Apply fairing compound to
fill all voids and smooth to shape.
Figure 23 Sand cured fairing com-
pound to desired contour.
Fairing refers to the filling of low areas and the shaping and smoothing of a surface to blend
with the surrounding areas and appear “fair” to the eye and touch. After major structural
assembly has been completed, final fairing can be easily accomplished with WEST SYSTEM
epoxy and low-density fillers.
1. Prepare the surface as you would for bonding (Surface preparation—page 6). Sand
smooth any bumps or ridges on the surface and remove all dust from the area to be
faired.
2. Wet out porous surfaces with unthickened epoxy (Figure 21).
3. Mix resin/hardener and 407 Low-Density or 410 Microlight™ filler to a peanut butter
consistency. The thicker the mixture, the easier it will be to sand when cured.
4. Trowel on the thickened epoxy mixture with a plastic spreader, working it into all voids
and depressions. Smooth the mixture to the desired shape, leaving the mixture slightly
higher than the surrounding area (Figure 22). Remove any excess thickened epoxy before it cures. If the voids you are filling are over ½" deep, apply the mixture in several applications or use 206 Slow Hardener or 209 Extra Slow Hardener, depending on
ambient temperature.
Note: On vertical and overhead surfaces, allow the wet-out coat to gel before applying
fairing compound. The fairing compound may sag or slide off the fresh wet-out coat.
Apply the fairing compound while the wet-out is still tacky.
5. Allow the final thickened epoxy application to cure thoroughly.
6. Sand the fairing material to blend with the surrounding contour (Figure 23). Begin with
50-grit sandpaper if you have a lot of fairing material to remove. Use 80-grit paper on
the appropriate sanding block when you are close to the final contour.
CAUTION! Don’t forget your dust mask. Remove the sanding dust and fill any remaining voids following the same procedure.
7. Apply several coats of resin/hardener to the area with a disposable brush or roller after
you are satisfied with the fairness. Allow the final coat to cure thoroughly before final
sanding and finishing. Note: 410 filler can be affected by the solvents in most paints.
Surfaces faired with with 410 Filler must be sealed with epoxy before applying any
solvented paints. n
Applying woven cloth and tape
Fiberglass cloth is applied to surfaces to provide reinforcement and/or abrasion resistance,
or in the case of Douglas Fir plywood, to prevent grain checking. It is usually applied after
fairing and shaping are completed, and before the final coating operation. It is also applied
in multiple layers and in combination with other materials to build composite parts.
Fiberglass cloth may be applied to surfaces by either of two methods. The “dry” method refers to applying the cloth over a dry surface. The “wet” method refers to applying the cloth
to an epoxy-coated surface often after the wet-out coat becomes tacky, which helps it cling
to vertical or overhead surfaces. Since this method makes it more difficult to position the
cloth, the dry method is the preferred method especially with thinner cloth.
Dry method
Figure 24 Spread the epoxy over the
cloth surface with a plastic spreader.
Figure 25 Squeegee away excess epoxy before it begins to gel.
10
1. Prepare the surface as you would for bonding (Surface preparation—page 6).
2. Position the cloth over the surface and cut it several inches larger on all sides. If the sur-
face area you are covering is larger than the cloth size, allow multiple pieces to overlap
by approximately two inches. On sloped or vertical surfaces, hold the cloth in place with
masking or duct tape, or with staples.
3. Mix a small quantity of epoxy (three or four pumps each of resin and hardener).
4. Pour a small pool of resin/hardener near the center of the cloth.
5. Spread the epoxy over the cloth surface with a plastic spreader, working the epoxy
gently from the pool into the dry areas (Figure 24). Use a foam roller or brush to wet out
fabric on vertical surfaces. Properly wet out fabric is transparent. White areas indicate
dry fabric. If you are applying the cloth over a porous surface, be sure to leave enough
epoxy to be absorbed by both the cloth and the surface below it. Try to limit the amount
of squeegeeing you do. The more you “work” the wet surface, the more minute air
WEST SYSTEM User Manual & Product Guide
User Manual
Figure 26 Trim excess cloth after the
epoxy gels.
Figure 27 Trim overlapped cloth after
the epoxy gels.
Figure 28 Remove the topmost trimming, lift the opposite cut edge to remove the overlapped trimming.
bubbles are placed in suspension in the epoxy. This is especially important if you plan to
use a clear finish (see Clear wood finishes, below left). You may use a roller or brush to
apply epoxy to horizontal as well as vertical surfaces.
Smooth wrinkles and position the cloth as you work your way to the edges. Check for
dry areas (especially over porous surfaces) and re-wet them with epoxy as necessary before proceeding to the next step. If you have to cut a pleat or notch in the cloth to lay it
flat on a compound curve or corner, make the cut with a pair of sharp scissors and overlap the edges for now.
6. Squeegee away excess epoxy before the first batch begins to gel (Figure 25). Slowly drag
the spreader over the fabric at a low (almost flat) angle, using even-pressured, overlapping strokes. Use enough pressure to remove excess epoxy that would allow the cloth to
float off the surface, but not enough pressure to create dry spots. Excess epoxy appears
as a shiny area, while a properly wet-out surface appears evenly transparent, with a
smooth, cloth texture. Later coats of epoxy will fill the weave of the cloth.
7. Trim the excess (Figure 26) and overlapped cloth after the epoxy has reached its initial
cure. The cloth will cut easily with a sharp utility knife. Trim overlapped cloth, if desired, as follows:
a) Place a metal straightedge on top of and midway between the two overlapped edges.
b) Cut through both layers of cloth with a sharp utility knife (Figure 27), being very careful not to cut too deeply. c) Remove the topmost trimming and then lift the opposite cut
edge to remove the overlapped trimming (Figure 28). d) Re-wet the underside of the
raised edge with epoxy and smooth into place.
The result should be a near perfect butt joint, eliminating double cloth thickness. A
lapped joint is stronger than a butt joint, so if appearance is not important, you may
want to leave the overlap and fair in the unevenness after coating.
8. Coat the surface to fill the weave before the wet-out becomes tack free (Figure 29). Follow the procedures for final coating in the next section. It will take two or three coats to
completely fill the weave of the cloth and provide a thick enough coating to allow for a
final sanding that will not affect the cloth.
A variation of this method is to apply the fabric after a wet out coat has cured thoroughly
and the surface has been prepared for bonding. This method assures a thorough wet out
of the substrate and fabric, and the fabric can still be positioned easily while it is being
wet out.
Wet method
Figure 29 Coat the surface to fill the
weave before the wet-out becomes
tack free.
Clear wood finishes
(For stripper canoes, etc.) An alternative wet
out method is to lay the epoxy onto the fabric
with a short-bristled brush. Dip the brush in
the epoxy and lay the epoxy onto the surface
with a light even stroke. Don’t force the epoxy
into the cloth, which may trap air in the fabric
and show through the clear finish. Apply
enough epoxy to saturate the fabric and the
wood below. After several minutes, lay on additional epoxy to dry (white) areas. If epoxy
appears milky due to high humidity or overworking, warm the surface by passing a heat
gun or hair dryer over the surface. Use low
heat to avoid out-gassing. Be sure to use 207
Hardener for clear finishes.
An alternative is to apply the fabric or tape to a surface coated with wet epoxy. As mentioned, this is not the preferred method, especially with large pieces of cloth, because of the
difficulty removing wrinkles or adjusting the position of the cloth as it is being wet out.
However, you may come across situations, such as applying fabric on vertical or overhead
surfaces, when this method may be useful or necessary.
1. Prepare the surface for bonding (Surface preparation—page 6). Pre-fit and trim the cloth
to size. Roll the cloth neatly so that it may be conveniently rolled back into position
later.
2. Roll a heavy coat of epoxy on the surface.
3. Unroll the glass cloth over the wet epoxy and position it. Surface tension will hold most
cloth in position. If you are applying the cloth vertically or overhead, you may want to
thicken the epoxy slightly with filler, then wait until it becomes sticky. Work out wrinkles by lifting the edge of the cloth and smoothing from the center with your gloved
hand or a plastic spreader.
4. Apply a second coat of epoxy with a foam roller. Apply enough epoxy to thoroughly wet
out the cloth.
5. Remove the excess epoxy with a plastic spreader, using long overlapping strokes. The
cloth should appear consistently transparent with a smooth cloth texture.
6. Follow steps 7 and 8 under the Dry method (above) to finish the procedure.
Any remaining irregularities or transitions between cloth and substrate can be faired by using an epoxy/filler fairing compound if the surface is to be painted. Any additional fairing
done after the final coating should receive several additional coats over the faired area. n
WEST SYSTEM User Manual & Product Guide
11
User Manual
Epoxy barrier coating
Figure 30 Roll lightly and randomly
over a small area. Spread the epoxy
into a thin even film.
Figure 31 Tip off the coating by dragging a foam roller brush lightly over
the fresh epoxy.
Barrier coat thickness
Epoxy applied with the 800 Roller Cover at
room temperature (70°F)*, and tipped off as
described (right), results in a film 3–4 mils
thick. A 6 or 7 mil film thickness (two
coats—three coats if sanded) provides an
excellent moisture barrier for most exterior
surfaces. A 9 or 10 mil film thickness is the
minimum recommended for hull bottoms or
other surfaces that are continuously wet.
Additional coats provide additional moisture
protection up to 20 mils (five or six coats).
Six coats with the last five modified with
422 Barrier Coat Additive provide maximum
protection and are generally recommended
only for polyester fiberglass hull bottoms
prone to gelcoat blistering.
*Epoxy film thickness per coat will vary with
temperature—thinner in warm temperatures, thicker in cooler temperatures.
The object of barrier coating is to build up an epoxy coating that provides an effective moisture barrier and a smooth base for final finishing.
Apply a minimum of two coats of WEST SYSTEM epoxy for an effective moisture barrier—
three coats if sanding is to be done (recommended for most wooden boats). Moisture protection will increase with additional coats, up to six coats or about a 20 mil thickness. Six
coats, with 422 Barrier Coat Additive in the final five coats, provides maximum moisture
protection (recommended for polyester fiberglass boats with gelcoat blisters). Additives or
pigments should not be added to the first coat. Mixing thinners with WEST SYSTEM epoxy
is not recommended (see Thinning epoxy—page 23).
Disposable, thin urethane foam rollers, such as WEST SYSTEM 800 Roller Covers, allow you
greater control over film thickness, are less likely to cause the epoxy to exotherm and leave
less stipple than thicker roller covers. Cut the covers into narrower widths to reach difficult
areas or for long narrow surfaces like stringers. A paint brush can be used for smaller areas,
if the bristles are stiff enough to spread the epoxy to an even film. If necessary cut the bristles shorter. Foam brushes are generally too flexible.
Complete all fairing and cloth application before beginning the final coating. Allow the
temperature of porous surfaces to stabilize before coating. Otherwise, as the material
warms up, air within the porous material may expand and pass from the material (out-gassing) through the coating and leave bubbles in the cured coating.
1. Prepare the surface for bonding (Surface preparation—page 6).
2. Mix only as much resin/hardener as you can apply during the open time of the mixture.
Pour the mixture into a roller pan as soon as it is mixed thoroughly.
3. Load the roller with a moderate amount of the epoxy mixture. Roll the excess out on the
ramp part of the roller pan to get a uniform coating on the roller.
4. Roll lightly and randomly over an area approximately 2'×2' to transfer the epoxy evenly
over the area (Figure 30).
5. As the roller dries out, increase pressure enough to spread the epoxy into a thin even
film. Increase the coverage area if necessary to spread the film more thinly and evenly.
The thinner the film, the easier it is to keep it even and avoid runs or sags in each coat.
6. Finish the area with long, light, even strokes to reduce roller marks. Overlap the previously coated area to blend both areas together.
7. Coat as many of these small working areas as you can with each batch. If a batch begins to
thicken before it can be applied, discard it and mix a fresh, smaller batch.
8. Tip off the coating by dragging a foam roller brush lightly over the fresh epoxy in long,
even, overlapping strokes after each batch is applied. Use enough pressure to smooth the
stipple, but not enough to remove any of the coating (Figure 31). Alternate the direction
in which each coat is tipped off, 1st coat vertical, 2nd coat horizontal, 3rd coat vertical,
etc. An 800 Roller Cover can be cut into segments to make a tipping brushes.
Recoating
Apply second and subsequent coats of epoxy following the same procedures. Recoat when
the previous coat is still tacky (about as tacky as masking tape). To avoid sanding between
coats, apply all of the coats when previous coats have cured to this tacky stage. After the final coat has cured overnight, wash and sand it to prepare for the final finish. (See Special
preparation—Cured epoxy on page 6.) n
Final surface preparation
Figure 32 Sand to a smooth finish.
12
Proper finishing techniques will not only add beauty to your efforts, but will also protect
your work from ultraviolet light, which will break down epoxy over time. The most common methods of finishing are painting or varnishing. These coating systems protect the epoxy from ultraviolet light and require proper preparation of the surface before application.
Preparation for the final finish is just as important as it is for recoating with epoxy. The surface must first be clean, dry and sanded.
1. Allow the final epoxy coat to cure thoroughly.
2. Wash the surface with a Scotch-brite™ pad and water to remove amine blush. Dry with
paper towels.
3. Sand to a smooth finish (Figure 32). If there are runs or sags, begin sanding with 80-grit
paper to remove the highest areas. Sand until the surface feels and looks fair. Complete
sanding with the appropriate grit for the type of coating to be applied—check coating
WEST SYSTEM User Manual & Product Guide
User Manual
Figure 33 Rinse the surface with fresh
water after sanding.
instructions. Paint adhesion relies on the mechanical grip of the paint keying into the
sanding scratches in the epoxy’s surface. If a high-build or filling primer is to be applied,
80–100 grit is usually sufficient. 120–180 grit may be adequate for primers and
high-solids coatings. Finishing with 220–400 grit paper will result in a high-gloss finish
for most paints or varnishes. Grits finer than this may not provide enough tooth for
good adhesion. Wet sanding is preferred by many people because it reduces sanding
dust and it will allow you to skip Step 2.
4. After you are satisfied with the texture and fairness of the surface, rinse the surface with
fresh water (Figure 33). Rinse water should sheet evenly without beading or fisheyeing.
If rinse water beads up (a sign of contamination), wipe the area with solvent and dry
with a paper towel, then wet sand again until beading is eliminated.
Proceed with your final coating after the surface has dried thoroughly. To reduce the
possibility of contamination, it is a good idea to begin coating within 24 hours of the final sanding. Follow all of the instructions from the coating system’s manufacturer. A
good trick used by professionals, is to make a test panel to evaluate the degree of surface
preparation required and the compatibility of the finish system. n
Finish coatings
Coating function
Finish coating types
A finish coating—paint or varnish—over an epoxy barrier coat
protects the epoxy from sunlight as
well as decorating the surface. In doing so, the finish coating extends the
life of the epoxy moisture barrier,
which in turn, provides a stable base
that extends the life of the finish
coating. Together, the two form a
protective system far more durable
than either coating by itself.
Protection from sunlight is a primary
consideration in the selection of a
finish coating. Long term UV protection of the barrier coat depends on
how well the finish coating itself resists UV and keeps its pigments, or its
shield of UV filters on the surface of
the epoxy barrier coat. A high gloss
finish reflects a higher proportion of
the light hitting the surface than a
dull surface. All other thing being
equal, a white (especially a glossy
white) coating will last the longest.
Latex paints are compatible with epoxy, even partially cured epoxy, and they do an adequate job of protecting the epoxy barrier from UV radiation. In many architectural applications, latex paint may be the most suitable coating to use. Their durability is limited.
Alkyd finishes—enamel, alkyd enamel, marine enamel, acrylic enamel, alkyd modified epoxy, traditional varnish and spar varnish—offer ease of application, low cost, low toxicity,
and easy availability. Their disadvantages are low UV resistance and low abrasion
resistance.
One-part polyurethanes offer easy application, cleanup and better properties than alkyds.
They are also more expensive and some may be incompatible with amine cure epoxy systems such as WEST SYSTEM epoxy, although 207 Hardener may offer better compatibility.
Be sure epoxy has cured thoroughly. Make a test panel to assure compatibility.
Epoxy paints are available in one-part and two-part versions. Two-part epoxies offer many
characteristics similar to the higher performance polyurethanes. They are durable and
chemical resistant, but offer limited UV protection compared to the linear polyurethanes.
Two-part linear polyurethane (LP) paints offer the most durable protection available. LP’s
are available as pigmented or clear coatings and offer excellent UV protection, gloss retention, abrasion resistance, plus compatibility with epoxy. However, compared to other
types of coatings, they are expensive, require more skill to apply and present a greater
health hazard, especially when sprayed.
Bottom paints are available in a variety of formulations. Most bottom paint systems are
compatible with epoxy and can be applied directly over a prepared epoxy barrier coat. If
you are unsure of compatibility or have curing or adhesion problems with a specific bottom
paint, use only a primer recommended for that bottom paint over the barrier coat. Follow
the recommendations given for preparation of fiberglass surfaces. Other paints, including
marine LP’s and primers, are not recommended for use below the waterline.
Primers are usually not needed to help a paint film bond to epoxy, although interfacing
primers may be required with some specialized bottom paints and high-build primers are
useful for hiding scratches or flaws in the substrate. If the instructions on your paint or varnish recommend a specially primed surface, follow the recommendations given for fiberglass preparation. Self-etching primers do not work well on an epoxy coating because of
epoxy’s chemical resistance.
Polyester gelcoat is a pigmented version of the resin used to build fiberglass boats and other
products. Gelcoat is sprayed into a mold before the glass fabric and resin are applied to provide a smooth pre-finished surface when the part is removed from the mold. It is not often
used as a post-production finish coating, but it can be applied over epoxy and is useful in
some repair situations. Epoxy must be cured thoroughly. Refer to 002-550 Fiberglass Boat
Repair & Maintenance, for detailed information on patching gelcoat over an epoxy repair.
Follow all instructions from the coating systems manufacturer. It is a good idea to make a
test panel to evaluate the degree of surface preparation required, and the compatibility and
handling characteristics of the finish system. n
Coating compatibility
Most types of coatings are compatible with epoxy. Thoroughly cured
epoxy is an almost completely inert
hard plastic. Most paint solvents will
not soften, swell or react with it.
One-part polyurethanes and polyester gelcoat can be affected by epoxy
amines and if used must be applied
when the epoxy is thoroughly cured,
generally after two weeks at room
temperature. A thorough cure can be
achieved much quicker with elevated
temperature post curing. Post curing
will also improve epoxy’s thermal
properties and is recommended if
dark paint is to be applied over epoxy.
WEST SYSTEM User Manual & Product Guide
13