1
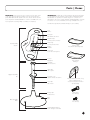
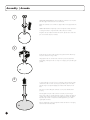
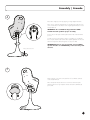
Flair
& Flair Elite
Instructions/Instrucciones
Warnings & Cautions | Advertencias y Precaución
IMPORTANT! KEEP FOR
FUTURE REFERENCE
¡IMPORTANTE! GUÁRDESE
PARA CONSULTA FUTURA
Failure to follow these warnings, cautions and the assembly
instructions could result in serious injury or death.
El hacer caso omiso de estas advertencias, precauciones e
instrucciones de montaje puede provocar lesiones graves o
letales.
Please read ALL instructions carefully before assembly and
use of this product.
WARNING
• Prevent serious injury or death from falls or sliding out.
• ALWAYS secure child using the waist, crotch and shoulder harness
restraint system. The child should be secured in the highchair at all
times by the restraint system. The tray is not designed to hold the
child in the chair.
• ALWAYS keep child in view while in highchair.
• ALWAYS use highchair on a flat smooth surface.
• ALWAYS use brake when child is in highchair.
• NEVER leave child unattended.
• NEVER use near stairs or in any location where hanging cords can
be reached by child.
• NEVER adjust seat height when child is in highchair.
• NEVER allow child to use footrest to climb in or out of highchair.
• It is recommended that the highchair be used only by children
capable of sitting upright unassisted.
• Do not use the highchair unless all components are correctly fitted
and adjusted.
• Do not use the highchair near open fire or other sources of heat/
flame.
• Do not use the highchair if any parts are broken, torn or missing.
• Maximum age: 4 years
• Maximum weight: 50 lbs.
CAUTION
• Adult assembly required.
• Tool required for assembly: Phillips screwdriver (not included).
• This product contains small parts. Keep small parts out of children’s
reach during assembly.
• Assembly components may have sharp points and edges. Exercise
care when unpacking and assembling product.
• After assembly is complete, properly discard all packaging
materials, including notice on tray liner.
2
Lea TODAS las instrucciones atentamente antes de proceder
al montaje y uso de este producto.
ADVERTENCIA
• Evite lesiones graves o letales como consecuencia de caídas o
deslizamiento.
• Asegure SIEMPRE al niño utilizando el sistema de sujeción de
cintura, entrepierna y hombros. El niño deberá estar sujeto en todo
momento mientras esté sentado en la silla alta. La bandeja no está
diseñada para sostener al niño sobre la silla.
• NUNCA pierda de vista al niño mientras se encuentra en la silla
alta.
• Utilice SIEMPRE la silla alta sobre una superficie plana y lisa.
• SIEMPRE use el freno mientras el niño esté en la silla.
• NUNCA utilice la silla cerca de escaleras o en lugares donde
existan cuerdas o cables que queden al alcance del niño.
• NUNCA permita que el niño utilice el reposapiés para subir o
bajar de a silla.
• Se recomienda que la silla la utilicen únicamente niños con
capacidad para permanecer sentados en posición erguida sin
ayuda.
• No utilice la silla alta a menos que todos los componentes estén
correctamente ensamblados y ajustados.
• No utilice la silla alta cerca de fuego u otras fuentes de calor o
llamas.
• No utilice la silla alta si le faltan piezas o si tiene piezas rotas o
rasgadas.
• Edad máxima: 4 años
• Peso máximo: 50lbs (22,67Kg)
PRECAUCIÓN
• El montaje deberá realizarlo un adulto.
• Herramienta requerida para el montaje: destornillador tipo Phillips
(no incluído).
• Este producto contiene piezas pequeñas. Mantenga las piezas
pequeñas fuera del alcance de los niños durante el montaje.
• Las piezas utilizadas para el montaje pueden ser puntiagudas y
tener bordes cortantes. Tenga cuidado al desembalar y realizar el
montaje del producto.
• Después de finalizar el montaje, deshágase del embalaje de forma
adecuada, incluyendo la nota de aviso del revestimiento de la
bandeja.
Parts | Piezas
IMPORTANT: Please check to be sure you have all of the parts shown
on this page before beginning assembly. If you are missing any parts,
please DO NOT return this product to the store. Please call our customer
service department at 888.376.4763 or contact us at [email protected].
Tools required for assembly: Phillips screwdriver (not included)
IMPORTANTE: Verifique que no falte ninguna de las piezas que figuran
en esta página antes de empezar a armar la silla. Si falta alguna pieza,
NO devuelva este producto a la tienda. Póngase en contacto con el
departamento de servicio al cliente llamando al 888.376.4763 o póngase
en contacto con nosotros mandando un mensaje a [email protected].
Herramienta requerida: Destornillador Phillips (no viene incluido)
Seat
Asiento
Seat pad
Almohadón del asiento
Shoulder straps
Correas para los hombros
Seat assembly
Asiento
Waist strap
Correa para la cintura
Buckles
Hebillas
Tray liner (x2)
Revestimiento de bandeja (x2)
Crotch post
Sostén de la entrepierna
Footrest
Apoyapiés
Seat base
Base del asiento
Tray assembly
Bandeja
Upper tube
Tubo superior
Support assembly
Pie
Seat base cover
Tapa de la base del asiento
Lower tube
Tubo inferior
Brake pedal
Pedal de freno
Base assembly
Base
Release handle on bottom of tray
Libere la palanca que se
encuentra en la parte de inferior
de la bandeja.
M6 bolt (x5)
Perno M6 (x5)
Base
Base
M4 bolt (x2)
Perno M4 (x2)
Height adjustment button
Botón de ajuste de la altura
3
Assembly | Armado
1
NOTE: DO NOT REMOVE the sticker holding the seat base cover in place
until after support tube has been inserted into base.
Make sure seat base cover remains on support tube. Insert support tube into
base.
NOTA: NO QUITE la etiqueta que sostiene la tapa de la base del asiento
en su lugar mientras no haya insertado el tubo del pie en la base.
Asegúrese de que la tapa de la base del asiento quede sobre el tubo del
pie. Inserte el tubo del pie en la base.
2
Rotate the tube clockwise while gently pressing down until the tube drops
into place and can no longer rotate.
Haga girar el tubo en sentido horario mientras lo presiona suavemente
hacia abajo, hasta que el tubo se encaje en su lugar y ya no pueda seguir
girando.
3
To ensure that tube is secure, first try to rotate tube counter-clockwise. Tube
should not be able to rotate. Second, try to pull tube up out of the base.
The tube may move upwards slightly, but should remain attached to the
base.
Remove the sticker holding the seat base cover in place and discard it
properly.
Para asegurarse de que el tubo esté bien colocado, en primer lugar
intente rotar el tubo en sentido antihorario. El tubo no debe poder girar. En
segundo lugar, intente jalar el tubo hacia arriba para sacarlo de la base.
Es posible que el tubo se mueva hacia arriba ligeramente, pero debe
seguir fijado a la base.
Retire la etiqueta que sostiene la tapa de la base del asiento en su lugar y
deséchela de forma adecuada.
4
Assembly | Armado
4
Raise tube to highest position by stepping on height adjustment button.
Place seat on seat base aligning back of seat with brake pedal. The front
of the seat will face in the direction of the height adjustment button. Secure
with (5) M6 bolts.
IMPORTANT: The seat MUST be aligned with its BACK
toward the brake pedal for proper assembly.
Presione el botón de ajuste de altura para levantar el tubo hasta la máxima
posición.
Coloque el asiento sobre la base y alinee el respaldo con el pedal del
freno. La parte delantera del asiento debe quedar apuntando en dirección
del botón de ajuste de altura. Asegúrelo con (5) pernos M6.
IMPORTANTE: Para un correcto armado, el asiento DEBE
quedar alineado con el RESPALDO y en dirección del pedal
de freno.
Brake pedal/Pedal de freno
5
Align seat base cover with notch toward front of seat. Attach seat base
cover with (2) M4 bolts.
Alinee la tapa de la base del asiento con la muesca hacia la parte
delantera del asiento. Fije la tapa de la base del asiento utilizando (2)
pernos M4.
5
Adjusting the seat height | Ajuste de la altura del asiento
To raise seat height, step on height
adjustment button on front of base.
The chair will raise to its maximum
position.
To lower seat height, step on
height adjustment button while
pushing down on seat. Release
button BEFORE letting go of seat.
Para levantar el asiento, presione
el botón de ajuste de altura en la
parte delantera de la base. La silla
se elevará a su posición máxima.
Para bajar el asiento, presione el
botón de ajuste de altura mientras
lo empuja hacia abajo. Libere el
botón ANTES de soltar el asiento.
WARNING
ADVERTENCIA
NEVER adjust the seat height when child is in highchair.
NUNCA ajuste la altura del asiento mientras el niño esté
sentado en la silla alta.
Using the brake | Uso del freno
Firmly press brake pedal all the
way down to activate brake.
Ensure brake is activated properly
by pushing the chair sideways to
be certain it does not roll.
If braking resistance becomes
diminished, tip chair on its
side. Using a damp cloth,
wipe the raised buttons on
the brake weight so they are
clean of dust and debris.
Press again to release brake.
Si la resistencia de frenado
se ve disminuida, incline la
silla hacia un costado. Con
un trapo húmedo, limpie
los botones elevados de la
pesa del freno de modo que
queden libres de polvo y
desechos.
Presione firmemente el pedal de
freno completamente hacia abajo
para activar el freno. Asegúrese
de que el freno esté debidamente
activado empujando la silla hacia
el costado para asegurarse de
que no se mueva.
Vuelva a presionar para soltar el
freno.
WARNING
ADVERTENCIA
ALWAYS use the highchair on a flat smooth surface.
SIEMPRE use la silla alta en una superficie lisa y plana.
ALWAYS use brake when child is in highchair.
SIEMPRE use el freno mientras el niño esté en la silla.
6
Securing your child | Asegurar al bebe
Optional Seat Pad
A durable, foam seat pad is pre-installed in the chair seat. This pad provides extra support and a more
secure fit for smaller children. The seat pad can be removed to accommodate larger toddlers. To remove the
seat pad, first remove restraint system (see diagram 1 on following page). After removing seat pad, ALWAYS
replace restraint system using diagrams 2 and 3 on the following page BEFORE using chair.
Almohadón de asiento opcional
En el asiento de la silla viene preinstalado un resistente almohadón de asiento de gomaespuma. Este
almohadón brinda apoyo adicional y un ajuste seguro para los niños más pequeños. El almohadón del
asiento se puede sacar para que quepan niños más grandes. Para retirar el almohadón del asiento, en
primer lugar retire el sistema de sujeción (consulte el diagrama 1 en la página siguiente). Después de retirar
el almohadón del asiento, debe volver a colocar SIEMPRE el sistema de sujeción siguiendo las indicaciones
de los diagramas 2 y 3, en la página siguiente, ANTES de usar la silla.
Shoulder strap
Correa para los hombros
Waist strap
Correa para la cintura
Crotch strap
Correa de la entrepierna
Crotch post
Soporte de la entrepierna
Place child in seat with one leg on each side of the crotch post. Position
crotch strap between child’s legs and shoulder straps over shoulders.
Position waist strap around child’s waist.
Insert male buckles on both waist straps into female buckle on crotch strap
until buckles click. Pull buckles outward to check that they are secure.
Coloque al niño en la silla con una pierna a cada lado del soporte de
entrepierna. Sitúe la correa de la entrepierna entre las piernas del niño
y las correas para los hombros sobre los hombros del niño. Coloque la
correa de la cintura alrededor de la cintura del niño.
Inserte los tensores macho de ambas correas de la cintura en el tensor
hembra de la correa de la entrepierna hasta que escuche un clic. Tire de
los tensores hacia afuera para comprobar que están bien sujetos.
Releasing the Buckles
Press down on button in the center of the buckle and then pull both male
buckles outward, as shown.
Libere los arneses.
Presione el botón que se encuentra en el centro del arnés y separe las
hebillas hacia los lados, tal como se muestra en la figura.
WARNING
Prevent serious injury or death from falls or sliding out.
ALWAYS secure child using the waist, crotch and shoulder
harness restraint system. The child should be secured in the
highchair at all times by the restraint system.
NEVER allow child to use footrest to climb in or out of
highchair.
ADVERTENCIA
Evite lesiones graves o letales como consecuencia de caídas
o deslizamiento.
Asegure SIEMPRE al niño utilizando el sistema de sujeción de
cintura, entrepierna y hombros. El niño deberá estar sujeto en
todo momento mientras esté sentado en la silla alta.
NUNCA permita que el niño utilice el reposapiés para subir
o bajar de a silla.
7
Adjusting restraint system straps | Ajuste de las correas del sistema de sujeción
Shoulder Strap Height Adjustment
Adjust shoulder strap height if necessary. Straps may need to be adjusted based on the height of the child. The shoulder
straps are pre-assembled using the lower slots so that the chair can initially be used for a smaller child. As your child grows,
these straps may need to be adjusted by moving them to the higher slots. Follow the steps below to adjust the shoulder
straps. ALWAYS use the same height slots for both sides of the shoulder straps.
Ajuste de la altura de la correa para los hombros
Si es necesario, ajuste la altura de la correa para los hombros. Las correas se deben ajustar de acuerdo con la altura del
niño. Las correas para los hombros vienen prearmadas utilizando las ranuras inferiores de modo que la silla se puede
usar inicialmente para un niño más pequeño. A medida que el niño crece, es posible que estas correas se deban ajustar
colocándolas en las ranuras superiores. Siga los pasos que se detallan a continuación para ajustar las correas para los
hombros. SIEMPRE use las mismas ranuras de altura para ambos lados de las correas para los hombros. SIEMPRE use las
mismas ranuras de altura para el asiento y el almohadón del asiento.
1
2
3
Strap Removal
Strap Insertion
Strap Check
From the back of the seat, squeeze the strap tabs
together while pulling the strap from the front of the seat.
Repeat for the strap on the other side. If the seat pad is
in place, repeat this process to pull the shoulder strap
through the pad also.
Squeeze the strap tabs together and push
through opening. Repeat for the strap on the
other side. ALWAYS use the same height
slots for both sides of the shoulder straps.
Inspect strap tabs and ensure tabs are flat against
back of chair. Pull straps on BOTH sides to ensure
that they are secure.
Remoción de las correas
Desde el respaldo del asiento, apriete las lengüetas
de las correas simultáneamente mientras jala la correa
desde la parte delantera del asiento. Repita este paso
para la correa del otro lado. Si el almohadón del
asiento está colocado, repita este proceso para jalar la
correa para los hombros a través del almohadón.
Inserción de las correas
Apriete las lengüetas de las correas entre sí
y empuje a través de la apertura. Repita este
paso para la correa del otro lado. SIEMPRE
use las mismas ranuras de altura para el
asiento y el almohadón del asiento.
Verificación de las correas
Inspeccione las lengüetas de las correas y
asegúrese de que las lengüetas estén colocadas
de modo que queden planas contra el respaldo
del asiento. Jale las correas ubicadas a AMBOS
lados para asegurarse de que estén trabadas.
Side Button
Botón lateral
Slide adjuster
Ajuste del deslizamiento
Waist Strap Adjustment
Shoulder Strap Length Adjustment
Pull shoulder strap through slide adjuster to tighten or loosen. Make sure that
both shoulder straps are adjusted to the same length.
Ajuste de la longitud de la correa para los hombros
Jale la correa para los hombros a través del ajuste de deslizamiento para
ajustarla o aflojarla. Asegúrese de que ambas correas para los hombros
estén ajustadas a la misma longitud.
8
Slide strap through the exposed inside slot from the rear to the front of the
buckle. Squeeze the side button to expose a second slot and insert strap
from the front to the rear through the outside slot. To tighten waist strap,
squeeze the side button and pull front strap outward, as show above. To
loosen waist strap, squeeze the side button and pull rear strap outward.
Ajuste de la correa de la cintura
Deslice la correa por la parte posterior de la ranura hacia el frente del
arnés. Luego, presione el botón lateral para ver la segunda ranura y pase
la correa hacia atrás. Para ajustar la correa a la cintura, presione el botón
lateral y jale la correa hacia afuera, tal como se muestra en la figura de
arriba. Para aflojarla, presione el botón lateral y jale hacia afuera la
correa que se encuentra en la parte posterior.
Using the tray | Usar la bendeja
2
1
Attaching the tray
Colocación de la bandeja
1
3
To release locking tabs: 1) slide release
handle to side, then 2) pull handle
toward front of tray. Place tray on seat
arm grooves.
Para liberar las lengüetas de fijación: 1)
deslice la lengüetas de fijación hacia
los lados. 2) tire de la palanca hacia
la parte frontal de la bandeja. Coloque
la bandeja en las ranuras del brazo del
asiento.
2
1
2
Position locking tabs at appropriate
slots and release handle. Tabs should
fit into slots in seat arms. There are two
adjustment positions for the tray. Make
sure that tabs are aligned in same
adjustment position slots on BOTH sides
of seat and release the handle and slide
lock.
3
Pull on tray to ensure that it is firmly in
place.
Tire de la bandeja para comprobar que
está colocada en su sitio de manera
firme.
Coloque las lengüetas de fijación en la
ranura adecuada y libere la palanca.
Las lengüetas deberán quedar ajustadas
en las ranuras de los brazos del asiento.
La bandeja tiene dos posiciones de
ajuste. Compruebe que las lengüetas
están alineadas en la misma posición
de ajuste a AMBOS lados del asiento,
libere la palanca y deslice el seguro.
Removing the tray or changing adjustment positions
To release locking tabs: 1) slide handle to side, then 2) pull handle toward front of tray. Make
sure that tabs have retracted fully into the tray. Pull tray out or relocate to the other adjustment
position.
Retirada de la bandeja o cambio de las posiciones de ajuste
Para liberar las lengüetas de fijación: 1) deslice la palanca naranja hacia el lado y, a
continuación, 2) tire de la palanca hacia la parte frontal de la bandeja. Compruebe que las
lengüetas se han retraído por completo dentro de la bandeja. Tire de la bandeja para quitarla o
para colocarla en otra posición de ajuste.
WARNING
The tray is not designed to hold the child in the chair. The
child should be secured in the highchair at all times by the
restraint system.
ADVERTENCIA
La bandeja no está diseñada para sostener al niño sobre la
silla. El niño deberá estar sujeto en todo momento mientras
esté sentado en la silla alta.
9
Using the tray | Usar la bendeja
Removing tray liner
Cleaning tray liner
Reinserting tray liner
Pull release tab at back of tray outward and lift up.
The tray liner may be placed in the dishwasher for
cleaning (top rack only).
Place front edge of tray liner into the tray then clip
back edge over tray.
DO NOT clean tray using dishwasher.
Reinserción del revestimiento de la
bandeja
Remoción del revestimiento de la
bandeja
Jale la lengüeta de liberación ubicada en la parte
posterior de la bandeja hacia fuera y levántela.
Limpieza del revestimiento de la bandeja
El revestimiento de la bandeja puede colocarse
en un lavavajillas para su limpieza (únicamente en
la rejilla superior).
Coloque la parte delantera del revestimiento de
la bandeja en la bandeja y luego sujete la parte
trasera sobre la bandeja.
NO limpie la bandeja en el lavavajillas.
Disassembly | Desmontaje
WARNING
If it should become necessary to disassemble your high chair for transport
or storage, please follow these instructions.
Tools required: Phillips screwdriver, flat-head screwdriver (not included)
Si fuera necesario desmontar la silla alta para su transporte o
almacenamiento, por favor, siga las instrucciones que se proporcionan a
continuación.
Herramientas requeridas: Destornillador tipo Phillips, destornillador plano
(no incluídos)
ADVERTENCIA
NO desmonte otras piezas de la silla alta.
2
1
Remove the two bolts that attach
the seat base cover to the seat.
Retire los dos pernos que sujetan
la cubierta de la base del asiento
al asiento.
10
DO NOT disassemble any other components of the high
chair.
Raise tube to highest position by
stepping on height adjustment
button. Remove the five bolts
that attach seat to support
assembly.
Eleve el tubo hasta su posición
más alta presionando el botón
naranja con el pie. Retire los
cinco pernos que sujetan el
asiento en el soporte.
Disassembly | Desmontaje
3
4
Locate the metal spring tab attached to the center tube of the base. Use the flathead
screwdriver to gently pry UP on the spring end of this tab, while at the same time pulling the
support tube out of the base. Note that it may be easier to have two people perform this
disassembly.
Tip the chair on its side. Locate the large gray weight
in the center of the base and the two plastic tabs that
hold it in place. Use the flathead screwdriver to pry
one of these tabs toward the center hole of the weight
while at the same time pulling the weight slightly
away from the base. Do the same for the other tab to
fully release the weight.
Vuelque la silla sobre un lado. Localice el contrapeso
grande de color gris que se encuentra en el centro
de la base y las dos lengüetas de plástico que lo
sujetan en su sitio. Utilice el destornillador plano
para empujar una de estas lengüetas hacia el
agujero central del contrapeso a la vez que tira
del contrapeso para sacarlo de la base. Repita
el procedimiento con la otra lengüeta para liberar
completamente el contrapeso.
Localice el resorte metálico que se encuentra unido al tubo central de la base. Utilice el
destornillador plano para empujar suavemente hacia arriba el extremo del resorte de esta
lengüeta mientras tira para sacar el tubo de la base. Tenga en cuenta que este desmontaje se
realiza con mayor facilidad entre dos personas.
5
Before storing or transporting chair, reattach gray weight to chair base. Position gray disc in
center of star with six raised bumps facing out. Reattach disc by fitting tabs into holes in center
of disc. Make sure tabs fit snuggly in holes.
Antes de almacenar o transportar la silla, vuelva a fijar el contrapeso a la base de la
silla. Coloque el disco gris en el centro de la estrella con las seis protuberancias hacia
afuera. Vuelva a fijar el disco colocando las lengüetas en los orificios del centro del disco.
Compruebe que las lengüetas queda bien ajustadas en los orificios.
Care | Cuidados
Seat
Clean with a soft cloth using warm water and mild soap. Disinfectant wipes can also be used.
Seat Pad
Clean the seat pad with a soft cloth using warm water and mild soap. Household disinfectants can also be used.
DO NOT place seat pad in dishwasher or washing machine.
Restraint System Straps and Buckles
Clean restraint system straps and buckles using a soft cloth with warm water and mild soap.
Tray
Clean with a soft cloth using warm water and mild soap. DO NOT place tray in dishwasher or submerge in water.
DO NOT place any of the above parts into a dishwasher or washing machine to clean them.
Tray Liner
Tray liner can be cleaned with a soft cloth using warm water and mild soap or can be placed in the dishwasher (top
rack only).
Asiento
Lávelo con un paño suave, agua caliente y jabón suave. También puede utilizar toallitas desinfectantes.
Almohadilla del asiento
Limpie la almohadilla del asiento con un paño suave, agua caliente y jabón suave. También puede utilizar
desinfectantes domésticos.
NO lave la almohadilla del asiento en el lavavajillas ni en la lavadora.
Correas del sistema de sujeción y
tensores
Lave las correas del sistema de sujeción con un trapo suave, agua caliente y jabón suave.
Bandeja
Lávela con un paño suave, agua caliente y jabón suave. NO lave la bandeja en el lavavajillas ni la sumerja en
agua.
No lave ninguna de las piezas antes mencionadas en el lavavajillas ni en la lavadora.
Revestimiento de la bandeja
El revestimiento de la bandeja puede lavarse utilizando un trapo suave, agua caliente y jabón suave, o bien puede
lavarse en lavavajillas (únicamente en la rejilla superior).
11
Actual product styling and colors may vary.
U.S. Patent No. 7,185,949 B2. Other U.S. and
foreign patents pending.
Patents, trademarks, copyrights, and designs are
exclusively owned by Boon Inc.
Boon Inc. products are made with the highest
quality materials and comply with applicable
regulations and standards.
Made in China
Item #701, 702, 703 (Flair)
Item #751 (Flair Elite)
El estilo y los colores reales del producto pueden
variar.
Patente de EE.UU núm. 7,185,949 B2.
Otras patentes estadounidenses y extranjeras
pendientes.
Las patentes, marcas comerciales, copyrights y
diseños son propiedad exclusiva de Boon Inc.
Los productos Boon Inc. están diseñados con
materiales de la más alta calidad y cumplen los
estándares y normativas aplicables.
Fabricado en China
Artículo #701, 702, 703 (Flair)
Artículo #751 (Flair Elite)
©2010 Boon Inc.
7404 W Detroit Street, Suite 100, Chandler, AZ 85226
[email protected] • 888.376.4763 • www.booninc.com
701-02-US-002