1
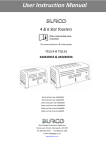
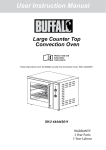
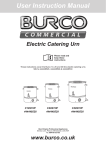
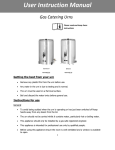
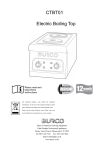
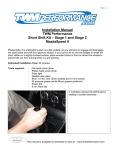
User Instruction Manual
Counter Top Convection Oven
Please read and
keep these
instructions
These instructions cover the Burco counter top convection oven model CTCO01, SKU 444440542
CTCO01
SKU 444440542
Glen Dimplex Professional Appliances
Stoney Lane, Prescot, Merseyside, L35 2XW
Tel: 0844 815 3755
www.burco.co.uk
INTRODUCTION
To ensure you obtain full benefits from your new convection oven:
• Please read this instruction booklet carefully, and follow all instructions.
• If you are unsure of any aspect of the installation, use or performance of your oven,
please contact the after sales number shown on the back page.
SPECIFICATIONS
Model
SKU Number
Dimensions
Weight
Voltage
Power rating
Height
Width
Depth
CTCO01
444440542
580mm
800mm
600mm
65kg
230V ~50Hz
2850W
INSTALLATION
Installation Requirements
It is essential that this appliance is installed correctly. Installation should comply with all
local electrical, and health and safety requirements.
WEEE directive registration no. WEE/DK0059TT
At end of unit life, dispose of appliance and any replacement parts in a safe
manner, via a licenced waste handler. Units are designed to be dismantled
easily and recycling of all material is encouraged whenever practicable.
Before Connection to Power Supply:
Remove all packaging.
Check the oven and parts for damage. Report any damage immediately to the carrier or
supplier.
Remove any protective plastic coating from the outer panels. Remove all cable ties
retaining the shelves and oven base pieces.
Check the following parts have been supplied with your oven:
4 x Oven shelves
Check the available power supply corresponds to that shown on the oven rating label.
Location:
This oven is for indoor use only.
Do not install the oven in a cabinet, it is for counter top use only. Allow at least these
clearances - top 200mm, rear 25mm, sides 25mm.
The oven is only to be installed in locations where its use and maintenance is restricted to
trained personnel.
The mains lead should reach from the mains socket without straining the connections.
Do not let the mains lead hang over the edge of the table or counter, and keep it away
from any hot surfaces.
Do not let the mains lead run across an open space
Do not place the oven where the mains lead could fall into a sink.
Do not place the oven near a hot gas or electric burner.
Ensure the oven is level both from side to side and front to back, to ensure even cooking.
The oven should be positioned such that it can be loaded and unloaded easily, and the
controls can be operated conveniently.
Important:
DO NOT OBSTRUCT THE VENTILATION VENT IN THE TOP, OR THE VENTILATION
SLOTS IN THE RIGHT HAND SIDE, REAR AND BASE OF THE OVEN.
Electrical Connection:
Fitting a plug
The mains lead of this oven will already be fitted with a BS1363 13A plug. If the fuse has to
be replaced, use a 13 amp fuse complying with BS 1362.
If the plug is not suitable for your socket then the plug must be cut off and disposed of safely.
An appropriate plug should be fitted as follows:
IMPORTANT: The wires in the mains lead are coloured in accordance with the following
code:
Green and Yellow - Earth
Blue - Neutral
Brown - Live
The wire which is coloured green and yellow must be connected to the terminal in the plug
which is marked with the letter E or the earth symbol or coloured green or green and yellow.
The wire which is coloured blue must be connected to the terminal which is marked with the
letter N or coloured black or blue.
The wire which is coloured brown must be connected to the terminal which is marked with
the letter L or coloured red or brown.
Make sure that the connections are tight and that there are no loose strands of wire and no
insulation trapped under the terminals. Tighten the clamp in the plug making sure that it grips
the outer covering of the cord. If fitting a BS 1363 13A fused plug then fit a 13A fuse. Tighten
the plug cover securely. If you are in any doubt, consult a qualified electrician.
IMPORTANT: if the supply cord is damaged, it must be replaced by the manufacturer,
service agent or similar qualified person in order to avoid a hazard.
WARNING - THIS APPLIANCE MUST BE EARTHED
In addition to the earth within the mains plug, connect the equipotential bonding
terminal on the rear panel.
Electrical connection: 230V ~ 50Hz, 12A, 2850W
Before Use:
Operate the oven for approximately 30 minutes at the highest temperature, to remove any
fumes or odour which may be emitted - this is due to oil used during manufacture, but is
not harmful.
800
580
600
USER GUIDE
Description of controls:
Power
Press to switch power on or off.
Switch illuminates when power is on.
Thermostat
Temperature range 50-250°C - top and bottom
elements are on. ‘Oven temperature’ indicator
illuminates when the elements are cycling on
to maintain set temperature.
Grill/Broil position - top element only is on. ‘Grill’
indicator will illuminate indicating that the grill/broil
function has been set. ‘Oven temperature’
will also illuminate whenever the element is on.
Bake Timer
1 Hour bake timer.
Indicator illuminates and buzzer sounds when
‘time up’ (0) is reached.
Cook & Hold
Press switch to activate ‘Cook & Hold’ function.
Switch illuminates when ‘Cook & Hold’ is on.
HOLD
COOK TIME
OFF
180
Cook Timer
.
3 Hour timer for ‘Cook & Hold’ function.
‘Hold’ indicator illuminates when ‘time up’ (0) is
reached. Product is then held at 75°C.
Light Switch
Press switch to activate light.
Light illuminates while button is latched in the
on position.
0
DO NOT COVER THE ELEMENTS OR SHELVES WITH METAL FOIL.
DURING USE THE OVEN BECOMES HOT. BE CAREFUL NOT TO TOUCH HOT
SURFACES.
TURN OFF THE POWER SUPPLY AND REMOVE THE PLUG WHEN NOT IN USE,
BEFORE CLEANING, AND BEFORE REPLACING ANY PARTS.
This convection oven will cook food faster, at a lower temperature and more evenly than a
conventional oven. For roasting, set the oven to 150-170°C. The hot air circulating in the
oven reduces moisture loss and shrinkage. Roasting times are reduced by approximately
10 minutes per kg compared to a conventional oven.
Baking / Roasting:
1. Turn power on
The power switch illuminates when it is pressed and latched in the on
position.
2. Set thermostat to the desired temperature
The OVEN TEMPERATURE indicator will illuminate whenever the elements are
cycling on to maintain the set temperature. Top and bottom elements are heated.
3. Load oven
Once the oven is up to temperature, open the door and load the oven with
product.
Avoid delays in loading the oven with the door open as this will delay the oven
temperature recovery.
Note:
The oven fan will switch off and the oven light will illuminate when the door is opened.
4. Set bake timer to desired time
To set timer, turn knob clockwise to the required time. At any stage, the time can
be adjusted in either direction. For settings less than 10 minutes, first set to a
greater setting then turn down to the required time.
Note:
This 60 minute timer is completely independent of the oven control.
5. Light
To view the product while baking, press the light switch on the control panel. The
light will stay on while the switch is latched in the on position.
6. Time up
When the timer reaches 0 minutes, the buzzer sounds and the BAKE TIME
indicator illuminates. To cancel the buzzer and indicator, turn the timer fully anti
clockwise to the off position.
7. Unload oven
Open the door and unload the oven.
Cook & Hold:
This system will automatically cook food for a set time, then hold the oven at a preset
temperature indefinitely to maintain food at a serving temperature.
1. Turn power on
The power switch illuminates when it is pressed and latched in the on
position.
2. Set thermostat to the desired temperature
The OVEN TEMPERATURE indicator will illuminate whenever the elements are
cycling on to maintain the set temperature.
3. Load oven
Once the oven is up to temperature, open the door and load the oven with
product.
Avoid delays in loading the oven with the door open as this will delay the oven
temperature recovery.
Note:
The oven fan will switch off and the oven light will illuminate when the door is opened.
4. Set Cook & Hold timer to desired time
This 3 hour timer is mechanically driven and is set by turning the timer knob
clockwise to the required time. At any stage, the time can be adjusted in either
direction. The timer will have no effect until the Cook & Hold switch is pressed
(switch illuminated).
5. Press Cook & Hold switch
The switch will illuminate and the timer is now effective.
6. Light
To view the product while baking, press the light switch on the control panel. The
light will stay on while the switch is latched in the on position.
7. Hold
When the timer reaches the hold position, the main oven thermostat is turned off
and a separate preset thermostat will keep the food warm at serving temperature
of 75°C as long as required, until the Cook & Hold switch is turned off.
Note:
The HOLD indicator will illuminate when the timer reaches the hold position, until the
Cook & Hold switch is turned off. The hold light may come on briefly when the Cook &
Hold switch is first pressed, until the oven heats up beyond the preset holding
temperature.
8. Unload oven
Open the door and unload the oven.
9. Press Cook & Hold switch to return to normal operation
The switch will no longer be illuminated.
Grilling / Broiling:
1. Turn power on
The power switch illuminates when it is pressed and latched in the on
position.
2. Set thermostat fully clockwise to the GRILL position
The GRILL indicator will illuminate to show the GRILL function has been set, the
OVEN TEMPERATURE indicator will also illuminate whenever the element is on.
Only the top element is heated.
Note:
It is recommended that the GRILL function is only used with the oven door open, as
the oven fan is then automatically off. However if the GRILL function is used with the
door closed, the element will cycle when the oven temperature reaches 300°C to
prevent damage to the oven.
3. Load oven
Place an oven shelf towards the top of the oven. When the element has reached
bright red (approximately 5 minutes) position the dish under the element. It is
recommended the door is not closed.
4. Set bake timer to desired time
To set timer, turn knob clockwise to the required time. At any stage, the time can
be adjusted in either direction. For settings less than 10 minutes, first set to a
greater setting then turn down to the required time.
Note:
This 60 minute timer is completely independent of the oven control.
5. Time up
When the timer reaches 0 minutes, the buzzer sounds and the BAKE TIME
indicator illuminates. To cancel the buzzer and indicator, turn the timer fully anti
clockwise to the off position.
6. Unload oven
Open the door and unload the oven.
Cleaning:
ALWAYS TURN OFF THE POWER SUPPLY AND REMOVE THE PLUG BEFORE
CLEANING
THIS APPLIANCE IS NOT WATERPROOF
DO NOT USE A WATER JET SPRAY TO CLEAN THE INTERIOR OR EXTERIOR OF
THE APPLIANCE, OR USE A WATER JET IN THE VICINITY OF THE APPLIANCE
Exterior
Clean with a good quality stainless steel cleaning compound. Do not use harsh abrasive
cleaners as this could damage the surface finish.
Interior
Ensure that the chamber is cool. Do not use wire brushes, steel wool or sharp utensils.
Clean the interior regularly with a good quality oven cleaner. Take care not to damage the
fan or the tube at the top of the chamber which controls the thermostat.
Shelves
To remove, slide out to the stop position, raise the front edge up, and lift out. Clean with
hot water and detergent.
Side racks
Undo the thumbscrew securing rack to side of oven, disengage location pin at front by
swinging rack towards centre of oven, and pull rack forward. Clean with hot water and
detergent. To replace, engage rack in rear holes, engage location pin at front by swinging
rack towards side of oven, and replace thumbscrew.
Bottom element cover
Lift out element cover and thoroughly clean at least per week.
Oven seals
To remove, hold each seal at the centre and pull forward until it unclips. Remove side
seals first, followed by top and bottom seals. Clean with hot water and detergent. Replace
seals with the lip facing the oven opening. Fit top and bottom seals first, followed by the
side seals.
Oven door glass
Clean with a good quality glass cleaner.
Troubleshooting:
Fault
Possible Cause
Remedy
The appliance does
No power to the oven.
not operate.
Check supply socket is switched on.
Check fuse and circuit breaker.
Press power switch, check switch
illuminates.
Interior light not
illuminated.
Replace bulb.
Blown bulb.
GUARANTEE
This convection oven is guaranteed against defective materials or faulty workmanship, for
a period of 12 months on labour and 36 months on parts.
This guarantee is given subject to the appliance being used in accordance with the
instructions supplied, and on the supply voltage marked on the rating label. The guarantee
is subject to fair wear and tear conditions.
The guarantee does not cover consequential damage arising out of any failure
acceptable under guarantee, nor does it cover damage resulting from misuse, accident or
unauthorised alterations to the oven.
Proof of purchase will be required.
In any communication with the supplier or manufacturer, quote the model and serial
number marked on the oven rating label.
This guarantee does not affect your statutory rights.
The products are intended for commercial use as detailed in these instructions.
The Company has a policy of continuous improvement in product quality and design. The
Company therefore reserves the right to change the specification at any time.
FAQ’s
WIRING SCHEMATIC
SPARES LIST
ALWAYS TURN OFF THE POWER SUPPLY AND REMOVE THE PLUG BEFORE
REPLACING ANY PARTS
Part Number
Description
Qty
082640633
082640634
082640635
082640636
082640637
082640638
082640639
082640640
082640641
082640642
082640643
082640644
082640645
082640646
082640647
082640648
082640649
082640650
082640651
082640652
082640653
082640654
082640655
082640656
082640657
082640765
082640861
082640860
082640927
082640941
082640942
082640943
082640944
082640945
082640946
082640947
082640948
082640949
082640950
GLASS outer door 30210019700
HANDLE door 302070080
RACK left or right 302110239 or
ELEMENT upper 301040387
SHELF oven 302110223
RACK left or right 302110239 or
ELEMENT lower 301040389
LAMP oven 301130048
MOTOR 301010034
SWITCH button/red 301080056
KNOB timer 301110173
INDICATOR lamp/red 301130077
KNOB 301110094
BUTTON switch/green 301080057
THERMOSTAT 90°C hold 301030086
TIMER 180min 301120013
FOOT 302090022
JUNCTION BOX 301070139
RELAY 301090039
MICRO SWITCH 30108006
TIMER 60 min 301120009
THERMOSTAT 320°C 301030081
FAN blade 20207027042
LAMP holder 301130038
DOOR inner glass 302100198
COVER power cord 301070070
BALLBEARING x 10mm 302190101
SPRING 302080049
DOOR assy 20107027001
ALARM buzzer 301100002
ACTUATOR door switch 302200732
SEAL door 302020093
SPINDLE door latch 302200730
TUBE door latch 302200729
NUT door latch 302200731
PLATE door latch 20207027013
SEAL inner glass 302020094
PIN hinge upper 302200630
CUP hinge upper 302200631
Handbook
1
1
1
1
4
1
1
1
1
1
1
4
2
2
1
1
4
1
2
1
1
1
1
1
1
1
1
1
1
1
1
1
1
1
1
1
1
3
3
1
Customer helpline
For spares and after-sales service please contact
Burco on:
T: 0844 815 3755
F: 0844 815 3748
E: [email protected]
Glen Dimplex Professional Appliances
(A Division of Glen Dimplex Home Appliances)
Stoney Lane,
Prescot,
Merseyside L35 2XW
www.burco.co.uk
07.2011