1
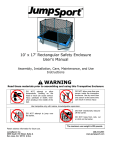
Safety Enclosure
Model 180
User’s Manual
Assembly, Installation, Care, Maintenance, and Use
Instructions
WARNING
Read these materials prior to assembling and using this
trampoline and trampoline enclosure
DO NOT attempt or allow
somersaults. Landing on the
head or neck can cause serious
injury, paralysis or death, even
when landing in the middle of the
bed.
DO NOT allow more than one
person inside the trampoline
enclosure. Use by more than
one person at the same time
can result in serious injury.
Use trampoline only with mature, knowledgeable supervision.
DO NOT intentionally rebound
off the barrier.
DO NOT attempt to jump over
the barrier.
DO NOT hang from, kick, cut
or climb on the barrier.
The maximum user weight is 180 pounds.
Retain address information for future use.
JumpSport, Inc.
2055 South 7th Street, Suite A
San Jose, CA 95112 U.S.A.
408-213-2551
www.jumpsport.com
1
P/N: INS-P-10099B
Copyright Notice
This material is protected by United States copyright laws and is proprietary to JumpSport, Inc. Disclosure, reproduction, translation,
modification, or use of this document by anyone other than authorized employees, authorized users, or licensees of JumpSport
without the prior written consent of JumpSport, Inc. is prohibited.
The information in this document is subject to change without notice. JumpSport, Inc. shall not be liable for any damages resulting
from technical errors or omissions, which may be present in this document, or from use of this document.
Copyright © 2006, by JumpSport, Inc. All rights reserved.
Printed: 2006
Instruction Manual P/N: INS-P-10099B
JumpSport Safety Enclosure Model 180 P/N: SEJ-S-10166A
Trademarks
JumpSport®, ProFlex™ Basketball Set, Game and Party Pak™, SureStep™ Trampoline Ladder, and BounceBoard Extreme™ are
trademarks of JumpSport, Inc.
All other brand or product names are trademarks or registered trademarks of their respective companies or organizations.
Patents
This product includes technology associated with one or more of the following U.S. Patents:
No. 6,053,845
No. 6,261,207
No. 6,840,891
No. 6,846,271
Additional Patents Pending.
How to Contact Customer Support
Should you require customer service or technical support for your JumpSport Safety Enclosure, please contact JumpSport’s Customer
Service department at:
408-213-2551
8:00am—5:00pm Monday through Friday, Pacific Time
2
Contents
Chapter 1
Introduction
5
JumpSport ProFlex Basketball Set
Game and Party Pak
Chapter 2
Chapter 3
Assembly and Installation Instructions
7
Preparation
Trampoline Placement
Tools
Parts List
Assembly
Final Steps
Disassembly
7
7
8
8
9
17
17
Care and Maintenance Instructions
Inspection
Cold Weather Protection
Replacement Parts
Disassembly
Care and Maintenance Safety Checklist
Windy Conditions
Moving the Trampoline
Care
Chapter 4
Warning Information
Points of Safety
Before you Jump, Read this:
Landing on Springs or Frame
Bouncing off the Trampoline
Landing Incorrectly on the Mat
Chapter 5
6
6
Use Instructions
19
19
19
19
19
20
21
21
21
23
23
23
24
24
24
25
Safety Rules
Basic Skills
Bouncing
Stop Bounce
Arm Action
Bounce Variations
Basic Landing Positions
Seat Drop
Hands and Knees Drop
Front Drop
Series of Drops
Twisting Moves
Swivel Hips
Turntable
Twist Variations
25
26
26
26
26
27
27
27
28
28
29
29
29
30
30
Warranty Information
3
Last Page
(This page left intentionally blank.)
4
Introduction
1
Congratulations on purchasing a JumpSport Safety Enclosure!
Safe use of a trampoline also requires adequate knowledge of technique, as well as what not to do. Please read this
manual thoroughly for key points of safety.
Trampolines, being rebounding devices, propel the performer to unaccustomed heights and into a variety of body
movements. Therefore, it is emphasized that all purchasers, and all persons using the trampoline, become familiar with
the rules for safe use. Misuse and abuse of this trampoline is dangerous, and can cause serious injuries. The purchaser/
user of this piece of equipment is assuming a degree of risk for which JumpSport cannot be responsible.
Read this information thoroughly before allowing the trampoline to be used. Keep this manual available for your
review, and for review by all potential users. If there are questions please call JumpSport for further explanation.
Caution
Many users of our trampolines are children, and therefore need close supervision and rules to follow while playing on
the trampoline. These rules must be enforced by whomever is responsible for the care of the children. It is strongly
recommended that the buyer of this product go over the rules and recommendations in the packet of information
supplied, including those in this manual. It is also strongly recommended that these rules and recommendations be
supplemented with those of your own, for example: the time that jumping is allowed, when neighbors can visit, and so
on. These rules and recommendations should be reviewed with anyone who is going to jump on the trampoline. If it is
possible, review these rules with the parents or guardians of any visitors who may be jumping on the trampoline. See
Safety Rules (under the Use Instructions section) for more information.
5
Introduction
JumpSport ProFlex Basketball Set
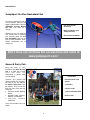
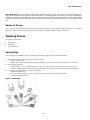
Let’s face it, kids have to look up
a lot: at parents, teachers, and
bigger brothers/sisters. With the
JumpSport ProFlex Basketball Set, look down for a
change!
Whether you are into practicing
your outside shot or improving
your up-close game, the ProFlex Basketball Set is a fun
way to avoid homework. Heck,
athletic scholarships pay for
college too!
•
Our most popular
accessory!
•
Easily installed to your
safety enclosure
•
Set includes basketball
Don’t miss out on these fun accessories and more at
www.jumpsport.com !
Game & Party Pak
Bring the party to your
trampoline! The Game & Party
Pak is a great way to take
turns
and
have
fun
participating in games while
you are waiting.
Set Includes:
Convince your parents that
games provide the “structure"
you need in your life, and that
the Game & Party Pak is just
the solution. Plus, you can tell
them the Party Pak does big
words like:
• Enhances Athletic Building
Blocks
• Develops Agility, Stamina,
Balance, Coordination
• Improves
Spatial
Awareness
(They won’t be able to turn you
down!)
6
•
Illustrated book of 20
games
•
3 soft balls
•
4 shock cords
•
1 box of sidewalk chalk
•
Hours of fun!
Assembly and Installation
Instructions
2
Preparation
Before you begin assembling your JumpSport Safety Enclosure, make sure your trampoline is in a proper location.
Trampoline Placement
Caution: When deciding on where to place your trampoline, consider the following:
WARNING
Overhead Clearance
Adequate overhead clearance is essential. A minimum of 24 feet from ground level
is recommended. Provide clearance for wires, tree limbs, and other possible hazards.
Lateral Clearance
Lateral clearance is essential. Place the trampoline and trampoline enclosure away from
walls, structures, fences, and other play areas. Maintain a clear space on all sides of the
trampoline and trampoline enclosure.
Level Surface
Place the trampoline and trampoline enclosure on a level surface before use.
Lighting
Use the trampoline and trampoline enclosure in a well-lighted area. Artificial
illumination may be required for indoor or shady areas.
Security
Secure the trampoline and trampoline enclosure against unauthorized and
unsupervised use.
Ground Clearance
Remove any obstructions from beneath the trampoline and trampoline enclosure.
Note: The trampoline enclosure is only to be used as an enclosure for a trampoline and the trampoline must be of
the appropriate size as covered by the specific enclosure.
Note: The owner and supervisors of the trampoline are responsible to make all users aware of practices specified in
the Use Instructions.
It is the responsibility of the purchaser to become familiar with all of the information in this booklet, to
convey the warnings to all users, and to enforce JumpSport’s rules for safe use.
This unit is not intended for commercial or public use and is therefore strictly prohibited.
The maximum user weight is 180 pounds.
7
Assembly and Installation Instructions
Tools
Installation of the safety enclosure requires an 10mm deep socket and ratchet, or a crescent/adjustable wrench. An 8 foot
A-Frame ladder will be useful for some Steps (use care and follow procedures for use). Safety glasses and gloves are also
recommended for safety.
Parts List
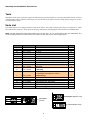
Your Safety Enclosure is shipped with the parts shown below. The safety enclosure parts ship in a separate box, which
has a smaller box inside of it. If any parts are missing, immediately call JumpSport Customer Service at 408-213-2551.
Note: Do NOT discard the foam tubing (Reference #12 and #13), as it is used as part of the pole assemblies. It is
not just packing material. Do NOT remove any caps from the ends of any of the support poles.
Reference #
Part #
1
CAB-P-10116A
2
PLC-P-10144A
3a
BOL-P-10121A
3b
SPA-P-10096A
3c
CLA-P-10105A
3d
WAS-P-10106A
3e
NUT-P-10107A
3f
NUT-P-10109A
4
BUN-P-10110A
5
STR-P-10154A
6
NET-P-10113A
7
8
9
10
11
12
13
STR-P-10115A
CAP-P-10090A
POL-A-10229A
POL-A-10230A
POL-P-10091A
FOA-P-10093A
FOA-P-10094A
Description
Cable tie
Warning placard
M6 U-bolt
Pole spacer, (fits M6 U-bolt)
Clamp (fits M6 U-bolt)
Washer (fits M6 U-bolt)
M6 Nylock nut (fits M6 U-bolt)
M6 acorn nut, capped end (fits M6 U-bolt)
Bungee T-anchor
Net strap
2 feet long
Net
47 feet long
Pole strap, loop at one end
(1 is packaged separately from other 8)
10 1/2 feet long
Ball end cap
Lower support pole
Lower support pole, with sticker
Upper support pole, notch at one end
Long foam tubing (1 tube packed over 1 pole)
Short foam tubing (2 tubes packed over 1 pole)
Quantity
1
1
16
8
16
32
32
32
1
15
1
9
8
7
1
8
8
8
Nylock nut (Ref. #13d)
Pole spacer
Ref. #3c
Acorn nut (Ref. #13e)
8
Assembly and Installation Instructions
The following pages contain diagrams, pictures, and written instructions for assembling your Economy Safety
Enclosure. The “Ref. #” mentioned in many Steps is referring to the “Reference #” column of the parts list on the
previous pages.
Before performing any Step, completely read the entire Step first.
For installation questions, please contact JumpSport’s Customer Service department at:
408-213-2551
8:00am—5:00pm Monday through Friday, Pacific Time
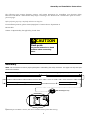
CAUTION
Pinch point.
Pay careful attention to hand
position when connecting
tubes.
Assembly
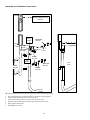
Note: We recommend at least 2 people participate in assembling the safety enclosure. Use page 8 to help with part
names and numbers.
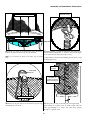
Lower pole, (Ref. #9 or #10)
Upper pole (Ref. #11)
Long foam tubing (Ref. #12)
Short foam tubing (Ref. #13)
Ball end cap (Ref. #8)
1) Build all pole assemblies as shown. (Pole sleeve and foam will fit up inside ball end cap.)
9
Assembly and Installation Instructions
Notch in ball end cap
should be aligned with rail,
as shown.
(Weld
on leg
socket)
Nylock nut
Ref. #3e
Pole spacer
Ref. #3b
Clamp
Ref. #3c
(Leg
socket)
U-bolt
Ref. #3a
Acorn nut
Ref. #3f
Washer
Ref. #3d
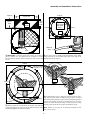
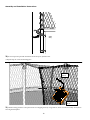
2) Using the hardware provided, attach a pole to the outside of each trampoline leg:
•
•
•
•
•
•
Pole should extend approximately 6 feet above the frame of the trampoline.
Align notch in ball end cap with rail as shown above.
Top U-bolt should be positioned on leg socket, below the weld.
Bottom U-bolt should be approximately 2 inches above bottom of pole.
Snugly tighten Nylock nuts.
Hand-tighten acorn nuts.
10
(Side
view)
Assembly and Installation Instructions
Top strap
Between 46 feet 8 inches
and 47 feet
Pole 6
Pole 5
Bottom
strap
Net
Ref. #6
End
with
loops
Pole 7
(Top view.
Legs shown
with dotted
lines.)
Pole 4
Pole 8
Start
Pole 1
Pole 3
Pole 2
Wider top
strap
Knot
Ball end cap at Pole 1
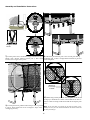
3)
IMPORTANT: To ensure proper door overlap, lay net flat on 4) Top strap of net is slightly wider than bottom strap. Wider
ground, measure net, and adjust knots as necessary to ensure strap must be at top of net. Place looped end of top strap of net
that the distance between knots is between 46 feet 8 inches and around ball end cap at pole 1.
47 feet.
Pole 6
(Net shown hung
on poles 1 - 4)
Pole 2
Pole 4
(View from outside of net)
Pole 2
6)
Continue back to pole 1. Hang net around outside of pole 1,
with
top strap and 1 mesh of netting resting in groove on top of
Pole 1
ball end cap. Then pull net to pole 2. Feed top strap through top of
net near pole 2. Wrap top strap around ball end cap to secure it.
(Top view)
Then tie a double knot in the strap. Loosely wrap excess strap
5) Hang net clockwise around outside of all poles. Top strap and around pole 2, and tie off loose end toward bottom of pole.
1 mesh of netting rest in groove on top of ball end cap. Top strap Note: Bottom of net may not be touching trampoline at this
should hang slightly curved between poles.
time. This is normal.
11
Assembly and Installation Instructions
Bungee T-anchor
Ref. #4
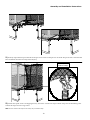
7) At inner panel of net, connect the bungee T-anchor to loop of 8)
Lift frame pad between poles 1 and 2. Tuck pad skirt up
bottom strap. Stretch T-anchor toward pole 1, then secure underneath pad, so skirt is wedged between bottom of pad and
T-anchor at a V-ring closest to pole 2.
rail of trampoline.
Minimum 6
inch overlap
in middle
10) When hung correctly, the inner and outer panel of net should
9) At outer panel of net, pull the bottom strap as close as possible
to pole 2. There should now be an “hourglass” shape at the
overlapping doorway.
overlap by a minimum of 6 inches in the middle. It can have as
much as 3 feet of overlap, but the net should not extend past poles
1 or 2.
Note: If the net does not overlap by at least 6 inches in the
middle, be sure your net measured between 46 feet 8 inches and
47 feet (see Step 3) .
12
Assembly and Installation Instructions
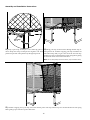
11) Securely wrap bottom strap around rail toward pole 2. Tie a knot around pole 2 to secure the strap to the rail. You should still
have a minimum of 6 inches of overlap at the entryway.
(Frame pad not
shown for clarity)
12)
Divide inner panel of net at overlapping doorway into halves. Connect net strap to bottom strap of net at the halfway point.
Connect net strap to closest V-ring on mat.
Note: Do not connect net strap to net mesh, only to bottom strap.
13
Assembly and Installation Instructions
Pole strap
Ref. #7
13)
Wrap a pole strap around pole 1 and vertical leg piece as 14) Wrap pole strap around rail and through bottom strap of
shown. Strap must wrap around pole and leg below rail. Then outer panel of net. Continue wrapping pole strap around the rail
pull non-looped end of strap all the way through looped end.
and bottom strap until you get to the end of the net. Pole strap
should wrap once around rail between each spring before getting
to end of net. Secure at end of net with a knot.
Note: Do not wrap strap around net mesh, only to bottom strap.
15) Continue wrapping excess pole strap around rail toward pole 2. Pole strap should wrap once around rail between each spring
before getting to pole 2. Secure at pole 2 with a knot.
14
Assembly and Installation Instructions
(Frame pad not
shown for clarity)
(View from inside trampoline)
(View from outside trampoline)
16)
Divide one section of net between the poles, into thirds.
Connect net straps to bottom strap of net at each third.
17) While standing on outside of trampoline, push bottom of net
toward middle of trampoline (as shown in the previous Step),
over top of frame pad. Secure net strap at V-ring.
Note: Do not connect net strap to net mesh, only to bottom
strap.
>> Repeat Steps 16 and 17 for all remaining sections of net, except
overlapping doorway.
(Picture not
to scale)
Pole strap
Ref. #7
Pole strap weaves
through 2—3
squares of net each
time around the pole
(View from outside of net)
18)
Place loop of pole strap in slot of ball end cap. Pole strap
should hang on inside of net.
19)
Wrap the pole strap around the pole, weaving through
approximately 2—3 squares of net on outside of pole. This will
create approximately 5—8 wraps, with each wrap weaving
through 2—3 squares of net.
15
Assembly and Installation Instructions
(Side
view)
20) Tie end of pole strap off with a firm knot at bottom of pole, just below rail.
>> Repeat Steps 18—20 at all remaining poles.
Cable tie
Ref. #1
Warning placard
Ref. #2
21) Attach warning placard to outer panel of net at overlapping doorway using cable tie, where it can be most easily seen by those
accessing the trampoline.
16
Assembly and Installation Instructions
Final Steps
Assembly is now complete! Make sure all parts are securely assembled. Before using your Safety Enclosure, familiarize
yourself and all users with the Care and Maintenance Instructions, Warning Information, and Use Instructions included in
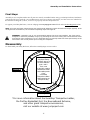
this manual. See Diagram 1, below, to see how to properly enter the safety enclosure.
To register your Safety Enclosure, visit our webpage at www.jumpsport.com and click on the Product Registration link.
Note: The upper and lower support straps may need periodic tightening. Check the knots and straps regularly. If the
net sags due to extended use, we recommend repeating Steps 4 through 20.
WARNING: Trampoline use is not recommended without the frame pad installed. The frame pad is
designed to reduce the possibility of injury by protecting the user from coming into contact with the frame
and springs of the trampoline. It is very important that you properly attach the frame pad securely to the
frame and in the correct position prior to using the trampoline.
Disassembly
To disassemble your Safety Enclosure, follow the assembly Steps in reverse order.
Diagram 1
(Top view)
To enter your
JumpSport Safety
Enclosure, step up on
the frame between
pole 1 and 2.
Then, move
to the right, passing
between the inside
and outside panels
of net.
A SureStep
Trampoline Ladder*
makes entering the
trampoline easy.
Pole 1
Pole 2
Enter through here.
*For more information about the SureStep Trampoline Ladder,
the ProFlex Basketball Set, the BounceBoard Extreme,
and other great trampoline accessories,
visit our website at www.jumpsport.com
17
Assembly and Installation Instructions
(This page left intentionally blank.)
18
Care and Maintenance
Instructions
3
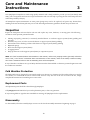
Your JumpSport Trampoline is made using quality materials and is finely-crafted to provide you and your family with
many years of enjoyment and exercise. Proper maintenance and care will help to prolong the life of the trampoline and
reduce the possibility of injury.
All trampolines require maintenance at some point. Springs may need to be replaced, rail pieces may become bent,
stitching in the mat and frame pads may rot out. The following maintenance guidelines should always be observed.
Inspection
Inspect the trampoline enclosure before each use and replace any worn, defective, or missing parts. The following
conditions could represent potential hazards:
•
•
•
•
•
•
•
Missing, improperly positioned, or insecurely attached barrier or enclosure support system (frame) padding and
pole caps
Puncture, frays, tears, or holes worn in the barrier or support system (frame) padding
Deterioration in the stitching or fabric of the barrier or support system (frame) padding
Ruptured springs
Bent or broken support system (frame)
A sagging barrier
Sharp protrusions on the support system (frame) or suspension system
Note: The “bed” mentioned above and elsewhere in this manual, refers to the jumping surface (generally referred to
as the “mat”). The “barrier” mentioned above and elsewhere in this manual, refers to the safety enclosure netting.
The “frame” mentioned refers to the rail assembly pieces of the trampoline.
If any of the above conditions exist, your Safety Enclosure must be disassembled or otherwise protected against use until
the condition is remedied.
Cold Weather Protection
The Safety Enclosure is designed for year-round outdoor use. However, in climates of cold weather where snow and ice
are common, we recommend the net be removed and stored in a dry area out of the sun. To remove the net, simply
complete the instructions for installing it in reverse order.
Replacement Parts
All replacement parts should be ordered through JumpSport.
Call JumpSport at 408-213-2551 if you need replacement parts, or have any questions.
If any warning labels or signs become unreadable or missing, call JumpSport for free replacements.
Disassembly
To disassemble, follow the assembly Steps in reverse order. See the Assembly Instructions beginning on page 9.
19
Care and Maintenance Instructions
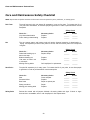
Care and Maintenance Safety Checklist
Note: Inspect the trampoline enclosure before each use and replace any worn, defective, or missing parts.
Pole Foam
The pole foam and vinyl pole sleeve life expectancy is two to five years. To increase the life of
your pole foam and sleeves, do not allow people to grab them in order to pull themselves onto the
trampoline.
Safety Check
Net
Check for…
Necessary Action
Safe
Unsafe
Vinyl sleeve deterioration
Replace
_______
_______
Foam missing or deteriorating
Replace
_______
_______
The net, support straps, and bungee cords will require frequent inspection for deterioration or
fraying. Life expectancy is three to five years for the net, and one to three years for the straps and
bungees.
Safety Check
Steel Poles
Check for…
Necessary Action
Safe
Unsafe
Faded and breaking top or
bottom net strap
Replace straps
_______
_______
Brittle and tearing net
Replace
_______
_______
Cuts, tears, or holes in net
or net straps
Replace
_______
_______
Missing warning labels
Call JumpSport for replacement
_______
_______
The pole life expectancy is for many years. To increase the life of your poles, do not allow people
to grab them in order to pull themselves onto the trampoline.
Safety Check
Safety Rules
Check for...
Necessary Action
Safe
Unsafe
Rust
Clean and paint
_______
_______
Structural failure
Replace
_______
_______
Bent frame
Repair or replace part
_______
_______
Sharp protrusions
Repair
_______
_______
Missing pole warning label
Replace
_______
_______
Review this manual with all jumpers. Maintain all warning labels and signs. If labels or signs
become lost or unreadable, write or call JumpSport for free replacements.
20
Care and Maintenance Instructions
Windy Conditions
It is possible for the trampoline to be blown about by a high wind. If you anticipate high winds, the frame should be
secured to the ground with the use of an AlleyOop Sports Trampoline Anchor Kit. If you anticipate severe winds, the
trampoline should be moved to a sheltered location or completely disassembled. Our anchor kit can be found in the
Accessories section at www.jumpsport.com.
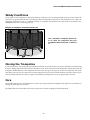
Diagram 2 JumpSport Trampoline Anchor Kit
Use a JumpSport Trampoline Anchor Kit
to tie down the trampoline that your
JumpSport Safety Enclosure is attached
to.
Moving the Trampoline
If you need to move your trampoline periodically, it should be moved by at least two people, and kept horizontal during
the move. Both people should stand next to each other on one of the short ends of the trampoline, and lift that end of the
trampoline. Rotate that end of the trampoline about five feet, then go to the opposite end of the trampoline, and do the
same thing. This will slowly rotate each end of the trampoline toward your desired destination, and is the easiest way to
move the trampoline due to its heavy weight. Disassemble the trampoline for any move greater than a few feet.
Care
Do not allow family pets on the trampoline, as claws may snag and pull the trampoline mat material or net material, or
damage the frame pad or pole foam.
The Safety Enclosure is intended to be used by one person at a time, weighing less than 180 pounds.
21
Care and Maintenance Instructions
(This page left intentionally blank.)
22
Warning Information
4
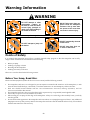
WARNING
DO NOT attempt or allow
somersaults. Landing on
the head or neck can cause
serious injury, paralysis or
death, even when landing in
the middle of the bed.
DO NOT allow more than one
person inside the trampoline
enclosure. Use by more than
one person at the same time
can result in serious injury.
Use trampoline only with mature, knowledgeable supervision.
DO NOT intentionally rebound
off the barrier.
DO NOT attempt to jump over
the barrier.
DO NOT hang from, kick, cut
or climb on the barrier.
Points of Safety
It is essential that trampoline users follow a carefully planned safety program so that the trampoline can be fully
enjoyed. Most accidents can be classified into the following:
•
•
•
•
Before you jump
Landing on springs or frame
Bouncing off the trampoline
Landing incorrectly on the mat
These are covered in detail in the following sections.
Before You Jump, Read this:
Please read the Safety Rules (under the Use Instructions section) with the following in mind:
•
•
•
•
•
•
The trampoline enclosure is not designed to prevent injuries associated with unsafe use of the trampoline, or with
more advanced skills like flips, somersaults, or acrobatic maneuvers. Do not attempt any of these activities.
Each user should become familiar with the Care and Maintenance Instructions, Warning Information, and Use
Instructions included in this manual.
The trampoline enclosure does not replace the need for supervision by a responsible, knowledgeable adult.
Allow only one person to use the entrance at one time.
When exiting, do not jump off the edge of the trampoline. Always sit on the edge, then carefully lower your body
onto the ground.
Do not attach other apparatus to the trampoline enclosure unless it is a JumpSport-approved device. Any additional
JumpSport accessory that you may attach to the trampoline enclosure must be attached and used only in accordance
with the instructions for such accessory.
23
Warning Information
Landing on Springs or Frame
The risk of falling on the springs or frame, landing between the springs, or hitting the frame can be reduced by:
•
•
•
•
Proper mounting and dismounting of the trampoline
Jumping at the center of the mat without traveling toward the side
Properly installing the frame pads
Properly installing the safety enclosure
Simple frame pads or spring covers on their own do not give adequate protection. Installing the JumpSport Safety
Enclosure and using spotters, will greatly reduce the risk of injury.
Bouncing off the Trampoline
Bouncing off of the trampoline can be controlled, if not completely eliminated, through:
•
•
•
•
•
•
Proper instruction and mastering of the “Stop Bounce” technique in the “Basic Skills” section
Maintaining a position in the center of the mat
Strictly forbidding any “flying dismounts” (i.e. jumping off of the trampoline onto another object or the ground)
Installing a JumpSport Safety Enclosure
Using spotters
Using the trampoline only with mature, knowledgeable supervision
Keep objects away from the trampoline. It is dangerous to jump from the trampoline to the floor or ground. Do not jump
from the trampoline into a swimming pool, onto a swing, or any other object. Do not install the trampoline on concrete,
asphalt or hard compacted surfaces.
Landing Incorrectly on the Mat
Landing incorrectly on the mat creates great risk of a serious injury, with most injuries resulting from attempted
somersaults/flips. It is strongly recommended that somersaults/flips are not performed.
24
Use Instructions
5
Safety Rules
It is the responsibility of the owner to become familiar with the safety rules and to convey these rules to all users.
WARNING
•
•
•
•
•
•
•
•
•
•
•
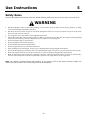
•
DO NOT attempt or allow somersaults. Landing on your head or neck can cause serious injury, paralysis, or death,
even when landing in the middle of the bed.
DO NOT allow more than one person inside the trampoline enclosure. Use by more than one person at the same
time can result in serious injuries.
Use trampoline only with mature, knowledgeable supervision.
Inspect the trampoline enclosure before each use. Make sure the barrier and the enclosure support (frame) padding
is correctly and securely positioned. Replace any worn, defective, or missing parts.
Do not attempt to jump over the barrier.
Do not attempt to crawl under the barrier.
Do not intentionally rebound off the barrier.
Do not hang from, kick, cut or climb on the barrier.
Wear clothing free of drawstrings, hooks, loops or anything that could get caught in the barrier.
Do not attach anything to the barrier that is not a manufacturer-approved accessory or part of the enclosure system.
Enter and exit the enclosure only at the enclosure door or barrier opening designated for that purpose.
Read all instructions before using the trampoline enclosure. Warnings and instructions for the care, maintenance,
and use of this trampoline enclosure are included to promote safe, enjoyable use of this equipment.
Note: The “barrier” mentioned above and elsewhere in this manual, refers to the safety enclosure netting. The
“frame” mentioned refers to the rail assembly pieces of the trampoline.
25
Use Instructions
Basic Skills
Basic trampoline skills include:
•
•
•
•
Bouncing
Stop Bounce
Arm Action
Bounce Variations
Bouncing
The most important basic skill in jumping on a trampoline, is controlling the height and landing of your bounce. The
goal is to land in the center of the mat, or as close to the center of the mat as possible. The basic bounce should always
being low. High, reckless bouncing should never be allowed.
Stop Bounce
The Stop Bounce technique allows the jumper to gain control by stopping quickly. It is done by keeping the feet in
contact with the mat, and absorbing the rebound of the trampoline with the knees and waist. This skill should be learned
right away and should be employed whenever you feel out of balance, or land away from the center area.
To learn the Stop Bounce:
1.
2.
3.
4.
Stand in center of the mat with your feet about hip-width apart.
Attempt three easy bounces; keep them low and controlled.
Focus your eyes toward the perimeter of the trampoline while bouncing, in order to keep your balance
Stop the bounce when your feet contact the mat by bending at your knees and hips.
Arm Action
Arms are very important for proper control and lift. Whenever you go up, your arms go up. They go up to a set position
about shoulder height and shoulder width. They should remain in this balanced position until you start to go down.
Then they circle down slightly behind the hips, ready to lift again as you bounce up. See Figure 2.
Figure 2 Arm Action
26
Use Instructions
Bounce Variations
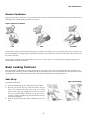
Figure 3 shows three variations you can perform in the air. These should be performed at the top of your bounce before
returning to the normal landing position on your feet.
Figure 3 Bounce Variations
Tuck
Pike
Straddle
Practice these simple variations and concentrate on perfect form. When you are in position, make sure you point your
toes and straighten your fingers (Pike and Straddle variations). Also make sure you take off and land in the same spot on
the center of the mat.
These simple variations to the basic bounce can be a lot of fun, and are very important for gaining experience in
coordinated movement and balance.
Basic Landing Positions
Once the jumper understands the body placement of the position, the drop can be performed after “priming” the
trampoline mat. Priming is done by bending the knees and pushing down on the trampoline mat several times, thereby
setting the mat in motion. The feet stay in contact with the mat during the entire priming motion.
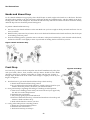
Seat Drop
Figure 4 Seat Drop
To perform a Seat Drop:
1. From the standing position, prime the mat several times.
2. Pick up your feet at the top of the last bounce, and sit
down. You should land with your body in a seated
position with your legs straight out in front of you and
your toes pointed. Hands should be on the mat next to
your hips. Fingers should be together and pointed toward
your feet. See Figure 4.
3. Push on the mat with your hands to rebound up to your
feet.
27
Use Instructions
Hands and Knees Drop
To do a Hands and Knees Drop properly, there should be just as much weight on the hands as on the knees. The back
should be about parallel to the mat. The knees and hands should land simultaneously, with the middle of the body
landing in the center of the trampoline. The hands should be directly under the shoulders. The knees should be directly
under the hips. The toes should be pointed. See Figure 5.
To perform a Hands and Knees Drop:
1. Get down on your hands and knees on the mat. Make sure you have weight on both your hands and knees. Do not
sit on your heels.
2. Remain in this position and try to bounce. Do not rock back and forth between the hands and knees, but develop an
even landing on all four points.
3. From the standing position, prime the mat several times. Lift upward with the hips, reach forward with the hands,
and land on all fours. Look slightly in front of your hands on landing. Push to rebound to your feet.
Figure 5 Hands and Knees Drop
Front Drop
Figure 6 Front Drop
In a front drop, contact with the trampoline mat should simultaneously take place
with your hands, elbows, chest, stomach, and hips. Knees should be bent. Hands
should be placed close together with palms in contact with the mat, forming a
triangle. Eyes should focus on the center of the triangle or slightly in front of your
fingers. See Figure 6.
1. First learn how to go from the hands and knees drop to the front drop.
a. Start from the hands and knees drop position.
b. As you rebound from the hands and knees, stretch so that you land on your
stomach. From this position, rebound to your hands and knees.
2. Next, perform Step 1, beginning and ending in a standing crouched position.
a. Start from a standing position with your knees bent and your upper body
low and close to the trampoline mat.
b. Prime the mat several times.
c. Lift your hips gently upward and backward.
d. Land in a hands and knees drop, rebound and stretch into a front drop, and
return to a hands and knees drop.
e. Push with the hands to return to your feet.
3. Lastly, perform Step 2 from a standing position.
a. Start from a straight standing position.
b. Prime the mat several times.
c. Perform a Front Drop as in Step 2.
28
Use Instructions
Front Drop Note: Your body must contact the trampoline mat all at once. If you land on your chest and arms first,
they will rebound before the knees hit, which will result in a straining action on the back. If this type of landing is
made with a traveling, diving approach, there is a good chance that the elbows may become skinned. If the landing
is made so that the knees and hips hit first, then they will rebound and you will land heavily on your shoulders and
face.
Series of Drops
Once you have mastered the individual bounce variations and drops, try performing them in sequence. For example:
Seat Drop—Hands and Knees Drop—Front Drop or Seat Drop—Hands and Knees Drop—Seat Drop.
Twisting Moves
Twisting moves include:
•
•
•
Swivel Hips
Turntable
Twist Variations
Swivel Hips
A Swivel Hips is a combination move consisting of a Seat Drop, half twist, then another Seat Drop.
1. First become familiar with the first part of a Swivel Hips.
a. Perform a seat drop.
b. Push down on the mat with the hands and straighten in the air with your arms stretched over your head.
2. Next, add the half twist.
a. Perform Step 1. As you rebound up to your feet, move one shoulder in the direction you want to twist.
b. Finish standing with arms stretched overhead, facing the opposite direction (180 degree twist completed).
3. Last, try the complete Swivel Hips twist. See Figure 7.
a. Perform a Seat Drop.
b. As you rebound with your arms overhead, twist around to face the opposite direction.
c. Land in another Seat Drop.
Figure 7 Swivel Hips
29
Use Instructions
Turntable
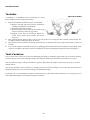
A Turntable is a combination move consisting of a Front
Drop, a Half Twist, then another Front Drop.
1.
2.
3.
4.
Figure 8 Turntable
First become familiar with the first part of a Turntable.
a. Begin in a hands and knees position, with hands
forming a triangle, like a Front Drop.
b. Prime the mat in this position.
c. Push backward with your hands and extend your
body to land in the Front Drop position.
d. Repeat several times in succession: Hands and
Knees Drop—Front Drop—Hands and Knees
Drop, etc.
Next, perform the movement in Step 1, but at twice the speed so as to bring the knees inward, under the hips and
out again without touching the knees on the mat.
Now, perform the movement in Step 2, but push sideways on the mat so that your body rotates before you land on
the mat.
Last, try the complete Turntable twist from a standing position. Prime the mat and perform a Front Drop. Push
sideways, complete a 180 degree rotation, and finish in a Front Drop facing the opposite direction. See Figure 8.
Twist Variations
You can have hours and hours of fun and challenging bouncing by combining twists with each of the basic landing
positions (Drops). You can twist after the landing. For example: Seat Drop with a half twist and land on your feet.
You can add more twists. Always remember to practice and perfect the simpler twists before moving on to more
complex twists.
You can also perform a series of twists. For example: perform several Swivel Hips in a row, all in the same direction or
alternate directions. You can do the same thing with Turntable twisting.
If you find you love the trampoline and have mastered the moves discussed in these instructions, we encourage you to
seek additional training from a certified trampoline instructor.
30
One Year Limited Warranty
What is covered by this warranty? This warranty covers any defects in materials or workmanship on all of the components
of the JumpSport Safety Enclosure Model 180, and is extended exclusively to the original retail purchaser.
How long does this coverage last? Warranty coverage for each component begins from the original date of purchase and
lasts for 1 year.
What will JumpSport do? If you return the defective part to JumpSport, as instructed below, JumpSport will either repair or
replace such part, at JumpSport’s discretion, and return it to you.
What is not covered by this warranty? This warranty does not cover expenses of on-site labor, travel, assembly or
disassembly, or other charges associated with the repair or replacement of covered components. This warranty also does not
cover any problem that is caused by abuse, misuse, commercial or public use, ordinary wear and tear, weathering, acts of God
(such as wind and lightning), failure to follow directions, improper installation, or improper maintenance. Rust is a natural
occurrence with any outdoor steel product and is likewise not covered by this warranty, to the extent that it does not affect the
structural integrity of the part.
JUMPSPORT IS NOT RESPONSIBLE OR LIABLE FOR INDIRECT, SPECIAL, OR CONSEQUENTIAL DAMAGES ARISING
OUT OF OR IN CONNECTION WITH THE USE OR PERFORMANCE OF THE PRODUCT OR OTHER DAMAGES WITH
RESPECT TO ANY LOSS, INCLUDING BUT NOT LIMITED TO ECONOMIC LOSS, LOSS OF PROPERTY, LOSS OF
REVENUE OR PROFITS, LOSS OF ENJOYMENT OR USE, COST OF REMOVAL, INSTALLATION OR OTHER
CONSEQUENTIAL DAMAGES. SOME STATES DO NOT ALLOW THE EXCLUSION OR LIMITATION OF INCIDENTAL OR
CONSEQUENTIAL DAMAGES. ACCORDINGLY, THE ABOVE LIMITATION MAY NOT APPLY TO YOU.
THE WARRANTY EXTENDED HEREUNDER IS IN LIEU OF ALL OTHER WARRANTIES AND ANY IMPLIED WARRANTY
OF MERCHANTABILITY OR FITNESS FOR A PARTICULAR PURPOSE IS LIMITED IN ITS SCOPE AND DURATION TO
THE TERMS SET FORTH HEREIN. SOME STATES DO NOT ALLOW LIMITATIONS ON HOW LONG AN IMPLIED
WARRANTY LASTS. ACCORDINGLY, THE ABOVE LIMITATION MAY NOT APPLY TO YOU.
How to get a defective part replaced:
1)
2)
3)
Call the JumpSport Customer Service department at 408-213-2551 to obtain a Return Authorization number. All returns
must be pre-authorized.
Send the part(s) to the designated Service Center, along with a copy of your original sales receipt and a brief written
description of the problem, including how it occurred. You must pay freight and insurance to return the part to JumpSport. At JumpSport’s sole discretion, we may ask you to send photographs in addition to or in lieu of returning the part.
After inspecting the returned part(s), JumpSport will make a final determination whether the part is covered by this
warranty. We reserve the right to examine photographs or physical evidence concerning parts claimed to be defective prior
to making a final determination concerning the claim. A repaired or replacement part will be returned to you. Please allow
3 to 4 weeks for delivery.
This warranty gives you specific legal rights. You may also have other rights which vary from state to state.
31
JumpSport, Inc.
2055 South 7th Street, Suite A
San Jose, CA 95112
408-213-2551
http://www.jumpsport.com
32