1
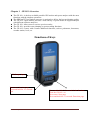
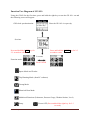
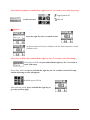
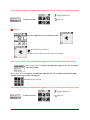
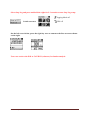
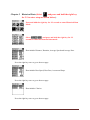
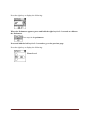
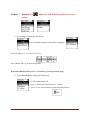
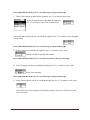
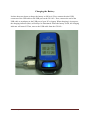
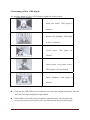
G-PORTER Portable GPS Tracker GP-102+ User’s Manual Canmore Corporation www.canmore.com.tw Chapter 1 GP-102+ Overview The GP-102+ is the best available portable GPS tracker and sports analyzer with the most functions with the simplest operations. The SiRFstarIV™ navigation processor is equipped to deliver the best positioning quality. The GP-102+ sports tracker provides a wide variety of sports modes to support analysis with different software analyzers. The GP-102+ allows users to retrieve previous tracks. The GP-102+ provides route planning or sports tracking functions. The GP-102+ comes with versatile additional functions, such as pedometer, barometer, weather station, level, etc. Functions of Keys 5V Charger Input Press once: Previous page Press and hold for 2-3 seconds: Exit Canmore Corporation Press and hold for 2-3 seconds for the first time: Turn the GP-102+ on. Press once: Next page Press and hold for 2-3 seconds: Enter that page. www.canmore.com.tw Function Tree Diagram of GP-102+ Using the GP102 for the first time, press and hold the right key to turn the GP-102+ on and the following screen will appear: GPS clock synchronization: Place the GP-102+ in open sky. Set time: Press and hold the LEFT key for 2-3 seconds to call out. Press and hold the RIGHT key for 2-3 seconds to enter. 2 screens Function mode: Press UP/DN Sports Mode and Tracker Trip Planning Mode (from PC software) Geotag Mode Historical Data Mode Additional Functions (Pedometer, Pressure Gauge, Weather Station, Level) Setup Canmore Corporation Power OFF (Press and hold the right key for 2-3 seconds) www.canmore.com.tw Chapter 2 Sports Mode and Tracker (Options: Press and hold the right key for 2-3 seconds to enter the following pages) Press and hold the right key for 2-3 seconds to enter the Sports Mode. Sports and Travel Options The following examples are based on the jogging mode . Press and hold the right key for 2-3 seconds to enter the jogging mode : █ Data 1 : Jogging Mode. GPS Signal Meter. Charging As shown on the left screen, Distance is 320m, Average Speed is 4.5km/h and the sports Duration is 4 minutes and 14 seconds. Select Save as POI. (Press and hold the right key for 2-3 seconds to enter POI setup) Select Save as POI and press and hold the right key for 2-3 seconds to enter POI setup. Select Save as POI and press and hold the right key for 2-3 seconds to enter POI setup and the following screens will appear: Available types of POIs. After selecting a POI, press and hold the right key to go to the previous page. Canmore Corporation www.canmore.com.tw Select Stop Log and press and hold the right for 2-3 seconds to enter Stop Log setup. Jogging Mode off Switch screen to GPS off █ Data 2 : Press the right key once to switch screen. As shown on the left screen, Speed is 0 km/h, Average Speed is 8km/h and Maximum Speed is 9.2 km/h. Select Save as POI. (Press and hold the right key for 2-3 seconds to enter POI setup) Select Save as POI and press and hold the right key for 2-3 seconds to enter POI setup. Select Save as POI and press and hold the right key for 2-3 seconds to enter POI setup and the following screens will appear: Available types of POIs. After selecting a POI, press and hold the right key to go to the previous page. Canmore Corporation www.canmore.com.tw Select Stop Log and press and hold the right key for 2-3 seconds to enter Stop Log setup Jogging Mode off Switch screen to GPS off █ Data 3 : Press the right key once to switch screen As shown on the left screen, Pace is hours/km, Average Pace is 7.5 hours/km and Minimum Pace is 6.5 hours/km. Select Save as POI. (Press and hold the right key for 2-3 seconds to enter POI setup) Select Save as POI and press and hold the right key for 2-3 seconds to enter POI setup. Select Save as POI and press and hold the right key for 2-3 seconds to enter POI setup and the following screens will appear: Available types of POIs. After selecting a POI, press and hold the right key to go to the previous page. Canmore Corporation www.canmore.com.tw Select Stop Log and press and hold the right key for 2-3 seconds to enter Stop Log setup. Jogging Mode off Switch screen to GPS off █ Data 4: Press the right key once to switch screens As shown on the left screen, Altitude is 60.3m, Total Ascend is 8.4 and Gradient is 0%. Select Save as POI. (Press and hold the right key for 2-3 seconds to enter POI setup) Select Save as POI and press and hold the right key for 2-3 seconds to enter POI setup. Select Save as POI and press and hold the right key for 2-3 seconds to enter POI setup and the following screens will appear: Available types of POIs. After selecting a POI, press and hold the right key to go to the previous page. Canmore Corporation www.canmore.com.tw Select Stop Log and press and hold the right key for 2-3 seconds to enter Stop Log setup. Jogging Mode off Switch screen to GPS off █ Data 5 Press the right key once to switch screens As shown on the left screen, Calories consumed is 57.1, Steps are 25 and Temperature is 28°C. Select Save as POI. (Press and hold the right key for 2-3 seconds to enter POI setup) Select Save as POI and press and hold the right key for 2-3 seconds to enter POI setup. Select Save as POI and press and hold the right key for 2-3 seconds to enter POI setup and the following screens will appear: Available types of POIs. After selecting a POI, press and hold the right key to return to the previous page. Canmore Corporation www.canmore.com.tw Select Stop Log and press and hold the right key for 2-3 seconds to enter Stop Log setup. Jogging Mode off Switch screen to GPS off █ Data 6 : Press the right key once to switch screens. A POI has been selected. As shown on the left screen, the object is moving. Select Save as POI. (Press and hold the right key for 2-3 seconds to enter POI setup) Select Save as POI and press and hold the right key for 2-3 seconds to enter POI setup. Select Save as POI and press and hold the right key for 2-3 seconds to enter POI setup, and the following screens will appear: Available types of POIs. Select Stop Log and press and hold the right key for 2-3 seconds to enter Stop Log setup. Jogging Mode off Switch screen to Canmore Corporation GPS off www.canmore.com.tw After selecting, press and hold the right key to return to the previous page. Select Map Scale and press and hold the right key for 2-3 seconds to enter Map Scale. After selecting, press and hold the right key to go to the previous page. █ Data 7 Press the right key once to switch screens. The GPS status is as shown on the left screen. Select Save as POI. (Press and hold the right key for 2-3 seconds to enter POI setup) Select Save as POI and press and hold the right key for 2-3 seconds to enter POI setup. Select Save as POI and press and hold the right key for 2-3 seconds to enter POI setup and the following screens will appear: Available types of POIs. After selecting, press and hold the right key to go to the previous page. Canmore Corporation www.canmore.com.tw Select Stop Log and press and hold the right for 2-3 seconds to enter Stop Log setup. Jogging Mode off Switch screen to GPS off On the left screen below, press the right key once to return to the first screen as shown on the right. Users can retrieve the POI to CANWAY (software) for further analysis. Canmore Corporation www.canmore.com.tw Chapter 3 Trip Planning (Select and press and hold the right key for 2-3 seconds to enter and set trip planning). 1. First, edit the required routes on the CanWay Planner. 2. Upload data to the GP-102+ with the Sync function. Canmore Corporation www.canmore.com.tw 3. Route upload in progress. 4. Press and hold the right key to enter Trip Planning. Next, the route uploaded from the PC is shown on the screen as Test 1. 5. The GP-102+ receives GPS signals in open sky. After your position is detected, press and hold the right key to enter route Test 1. 6. Press and hold the right key to call out Save as POI and Map Scale. Select Save as POI to save data as a POI. Select Map Scale to adjust map display scale. Canmore Corporation www.canmore.com.tw 7. Press and hold the right key to enter Map Scale and press the left and right keys to adjust the map scale. 8. After adjusting the map scale, the route planned in Test 1 will be displayed on the map. If a POI is set in the CanWay Planner, it will be displayed on the map at the same time. Press and hold the left key for 2-3 seconds to return to Home. Canmore Corporation www.canmore.com.tw Chapter 4 Geotag Mode (Select and press and hold the right key for 2-3 seconds to enter setup as shown below.) Press and hold the right key for 2-3 seconds to enter POI setup. After setting a POI, turn the GPS on . : The POI set at 14:01 on April 11. Select New POI: Press and hold the right key for 2-3 seconds to enter POI setup Select POI type. Select : Press and hold the right key for 2-3 seconds. The direction, distance, and altitude of POI set at 15:45 on April 11 from the present location. The relative position of the POI and current location. Press and hold the right key for 2-3 seconds to enter Map Scale setup. Press and hold the left key for 2-3 seconds to return to the previous screen. Canmore Corporation www.canmore.com.tw The new POI has been added to the GP-102+. Press and hold the left key for 2-3 seconds to return to Home. Canmore Corporation www.canmore.com.tw Chapter 5 Historical Data (Select and press and hold the right key for 2-3 to enter setup as shown below.) Press and hold the right key for 2-3 seconds to enter Historical Data Mode. Select and press and hold the right key for 2-3 seconds to enter the historical data mode. Data include Distance, Duration, Average Speed and Average Pace. Press the right key once to go to the next page. Data include Best Speed, Best Pace, Ascent and Steps. Press the right key once to go to the next page. Data include Calories. Press the right key once to go to the next page. Canmore Corporation www.canmore.com.tw Please refer to the track on the left screen. Press and hold the right key for 2-3 seconds to enter the Follow Historical Data mode. Select Follow and press and hold the right key for 2-3 seconds to enter the Follow Historical Data mode Select Map Scale and press and hold the right key for 2-3 seconds to enter the Map Scale setup. When the Follow sign appears, follow the track as shown on the left screen to return to the origin. Press and hold the left key for 2-3 seconds to return to Home. Canmore Corporation www.canmore.com.tw Chapter 6 Extra Function Mode (Select key to enter setup.) and press and hold the right When your compass appears on the screen, press and hold the right key for 2-3 seconds to calibrate the compass. Rotate the GP-102+ as shown for 20 seconds. Press and hold the left key for 2-3 seconds to return to the previous page. Press the right key to display the following. The atmospheric pressure is shown on the Barometer. Press the right key for 2-3 seconds to calibrate the altimeter. Select Auto by GPS (reset altimeter automatically by GPS) Select Manual (reset altimeter manually) Press and hold the left key for 2-3 seconds to go to the previous page. Press the right key to display the following: Weather conditions. Canmore Corporation www.canmore.com.tw Press the right key to display the following: When the Pedometer appears, press and hold the right key for 2-3 seconds to calibrate the Pedometer. Clear steps in the pedometer. Press and hold the left key for 2-3 seconds to go to the previous page. Press the right key to display the following: Water Level. Canmore Corporation www.canmore.com.tw Chapter 7 Setup (Select setup) and press and hold the right key to enter 1. Select Log to display the following: Select Log Rule and press and hold the right key. Select Log Rule: by Time and by Distance Select Delete All Log to clear all log data. Press and hold the left key for 2-3 seconds to go to the previous page. 2. Select Auto Pause to display the following: Off: Turn Auto Pause off. Stopped: Pause when speed is below 1.5kmh. Custom: Users can customize speed and related pause. Canmore Corporation www.canmore.com.tw 3. Select User Profile to display the following: Gender Birth Year Weight 4. Select Calibration (altimeter and compass) to display the following: Select Altimeter and press and hold the right key to display the following: Select Auto by GPS (reset altimeter automatically by GPS) Select Manual (reset altimeter manually) Select Compass and press and hold the right key to display the following: Rotate the GP-102+ as shown for 20 seconds. Canmore Corporation www.canmore.com.tw 5. Select GPS (set GPS status) to display the following: Differential GPS: Turn Differential GPS on or off. Self-AGPS: Turn Self-AGPS on or off. Power Saving: Turn Power Saving on or off. Press and hold the left key for 2-3 seconds to go to the previous page. 6. Select System (set System status) to display the following: A. Select Display and press and hold the right key for 2-3 seconds to enter setup. Select Backlight press and hold the right key for 2-3 seconds to enter Backlight setup. Available options in include Always On, 10 seconds, and 30 seconds. Select Contract and press and hold the right key for 2-3 seconds to enter Contrast setup. Set display contrast. Press and hold the left key for 2-3 seconds to go to the previous page. B. Select Power Down and press and hold the right key for 2-3 seconds to enter setup. Set G-Sensor to on and off; i.e., the system will enter the sleep mode if there is no motion for 5 minutes. Canmore Corporation www.canmore.com.tw Press and hold the left key for 2-3 seconds to go to the previous page. C. Select Time and press and hold the right key for 2-3 seconds to enter setup. Select Format and press and hold the right key for 2-3 seconds to enter Time Format setup Select Daylight Saving and press and hold the right key for 2-3 seconds to enter Daylight Saving setup. Press and hold the left key for 2-3 seconds to go to the previous page. D. Select Units press and hold the right key for 2-3 seconds to enter setup. Options include: km/m/kg and mi/ft/lb. Press and hold the left key for 2-3 seconds to return to the previous page. E. Select Language and press and hold the right key for 2-3 seconds to enter setup. Select your language. Press and hold the left key for 2-3 seconds to go to the previous page. F. Select Factory Reset and press and hold the right key for 2-3 seconds to enter setup. Select YES to reset all settings to the default settings. Next, turn off the power and restart GP-102+. Canmore Corporation www.canmore.com.tw Appendix The package includes the following items: GP-102+ Software Disc/ User’s Manual USB Cable Precautions Keep the GPS receiver away from children’s reach. It contains small parts that may come off the unit and cause suffocation. Follow all safety regulations for electronic devices and turn off electrical devices or RF products when requested. This product uses a lithium battery. Keep away from fires and high temperatures. Improper disposal of waste equipment or battery may cause explosion. Dispose of or recycle the battery as instructed. Please call your local recycling centers for details. Canmore Corporation www.canmore.com.tw Charging the Battery It takes about two hours to charge the battery to full level. First, connect the mini-USB connector of the USB cable to the USB port on the GP-102+. Next, connect the end of the USB cable to an adaptor or the USB port of your PC or laptop. When charging is in progress, the charging indicator (blue) will always be illuminated. When the battery is full, the charging indicator will turn off. Then, remove the USB cable from the GP-102+. Canmore Corporation www.canmore.com.tw Battery Warning If you do not follow the instructions below, you may risk shortening the battery life and causing a fire, chemical burn, electrolyte leakage or other damage. 1. Operating temperature :-20°C to 60°C (-4°F to 140°F) Charging temperature: 0°C to 45°C (32°F to 113°F), using GP-101. 2. Storage temperature: -10°C to 45°C (14°F ~ 113°F). Charging Power Supply To ensure safety, please charge your GP-102+ with the following power sources: Standard PC or laptop USB port. Car USB adaptor: Input 12V; Output 5.0V. Indoor USB adaptor: Input 110/220VAC; Output 5.0V. Canmore Corporation www.canmore.com.tw FAQ Q1: Why can’t I find my position with my GP-102+? A1: Please make sure that you are using your GP-102+ in open sky and the LCD screen is facing upward. Q2: Why does my GP-102+ sometimes work very fast and sometimes very slowly? A2: If you have used your GP-102+ in open sky within the past two hours, it works really fast; otherwise, you will need to wait for 30-40 seconds to find your position. It will take a longer time (a few minutes) if you are under a tree shade, inside a tall building, or in places with weak GPS signal. Q3: Why does the compass work incorrectly? A3: First, calibrate the compass on the GP-102+ and make sure that there are no metal objects around. The GP-102+ works with a magnetic sensor which is easily affected by metals. Q4: Why is the direction incorrect inside a slowly moving car? A4: When the speed is below 10km/h, the GP-102+ will calculate the direction of the destination with the built-in digital compass. If you are inside a car, the metal body of the car may interfere with the compass operations. When the speed is over 10km/h, the GP-102+ will calculate the direction of the GPS. By placing the GP-102+ horizontally in the car, it will point to the destination correctly. Q5: How does the satellite signal level meter work? A5: The strength of the satellite signals affects positioning accuracy. When the signal is strong, the GP-102+ can find your position more accurately. In places with weaker signals, you may need to wait some time for the signal to ensure positioning accuracy. Q6: Will the GP-102+ store my POIs after I turn it off? A6: You may turn the GP-102+ off to save power, all POIs will be stored. When you turn it on again, the GP-102+ will display the last mode you used. Even if the battery is out, the GP-102+ will store all settings. Canmore Corporation www.canmore.com.tw Concerning of Poor GPS Signal It is possible unable to receive GPS signal or signal low in these places: Inside the tunnel, GPS signal is blocked. Beside some buildings, GPS signal is low or disturbed. Covers above, GPS signal are blocked. Inside forests, or too many covers, GPS signal is low or disturbed. Inside buildings, GPS signal is blocked. If you use the USB GPS Receiver inside the car, some anti-sunlight windscreen film will make the GPS signal degraded or signal blank. GPS satellite is owned by America military; sometimes they will tune-down the accuracy by some reason. In such cases, the GPS position may not fixed exactly. Canmore Corporation www.canmore.com.tw Used equipment must be disposed of in compliance with current environmental protection regulations. You should return it to your reseller or dispose of it in an approved recycling centre. DECLARATION: We hereby declare that this product complies with essential requirements and other related requirements, of the 1999/5/EC R&TTE directive and particularly with article 3 sections 1a, 1b and 3. Canmore Corporation www.canmore.com.tw Warranty Card Thank you for purchasing CANMORE products. The GP-102+ is a portable GPS tracker independently developed by CANMORE. Before shipping out of the factory, each unit has been tested to comply with related quality and regulatory requirements. CanMore provides the following warranty for this product. 1. CanMore shall provide one year free repair and maintenance service as of the date of purchase for product failures from normal use. 2. The exceptions of the warranty shall include: A. Force majeure, such as natural disasters, fire, earthquake, etc and human negligence. B. Users have disassembled and/or modified the unit. C. Natural wear and tear of components and consumables. D. Failure and/or damage due to handling and being dropped after purchase. E. Failure and/or damage after warranty has expired. F. Alteration or forgery of any part of this warranty. 3. If you have any problems or need to have your GP-102+ repaired, please contact your dealer or CanMore. Canmore Corporation www.canmore.com.tw