1
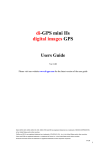
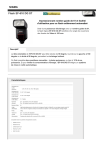
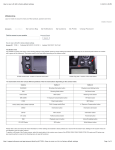
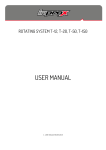
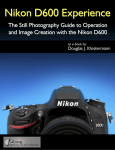
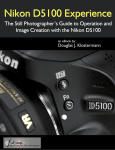
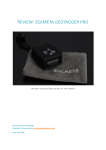
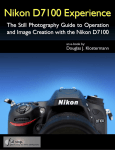
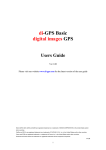
R
GEOTAGGER N3
User Manual (V1.0)
Solmeta Technology Co., Ltd
Copyright ©2011 Solmeta Technology Co., Ltd. All Rights Reserved
Solmeta geotagger N3
R
Contents
Safety Information........................................................................................................ 1
Introduction................................................................................................................. 2
Packing list................................................................................................................... 3
Product view................................................................................................................. 4
How to use the N3 with Nikon camera?.............................................................................. 5
Warranty...................................................................................................................... 8
Specification................................................................................................................. 9
Compass calibration...................................................................................................... 10
Mounting illustration......................................................................................................11
Contact/Service............................................................................................................12
R
Solmeta geotagger N3
Safety Information
To prevent damage to the GPS unit or injury to you or to others, please read the following safety instructions before
using this equipment.
Do not disassemble
Touching the product’s internal parts could result in injury. In the event of malfunction, the products should be
repaired only by a qualified technician. Any unauthorized disassembly or modification may void the unit’s warranty.
Keep the GPS unit dry
Do not immerse in or expose to water or handle with wet hands. Exposing the GPS unit to water could result fire or
electric shock.
Do not subject to high temperatures
The GPS unit can be damaged by exposure to fire or high temperatures. Do not leave the unit in areas subject to
extremely high temperatures. Failure to observe this precaution could result in damage to the casing or internal
circuitry, and could potentially cause a fire.
Keep out of reach of children
Failure to observe this precaution could result in injury.
FCC/CE Certificate
1
R
Solmeta geotagger N3
Introduction
Thank you for your purchase of a Solmeta Geotagger N3 unit, a photo-GPS that records the latitude, longitude,
altitude, heading and Coordinated Universal Time (UTC) with your photographs. With the supported cameras,
this information is embedded directly within the images as they are taken.
This guide explains how to use the Geotagger N3 to geotag your photos. For further information please visit
www. Solmeta.com
Features:
• The real time geographical information is recorded to the EXIF metadata of the image file.
• 3-axis electronic compass provides accurate heading data that is stored in the image file.
The compass can be calibrated.
• High sensitivity, capture the GPS signal quickly.
• Power from camera directly, very low power consumption. A special work mode applied for low power consumption
and maximum latest GPS data using.
• “Indoor fixed”, automatically re-use the last received GPS information when there is no GPS signal.
• Shutter release socket, allows you to use the remote trigger when the remote terminal is used by Geotagger
N3. (A remote cord for remote shutter release is free provided in package)
• “Wake up” and “sleep” working mode, which make it is possible for “camera off and GPS stays on”.
• Multi-model can be used with: Nikon D3-series, D700, D300-series, D2X, D2XS, D2HS, D200, D90, D5000,
D7000, D3100 and D5100.
• Geotagger N3-A can be used with Nikon D3-series, D700, D300-series, D2X, D2XS, D2HS, D200
• Geotagger N3-B can be used with Nikon D90
Geotagger N3-C can be used with Nikon D5000, D7000, D3100, D5100
•
Note
The Geotagger N3 is not equipped with a battery or on/off switch: power is supplied from the camera.
The Geotagger N3 turns off only when the cable connecting it to the camera is disconnected; even when the camera
is off,the Geotagger continues to receive GPS data. For more information, see““Wake up” and “sleep” working
mode”in page 6.
2
R
Solmeta geotagger N3
Geotagger N3-A can be used with Nikon D3-series, D700, D300-series, D2X, D2XS, D2HS, D200
Geotagger N3-B can be used with for connection to Nikon D90
Geotagger N3-C can be used with Nikon D5000, D7000, D3100, D5100
The illustration shows the items of one package of Geotagger N3-A.
3
R
Solmeta geotagger N3
Product view
Connector
Shutter release socket
Stauts LED
Calibration button
Hot shoe connector
4
R
Solmeta geotagger N3
How to use the Geotagger N3 with Nikon camera?
1. Connect the Geotagger N3 to a Compatible DSLR Camera, check the connection
1. Turn the camera off.
2. Mount the Geotagger N3 on the camera by sliding its base into the flash hot shoe or by using the supplied
strap adapter to attach it to the camera strap. Then insert the connector to the camera’s GPS terminal.
3. Turn the camera on, a blinking GPS icon will be displayed in the camera’s control panel and the LED on the
Geotagger N3 will be red flashing. If there is no GPS icon or no red LED flashing, check the connection.
2. Obtain a GPS fix
1. With the camera on and the LED on the Geotagger N3 red flashing, go to an open outside space, holding
the camera in one of your hand and stand still.
2. Within 1 minute, the red flashing LED will change to green flashing, then the green flashing will be steady.
Meanwhile, the blinking GPS ICON in the camera’s control panel will be steady. This means that the Geotagger
N3 is GPS fixed and ready to provide the current GPS data to the camera. (At the initialize stage, the Geotagger
N3 usually needs 1 minute to obtain a GPS fix, but once the GPS fixed, it will only takes a few seconds for reacquisition even in a weak signal environment.)
3. Take photos and get the GPS data recorded in the photograph.
1. Take photos as normal, GPS and heading (direction) data will be recorded in the metadata of the photograph.
( If the heading data is not accurate, it is necessary to perform a compass calibration, please refer to the
calibration instruction in page 9 )
2. To view the GPS data recorded with each photograph, press the
button and display the photographs
full frame. The photo info display will contain a page listing GPS and heading data for the current photograph.
5
4.Tips
Turning Geotagger N3 on and Off
The Geotagger N3 is not equipped with a battery or on/off switch: power is supplied from the camera. The Geotagger N3
totally turns off only when the cable connecting it to the camera is disconnected. Even when the camera or exposure
meters are off, the Geotagger N3 periodically acquires GPS data for three hours. (See “wakeup” and “sleep” working
mode below)
“Wake up “ and “sleep” work mode
In order to avoid drain out camera’s battery very quickly and use the maximum latest GPS data, a “wake up” and “sleep”
working mode applied on the GPS unit.
In your photographic day, if you turn the camera off but with the device connect. ( or the exposure meters is off );
In the first 1 hour, the device wakes up every 5 minutes for 1 minute continuous working no matter the GPS signal
captured or not. This helps to get more accurate data.
In the next two hours, the device wakes up every 5 minutes for 1 minute working. However, if the GPS signal captured
with 3D fix, GPS module will be shut down immediately for saving battery power.
If the camera and the exposure meters continue off after three hours, the Geotagger N3 will go to “deep sleep” with no
periodical working. Only when the camera is on, the Geotagger N3 goes to normal working.
“Indoor fixed” function
If you wish to take geotagged photos in situations where the GPS signal is lost after it was acquired, such as when going
indoors to continue shooting, the “Indoor fixed” function, will automatically reuse
the last known position for subsequent images. Under the circumstances, the GPS icon in the camera’s control panel is
steady but the LED on the Geotagger N3 is traffic lights flashing. Once the new fixed available, the Geotagger N3 will
immediately report the updated GPS data to the camera.
Status LED
7
R
Solmeta geotagger N3
Warranty
• Solmeta Technology Co., Limited guarantees its product from manufacturing defects and workmanship for a
period of two-year from the date of original purchase. During the two-year warranty, Solmeta Technology will
repair or replace the product free of charge. Please keep your original invoice as proof of purchase.
• Customers who have products covered under the warranty are required to contact Solmeta Technology by email ([email protected]) for troubleshooting issues before returning the product.
• Customers are responsible for shipping and insurance charges for returning the product to Solmeta Technology.
• Charges will be imposed for repairing product, which is out of warranty coverage or invalid warranty.
• The guarantee is not valid if defect is due to damage caused by incorrect use, poor maintenance or if persons
not authorized by Solmeta Technology have carried out alterations or repairs.
• For the device to be used correctly, the user should strictly adhere to all instructions included in the user guide
and should abstain from any actions or uses that are described as undesired or which are warned against in the
user guide.
Precautions for use
Do not drop: The product may malfunction if subjected to strong shocks or vibration.
Keep dry: This product is not waterproof, and may malfunction if immersed in or exposed to water.
Avoid sudden changes in temperature: Sudden changes in temperature, such as occur when entering or leaving a
heated building on a cold day, can cause condensation inside the device. To prevent condensation, place the
device in a carrying case or plastic bag before exposing it to sudden changes in temperature.
Keep away from strong magnetic fields: Do not use or store this device in the vicinity of equipment that generates
strong electromagnetic radiation or magnetic fields. Strong static charges or the magnetic fields produced by
equipment such as radio transmitters could affect the product’s internal circuitry.
A note on electronic devices: In extremely rare instances, a strong external static charge may cause the device to
stop functioning. Turn the camera off and disconnect and reconnect the Geotagger Pro. In the event of continued
malfunction, contact your retailer or Solmeta-authorized service representative.
Information in this document is subject to change without notice. Solmeta Technology reserves the right to
change or improve their products and to make changes in the content without obligation to notify any person or
organization of such changes or improvements.
8
R
Solmeta geotagger N3
Specification
9
R
Solmeta geotagger N3
Compass calibration
IMPORTANT: Before using the Geotagger N3, you must do the calibration. Repeat these procedures each time you
move the device and camera more than 100 miles or you are using the different cameras.
Why calibrate?
The compass in the device is sensitive to nearby magnetic objects that could cause measuring error. To compensate
for this error it is sometime necessary to perform a calibration. (If the compass is accurate, there is no need to
perform the calibration)
How to calibrate?
1. With the Geotagger N3 mounted on the camera’s hot shoe and connected with the camera, turn the camera
on, the LED on the Geotagger N3 will red flashing.
2. Short press the calibration button, the LED turns orange flashing.
3. Hold the camera and the N3 in your hand, rotate the device at X, Y, and Z axes direction. On each direction,
do the rotation clockwise and do the rotation twice. Please try to keep the rotation as a constant speed as you
can, and try to keep the device horizontally (leveled) at that direction you are busy with!
4. Each rotation takes 5-10 seconds.
5. After the rotation is completed, short press the calibration button again to end the calibration. The LED will
start red flashing.
Note
• Magnetic sensors are very sensitive to nearby magnetic objects, which can cause calibration errors and misreading.
Please keep the device away from magnetic source when perform a calibration.
• If the compass is not accurate after the calibration, please repeat above operations.
10
R
Solmeta geotagger N3
Mounting illustration
The Geotagger N3 connected to Nikon D200
The Geotagger N3 connected to Nikon D5100
11
R
Solmeta geotagger N3
Contact/Service
If you have any questions on or need help with our products please do not hesitate to get in
touch with our Technical Service. You can reach our service people by phone under the telephone
number indicated below from Monday through Friday from 9:00 am to 5:00 pm. Independently
of these service times you can also get in touch by e-mail;
Solmeta Technology
Tel: 0086 755 26969187
E-mail: [email protected]
www.solmeta.com
12
Shenzhen Solmeta Technology Company
Add: Room 327, Building 5, Zhong Xing Industrial Town,
Chuang Ye Road, Nan Shan district, Shenzhen,
518054,China
Tel: 0086-755-26969187
Fax: 0086-755-26969187
E-Mail: [email protected]
Web: www.solmeta.com