1
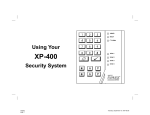
Using Your
XP-400
Security System
NAPCO
© 2005 NAPCO
OI300 1/05
1
XP-400_RPXP4GT_OI300.02_...
page 1
Friday, January 28, 2005 13:42
Composite
This page intentionally left blank
2
XP-400_RPXP4GT_OI300.02_...
page 2
Friday, January 28, 2005 13:42
Composite
Introduction
Congratulations on your purchase of an advanced NAPCO EXPRESS XP-400 Security System. Meticulously developed by
a leading manufacturer of state-of-the-art security products, this system will provide you with unprecedented peace-of-mind, and
incorporates some of the most sophisticated features available today. Above all, it has been designed with an extra step, to provide all those operating it with very easy, intuitive use. Please review the information contained in this manual, so that you and
all potential users of the system familiarize yourselves with its operation, and can therefore take full advantage of EXPRESS’
many convenient features and amenities.
Your system consists of a control panel (a computer housed within a white metal panel enclosure), one or more EXPRESS
Decorator Keypads for controlling the system, and various security detection devices. These detection devices are divided
among separate areas known as “zones”, set up throughout your premises. Each zone number corresponds to a zone light on
your Keypad’s black display area.
When a zone’s red light is ON (or lit), it indicates that one or more detection device(s) assigned to that area are active or open.
For example, if zone 1 is the front door, and it is open, the zone 1 light will be on. If zone 2 is a motion detector, and there is
movement in that area, zone light 2 will turn ON. Depending upon the actual layout your security professional has chosen to
properly protect your premises, each zone may function a little differently: The zone protecting your front door may be programmed as an Exit/Entry zone to allow you time to enter the premises and disarm the system without inadvertently sounding
the alarm. Alternatively, a zone protecting a window could be designated as an “instant” zone, so that if it is entered or opened
while the system is on/armed, there will be an immediate alarm.
Your easy NAPCO EXPRESS Keypad puts super-simple system control at your fingertips. Most keypad commands
involve entering your four digit User Code. This includes Arming (or activating) and Disarming (or deactivating) the system. Simply put, ARMED means the system is ON; DISARMED means the system is OFF. If the system is OFF and you want to turn it
ON, just enter your Code. To turn the system back OFF, enter your code again. It’s easy, just always remember, in the event
of an alarm, entering your User Code will silence all Sirens. Your keypad is your command and status center, it keeps you
informed visibly, using its zone and status lights (in the black display area) and audibly, using its built-in keypad sounder. For
more information, please see Keypad Controls and Indicators on page 5.
3
XP-400_RPXP4GT_OI300.02_...
page 3
Friday, January 28, 2005 13:42
Composite
Introduction
Table of Contents
Keypad Controls and Indicators ........................................ 5
Arming your System (When Leaving) ................................ 6
Bypassing Zones ............................................................... 6
Protecting Yourself While Home ........................................ 7
Emergency Keys ............................................................... 8
Disarming the System ....................................................... 9
Silencing an Alarm ............................................................. 9
Special Functions ............................................................ 10
Programming User Codes ............................................... 11
System Troubles .............................................................. 12
Glossary .......................................................................... 15
System Information
Central Station Phone Number: ____________________
Central Station Account Number: ____________________
For Service Call: ____________________
Entry Delay:
____________________
Exit Delay: ____________________
Alarm Time-out: ____________________
Important - Test Your System Weekly !
1
Bell / Battery Test
Test your bell or siren by pressing G followed by 1.
This will cause the bell, or siren to sound for 2 seconds
and also initiate a test of the battery.
2
Central Station Communication Test
(This test should only be performed on weekends or at a
time designated by your alarm company)
1. Notify Central Station of the impending test.
2. Secure all zones to light the W Light on your keypad.
3. Enter your user code to Arm the system.
4. Violate your alarm by opening a window / door etc.
5. The siren or bell should sound and the system will send
the alarm signals to the Central Station.
6. Enter your user code to silence the bell or sounder.
7. Call Central Station to insure that the alarm signals were
received properly.
4
XP-400_RPXP4GT_OI300.02_...
page 4
Friday, January 28, 2005 13:42
Composite
Keypad Controls and Indicators
* Key Used to enable
special functions and
options. Press *and
then the corresponding
Special Function number Option (See Special
Functions, Page 10)
Numerical Keys 1-9, 0. Used to enter
User Codes, Zone numbers, etc.
X Ready Light will light when all zones are secure and system is ready to be Armed.
H System Light will light and the Keypad
sounder will pulse to indicate that a system trouble is present. (See System troubles, Page 12)
I Fire Light will light and the Keypad sounder
will pulse to indicate that a fire has been detected in the system.
Y Power Failure will light and the Keypad
sounder will pulse to indicate the absence of AC
power at the control panel. Call for service.
Bypass Key Used to
bypass zones. Press
Bypass and the corresponding zone number,
and then Arm system.
Emergency Keys Press
simultaneously to signal
an emergency condition.
Press A+A for
Auxiliary Emergency or
P+P for Police Emergency. (Programmable)
W Armed Light will light when system is Armed,
and will flash when system is in Alarm.
Zone Lights (1 through 4) will light to indicate
that the corresponding Zone is open, and will
flash to indicate a zone in alarm.
! Key Press to display any present
System troubles. Only available when
H System Light is lit. (See System
troubles, Page 12)
#Key - (Reset) used to clear miss-entered
codes, reset Alarm Memory, etc..
5
XP-400_RPXP4GT_OI300.02_...
page 5
Friday, January 28, 2005 13:42
Composite
Arming Your System
Arming Your System When Leaving
1
Before arming your system, make sure the Green X Ready light is ON. This indicates that all of your
protective zones are secure. If any zones are open, the corresponding Zone light will be ON. Secure
these zones before proceeding. If any zones cannot be secured, see Bypassing zones below.
2
Enter your user code. The Green X Ready light will go out, the Red W Armed light will light.
• If you make a mistake entering your code, press B and re-enter the code.
3
Leave the premises through the Exit/Entry door. If the keypad gives a steady tone, you have taken too
long. Enter your code again to disarm system and then re-enter code and leave.
Easy Arm
The Easy Arm feature allows the system to be armed by simply pressing A followed by 0. This will
allow the easy arming of the system by someone who is not a regular system user.
Bypassing Zones
If an open zone cannot be immediately fixed it can be left unprotected, or Bypassed, while the rest of the
system is Armed. To Bypass a zone:
1
2
3
Press H followed by the zone number to be Bypassed. The Bypassed zone’s light will flash slowly.
Enter your user code. The Green X Ready light will go out and the Red W Armed light will light.
Leave the premises through the Exit/Entry door.
When the system is subsequently disarmed, all bypassed zones will be reset, ready to be armed again.
If it is necessary to bypass any inoperative zone(s), it is important to have the zone(s) repaired as soon as
possible. A bypassed zone does not provide any protection, compromising system security.
6
XP-400_RPXP4GT_OI300.02_...
page 6
Friday, January 28, 2005 13:42
Composite
Arming Your System
Protecting Yourself While at Home
1
Before arming the system, the Green X Ready light must be ON. This indicates that all of your protective
zones are secure. If any zones are open, the matching Zone light will be ON. Secure those zones before proceeding.
2
3
Enter your user code. The Green X Ready light will go out, and the red W Armed light will light.
Before your exit delay expires, press c to bypass any interior zones, deactivating devices such as motion
sensors (allowing free movement within the premises). The Zone light of any bypassed zones will flash slowly.
• Your system may have been programmed for Automatic Interior Bypass, in which case it will recognize
that you have not left the premises and will automatically bypass any interior zones.
Instant Mode
Pressing G followed by 4 will cancel the Entry delay, activating the “Instant” mode. This is typically
done in the evening when all family members are home for the night. Instant Mode can be activated at any
time after the system has been armed. The Red W Armed light will flash rapidly while in the Instant Mode.
Easy Exit (optional)
Your System may have been programmed to allow Easy Exit, which allows a user to exit the premises with the
system armed. By pressing G followed by 0, the protection is removed from the Exit/ Entry zone for
3 minutes. This will allow, for example, an early morning commuter to exit the house in the morning, without
having to disarm and rearm the system, waking the family.
Arming With a System Trouble Present (the H System Light is Lit)
If the XP400 has a system trouble present, the H SYSTEM light will be lit and the keypad sounder pulsing. If
you cannot immediately clear the system trouble, the system can still be armed. Simply press D to view
the trouble, press D again to reset the trouble and then arm the system. For more information, refer to
page 12. Note: System troubles should be repaired as soon as possible.
7
XP-400_RPXP4GT_OI300.02_...
page 7
Friday, January 28, 2005 13:42
Composite
Emergency Conditions
f
f
Auxiliary
Emergency
Enabled?
Yes
G
G
Police
Emergency
Enabled?
Yes
Ambush
Alarm
Enabled?
Yes
Emergency Buttons
FG
FG
The two sets of emergency buttons, if programmed, are always active whether the system is armed
or disarmed. Discuss these buttons with your installer. The emergency signal will only be activated
when the two respective buttons are pressed at the same time.
Auxiliary Alarm: Simultaneously press f + F to alert the central station of an auxiliary emergency, if so programmed.
(The nature of this emergency alarm is to be determined by the installer)
Police Emergency: Simultaneously press G + G to sound a police emergency alarm, and to
alert the central station of a fire emergency, if so programmed.
Ambush Alarm
In the event that you are forced by an intruder to disarm your system, the ambush alarm can be activated. Disarming the system with the Ambush Code will cause the system to disarm and simultaneously send a silent ambush alarm signal to Central Station. If your system has the Ambush feature
enabled, the code assigned as the User 4 code will function as your Ambush Code.
8
XP-400_RPXP4GT_OI300.02_...
page 8
Friday, January 28, 2005 13:42
Composite
Disarming Your System / Silencing an Alarm
Disarming Your System when Returning
1
Enter your premises through the Entry/Exit door. The keypad will sound a steady tone to remind you to
disarm the system before your Entry Delay time expires.
2
Enter your user code. The Red W Armed light will go out, indicating that the system has been disarmed.
Note: If you make a mistake entering your code, press the B key and re-enter the code.
Alarm Indication
If the Red W Armed light is flashing rapidly, an alarm occurred while you were away.
Proceed with caution! For your own protection, leave immediately and call authorities from a neighbor’s
telephone.
Silencing an Alarm
In the event that the system goes into alarm due to a violated burglary zone, the bell or siren will sound and
the keypad sounder will also activate. To silence the system, enter your User code. The zone light of the
zone that went into alarm will continue flashing until B is pressed to reset the alarm memory.
9
XP-400_RPXP4GT_OI300.02_...
page 9
Friday, January 28, 2005 13:42
Composite
Special Functions A
By pressing A followed by the appropriate key, (do not press simultaneously) these special functions and
features can be enabled:
Easy Arm (when system is disarmed)
The Easy Arm feature allows the system to be armed by
pressing a followed by 0. This will allow the easy arming of the system by someone who is not a regular system
user.
A0
a 0 Easy Exit (when system is armed)
This function (if programmed) allows an occupant to leave
the premises without disarming the system. Pressing A
followed by 0 while the system is armed will start a 3 minute period, during which you can leave through the Exit/ Entry door.
Bell / Battery Test
Pressing A followed by 1 will cause the bell, or siren to
sound for 2 seconds. This will also initiate a test of your battery to make sure it is adequately charged. The XP-400 also
performs an automatic battery test very 24 hours
A1
Access Output
If programmed, pressing A followed by 3 will activate
the Access Output which may be configured to open a door
strike, turn on lighting, or activate some other special feature
your installer has provided.
A3
A 4 Instant Mode
Pressing A followed by 4 will cancel the Entry delay
and put the system into the “Instant” mode. This is typically
used in the evening when all family members are home for
the night. When the system is disarmed, the Instant mode
will be canceled.
Chime Mode On / Off
Pressing A followed by 5 will activate / deactivate the
door chime. Activating this feature will cause any door to
beep the keypad sounder when it is opened.
A5
Program Mode
Pressing A followed by 8 will enable the “Program
Mode”, which will allow you to program and erase user codes
(see Programming user codes, page 14).
A8
Keypad Sounder On / Off
Pressing A followed by 9 will deactivate / activate the
keypad sounder, depending on its present state. By activating sleep mode on a keypad installed in a bedroom, for example, you effectively turn off that keypad’s sounder. However, any other keypads on the system will still sound normally.
A9
10
XP-400_RPXP4GT_OI300.02_...
page 10
Friday, January 28, 2005 13:42
Composite
Programming User Codes
Your Installer has assigned a User 1 Code which may be used to not only Arm and Disarm the system,
but also to enter the User Program Mode, where you can program and/or reprogram up to 4 User Codes.
The following explains how you will use this code to program or erase additional user codes.
Entering the User Program Mode
Press A followed by 8 and then enter the User 1 code. The W Armed, X Status and H System
Lights will flash, and the keypad will beep 4 times. You are now in the User Program mode. Zone lights
1 through 4 will light to indicate any User Codes presently programmed.
Programming / Reprogramming User Codes
1 Press the User number to be programmed. (For example, press 2 to program the User 2 code).
The keypad will beep 2 times and the corresponding zone light will flash to indicate the user number
you are about to program.
2 Press in the 4 digits of the new User 2 code, the keypad will beep 4 times.
3 If there are more user codes to be programmed, return to step 1 above; otherwise, go to Exiting the
User Program Mode below.
Erasing a User Code
1 Press the User number to be erased. The keypad will beep 2 times and the corresponding zone light
will flash to indicate the user number you are about to erase.
2 Press D. The zone light will go out to indicate that the user code has been erased.
3 If there are more user codes to be erased, return to step 1 above; otherwise, go to Exiting the user
Program Mode below.
Exiting the User Program Mode
When you are finished programming or erasing User codes, press B to Exit the User Program Mode.
11
XP-400_RPXP4GT_OI300.02_...
page 11
Friday, January 28, 2005 13:42
Composite
H System Troubles
The XP-400 is constantly monitoring its own components, as well as all critical services, such as AC Power
and the Telephone line, to insure that it is always ready to provide the protection for which it was designed.
When a system trouble does occur, it will caution you by lighting the yellow HSYSTEM light and beeping
the keypad buzzer. If you cannot immediately clear the system trouble, the system can still be used. Simply press D to view the trouble as described below, and then arm the system.
In order to determine the nature of the trouble, press D , count the number of keypad beeps and observe
the number of the illuminated zone light. Refer to the following table to determine the cause of the trouble.
If there is more than one trouble to be viewed, pressing D will scroll to the next, and then exit the
!SYSTEM mode if there are no additional troubles to view.
Keypad Beeps or
Zone light
ON
System Trouble
Condition
1 Beep with Y flashes
1
AC Power Failure
This trouble will occur if AC power is not present. Make sure system
transformer is plugged into AC receptacle and check circuit breaker,
otherwise call installing company for service.
1 Beep
2
Low Battery
If there has been a recent power failure, the battery may be partially
depleted and must be recharged by the control panel. If the trouble
does not go away in 24 hours, call installing company for service.
1 Beep
3
Communication
Failure
The system was not able to report to central station. If this is due to a
temporary interruption in the telephone service, the trouble can be
cleared when the service is restored by pressing D. Otherwise,
Action
call installing company for service.
1 Beep
4
Telephone Line Cut
The telephone line has failed. If telephone service has been temporarily interrupted, the trouble will clear it is when restored. Otherwise,
call installing company for service.
12
XP-400_RPXP4GT_OI300.02_...
page 12
Friday, January 28, 2005 13:42
Composite
H System Troubles
Keypad Beeps or H Zone light
ON
SYSTEM Flashes
System Trouble
Condition
Action
2 Beeps
1
Bell / Siren Trouble
There is a problem with the Bell or Siren. Call installing company for service.
2 Beeps
3
Wireless Receiver
Trouble
A problem has been detected with the wireless receiver.
Call installing company for service.
2 Beeps
4
Wireless Receiver
Jam
A problem has been detected with a wireless receiver.
Call installing company for service.
3 Beeps
1-4
Wireless
Transmitter Low
Battery
The battery in a wireless transmitter is low and should be replaced. This transmitter is on the zone corresponding to the
number of the lit zone light. The replacement battery for the
GEM-Trans2 door/window transmitter, GEM-PIR motion detector and GEM-GB glass break detector is the Duracell
DL123A. (2 required for the GEM-PIR and GEM-GB.) The
GEM-DT Dual Technology Sensor requires 4 C-Cell Duracell
MN1400 Alkaline batteries.
Warning: Replace batteries only with the same type as specified above. Use of another battery may present a risk of fire or
explosion. Do not recharge or disassemble battery, or dispose
of in fire.
4 Beeps
1-4
Wireless
Transmitter
Supervisory Failure
A problem has been detected with a wireless transmitter.
Call installing company for service
7 Beeps
1-4
Zone Trouble
Call installing company for service.
13
XP-400_RPXP4GT_OI300.02_...
page 13
Friday, January 28, 2005 13:42
Composite
Glossary
Ambush Code - In the event that you are
forced by an intruder to disarm your system, this special code can be used to disarm the system, and simultaneously send
a silent alarm to the Central Station. If
your system has the Ambush feature enabled, the code assigned as the User 4
code will function as your Ambush Code.
Arming / Disarming - Turning the system
on or off by entering your user code at the
keypad.
Auto Interior Bypass - A feature which
allows the system to recognize when you
have not left the premises and automatically bypass any interior zones, deactivating devices such as motion sensors, allowing free movement throughout the
premises.
Battery - A backup source of power to
provide protection for a limited time in the
event of a power failure.
Bypass - the manual or automatic removal of one or more protection zones
from the system. Press C and then
the zone number to bypass a zone.
Delay while remaining on the premises.
(Press A 4 while armed).
Central Station - Monitors alarm, emergency and trouble reports from the alarm
system and notifies proper authorities.
Keypad Sounder - A local warning device at the keypad to alert that Entry delay
has started.
Chime - a keypad beep which indicates
that a door has been opened while the
system is disarmed.
System Trouble - A problem has been
detected in the system which may prevent
it from working properly. The HSYSTEM
light will be lit.
Easy Exit - Allows an occupant to leave
the premises without disarming the system. Pressing A and then 0 while
the system is armed will permit exit by removing the protection on the Exit/Entry
door for 3 minutes.
Exit/Entry Delay - The amount of time
you are allowed to enter and leave the
premises when the system is armed.
Exit/Entry Zone - A zone which will allow
you to enter and leave the premises when
the system is armed.
Instant Protection - Arming without Entry
User Code - A four digit code which is
used to arm and disarm the system from
the keypad.
User 1 Code - A four digit code which can
be used to program, re-program and
erase user codes, as well as arm and disarm the system from the keypad.
Zone - An area which is protected by a
security device. Your front door may be
designated as Zone 1, while the living
room motion detector may be Zone 2.
Refer to the Zone Label on your keypad
for the Zone Identification of your system.
14
XP-400_RPXP4GT_OI300.02_...
page 14
Friday, January 28, 2005 13:42
Composite
Notes
15
XP-400_RPXP4GT_OI300.02_...
page 15
Friday, January 28, 2005 13:42
Composite
NAPCO LIMITED WARRANTY
NAPCO SECURITY SYSTEMS, INC. (NAPCO) warrants its products to be free from manufacturing defects in materials and workmanship for thirty-six months following the date of manufacture. NAPCO will,
within said period, at its option, repair or replace any product failing to operate correctly without charge to
the original purchaser or user.
This warranty shall not apply to any equipment, or any part thereof, which has been repaired by others,
improperly installed, improperly used, abused, altered, damaged, subjected to acts of God, or on which any
serial numbers have been altered, defaced or removed. Seller will not be responsible for any dismantling or
reinstallation charges.
sumes, nor authorizes any other person purporting to act on its behalf to modify, to change, or to assume
for it, any other warranty or liability concerning its products.
In no event shall NAPCO be liable for an amount in excess of NAPCO's original selling price of the product,
for any loss or damage, whether direct, indirect, incidental, consequential, or otherwise arising out of any
failure of the product. Seller's warranty, as hereinabove set forth, shall not be enlarged, diminished or
affected by and no obligation or liability shall arise or grow out of Seller's rendering of technical advice or
service in connection with Buyer's order of the goods furnished hereunder.
NAPCO RECOMMENDS THAT THE ENTIRE SYSTEM BE COMPLETELY TESTED WEEKLY.
THERE ARE NO WARRANTIES, EXPRESS OR IMPLIED, WHICH EXTEND BEYOND THE DESCRIPTION ON THE FACE HEREOF. THERE IS NO EXPRESS OR IMPLIED WARRANTY OF MERCHANTABILITY OR A WARRANTY OF FITNESS FOR A PARTICULAR PURPOSE. ADDITIONALLY, THIS WARRANTY IS IN LIEU OF ALL OTHER OBLIGATIONS OR LIABILITIES ON THE PART OF NAPCO.
Any action for breach of warranty, including but not limited to any implied warranty of merchantability, must
be brought within the six months following the end of the warranty period.
IN NO CASE SHALL NAPCO BE LIABLE TO ANYONE FOR ANY CONSEQUENTIAL OR INCIDENTAL
DAMAGES FOR BREACH OF THIS OR ANY OTHER WARRANTY, EXPRESS OR IMPLIED, EVEN IF
THE LOSS OR DAMAGE IS CAUSED BY THE SELLER'S OWN NEGLIGENCE OR FAULT.
In case of defect, contact the security professional who installed and maintains your security system. In
order to exercise the warranty, the product must be returned by the security professional, shipping costs
prepaid and insured to NAPCO. After repair or replacement, NAPCO assumes the cost of returning products under warranty. NAPCO shall have no obligation under this warranty, or otherwise, if the product has
been repaired by others, improperly installed, improperly used, abused, altered, damaged, subjected to
accident, nuisance, flood, fire or acts of God, or on which any serial numbers have been altered, defaced
or removed. NAPCO will not be responsible for any dismantling, reassembly or reinstallation charges.
This warranty contains the entire warranty. It is the sole warranty and any prior agreements or representations, whether oral or written, are either merged herein or are expressly cancelled. NAPCO neither as-
THE FOLLOWING STATEMENT IS REQUIRED BY THE FCC.
This equipment generates and uses radio-frequency energy and, if not installed and used properly,
that is, in strict accordance with the manufacturer's instructions, may cause interference to radio and
television
reception. It has been type tested and found to comply with the limits for a Class-B computing device in
accordance with the specifications in Subpart J of Part 15 of FCC Rules, which are designed to provide
reasonable protection against such interference in a residential installation.
However, there is no guarantee that interference will not occur in a particular installation. If this equipment does cause interference to radio or television reception, which can be determined by turning the
NAPCO Security Systems, 333 Bayview Avenue, Amityville, NY 11701
Warning: Despite frequent testing, and due to, but not limited to, any or all of the following; criminal tampering, electrical or communications disruption, it is possible for the system to fail to perform as expected.
NAPCO does not represent that the product/system may not be compromised or circumvented; or that the
product or system will prevent any personal injury or property loss by burglary, robbery, fire or otherwise;
nor that the product or system will in all cases provide adequate warning or protection. A properly installed
and maintained alarm may only reduce risk of burglary, robbery, fire or otherwise but it is not insurance or
a guarantee that these events will not occur. CONSEQUENTLY, SELLER SHALL HAVE NO LIABILITY
FOR ANY PERSONAL INJURY, PROPERTY DAMAGE, OR OTHER LOSS BASED ON A CLAIM THE
PRODUCT FAILED TO GIVE WARNING. Therefore, the installer should in turn advise the consumer to
take any and all precautions for his or her safety including, but not limited to, fleeing the premises and
calling police or fire department, in order to mitigate the possibilities of harm and/or damage.
NAPCO is not an insurer of either the property or safety of the user's family or employees, and limits its
liability for any loss or damage including incidental or consequential damages to NAPCO's original selling
price of the product regardless of the cause of such loss or damage.
Some states do not allow limitations on how long an implied warranty lasts or do not allow the exclusion or
limitation of incidental or consequential damages, or differentiate in their treatment of limitations of liability
for ordinary or gross negligence, so the above limitations or exclusions may not apply to you. This Warranty gives you specific legal rights and you may also have other rights which vary from state to state.
equipment off and on, the user is encouraged to try to correct the interference by one or more of the
following measures: reorient the receiving antenna; relocate the computer with respect to the receiver;
move the computer away from the receiver; plug the computer into a different outlet so that computer
and receiver are on different branch circuits.
If necessary, the user should consult the dealer or an experienced radio/television technician for additional suggestions. The user may find the following booklet prepared by the Federal Communications
Commission helpful: “How to Identify and Resolve Radio-TV Interference Problems”. This booklet is
available from the U.S. Government Printing Office, Washington, DC 20402; Stock No. 004-00000345-4.
© NAPCO 2005
16
XP-400_RPXP4GT_OI300.02_...
page 16
Friday, January 28, 2005 13:42
Composite