1
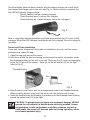
Once the battery pack has been installed, plug the battery charger into a wall outlet
and connect the charger jack to the unit (see Fig. 3). When correctly connected, the
first LED will indicate charging status:
Quickly flashing orange = battery charging
Slowly flashing green = battery fully charged
Slowly flashing red = failed batteries; cannot be recharged
Fig. 3
New or completely discharged batteries will take approximately two (2) hours to fully
recharge. When the LED indicates the batteries are fully charged, the unit is ready for
operation.
Sensor and Probe Installation
A new unit comes shipped with the probe not installed on the unit, and the sensor
packaged in a sealed foil bag.
1. Open the bag and remove the sensor.
2. Hold the unit with the front end facing you and note the sensor connection inside
the threaded bushing on the end of the unit. There are five (5) holes corresponding
to the five (5) pins on the sensor – three (3) on the left and two (2) on the right
(refer to Fig. 4).
Threaded Bushing
Pins
Sensor
Fig. 4
3. Align the pins in the sensor with the corresponding holes in the threaded bushing.
When correctly aligned, firmly push the sensor into the bushing until it stops.
4. Install the flexible probe by threading it clockwise onto the threaded brass bushing
around the sensor until it is finger tight.
CAUTION: To prevent personal injury and equipment damage, NEVER
operate the unit without the flexible probe correctly installed. Sensor
contamination, erratic performance, and other problems may occur.
Additionally, the sensor will become quite hot during operation, which
could cause personal injury.
5