1
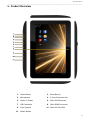
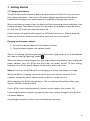
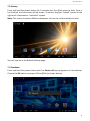
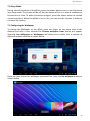
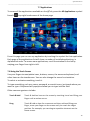
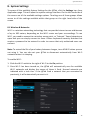
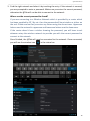
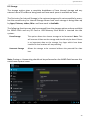
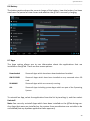
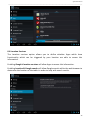
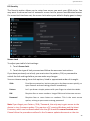
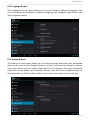
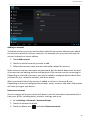
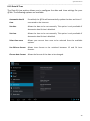
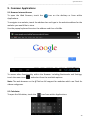
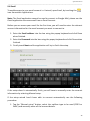
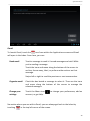
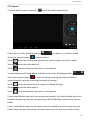
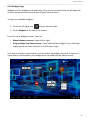
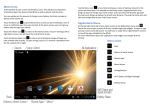
DUAL CORE @Tab User Manual ___________________________________________________________________________________________________________________________ Contents 1. Using This Manual ……..……………………………………………….……….. 4 2. Safety Instructions ……………………………………………………………….. 5 3. Boxed Contents …………………………………………………………………….. 7 4. Hardware Specification …………………………………………….…….….… 7 5. Product Overview …………………………………………………………….….. 8 6. Connectivity …….………………………………………………………………….. 9 6.1 Connecting to a PC ……………………………….……….…………….... 9 6.2 Connecting an external USB device ……………...…….……….... 9 6.3 Connecting a micro SD Card ………………………….……………..… 9 7. Getting Started ………………………………………………….………………… 10 7.1 Charging the battery …………………………….……….…………….... 10 7.2 Startup ………………………………………………………….…….……….... 11 7.3 Shutdown …………………………………………………….………………… 11 7.4 Sleep Mode …………………………………………….……………………… 12 7.5 Configuring the Wallpaper ………………………………….…….……. 12 7.6 Desktop ……………………….………………………………….……………… 13 7.7 Applications ………………………………………………………….………… 14 7.8 Using the Touch Screen ……………………………………….……….… 14 7.9 Using Google Search ………………………………………………………. 15 8. System Settings ………………………………………………………..………….. 17 8.1 Wireless & Networks ………………………………………….……….…. 17 8.2 Bluetooth ……………………………………………………………….…….... 20 8.3 Sound …………………………………………………………………….…….... 21 8.4 Display ………………………………………………………..……………….... 22 8.5 Storage …………………………………………………………….………….... 23 8.6 Battery …………………………………………………………..…………….... 24 8.7 Apps ………………………………………………………………………………. 24 8.8 Location Services ……………………………………………….…………… 25 8.9 Security ……………………………………………….…………………..…….. 26 8.10 Language & Input ……………………………….…………………………… 27 2 @Tab User Manual ___________________________________________________________________________________________________________________________ 9. 8.11 Backup & Reset ………………………………….…………………………… 27 8.12 Accounts ………………………………………………….….………………….. 28 8.13 Date & Time …………………………………………….….………………….. 30 8.14 Accessibility ………………………………………………………..…………… 31 8.15 Developer Options …………………………………………………….….… 32 8.16 About Tablet …………………………………………….…………………….. 33 Common Applications …………………………………………………..……… 33 9.1 Browser Internet Access …………………………………….…….. 33 9.2 Calculator ……………………………………………………………….… 34 9.3 Calendar ……………………………………………………………..……. 34 9.4 Clock ………………………………………………………………...………. 35 9.5 Downloads ……………………………………………………………….. 35 9.6 Email ………………………………………………………………..………. 36 9.7 Gmail / Google Play ………………………………………………….. 38 9.8 1Mobile Market ……………………………………………………….. 41 9.9 Explorer ……………………………………………………………………. 42 9.10 Music ………………………………………………………………..……… 43 9.11 Sound Recorder ………………………………………………………… 43 9.12 Video Player ……………………………………………………………… 44 9.13 Camera ……………………………………………………………..……… 45 9.14 Widgets Page ……………………………………………………………. 46 10. Troubleshooting ……………………………………………………………..….… 47 11. Support………………………………………………………………..…..…………. 49 12. Copyright ………………………………………………………………..….……….. 50 13. Warranty Information ………………………………………………..………… 50 14. Licencing ..………………………………………………………………..……..…… 52 15. Correct disposal of this product ….…………………………..……..…… 53 16. Correct disposal of batteries ….………………………………..……..…… 53 17. Disclaimer ..……………………………………………………………...……..…… 54 3 @Tab User Manual ___________________________________________________________________________________________________________________________ 1. Using This Manual Congratulations on your purchase of this @Tab Tablet. This powerful and versatile tablet brings the best of the web and mobile computing to your fingertips in a lightweight, highly versatile platform that fits an active lifestyle. Built around the Google Android 4.1 operating system, the @Tab gives you access to thousands of useful and entertaining applications to enhance your mobile web experience. With integrated wireless access and a highly responsive touchscreen, you can read books and newspapers on the go; stay up-to-date on the latest news, sports, and weather; manage your multimedia and business files; browse the web, and lots more. Note: This @Tab does not have built in 3G and can only access the Internet when connected to a wireless (Wi-Fi) network. If you would like to access the Internet while on the move there are a number of 3G Mobile Hotspots available from all the major mobile operators. These allow the @Tab to connect wirelessly with the Hotspot, bringing the Internet to you when on the move. Read Me First Please keep this manual for future reference. Please read this manual and all safety instructions carefully before using your @Tab to ensure safe and proper use. The descriptions in this manual are based on the default settings of your device. Images and screenshots used in this user manual may differ in appearance from the actual product. Formatting and delivery of this user manual is based on the Google Android 4.1 operating system and may vary depending on the device. Content in this user manual may differ from the product, and is subject to change without prior notice. Available features and additional services may vary by device, software, or service provider. Applications and their functions may vary by country, region, or hardware specification. @Tab are not liable for performance issues caused by third-party applications. @Tab are not liable for performance issues or incompatibilities caused by user editing of system settings. Software, wallpapers, images, sound sources, and other contents provided in this device are licenced for limited use between @Tab and their respective owners. Extracting and using these materials for commercial or other purposes 4 @Tab User Manual ___________________________________________________________________________________________________________________________ is an infringement of copyright laws. @Tab cannot be held liable for such copyright infringement by the user. Trademarks @Tab and the @Tab logo are registered trademarks. The Android logo, Google Search™, Google Maps™, Google Mail™, YouTube™, Android Market™, and GoogleTalk™ are trademarks of Google, Inc. Bluetooth® is a registered trademark of the Bluetooth SIG, Inc. worldwide. 2. Safety Instructions This user manual contains important safety instructions and information for proper use of the device. Please follow the instructions in this manual carefully. This is a high-density electronic product; please do not dismantle it by yourself. Avoid shocks and do not let the device fall, as otherwise it may cause damage to the device. Do not use damaged power cords or plugs, or loose electrical sockets. Do not touch the power cord with wet hands, or disconnect the charger by pulling the cord. Do not bend or damage the power cord. Avoid using this product in the following environments: high and low temperatures, humid environments, dusty environments, areas with strong magnetic fields and prevent long-term exposure to the sun. In particular please avoid leaving the device in the car during summer if the doors are closed. To clean the product, gently wipe the product using a moist cotton cloth; the use of other chemical cleaning is prohibited unless they are specifically designed for this purpose. This product should be kept away from water droplets splashes, so cups filled with liquids should not be placed near the product. Do not use alcohol, thinners or petrol to clean the display. If using the headset for a long time, high volume may cause permanent damage to hearing. Do not use headphones when going across a road, driving a motorcycle or bicycle, in order to avoid traffic accidents. Please use only the supplied battery, charger and accessories, the use of any other type of product would be a breach of warranty regulations, and may be dangerous. 5 @Tab User Manual ___________________________________________________________________________________________________________________________ Do not short-circuit the charger or the battery. Do not drop or cause an impact to the charger or the battery. Please deal with waste machinery and accessories according to local environmental regulations. If you have any questions about the use of this product, please contact your local dealer or the customer service center of @Tab. The Standby Time of the batteries may vary due to different environmental influences. Any loss of data caused by product damage, repair or through any other issues relating to the device are not covered under warranty. Please ensure you make timely backups of all your data. Do not handle a damaged or leaking Lithium Ion (Li-Ion) battery. For safe disposal of your Li-Ion batteries, contact your nearest authorised recycling centre. Handle and dispose of batteries and chargers with care. Never dispose of batteries or devices in a fire. Follow all local regulations when disposing of used batteries or devices. Never place batteries or devices on or in heating devices, such as microwave ovens, cookers, or radiators. Batteries may explode when overheated. Never crush or puncture the battery. Avoid exposing the battery to high external pressure, which can lead to an internal short circuit and overheating. Touchscreen Precautions For optimal use of the touch screen, remove the screen protection film before using your device. To avoid scratching the touch screen, do not use sharp tools. Do not allow the touch screen to come into contact with other electrical devices. Electrostatic discharges can cause the touch screen to malfunction. Do not allow the touch screen to come into contact with water. The touch screen may malfunction in humid conditions or when exposed to water. Your touch screen has a layer that detects small electrical charges emitted by the human body. For best performance, tap the touch screen with your fingertip. The touch screen will not react to touches of sharp tools, such as a stylus or pen which could damage and mark the screen. 6 @Tab User Manual ___________________________________________________________________________________________________________________________ 3. Boxed Contents 1. @Tab Tablet 2. Power Adapter 3. User Manual 4. Quick Start Guide 5. USB Cable (for connecting to a PC) 4. Hardware Specification Processor High performance Cortex A9 Dual Core 1.6GHZ Processor Supports hardware OpenGL 2.0 3D image acceleration Memory 1GB DDR3 high-speed memory Storage 16GB built-in with support for external micro SD card up to 32GB Wireless IEEE802.11b/g/n Wireless internet USB USB2.0 OTG high speed interface Video Output HDMI 1.4 high definition video output interface Audio 3.5mm earphone interface, Built-in microphone Size 9 inch capacitive multi touch Resolution 800 x 480 Operation Capacitive 5 point multi touch screen System Android 4.1 “Jelly Bean” Size (Length × Width × Thickness) 238 x 156 x 12.5mm Weight 500 - 550g Battery Built-in polymer lithium battery 5000mAh Screen Others 7 @Tab User Manual ___________________________________________________________________________________________________________________________ 5. Product Overview 1. Home Button 2. Reset Button 3. Microphone 4. 3.5mm Earphone Jack 5. Power-in Socket 6. Mini USB Connector 7. USB Connector 8. Mini HDMI Connector 9. Front Camera 10 Micro SD Card Slot 11. Power Button 8 @Tab User Manual ___________________________________________________________________________________________________________________________ 6. Connectivity 6.1 Connecting to a PC You can connect the @Tab directly to a PC or Laptop using the supplied USB cable. Once connected to a PC, the @Tab will appear as a mass storage device allowing you to access it in the same way you would a removable hard drive, with access via explorer or my computer. 1. Using the USB cable, connect the mini USB connector to your @Tab. 2. Connect the USB connector to a PC or Laptop. 3. Open folders to view files. 4. Copy files from the PC or Laptop to your @Tab. To disconnect the @Tab from a PC, click the USB device icon on the Windows task bar and click the option to safely remove the mass storage device. Then remove the USB cable from the PC. Failure to follow these instructions may result in loss of data on your @Tab or damage to your device. 6.2 Connecting an external USB device You can use a USB storage device to store additional files. Note: Your device may not support some USB storage devices. 1. Connect a USB device to the USB port on the @Tab. 2. Open Explorer. 3. Touch the USB symbol to view files on the USB device. 6.3 Connecting a micro SD Card You can insert a micro SD Card into your @Tab to store additional files. Capacities up to 32GB are supported. 1. Insert a micro SD Card into the micro SD Card slot. 2. Open Explorer. 3. Touch the SD Card symbol Card. to view files on the micro SD 9 @Tab User Manual ___________________________________________________________________________________________________________________________ 7. Getting Started 7.1 Charging the battery The @Tab has a built-in battery. Before using the device for the first time, you must fully charge the battery. Use only the 5V power adapter provided with the device. Unauthorised chargers can cause batteries to explode or damage your device. When your battery charge is low, the device will emit a warning tone and display a low battery message. The battery icon will also be empty. If the battery charge becomes too low, the @Tab will automatically power off. If the battery is completely discharged, the @Tab will not turn on. Allow a depleted battery to charge for a few minutes before you try to turn on the device. Charging via the power adapter 1. Connect the power adapter to the Power-in socket. 2. Plug the power adapter into a power outlet. When it is charging, the battery symbol in the bottom right hand corner of the desktop will show a charging (lightning) symbol . When the battery is fully charged (no lightning symbol in the battery icon), unplug the power adapter from the @Tab and then from the power socket. To save energy, unplug or turn off the power adapter at the socket, when not in use. Note: You can use the @Tab while it is charging, but it may take longer to charge. While the @Tab is charging, the touch screen may not function correctly. If this happens, unplug the power adapter from the device in order to use it. While charging, the @Tab may get warm. This is normal and should not affect your device’s lifespan or performance. If your @Tab is not charging properly, please contact support (see chapter 11). Connecting the power adapter improperly may cause serious damage to the @Tab or the power adapter. Any damage caused by misuse is not covered by the warranty. 10 @Tab User Manual ___________________________________________________________________________________________________________________________ 7.2 Startup Press and hold the power button for 3 seconds until the @Tab starts to boot. Once it has finished, the lock screen will be shown. To unlock, drag the “locked” symbol to the right until it becomes an “unlocked” symbol. Note: This screen may have different wallpaper; this can be customised by the user. You will now be at the default desktop page. 7.3 Shutdown Press and hold the power button until the Power off pop-up appears on the desktop. Choose the OK option to power off the @Tab (as shown below). 11 @Tab User Manual ___________________________________________________________________________________________________________________________ 7.4 Sleep Mode During normal operation of the @Tab, press the power button once, to set the device into sleep mode. The screen will be off, but the device will be in a state of readiness to be used at any time. To wake the device up again, press the power button to resume normal operation. When the @Tab is not in use, you can use this function in order to conserve the battery. 7.5 Configuring the Wallpaper To change the Wallpaper on the @Tab, press one finger on any empty area of the desktop and after a few seconds the Choose wallpaper from pop-up will appear. Selecting Live Wallpapers or Wallpapers will allow you to select from a number of different options available as shown below. Once you have chosen the wallpaper you would like, press the Set wallpaper button as shown below. 12 @Tab User Manual ___________________________________________________________________________________________________________________________ 7.6 Desktop The @Tab runs the latest version of the Android Operating System. Version 4.1 has a similar user interface to previous versions, but has been updated specifically for use with tablet devices. The main interface controls on the desktop are shown below: Icon Name Description Back Opens the previous screen you were working in, even if it was in a different app. Once you are back at the Home screen, you can't go any further back through your history. Home Opens Home. If you’re viewing a left or right Home screen, opens the central Home screen. Recent Apps Opens a list of thumbnail images of Apps you have worked with recently. To open an App, touch it. To remove a thumbnail from the list, swipe it left or right. Menu Button Allows easy access to the menu options for the current application. All Applications Allows access to all your apps and widgets. Battery Status Shows the current battery capacity or if the @Tab is currently charging. Status Icons Status icons to the left of the clock tell you which apps have sent you notifications. Icons to the right of the clock display the current wireless network connection strength, battery charge level etc. 13 @Tab User Manual ___________________________________________________________________________________________________________________________ 7.7 Applications To access all the applications available on the @Tab, press the All Applications symbol found in the top right hand corner of the home page. From this page you can run any application by touching the symbol for that application. Each page of the applications list will show a number of installed applications, in alphabetical order. To access more applications, scroll the window to the left by swiping your finger from right to left. 7.8 Using the Touch Screen Use your fingers to manipulate icons, buttons, menus, the onscreen keyboard, and other items on the touchscreen. You can also change the screen's orientation. To select or activate something, touch it. To type something, such as a name, password, or search terms, just touch where you want to type. A keyboard will popup and allow you to type into the field. Other common gestures include: Touch & hold Touch & hold an item on the screen by touching it and not lifting your finger until an action occurs. Drag Touch & hold an item for a moment and then, without lifting your finger, move your finger on the screen until you reach the target position. For example, you can drag to reposition shortcuts on the Home screen. 14 @Tab User Manual ___________________________________________________________________________________________________________________________ Swipe or slide Quickly move your finger across the surface of the screen, without pausing when you first touch (so you don't drag something instead). For example, you can slide a Home screen left or right to view the other Home screens. Double-tap Quickly tap twice on a webpage, map, or other screen to zoom. For example, doubletap a webpage in Browser to zoom in, and double-tap again to zoom out. Pinch In some apps (such as Maps, Browser, and Gallery), you can zoom in and out by placing two fingers on the screen at once and pinching them together (to zoom out) or spreading them apart (to zoom in). 7.9 Using Google Search Google Search can help you find anything you need on your tablet or the web and is available from the top of any Home screen on the @Tab. There are two options available: Speak search terms: Touch the Microphone icon . After you say what you're looking for, the Browser will open with a list of search results. Type search terms: Touch Google. As you type, suggestions appear below the Search box. The first few suggestions attempt to complete what you are typing: To search for a suggestion immediately, touch it. To add a suggestion to the search field, touch the arrow to its right. You can then keep on typing or choose further suggestions. To search for the contents of the search field, touch the Return key on the right side of the keyboard. 15 @Tab User Manual ___________________________________________________________________________________________________________________________ The Browser will open with a list of search results, and below the search term suggestions are items found on your tablet: A Maps marker indicates a business listing. Touch to view the listing, see its location on a map, get directions or take other actions. A Favorites icon identifies one of your bookmarks. Touch to open the bookmarked page. An App icon indicates one of your Apps. Touch to open the App. A Book cover icon indicates one of your books. Touch to open that book. A Music album icon indicates a song or other music you have downloaded to your tablet. Touch to play that music. A Video icon indicates one of your videos. Touch to play that video. Set searchable items To adjust where Google Search looks on your tablet: 1. On a Home screen, touch Google. 2. Touch the Menu icon items is selected. and select Settings and make sure that Searchable 3. Check the items on your tablet that you want to include in searches. Manage Google Search privacy settings 1. On a Home screen, touch Google. 2. Touch the Menu icon Search is selected. and select Settings and make sure that Google 3. Adjust any of these settings: Use Web History - Check to include suggestions based on previous searches from your computer or other devices. Manage Web History - Opens Browser to the web search history settings associated with your Google Account. Use My Location - Check to take account of your location in search results and other Google services. 16 @Tab User Manual ___________________________________________________________________________________________________________________________ 8. System Settings To access all the available System Settings for the @Tab, click the Settings icon from Application page. This will open the system settings interface. On the left hand side of the screen are all the available settings options. Touching one of these groups allows access to all the settings available within that group on the right hand side of the screen. 8.1 Wireless & Networks Wi-Fi is a wireless networking technology that can provide Internet access at distances of up to 100 meters, depending on the Wi-Fi router and your surroundings. To use Wi-Fi, you need to connect to a wireless access point, or "hotspot." Some hotspots are open and you can simply connect to them. Others implement security features that require a password to be entered in order to ensure that only authorized users can connect. Note: To extend the life of your battery between charges, turn off Wi-Fi when you are not using it. You can also set your @Tab to disconnect automatically from Wi-Fi networks when it is sleeping. To enable Wi-Fi: 1. Slide the Wi-Fi switch to the right of Wi-Fi to the On position. 2. Once Wi-Fi has been turned on, the @Tab will automatically scan for available Wi-Fi networks and display the names of those it finds. Secured networks are indicated with a Lock icon. If the @Tab finds a network that you connected to previously, it will automatically connect to it. 17 @Tab User Manual ___________________________________________________________________________________________________________________________ 3. Find the right network and select it by touching the entry. If the network is secured, you are prompted to enter a password. Make sure you enter the correct password, otherwise the @Tab will not be able to connect to the network. Where can the correct password be found? If you are connecting to a Wireless Network which is provided by a router which has been supplied by BT, Sky etc. then the password will be printed on a sticker on the unit. Please ensure that you enter any letters using the correct case. Uppercase letters must be entered in uppercase and lowercase letters must be lowercase. If the router doesn’t have a sticker showing the password, you will have to ask whoever setup the wireless network to provide you with the correct password to connect to the network. Once finished, the @Tab will now be connected to the network. Once connected, you will see the wireless icon in the status bar. 18 @Tab User Manual ___________________________________________________________________________________________________________________________ Add a Wi-Fi network If your wireless network does not broadcast its name (SSID), or you are outside the range of a Wi-Fi network, you can still add a Wi-Fi network so your @Tab will remember it, along with any security credentials, and connect to it automatically when it's in range. 1. Turn on Wi-Fi, if it's not already on. 2. Touch Add Network at the top of the screen. 3. Enter the SSID (name) of the network. If necessary, enter security or other network configuration details. 4. Touch Save. The information about the network is saved. Your @Tab will connect to this network automatically the next time you come within range. Forget a Wi-Fi network You can make the @Tab forget about the details of a Wi-Fi network that you added, if you no longer use it. 1. Turn on Wi-Fi, if it's not already on. 2. In the Wi-Fi settings screen, touch the name of the network. 3. Touch Forget in the dialog that opens. Configure proxy settings for a Wi-Fi network Some networks require you to connect to internal or external network resources via a proxy server. By default, the Wi-Fi networks you add are not configured to connect via a proxy, but you can change that for each Wi-Fi network you've added. 1. In the Wi-Fi settings screen, touch and hold the name of the network. 2. Touch Modify network in the dialog that opens. 3. Select Show advanced options. 4. If the network has no proxy settings, touch None under Proxy Settings. If it does, touch Manual in the menu that opens. 5. Enter the proxy settings supplied by your network administrator. 6. Touch Save. The proxy settings apply only to the Wi-Fi network you modified. To change the proxy settings for other Wi-Fi networks, modify them individually. 19 @Tab User Manual ___________________________________________________________________________________________________________________________ 8.2 Bluetooth Bluetooth is a wireless technology that allows accessories like Headsets, Keyboards etc. to be connected to the @Tab without using cables. To connect to a Bluetooth device, the @Tab will need to be paired with it, which sets up a connection that will be remembered by both devices. Note: To extend the life of your battery between charges, turn off Bluetooth when you are not using it. To enable Bluetooth: 1. Slide the switch to the right, into the On position. 2. Once Bluetooth has been turned on, the @Tab will automatically scan for available Bluetooth devices and display the names of those it finds. 3. Find the device you want to connect to and select it by touching the entry. Some Bluetooth devices require a four digit pairing code to be entered to allow the connection to complete. If this is the case, then a window will popup allowing the code to be entered. You should refer to the instructions that came with the device for this pairing code, but the most common codes are 0000 or 1234. The device should now be paired and will start to work with the @Tab. 20 @Tab User Manual ___________________________________________________________________________________________________________________________ 8.3 Sound The sound option allows access to all the sound settings available within the @Tab. Within this option, you can make the following changes: Volumes This option allows you to configure the default volume settings for Music, video, games & other media, Ringtone & notifications and Alarms. Silent Mode This option allows you to Mute the @Tab or turn Silent Mode Off. Default notification Allows a different sound for notifications to be selected. Touch sounds This option allows you to turn the sound caused by touching the screen off. Screen lock sounds This option allows you to turn the sound caused by unlocking the screen off. Vibrate on touch Allows the tablet to be set to Vibrate whenever the screen is touched. 21 @Tab User Manual ___________________________________________________________________________________________________________________________ 8.4 Display The display option allows access to all the display settings available within the @Tab. Brightness This option allows you to configure the default brightness of the screen. Wallpaper Select different desktop wallpaper from Gallery, Live Wallpapers or Wallpaper. Auto-rotate screen Enable or disable automatic screen rotation when the tablet is rotated. Sleep Set the time period before the tablet enters sleep mode from never to 30 minutes. Font Size Allows the default font size to be changed in order to allow easier reading of text. 22 @Tab User Manual ___________________________________________________________________________________________________________________________ 8.5 Storage The storage option gives a complete breakdown of how internal storage and any external micro SD cards are being used and how much space is available on them. The first entry for Internal Storage is the system storage and is not accessible by users, but the second entry for Internal Storage shows how much storage is being taken up by Apps, Pictures, videos, Misc. and how much is Available. The following functions can also be accessed from the storage option and are available for NAND Flash and any SD Card or USB Memory Stick which is inserted into the system: Erase Storage This option allows the chosen storage to be formatted. Note: This will remove all data on the storage and should only be done if there is no important data on the storage. Any Apps which have been installed in that location will stop working. Unmount Storage Allows the storage to be removed without the potential for data loss. Note: Erasing or Unmounting should not be performed on the NAND flash because this could cause system issues. 23 @Tab User Manual ___________________________________________________________________________________________________________________________ 8.6 Battery The battery option shows the current charge of the battery, how the battery has been used over the period of time shown and whether the @Tab is currently charging. 8.7 Apps The Apps option allows you to see information about the applications that are installed on the @Tab. There are four menu options: Downloaded Shows all Apps which have been downloaded and installed. ON SD CARD Shows all Apps which have been installed on any mounted micro SD card. RUNNING Shows all Apps which are currently running. ALL Shows all Apps including system Apps which are part of the Operating System. To uninstall an App, select the application from the list by touching it, and then select Uninstall. Note: You can only uninstall Apps which have been installed on the @Tab during use. Any Apps that were pre-installed on the system from manufacture are not able to be uninstalled (but any updates applied to these apps can). 24 @Tab User Manual ___________________________________________________________________________________________________________________________ 8.8 Location Services The Location services option allows you to define whether Apps which have functionality which can be triggered by your location are able to access this information. Enabling Google’s location services will allow Apps to access this information. Enabling Location & Google search will allow Google search within the web browser to determine the location of the tablet in order to help with search results. 25 @Tab User Manual ___________________________________________________________________________________________________________________________ 8.9 Security The Security option allows you to setup how secure you want your @Tab to be. You may want to set some form of automatic screen lock to prevent unauthorized access. If a screen lock has been set, the screen locks when your tablet's display goes to sleep. Screen Lock To adjust your tablet's lock settings: 1. Touch Screen lock. 2. Touch the type of lock you want and follow the onscreen instructions. If you have previously set a lock, you must enter the pattern, PIN, or password to unlock the lock settings before you can make any changes. You can choose among these lock options, listed in approximate order of strength: Slide Provides no protection, but lets you get to the Home screen quickly, or open Camera and start taking pictures immediately. Pattern Let’s you draw a simple pattern with your finger to unlock the tablet. PIN Requires four or more numbers. Longer PINs tend to be more secure. Password Requires four or more letters or numbers. This is the most secure option, as long as you create a strong password. Note If you forget your Pattern / PIN / Password, the only way to gain access to the device is via a firmware update. This requires a PC running Windows and the latest firmware, which can be downloaded from the @Tab website www.theattab.com. Please follow the procedure outlined in the firmware update document on the site. 26 @Tab User Manual ___________________________________________________________________________________________________________________________ 8.10 Language & Input The Language & input option allows you to select between different languages, also you can change the keyboard to different language and configure Voice Search and Text-to-speech output. 8.11 Backup & Reset The Backup & reset option allows you to backup settings and other data associated with one or more of your Google Accounts. So that if you need to replace or factory reset your device, you can restore your data for any accounts that were previously backed up. It also allows you to enable a factory reset which will completely wipe all data stored on the @Tab and set it back to the state it was when it left the factory. 27 @Tab User Manual ___________________________________________________________________________________________________________________________ There are four menu options: Back up my data If you check this option, a wide variety of your personal data is backed up automatically, including your Wi-Fi passwords, Browser bookmarks, a list of the apps you’ve installed on Google Play, the words you’ve added to the dictionary used by the onscreen keyboard, and most of your customized settings. If you uncheck this option, your data stops getting backed up, and any existing backups are deleted from Google servers. Backup account Displays the Google Accounts whose information gets backed up. You must sign in with one or more of these accounts on a new or reset device to retrieve the associated information. To add a new account, touch Add account. Automatic restore Check this option to restore settings and other data when you reinstall an app. This feature requires that you are backing up your data with your Google Account and that the app is using the backup service. Factory data reset Touch this option, then select Reset tablet to erase all your personal data from internal storage, including information about your Google Account, any other accounts, your system and app settings, any downloaded applications, and your music, photos, videos, and other files. After resetting your tablet, you will need to re-enter the same information requested when you first set up your tablet. If you've been backing up your data to a Google account, an option during the setup process allows you to restore it. Some third-party apps also make use of the backup service, so if you re-install one, its settings and data are restored. 8.12 Accounts The Accounts option allows you to setup and use multiple Google Accounts and Microsoft Exchange ActiveSync accounts on your device. Note: Some accounts can be added in the Accounts screen, as described here. Others need to be added using an app that works with those kinds of accounts. For example, you can only add IMAP and POP3 email accounts with the Email app. 28 @Tab User Manual ___________________________________________________________________________________________________________________________ Adding an account To add an account, you may need to obtain details from system administrator about the service to which the account connects. For example, you may need to know the account’s domain or server address. 1. Touch Add account. 2. Touch the kind of account you wish to add. 3. Follow the onscreen steps to enter information about the account. Most accounts require a username and password, but the details depend on the kind of account you are adding and the configuration of the service you are connecting to. Depending on the kind of account, you may be asked to configure what kinds of data you want to sync, name the account, and other details. When you have finished, the account is added to the list in Accounts & sync. Depending on how you configured the account, email, contacts, and other information will start syncing to your device. Remove an account You can remove an account, which will delete it and all information associated with it from your @Tab, including email, contacts, settings, and so on. 1. Go to Settings > Personal > Accounts & sync. 2. Touch the account to delete. 3. Touch the Menu icon and select Remove account. 29 @Tab User Manual ___________________________________________________________________________________________________________________________ 8.13 Date & Time The Date & time option allows you to configure the date and time settings for your @Tab. The following options are available: Automatic date & time If enabled, the @Tab will automatically update the date and time if connected to the Internet. Set date Allows the date to be set manually. This option is only available if Automatic date & time is disabled. Set time Allows the time to be set manually. This option is only available if Automatic date & time is disabled. Select time zone Allows your current time zone to be selected from the available options. Use 24-hour format Allows time format to be switched between 12 and 24 hour formats. Choose date format Allows the format of the date to be changed. 30 @Tab User Manual ___________________________________________________________________________________________________________________________ 8.14 Accessibility The Accessibility option allows the @Tab to be configured for use by anyone. The following options are available: TalkBack The TalkBack option provides spoken feedback to help blind and low-vision users by guiding their finger around the screen using audio prompting. It describes what is being touched, selected and activated. Large text If enabled, will increase the text size used for all functions of the @Tab. Auto-rotate screen Enable or disable automatic screen rotation when the @Tab is rotated. Speak passwords Allows passwords to be entered using speech instead of the keyboard. Text-to speech output Allows configuration of the text to speech engine which is used by default by the @Tab. Touch & hold delay Allows the delay settings for gestures on the screen to be changed. Install web scripts Allows Apps to install scripts from Google that make their web content more accessible. 31 @Tab User Manual ___________________________________________________________________________________________________________________________ 8.15 Developer Options The Developer options settings are for system development only and shouldn’t be changed unless you are advised to do so by a support engineer. 8.16 About Tablet The About tablet option allows you can see some basic information about your @Tab. 32 @Tab User Manual ___________________________________________________________________________________________________________________________ 9. Common Applications 9.1 Browser Internet Access To open the Web Browser, touch the Applications. icon on the desktop or from within To navigate to a website, touch the address bar and type in the website address for the website you would like to view. Use the popup keyboard to enter the address and then click Go. To access other functionality within the Browser including Bookmarks and Settings, touch the menu icon and select from the available options. Note: The web browser on the @Tab has full support for websites which use Flash for videos and games. 9.2 Calculator To open the Calculator, touch the icon from within Applications. 33 @Tab User Manual ___________________________________________________________________________________________________________________________ 9.3 Calendar To open the Calendar, touch the icon from within Applications. To add an entry into the Calendar find a cell that corresponds to the time and date you want to add the entry for and touch the cell until a New event option appears. Select New event, enter all the relevant details and select Done once you are finished. Once an event has been saved, you can Touch it to view its details. To change the Calendar view, choose Day, Week, Month, or Agenda using the tabs at the top of the screen. Swipe to scroll vertically or horizontally. In the Day or Week views, spread your fingers apart or pinch them together to zoom in or out. To access other functionality within the Calendar including Search and Settings, touch the menu icon and select from the available options. 34 @Tab User Manual ___________________________________________________________________________________________________________________________ 9.4 Clock To access the Clock, touch the icon from within Applications. The @Tab will show a large clock on screen and access to other functionality will be disabled until you exit the clock function by pressing the Back or Home menu options. Pressing the screen will dim everything on screen including the clock, holding your figure down on the screen will dim everything on screen except the clock. You can set an alarm by touching the Set alarm option and selecting Add alarm. Setup the alarm and select OK when finished. 9.5 Downloads You can see the all applications and files you have downloaded, by touching the Downloads icon from within Applications. 35 @Tab User Manual ___________________________________________________________________________________________________________________________ 9.6 Email To enable access to your email account i.e. Hotmail, open Email, by touching the icon from within Applications. Note: The Email application cannot be used to connect to Google Mail, please use the Gmail application to access email from a Gmail Account. Before you can access your email for the first time, you will need to enter the relevant account information for the email account you want to connect to. 1. Enter the Email address into the box using the popup keyboard and click Done when finished. 2. Enter the Password into the box using the popup keyboard and click Done when finished. 3. Finally touch Next and the application will try to finish the setup. If the setup doesn’t automatically finish, you will have to manually enter the account information by selecting Manual setup. If the setup wizard hasn’t been able to connect automatically use the following procedure: 1. Tap the “Manual setup” button, select the mailbox type to be used (POP3 or IMAP) and manually enter all the account details. 36 @Tab User Manual ___________________________________________________________________________________________________________________________ Example for a Windows Live Hotmail Account Note: For other email providers, please refer to the correct settings required to setup access to your account. You may need to speak to your email providers support center to obtain these settings. 2. Select POP3 account Username: Password: POP3 server: Port: Security type: Delete email from server: [email protected] ******** pop3.live.com 995 SSL (always) Never 3. Tap Next SMTP server: Port: Security type: Require sign-in: smtp.live.com 25 None Make sure this is not ticked. 4. Tap Next 5. Decide on the Email checking frequency, whether to set this as the default email account and whether to be notified when emails arrive. Tap Next. 6. Enter an account name and display name for outgoing messages, then tap Done. Viewing E-mail 1. Open the email application and select the email account you wish to view emails for by tapping the account name. 2. Tap the Inbox icon and the select the email you wish to view by tapping on it. Sending an E-mail 1. Open the email application and select the email account you wish to send an email from by tapping the account name. 2. Tap the Menu icon and select Compose from the Menu which appears at the bottom of the screen. 3. Enter the To, Subject and Compose Mail information to create the email. To add an attachment tap the Menu icon and select Add attachment, you can then browse for the file to attach. 4. When finished tap the Send button. 37 @Tab User Manual ___________________________________________________________________________________________________________________________ 9.7 Gmail / Google Play In order to use Gmail to access your Google Mail account or Google Play to download more Apps or Games for your @Tab, you will either have to setup a Google Account or enter the details for an existing Google Account the first time you want to use one of these applications. Note: The Gmail application cannot be used to connect to any email service other than Google Mail. A Google Account has many benefits because it lets you organise and access your personal information from any computer or mobile device: Never lose your contacts again. When you sign in to your @Tab with a Google account, all the contacts you associate with that account in the People app are automatically backed up. As a result, they're always accessible through your Gmail account from any computer. Synchronize and back up everything. Whether you draft an email, add an event to your calendar, or take a photo, your work gets backed up continuously by Google and synchronized with any computer where you use the same Google Account. Access from anywhere. Check your latest calendar, email, text messages, or social stream, wherever you are, no matter what computer or mobile device you are using. Keep your data secure and available. Google works round the clock to protect your personal data from unauthorized access and to ensure that you get it when you need it, wherever you need it. Use other Google services. Your Google Account also lets you take full advantage of any other Google apps and services that you may want to use, such as Gmail, YouTube, Google Play, YouTube, Google Talk, Messaging, and many more. To enter details for an existing account touch the Existing option, or to create a new Google Account touch the New option and follow the straightforward setup process. 38 @Tab User Manual ___________________________________________________________________________________________________________________________ Gmail To launch Gmail, touch the icon from within the Applications screen and Gmail will open in the Inbox. From here, you can: Read email Touch a message to read it. Unread messages are bold. While you're reading a message: Touch the icons and menu along the bottom of the screen to archive, throw away, label, or perform other actions on that message. Swipe left or right to read the previous or next conversation. Organize email Check the box beside a message to select it. Then use the icons and menu along the bottom of the screen to manage the selected messages. Change your settings Touch the Menu icon account, or get Help. to change your preferences, add an No matter where you are within Gmail, you can always get back to the Inbox by touching in the top left corner of the screen. 39 @Tab User Manual ___________________________________________________________________________________________________________________________ Google Play To launch Google Play, touch the Google Play will open. icon from within the Applications screen and You can search for Apps, Books and Movies you would like to download by touching the search icon. Enter the name of something you would like to search for using the popup keyboard and then touch the search icon to search for it. Once you have found something you would like to download / install, select it by touching its entry on screen and then select Install. From the popup permissions window, touch the option to Accept & download the App. Once the installation has finished you can select Done to continue or Open to run the App for the first time. Installed Apps will appear in All Applications, click to view all installed applications and look for the newly installed App. Note: Apps are displayed alphabetically. 40 @Tab User Manual ___________________________________________________________________________________________________________________________ 9.8 1Mobile Market 1Mobile Market is one of the leading App Stores for Android and has over 200,000 free apps for direct download to your @Tab. To launch 1Mobile Market, touch the icon from within the Applications screen and 1Mobile Market will open. You can search for Apps and Books you would like to download by touching the search icon . Enter the name of something you would like to search for using the popup keyboard and then touch the search icon to search for it. Once you have found something you would like to download / install, select it by touching its entry on screen and then select Download. When the App has finished downloading, a popup installation window will appear for the App. Touch the option to Install the App. Once the installation has finished you can select Done to continue or Open to run the App for the first time. Installed Apps will appear in All Applications, click to view all installed applications and look for the newly installed App. Note: Apps are displayed alphabetically. 41 @Tab User Manual ___________________________________________________________________________________________________________________________ 9.9 Explorer To navigate to all files on your @Tab, or any other storage device you attach to it, open Explorer, by touching the icon from within Applications. When Explorer opens, it will show all the main storage locations including SD Card, Internal Memory and USB. The SD Card and USB storage locations will only be accessible if these types of storage are inserted or connected to the @Tab. Touch the Internal Memory storage location to show all the folders and files at the highest level of your @Tab’s internal storage. You can navigate through folders just by touching them and then select files by also touching them. To copy and paste files from one folder to another, tap and hold the original file until a menu appears with options to Delete, Rename, Copy, Move(Cut) or Email the file. Tap Copy File to create a duplicate of the file or Move(Cut) to move the original file to a new location. You can then navigate to the destination folder where you want to copy the file. Tap and hold the folder you want to Copy / Move the file to and from the menu which appears, select Paste into Folder (you may have to scroll down to find this option) and the file Copy / Move will complete. To create a new folder for your own files, tap the menu icon and select the New Directory option and use the virtual keyboard to type the folder name. To access Pictures and Movies taken with the built-in camera, touch the DCIM folder and then the Camera folder. There are Music and Movies folders already created to store your media files in. 42 @Tab User Manual ___________________________________________________________________________________________________________________________ 9.10 Music To access the Music player, touch the icon from within Applications. By default the Music player will access tracks stored in the Music folder of the @Tab’s internal storage. Alternatively you can navigate to a music track and open it in the player from Explorer. To enable shuffle options touch the menu icon options. and select from the available 9.11 Sound Recorder To access the Music player, touch the icon from within Applications. Once Sound Recorder has started, you can start recording by pressing the button and finish the recording by touching the button. You can playback the recording by pressing the button and then choose to Discard the recording or save it by pressing Done. 43 @Tab User Manual ___________________________________________________________________________________________________________________________ 9.12 Video Player To access the Video Player, touch the icon from within Applications or you can navigate to a movie and open it in the player from Explorer. If no movie is specified, the player will access videos stored in the Movies folder of the @Tab’s internal storage. Select a video by touching it and it will start playing. Standard controls are available to control playback at the bottom of the screen. They will disappear after a few seconds, but can be brought back by touching the screen. Play / Pause Your video will begin playing automatically, to pause the video, simply touch the screen anywhere on the video player to bring up the control bar and then touch the pause icon. To resume playing, touch the play icon. Exiting Playback In order to exit from a video which is currently being played, press and hold the power button for 2 seconds. When the Power Off option appears, select the home icon from the control bar at the bottom of the screen. Mini HDMI Port The @Tab supports HDMI output by mini HDMI cable. Connect the @Tab to a TV which supports HDMI using a mini HDMI cable (not supplied), and around 5 seconds after being connected, the screen will transfer to HDMI output, and will automatically output sound and image to the TV. 44 @Tab User Manual ___________________________________________________________________________________________________________________________ 9.13 Camera To access both Cameras, touch the icon from within Applications. If the cursor is in the following position Touch the capture button , the device is in Camera mode. to take a picture. Touch to set the scene mode, picture size, picture quality, and colour effect. Touch to set the white balance. Touch to switch between the front or rear cameras. To switch between Still and Movie slide the cursor to the following position Touch the capture button to start recording, touching the capture button a second time will stop the recording and save the footage. Touch to set the colour effect or restore to default settings. Touch to set the video quality. Touch to switch between the front or rear cameras. Pictures and Movies taken with the camera are stored in the Camera folder which can be found by opening Explorer and touching on the DCIM folder and then the Camera folder. Pictures and Movies taken via the camera are also available to play directly from the Video Player. Just open the player and select the picture or movie you want to view. 45 @Tab User Manual ___________________________________________________________________________________________________________________________ 9.14 Widgets Page Widgets are like windows into your apps, they can be accessed from the All Apps tab and can be moved from there to one of your Home screens. To see your available widgets: 1. Touch the All Apps icon on your Home screen. 2. Touch Widgets at the top of the screen. From the main Widgets screen, you can: Move between screens: Swipe left or right. Drag a widget to a Home screen: Touch and hold the widget's icon, slide your finger where you want to place it, and lift your finger. You may be asked to make further choices before the widget activates. If there isn't room where you dropped it, the widget won't be added to the Home screen. 46 @Tab User Manual ___________________________________________________________________________________________________________________________ 10. Troubleshooting 10.1 Device cannot connect to Wi-Fi Ensure the wireless network is working by testing it using another wireless device. Ensure the device is within range of the wireless network to be connected too. Walls or other obstructions will reduce the possible distances between wireless devices. Ensure the security password being used is correct. 10.2 Device doesn’t turn on. You cannot turn on the device when the battery charge is below the critical level, please charge the battery. Check if the charger is connected correctly. 10.3 Heat Issues When running multiple applications, using the screen on its brightest setting, or when being charged, this device can get warm. This is normal and should not cause any inconvenience when in use. 10.4 System has anomalies and doesn’t work correctly Installing some third-party applications may cause the system to not operate correctly. Try uninstalling any recently installed apps that could be causing this problem. 10.5 Cannot setup e-mail or other online applications Ensure that the @Tab is connected to a Wi-Fi network and can connect to the Internet. Ensure you E-mail settings have been entered correctly for the account being accessed. Make sure your system time and local time are correct. 47 @Tab User Manual ___________________________________________________________________________________________________________________________ 10.6 Restoring factory settings If the @Tab appears to have a significant error, you can use this procedure to restore the device to its factory settings. Note: Restoring factory settings will delete all downloaded applications and user settings, so all data will be lost, remember to back up your data before carrying out a factory restore. Tap the Settings icon from Application page. Tap Backup & reset and scroll to the bottom of the list. Tap Factory data reset. The system will enter an erasing data state and the screen will go off. This process takes around 10 seconds, after the erasing process, the system will automatically reboot. 10.7 The touch screen responds slowly or improperly If the touch screen is not responding properly, try the following: Remove any protective covers from the touch screen. Protective covers may prevent the device from recognising your inputs and are not recommended for touch screen devices. Ensure that your hands are clean and dry when tapping the touch screen. Restart your device to clear any temporary software bugs. Check for any major scratches or cracks. These can cause issues when tapping the touch screen in affected areas. 10.8 Error messages appear when opening music files Some music files may not play on this @Tab for a variety of reasons. If you receive error messages when opening music files on your device, try the following: Ensure that the music file is not Digital Rights Management (DRM)-protected. If the file is DRM-protected, ensure that you have the appropriate license or key to play the file. Free some memory by transferring files to a PC or deleting files from your device. 10.9 A connection is not established when you connect the @Tab to a PC Ensure that the USB cable you are using is compatible with your device. Ensure that you have the proper drivers installed and updated on your PC. 48 @Tab User Manual ___________________________________________________________________________________________________________________________ Ensure USB debugging is disabled: Tap the Settings icon from Application page. Scroll to Developer options. Ensure there is no tick by USB debugging. Tap the box to untick this option if necessary. 10.10 An error is occurring when connecting to Google Play Store. To resolve any errors (usually 902 or 101) that occur when connecting to Play Store, try the following: Tap the Settings icon from Application page, then select Apps, select All, select Google Play Store, select Clear Cache & Clear Data. Then from the Settings menu, select Accounts & Sync, then select ”your Google Account” and tap the menu option (the three dots in the top right hand corner, then select Remove Google Account. Finally, add your Google Account again. 11. Support For support on your @Tab product please visit [email protected] and read our frequently asked questions page. Support issues can also be emailed to [email protected], please provide detailed information about the problem you are experiencing. @Tab also provides English-language Technical Support to its customers, which can be contacted by calling +44 (0) 844 997 7666 (calls are charged at 5p per minute). This support line is available from 9:30am to 6:00pm GMT Monday to Friday. If you experience difficulty during the installation or subsequent use of a @Tab product, you should contact the @Tab Technical Support department prior to servicing your system. Firmware Updates Firmware updates may be made available periodically on the @Tab website. Please go to the support section of [email protected] for more information on the availability of any updates and how to perform an update. We hope you enjoy your @Tab product. 49 @Tab User Manual ___________________________________________________________________________________________________________________________ 12. Copyright All rights reserved. No part of this manual may be reproduced, stored in a retrieval system, or transmitted in any form or by any means, electronic, mechanical, photocopying, recording or otherwise, without the prior written permission from the copyright holder. According to copyright law, no recorded data may be used for purposes other than personal enjoyment without permission from the copyright holder. 13. Warranty Information One year limited hardware warranty This product is covered by a one year warranty against defects in material and workmanship. This warranty excludes the battery, which is covered by a six month warranty. This limited warranty applies only to the original end user customer of the product for so long as the original end user customer owns the product. This limited warranty is non-transferable. For all warranty issues please contact your place of purchase. @Tab warrants to the original end user customer of its products specified below that its products are free from defects in material and workmanship. Subject to the conditions and limitations set forth below, @Tab will, at its option, either repair or replace any part of its products that prove defective by reason of improper workmanship or materials. Repaired parts or replacement products will be provided by @Tab on an exchange basis, and will be either new or refurbished to be functionally equivalent to new. If @Tab is unable to repair or replace the product, it will refund the current value of the product at the time the warranty claim is made. This limited warranty does not cover any damage to this product that results from improper installation, accident, abuse, misuse, natural disaster, insufficient or excessive electrical supply, abnormal mechanical or environmental conditions, or any unauthorized disassembly, repair, or modification. This limited warranty also does not apply to any product on which the original identification information has been altered, obliterated or removed, has not been handled or packaged correctly, has been sold as second-hand or has been resold contrary to the US export regulations. This limited warranty covers only repair, replacement or refund for defective @Tab products, as provided above. @Tab is not liable for, and does not cover under warranty, any loss of data or any costs associated with determining the source of system problems or removing, servicing or installing @Tab products. This warranty excludes 3rd party software, connected equipment or stored data. In the event of a claim, 50 @Tab User Manual ___________________________________________________________________________________________________________________________ @Tab’ sole obligation shall be replacement of the hardware. The foregoing is the complete warranty for @Tab products and supersedes all other warranties and representations, whether oral or written. except as expressly set forth above, no other warranties are made with respect to @Tab products and @Tab expressly disclaims all warranties not stated herein, including, to the extent permitted by applicable law, any warranty that may exist under national, state, provincial or local law including but not limited to any implied warranty of non-infringement, merchantability or fitness for a particular purpose. All warranties, whether express or implied, are limited to the periods of time set forth above. Some states or other jurisdictions do not allow the exclusion of implied warranties or limitations on how long an implied warranty lasts, so the above limitations may not apply to you. @Tab products are not authorized for use as critical components in life support equipment or for applications in which the failure or malfunction of the products would create a situation in which personal injury or death is likely to occur. @Tab shall not be liable for the death of any person or any loss, injury or damage to persons or property by use of products used in applications including, but not limited to, military or military-related equipment, traffic control equipment, disaster prevention systems and medical or medical-related equipment. If such use is intended, contact @Tab for components suitable for such applications. @Tab’ total liability under this or any other warranty, express or implied, is limited to repair, replacement or refund. Repair, replacement or refund are the sole and exclusive remedies for breach of warranty or any other legal theory. to the fullest extent permitted by applicable law, @Tab shall not be liable to the purchaser or end user customer of a @Tab product for any damages, expenses, lost data, lost revenues, lost savings, lost profits, or any other incidental or consequential damages arising from the purchase, use or inability to use the @Tab product, even if @Tab has been advised of the possibility of such damages. Some states or other jurisdictions do not allow the exclusion or limitation of incidental or consequential damages, so the above limitations or exclusions may not apply to you. This limited warranty gives you specific legal rights, and you may also have other rights which vary from state to state or jurisdiction to jurisdiction. With regards to citizens of countries that are members of the European Union, if this product is purchased by a consumer and not in the course of a business, this warranty shall not affect your statutory rights as a consumer. This disclaimer does not purport to limit or exclude @Tab’ liability for death or injury caused by its negligence or for fraudulent misrepresentation. 51 @Tab User Manual ___________________________________________________________________________________________________________________________ Limitation of warranty The above warranty shall not apply to defects resulting from: misuse; unauthorized modification; opening for any reason; operation or storage outside the environmental specifications for the product; in-transit damage; improper maintenance; physical damage to the unit, such as a cracked or broken screen or defect resulting from use software, accessories, media, supplies, consumables, or such items not designed for use with the product. There is no other express warranty, whether written or oral, with respect to this product. Any implied warranty of merchantability or fitness for a particular purpose is limited to the one-year duration of this written warranty. Some states, provinces, or countries do not allow limitations on how long an implied warranty lasts, so the above limitation or exclusion may not apply to you. This warranty gives your specific legal rights, and you may also have other rights that vary from state to state, province to province, or country to country. 14. Licencing Google Android is Licenced under the Apache Licence, Version 2.0. More information about this licence can be obtained from http://www.apache.org/licenses/LICENSE-2.0. The source code for the full Android stack is available from the Android Open Source Project site http://source.android.com/. Other mirrored GPL and LGPL'd components are available at http://code.google.com /p/android/downloads/list. Notices for other licenses can be found within the SDK. All information is subject to change without notice. 52 @Tab User Manual ___________________________________________________________________________________________________________________________ 15. Correct disposal of this product (Waste Electrical & Electronic Equipment) (Applicable in the European Union and other European countries with separate collection systems) This marking on the product, accessories or literature indicates that the product and its electronic accessories (e.g. charger, headset, USB cable) should not be disposed of with other household waste at the end of their working life. To prevent possible harm to the environment or human health from uncontrolled waste disposal, please separate these items from other types of waste and recycle them responsibly to promote the sustainable reuse of material resources. Household users should contact either the retailer where they purchased this product, or their local council office, for details of where and how they can take these items for environmentally safe recycling. Business users should contact their supplier and check the terms and conditions of the purchase contract. This product and its electronic accessories should not be mixed with other commercial wastes for disposal. This EEE is compliant with RoHS 16. Correct disposal of batteries (Applicable in the European Union and other European countries with separate battery return systems) This marking on the battery, manual or packaging indicates that the batteries in this product should not be disposed of with other household waste at the end of their working life. Where marked, the chemical symbols Hg, Cd or Pb indicate that the battery contains mercury, cadmium or lead above the reference levels in EC Directive 2006/66. If batteries are not properly disposed of, these substances can cause harm to human health or the environment. To protect natural resources and to promote material reuse, please separate batteries from other types of waste and recycle them through your local, free battery return system. The rechargeable battery built into this product is not user replaceable. For information on its replacement, please contact @Tab support. 53 @Tab User Manual ___________________________________________________________________________________________________________________________ 17. Disclaimer Some content and services accessible through this device belong to third parties and are protected by copyright, patent, trademark and / or other intellectual property laws. Such content and services are provided solely for your personal non-commercial use. You may not use any content or services in a manner that has not been authorised by the content owner or service provider. Without limiting the foregoing, unless expressly authorised by the applicable content owner or service provider, you may not modify, copy, republish, upload, post, transmit, translate, sell, create derivative works, exploit, or distribute in any manner or medium any content or services displayed through this device. Third party content and services are provided as is. @Tab does not warrant the content or services provided, this is neither expressed nor implied, for any purpose. @Tab expressly disclaims any implied warranties, including but not limited to, warranties of merchantability or fitness for a particular purpose. @Tab does not guarantee the accuracy, validity, timeliness, legality, or completeness of any content or service made available through this device and under no circumstances, including negligence, shall @Tab be liable, whether in contract or tort, for any direct, indirect, incidental, special or consequential damages, attorney fees, expenses, or any other damages arising out of, or in connection with, any information contained in, or as a result of the use of any content or service by you or any third party, even if advised of the possibility of such damages. Third party services may be terminated or interrupted at any time, and @Tab makes no representation or warranty that any content or service will remain available for any period of time. Content and services are transmitted by third parties by means of networks and transmission facilities over which @Tab has no control. Without limiting the generality of this disclaimer, @Tab expressly disclaims any responsibility or liability for any interruption or suspension of any content or service made available through this device. @Tab is neither responsible nor liable for customer service related to the content and services. Any question or request for service relating to the content or services should be made directly to the respective content and service providers. 54