1
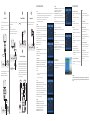
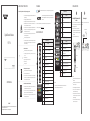
IMPORTANT SAFETY INSTRUCTION TRADEMARK Please read following information carefully before starting your operation! and designs reserved. ® Please turn off power before changing connections between this unit and other related equipments (e.g. TV). Do not unplug signal and AV cables when the unit is on. Please unplug power cord from power outlet when the unit is not in use for a long time. When suddenly move the unit from a hot environment to a cold environment, or vice ! Digital Terrestrial Receiver ® INSTALLATION STEPS are trademarks of Shenzhen Coship Electronics Co., Ltd. All rights concerning marks, logos and brand Name The terms HDMI and HDMI High-Definition Multimedia Interface, and the HDMI Logo are trademarks or registered trademarks of HDMI Licensing LLC in the United States and other countries. PVR Other trademarks, product and company names mentioned herein are the property of their respective owners. V-FORMAT versa, turn off power and turn it on after 1 to 2 hours. Keep the unit away from rain or any other liquid. Object with liquid inside should not be placed on top of the unit. If there is liquid flowing into the unit, pull out power cord immediately to avoid fire or electric shock. Do not cover ventilation holes with newspaper, tablecloth, curtain or other items in For more details, please refer to http://www.coship.com ASPECT REMOTE CONTROL UNIT TIMER order to ensure good ventilation. the outer surface with a dry cloth. Do not let liquids, aerosols, etc. flow into the unit and cause serious damage. -------------------------------------------------------------------------------------------------------------------------------------------------------------- Receiver Keys Name POWER GOTO Switch between operation and standby modes REPEAT Installation environment Good ventilation (keep more than 10cm spacing around the unit) No heat-producing object or device nearby (e.g. candle, radiator, SUB-T heater, stove, amplifier) Moderate temperature No high humidity (e.g. bathroom, kitchen room) No direct sunlight No strong vibration TTX MUTE EPG LANG Select a language to display corresponding Subtitle INFO Display Teletext Mute/restore sound Display program guide Make sure power outlet is near the unit and well-grounded. Do not touch power cord with wet hands. In order to avoid fire or electric shock caused by short circuit, which may endanger USER’S MANUAL personal safety or property damage, do not use a damaged power cord, and please contact your local operator for replacement. -------------------------------------------------------------------------------------------------------------------------------------------------------------- Instructions on remote control unit and battery Put batteries into the battery compartment with polarity consistent with polarity symbols identified inside the battery compartment. If the unit is not in use for a long time, please remove batteries to avoid battery leakage, which may corrode components inside remote control unit. Replace batteries if there is no enough power. Do not discard waste batteries carelessly and pollute environment. -------------------------------------------------------------------------------------------------------------------------------------------------------------- PAGE+/MENU EXIT No part of this manual may be reproduced in any form or by any means without written permission of Shenzhen Coship Electronics Co., Ltd. 2012 Shenzhen Coship Electronics Co., Ltd. All rights reserved. Select aspect ratio, other functions depend on specific applications Display schedule window, other functions depend on specific applications OK FAV Go to desired time point in multimedia file Play multimedia file repeatedly Display recording information, time shift progress bar or multimedia file information / Fast backward/forward (x2, x4, x8, x16, x32 speed) / Switch to previous/next multimedia file TV/RADIO Switch between TV and radio modes 0~9 Switch channels or input numbers RECALL Back to previously viewed channel Display channel information bar or detailed channel information CI Module Smart Card Record current program Exit from operation Display favorite channel list Connect ANT IN port on the receiver to terrestrial antenna with an RF cable. Stop playing, recording or time shift Display main menu or back to previous menu Display channel list or confirm operation Digital TV smart card and CI module are provided by your local operator for watching programs of encrypted channels and accessing digital TV services. The CI module slot is on the rear panel of the receiver. Face the side with electronic chip upwards and insert the smart card into the CI module horizontally according to arrow direction. Insert the CI module into the slot horizontally. (TIMESHIFT) Pause playing or pause playing to start time shift Page up/down Adjust volume or move cursor left/right Connect signal Function Notes: Switch channels or move cursor up/down INFO COPYRIGHT Select resolution, other functions depend on specific applications Only FTA channels are available without the smart card and CI module. Notes: The keys on the front panel of the receiver have the same functions of those on the RCU. Please operate according to the key instructions on screen. Install digital TV smart card and CI module Start playing or return to play at normal speed Select audio language and audio track -------------------------------------------------------------------------------------------------------------------------------------------------------------- Notes for power outlet and power cord Display recorded file list, other functions depend on specific applications Name Function Function Multimedia Keys Do not put any heavy object on top of the unit. Please disconnect power cord from power outlet before cleaning the unit. Gently wipe F8771U Receiver Keys Please remember the smart card number and CI module number in case of queries. Do not bend or damage the smart card and CI module. Do not place the smart card and CI module in hot environment or under direct sunlight. Please use dry and soft cloth to clean the surface of the smart card and CI module gently. Do not put them into liquid or cleaning agent. If the smart card and CI module do not work properly, please contact your local operator. Terrestrial Antenna RF Cable MENU OPERATION GUIDE Connect TV Please choose one of following 3 ways to connect TV. A. Connect HDMI port on the receiver to HDMI port on TV with an HDMI cable. Note: Make sure your TV is set to HDMI input mode. TV Connect USB device C. Connect RF OUT port on the receiver to corresponding port on TV with an RF cable. Connect cable. Connect power port on the receiver to USB device with a USB Connect power cord of the receiver to power outlet. Turn on the power switch on the rear panel. Notes: Make sure your TV is set to TV input mode. You can also connect RF IN port on the receiver to analog USB Device signal source with an RF cable to input analog signal. USB Cable TV Notes: Please press MENU key to display main menu whenever you want to use menu system. In the main menu, press keys to select a sub-menu, press keys to select an item and press key to enter or press keys to switch options. The default system password is “000000”, which you should remember after modification. Shortcut keys are more useful when you watch programs, and their meanings are indicated on remote control unit. 1. Program Program Edit: You can lock channels. System password is required to watch programs of these channels. In addition, you can move, skip, delete and rename channels, and set favorite channels. You can easily select favorite channels in favorite channel list. EPG: You can browse program information in a week and schedule to play or record future programs. All the schedules are displayed in schedule window. You can add, edit and delete schedules. Note: System will remind you near the airtime of the scheduled programs. Sort: You can set channel sort mode. LCN: You can switch on/off LCN. ANTENNA IN HDMI 2. Picture RF Cable HDMI Cable Connect other equipment Aspect Ratio/Resolution/TV Format: You can view and modify aspect ratio/resolution/TV format. RF Setting: If TV is connected to your receiver with RF cable, please set RF audio mode and RF channel. 3. Channel Search RF Cable Analog Signal Source B. Connect VIDEO/R-AUDIO/L-AUDIO ports on the receiver to corresponding ports on TV with an AV cable. Note: Make sure your TV is set to AV input mode. If you need to connect audio equipment, connect R-AUDIO/LAUDIO ports on the receiver to corresponding ports on audio equipment with an audio cable, or connect S/P DIF port on the receiver to corresponding port on audio equipment with an S/P DIF cable, or connect D-AUDIO port on the receiver to corresponding port on audio equipment with a D-Audio cable. If you need to loop output RF signal to another receiver, please connect LOOP OUT port on the receiver to ANT IN port on another receiver with an RF cable. TV RF Cable VIDEO R-AUDIO S/P DIF Cable D-Audio Cable L-AUDIO Audio Cable Auto Search: You can search channels automatically without more operation. Manual Search: You can search channels by specifying frequency channel. Country: Before searching, please select your country of residence. Antenna Power: You can enable antenna power if an external active antenna is connected. D-AUDIO L-AUDIO R-AUDIO ANT IN S/P DIF Another Receiver Audio Equipment 7. USB Multimedia: You can play music, browse photos, play movies and playback recorded files on USB device. In addition, you can delete and rename recorded files. Photo Configure: You can view and modify photo configuration parameters, such as slide time, slide mode, etc. Movie Configure: You can view and modify movie configuration parameters, such as Subtitle background color, Subtitle font color, etc. PVR Configure: You can select recording device. In addition, you can format USB device, and all files will be deleted. CHANNEL LIST Press OK key to display channel list in non-menu mode. You can browse channels of different classes, such as All TV List, All Radio List, etc., and select a channel to play it in full screen. TROUBLE SHOOTING A. THE FRONT PANEL LIGHT IS OFF. F. NO SIGNAL. Make sure power cord is plugged into a live power outlet Make sure signal cable is connected correctly. Program parameters are set wrongly. Please securely. Make sure power switch is in correct position “I”. ------------------------------------------------------------------------- correct parameters. ------------------------------------------------------------------------- B. NO PICTURE. G. PAUSE OR MOSAIC IMAGE. Make sure video cable is connected correctly. Signal is too weak. Please connect signal cable securely. ------------------------------------------------------------------------- ------------------------------------------------------------------------- C. NO SOUND. H. PROGRAM CANNOT BE PLAYED. Make sure audio cable is connected correctly. Press MUTE key to resume volume if the unit is in mute Smart card or CI module is inserted incorrectly. Insert the smart card and CI module correctly. Press Smart card cannot decrypt this kind of program. You have not subscribed to the selected channel. Please Press contact your local operator. ------------------------------------------------------------------------- mode. key to turn up volume if volume is set to minimum. LANG key to select proper audio language and audio track. ------------------------------------------------------------------------- D. NO SOUND AND NO PICTURE. I. THE UNIT STOPS WORKING SUDDENLY. Poor ventilation, or heat-producing object or device is nearby. Put the unit in a cool and well-ventilated place. ------------------------------------------------------------------------- Make sure AV cable is connected correctly. Make sure your TV is set to correct AV input mode. Press POWER key to switch to operation mode if the unit Make is in standby mode. ------------------------------------------------------------------------- No enough E. PICTURE AND SOUND MISMATCHED. Press LANG key to select proper audio language and audio track. ------------------------------------------------------------------------- J. REMOTE CONTROL FAILURE. sure your remote control unit is aimed at the remote control signal receiver on the front panel. power in batteries of remote control unit. Please replace batteries. ------------------------------------------------------------------------- Notes: If you are not sure about parameter values, you can search channels according to defaults. Do not turn off the receiver during searching. 4. Time Time Offset: You can set GMT offset adjustment method. Country Region: If “Time Offset” is set to “Auto”, you can set country region. Note: Options vary with the country you selected. Time Zone: If “Time Offset” is set to “Manual”, you can set local time zone. Sleep: You can set sleep timer, so that when there is no operation within the set time, the receiver will switch to standby mode automatically. Power on/off: You can set timer to switch the receiver to standby mode or operation mode at a set time automatically. 5. Option AV Cable 6. System Parental Guidance: You can view and modify parental control age. System password is required to view programs beyond the set age. Set Password: You can modify system password. Restore Factory Default: This function will restore system settings to factory default and erase all channels. Please use this function carefully! Information: You can view model number, software version and hardware version. Software Update: OAD and USB upgrade are provided for software update. Please follow instruction displayed on screen to perform update when you need it. Note: Do not turn off the receiver during updating. CI Information: You can view information about CI (Common Interface). OSD Language: You can view and modify OSD language. Subtitle Language: You can set preferred Subtitle language. Audio Language: You set preferred audio language. If the set language is not available, the default program language will be used. Digital Audio: You can set digital audio output type. Audio Description: You can adjust voice-over volume. CAUTION! If you cannot solve the problem after referring to above trouble shooting, please contact your local operator. To reduce the risk of electric shock, do not remove the cover. Equipment service and maintenance should be undertaken by trained personnel.