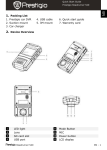
1
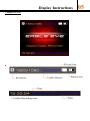
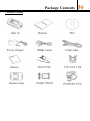
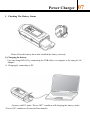
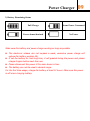
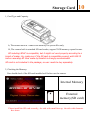
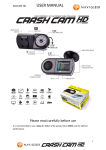
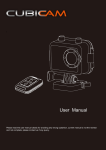
_______________________________________________________________________________________________________________________________________ Pocket Mini HD Digital Video Recorder USER MANUAL Please read this user manual carefully and thoroughly before any attemptto Install and operate this product and retain it for your future reference. CATALOG PREFACE----------------------------------------------------------------------------------1 APPROVAL INFORMATION--------------------------------------------------------1 ABOUT THE MANUAL----------------------------------------------------------------1 WARNING---------------------------------------------------------------------------------2 Main Features-----------------------------------------------------------------------------3 The Name of Each Part------------------------------------------------------------------4 Display Instructions----------------------------------------------------------------------5 Package Contents-------------------------------------------------------------------------6 Power Charger--------------------------------------------------------------------------7-9 Storage Card-----------------------------------------------------------------------------10 Manual Structure--------------------------------------------------------------------11-12 Basic Operation----------------------------------------------------------------------13-19 General Specification-------------------------------------------------------------------20 PREFACE 01 Thank you for purchasing HD119 which has the unique, ultra-small and delicate design. It can be used in many recording situations. HD119 rings more convenience, safety and funs to your daily life. APPROVAL INFORMATION All our products meet the requirements of approval FCC or CE, and are granted the FCC or CE certification. They are authorized to bear FCC or CE mark. FCC: This product has been tested and found to comply with the limits for a Class B digital device, pursuant to Part 15 of the FCC rules. These limits are designed to provide reasonable protection against harmful interference in a residential installation. CE: This product complies with standards including Low Voltage Device Directive 73/23/EEC; EMC Directive 89/336/EEC and R&TTE Directive1999/5/EC. It passed the subject tests by the authority concerned and is authorized to bear CE mark. ABOUT THE MANUAL We do our best to ensure all content and details are correctly and the newest. Whereas not 100% exactly correct. If the instruction content is different with the machine , then the machine shall control. We keep the rights for amending this manual but without notice in advance, besides, the manufacturer also keep the same rights for amending the content and technology specifications. The real packing contents shall control if it is different with the manual mentioned. WARNING 02 Do not store the device in any place with following conditions: - High temperature (45 or higher) - Exposure to the direct sun rays or a heating device - Inside the car with closed windows (especially, in the summer) - Humid place such as the bathroom When removing dust, use soft cloth in dry. Do not use organic solvents such as thinner or benzene or wet cloth. Do not place a debit card or a bus pass near the speakers. The magnetic interference may occur, which will damage the card. Do not place the device near a magnet. The device may not be workable properly. Do not repair, disassemble, or remodel the device. Do not use the product in a place where use of electronic devices is prohibited. Do not operate or set up this device while driving. If it is required to change set up, please do it after pulling over the car or before driving. Do not heat up or short the main body or the battery. When using an auxiliary device, leave a gap between the auxiliary device and the main device. Incorrect use of the product by the user or a third party or static electricity or electric shock loaded on the product may cause loss of or change in the data saved in the product during repair services or replacement of the battery. Keep the device out of reach of children. Waterproof Capability -The waterproof capability of this camera is similar as IPX6; -Please do not use the camera under water; -The camera is not dust-proof; -The accessories is not waterproof; Main Features 03 1.5inch TFT LCD(480 x 240) 5.0 MP High definition CMOS image sensor The most popular MOV video recording format Waterproof function ( Rain water level) Easy operation for recording and taking a picture Optional recording resolution (Full HD/HD/WVGA/VGA) Optional picture resolution(3200 x 2400/8M, 2592 x 1944/5M) Video and Picture playback available Internal SD card reader for memory expand(SDHC 1GB~32GB available) High speed USB2.0 interface for power charge and date transfer HDMI 1080i output 3.7V 1300MA removable and rechargeable Li-ion battery Kinds of Mounts for different use The Name of Each Part 1.Main Unit & Buttons 1,MIC 2,Power on/Power charge indicators 3,MEUN button 4,Down/Fast Forward 5, Up/Rewind 6,Recording indicator 7,1.5inch LCD 8,Power ON/OFF, / Picture Capture / Quit / Confirm 9,Record/Play/Choose 04 Display Instructions 2.Display & Icon 05 Package Contents 3.Package Contents 06 Power Charger 07 1. Checking The Battery Status Please Close the battery door after installed the battery correctly. 1) Charging the battery User can charge HD119 by connecting the USB cable to a computer or by using the AC Adaptor. A. Charging by connecting to PC Connect with PC under “Power OFF” condition will charging the battery, under “Power ON” condition will start the Data transfer. Power Charger 08 B.Charing With AC/DC Adaptor C.Charging With Cigar-lighter 2) Battery Charging Time & Operating Time Charging Time Continuous play time Recording time Approx. 5hrs in Power On Approx :4 hours Approx :2 hours and 30 minutes(1080P) Approx. 3hrs 30mins in Power Off When plugging or unplugging the AC/DC adaptor, turning off the unit is strongly recommended. The maker strongly recommends using a supplied AC/DC adaptor, but if it is necessary that another AC/DC adaptor is purchased separately at a shop, please check its electric specification is in accordance with HD119's specification. Power Charger 09 3) Battery Remaining Status Full Charge Some Power Consumed Power almost drained No Power Make sure the battery and power charge working as long as possible. The electronic release can not surpass a week, excessive power charge will reduce the battery working life; If set the battery for free long time, it will gradual losing the power and please charge it again before next time use. Please disconnect the power if the main device is free. The battery can not be used in deviant range. For the first time usage, charge the battery at least 12 hours. Make sure the power is off when charging battery Storage Card 10 1, Card Type and Capacity. A, The camera built in 32MB ROM memory for system files only. B, The camera built in standard SD card reader, support 32GB memory expand in max. SD including SDHC is compatible, but it might not work properly according to a brand of maker. So, make sure if the SD card is compatible properly with HD119 before recording.SD Card made by Sandisk is strongly recommended. SD card is not included in the package, so user needs to buy separately. 2, Checking the Memory: User should check if the SD card installed well before use the camera. Internal Memory External memory(SD card) Please install the SD card correctly, the side with metal face up, the side with character face down. Manual Structure Main Menu 11 Record Setting System Setting Record Setting Size 1920 x 1080 1280 x 720 848 x 480 640 x 480 Size 8M 5M EV +0/+0.3/+0.7/+1/+1.3/+1.7/+2.0 +0/-0.3/-0.7/-1/-1.3/-1.7/-2.0 White B Auto/Fluorescent/Tungsten/Cloudy/Sunny Contrast Standard Soft Hard Sharpness Standard Soft Hard Effect Recycle Off/Vivid/Monochrome/Negative/Sepia/Art No 15Mins 35Mins 45Mins Audio No Off Manual Structure System Setting Volume Language 1/2/3/4/5/6/7/8 简体中文 繁体中文 English Russian Spanish Italiano 日本 Date YYYY-MM-DD Clock HH:MM Format No Yes Sys.Reset No/ Yes Off Auto Off 5Mins 3Mins 1Min Light Fred 50Hz 60Hz Stamp On Off Lcd Off Off 5Mins 3Mins 1Mins Version V2010924 12 Basic Operation 13 1,Record Setting Long press Use to power on, then press and to save and quit. to enter the setting menu . to select menu,press to change setting and press 2,System Setting Press to enter the record setting menu, then press setting” and “record setting” switch condition, then press setting” menu. Use press and to select menu, and press to save and quit. to enter the “system to switch to the “system to change the setting, then Basic Operation 14 3, Take picture and Record video Short press under monitor condition will take a picture, the red recording indicator will flash one time at the same. Short press under monitor condition will start the video recording, the red recording indicator will keep flash, the upper left corner of the screen will display a red REC icon . (Figure below) Red indicator mean the camera is under recording condition, 00:03:29 is the recorded time. How long time that the SD card could record ? Below is the available recording time for video and pictures .( For reference only, real parameters shall control) SD Card 1280x720P 1920x1080P 848x480P 2592x1944 3200x2400 8GB 200min 120min 320min 3996photos 3193photos 4GB 100min 60min 160min 2386photos 1565photos 2GB 50min 30min 80min 1148hotos 753photos 1GB 25min 15min 40min 589photos 386photos Basic Operation 15 4,Video playback A, Playback in the camera Long press and to enter the playback condition, under the monitor condition, use to select video files. Video file display: Picture file display: Lantern slide browse: User could browse the files by slide playback mode, press under playback condition, use to select “SLIDE SHOW” menu, choose the playing speed and then press to confirm the setting. Basic Operation 16 B,TV playback(HDMI) Connect the camera with TV by HDMI cable, power on the camera, switch the TV to the HDMI video channel. Long press to enter the playback condition under playback condition, use to select the files, short press While playing the files, you could use and to play the files. and to do Fast Forward and Rewind. Press Long press to stop playing and quit. to quit playing back menu. Attention: The output resolution is 1080i in playback condition, 480i in recording condition, some TV would be can’t display correctly that because the TV does not support 1080i HD signal, the camera will recognize the TV system when connected. Basic Operation 17 C,Delete files Under the playback condition, press delete operation. ( Figure below) Press to select YES. Press to confirm “ delete” operation. 在 to switch out the delete menu and do the Basic Operation 18 D, Connect with Computer Connect HD119 to PC thru the provided USB cable for downloading or uploading files and upgrading firmware ① Connect the Camera with Computer by the USB cable ② Power on the camera ③ The screen of the camera will display“USB connected” . Attention:User can not do any operation on the Camera after connected with the computer, only operation in computer available. Basic Operation 19 ④ Open “my computer” to check if there has the removable hard disk, called “NO_NAME” . Picture details: ⑤ Open the video files in the folders. ⑥ Check the video files in the folders, and play it by the default media player in your computer. Advise:Advise the user to use “KM player” media software to play the video files. General Specification SPEC Detail & Support Internal Storage Device 32MB SD Card 1-32GB LCD Sensor H/W Audio PC Interface Size Other functions 1.5inch Resolution 480x240,TFT Optical Format 1/2.5inch(4:3) Active Pixels Video Power Size Remark Support SDHC 32GB 2592H x 1944V Output Ch 1Ch Built-in MIC YES Output Ch 1Ch Speaker Battery Mono USB 2.0 (High Speed) 3.7[V], 1300[mAH] AC Adaptor DC 5V, 1.5A USB 20 Dimensions 116x27.2x44.8[mm] Weight Memory Change in Memory Full Time Stamp 133[g] Record Quality Select YES Slide Show YES LCD On/Off YES Video/Audio Select YES Image Thumbnail View NO Support LCD Off to Recording YES Recording backup to low battery YES Auto Power Off YES YES YES TV/LCD Selectable Li-ion Polymer Battery installed Video Format Recording Video Recording Audio Rec. NTSC/PAL Video+Audio, Video 1920x1080 30fps 1280x720 30fps 848x480 60fps 640x320 60fps Resolution Video & Audio Rec YES Resolution 1920x1080 1280x720 848x480 640x480 Frame Rate Max. 30 fps Max. 60 fps Video File Format Playback PC Player HD=H.264 Playback speed 1/8, 1/4, 1/2, 1, 2, 4, 8 KM Player Stored in the folder of HD119 Internet Download available We will not inform you if there is any modification for user maual in future