1
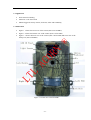
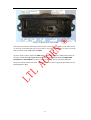
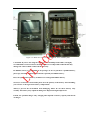
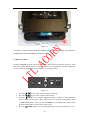
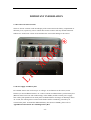
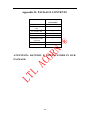
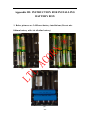
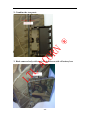
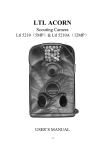
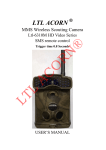
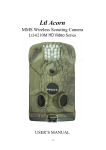
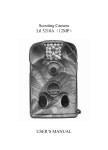
LTL ACORN ® Infrared Digital Scouting Camera LT L AC O RN ® Ltl-6510 MC 1080P video 0.8 Second Trigger Time USER’S MANUAL TABLE OF CONTENTS General Information .......................................................................................................................1 1.1 Features ...............................................................................................................................1 1.2 Application..........................................................................................................................2 1.3 Illustration ...........................................................................................................................2 Quick Start.......................................................................................................................................5 2.1 Load Batteries .....................................................................................................................5 2.2 Insert SD Card.....................................................................................................................5 2.3 Enter Test Mode ..................................................................................................................6 2.4 Enter Live Mode .................................................................................................................8 2.5 Advantages of two horizontal PIR design .........................................................................8 ® Advanced Settings .........................................................................................................................10 3.1 Parameter Settings.............................................................................................................10 3.2 File Format........................................................................................................................12 3.3 Set up Camera on PC ........................................................................................................13 LT L AC O RN Ltl-6510MC Products ...................................................................................................................16 4.1 Parts...................................................................................................................................16 4.2 Models for Purchase..........................................................................................................16 Important Information .................................................................................................................17 5.1 Prevent From Short-Circuits .............................................................................................17 5.2 Power Supply and Battery Box .........................................................................................17 5.3 SD Card.............................................................................................................................18 5.4 Auto Adjustment on Video Length....................................................................................18 5.5 850nm and 940nm IR LED ...............................................................................................18 Firmware Upgrades ......................................................................................................................19 6.1 Firmware Upgrades...........................................................................................................19 Warranty Information..................................................................................................................20 Appendix I Technical Specifications............................................................................................21 Appendix II Package Contents ....................................................................................................23 Appendix III Instruction For Installing Battery Box.................................................................24 Appendix IV Instruction For Installing Camera With Battery Box.........................................26 GENERAL INFORMATION Introduction Ltl-6510MC is the second generation of 6510 series scouting camera. With its highly sensitive Passive Infra-Red (PIR) sensor the camera detects the sudden change of ambient temperature caused by moving game in a region of interest (ROI), triggered to take pictures/videos. 1.1 Features: Programmable 2 or 5 or 12-Megapixel high-quality resolution. There are two selects of IR LED on the Ltl-6510MC camera, 850nm and 940nm. The former provides up to 25 meters flash range whereas the latter up to 13 meters flash range. In “Cam + Video” mode, camera takes both pictures and video at every trigger event. Ultra low standby power consumption. Extremely long in-field life (in standby mode, up to 6 months with 12 x AA batteries). LTL ACORN unique two horizontal PIR patented design comes up with a 100° angle of induction, makes our camera activated in advance and gets ready to shoot, this split-second process could be short as 0.2 second. Two horizontal PIR design improves accuracy on shooting, decrease shoots happening by mistake. Perform in the most extreme temperatures from -22°F to 158°F. Compact size. Well designed to deploy covertly. Rapid trigger time (0.8 second). In Time Lapse setting, the camera automatically and constantly takes pictures/videos at specified interval. This is very useful when observing plants flowering, birds building nest, or when monitoring unattended properties such as parking lots. With Timer setting on, the camera can be programmed to only work in specified period every day. This feature can work together with Time Lapse feature. Convenient to be mounted on trunk or tripod. Serial Number setting enables you to code locations in the photos. This helps multi-camera users identify the location when reviewing the photos. Built-in 2.36” TFT color display to review images and videos. Date, time, temperature and moon phase would be stamped on the bottom of the pictures. Lockable and password protected. Users can configure the Camera on the computer, or directly on the built-in TFT screen. RN AC O L LT ® -1- 1.2 Application Trail camera for hunting Animal or event observation Motion-triggered security camera, for home, office and community 1.3 Illustration L AC O RN ® Figure 1.1 shows the front view of the camera (Part # Ltl-6510MC) Figure 1.2 shows the bottom view of the camera (Part # Ltl-6510M) Figure 1.3 shows the back view of the camera (Part # Ltl-6510M) and front view of the battery box (Part # Ltl-BM2) LT Figure 1.1: Front View of Ltl-6510MC -2- ® Figure 1.2: Bottom View of Ltl-6510M RN The camera provides the following connections for external devices: USB 2.0 port, SD card slot, TV out jack, and external DC power in jack. The 3-way Power/Mode Switch is used to select the main operation modes: OFF, ON and TEST. LT L AC O To power up the camera, install four NEW high-performance alkaline or lithium AA batteries in the camera. FOR BETTER PERFORMANCE, WE RECOMMEND USING ENERGIZER LITHIUM AA BATTERIES. To achieve longer in-field life, always install the additional battery box which contains four more AA batteries. (Please refer to Appendix III: Instruction For Installing Battery Box) -3- ® RN AC O Figure 1.3: Back View of Ltl-6510M and Front View of Battery Box CAUTION: If you are not using the camera for an extended period of time, it is highly recommended to remove batteries from the camera to avoid possible acid leak that may damage the camera which would void the warranty. LT L In addition, battery is not included in our package, be sure to purchase a qualified battery, please pay attention to following instructions especially for lithium battery: First, the specification of battery is 18650 3.7V rechargeable lithium battery. Second, to avoid short-circuit faults please note the polarity of the battery when installing, you can refer to the sign on the battery compartment. Third, to prevent the environment from damaging .Please do not throw battery away casually. The battery may explode if damaged or disposed in high temperature. Fourth, use specified charger only, charging time depends on battery capacity and current of charger. -4- QUICK START 2.1 Load Batteries To install batteries on the camera (Part # Ltl-6510M ), please follow the instructions below. Follow direction of arrow, push left slip switch, it will pop out. Install 4 AA batteries. Make sure the polarity matches the sign on the cover. Replace the cover. ® RN To install the additional battery box (Part # Ltl-BM2), please refer to Appendix III: Instructions For Installing Battery Box) AC O Alternatively the camera can run on an external 6V~12V DC power source (optional). When both external power and batteries are connected, the camera will be powered by the external one preferentially. Bundled with our external solar power supply (purchased separately), the camera could work in the field over one year without changing batteries. L When battery level gets low, on the TEST mode, the message “Low Battery” will show on the TFT screen. On live mode, the Motion Indicator in the LED array will flash blue. LT 2.2 Insert SD Card The camera does not come with internal memory. So it will not work without a SD (Secure Digital) memory card or SDHC (High Capacity) card. Before inserting the SD card into the card slot, please make sure the write-protect switch on the side of the SD card is “off” (NOT in the “Lock” position). The supported memory capacity is up to 32GB. If you use a card which capacity is larger than 32GB, make sure you test it in advance. -5- ® RN Figure 2-2 2.3 Enter Test Mode AC O CAUTION: ALWAYS SWITCH THE CAMERA TO OFF MODE BEFORE YOU INSTALL OR REMOVE THE BATTERIES OR THE SD CARD. LT L Switch to the TEST position to enter the Test mode. In this mode you can take pictures or video clips like a regular digital camera, or enter the Menu to set up parameters. On the keypad there are four “shortcut” functional keys (see Figure 2-3) working as below: Figure 2-3 Press the key to set the camera to shoot video clips. Press the key to set the camera to take pictures. Press the SHOT key to manually trigger the shutter. A photo or video (depending on the camera setting) will be taken and saved to the SD card. If the display shows “CARD PROTECTED” when you press the SHOT key, switch the power OFF, remove the SD card and slide its write-protect switch to off. Press the REPLAY key to review/playback photos/videos on the TFT screen, or a -6- connected TV monitor. Use and key to navigate.Use and key to zoom in and out on the pictures.Under zoom in,short press to move picture leftwards, to move rightwards, long press long press to move picture upwards, short press to move downwards. There is another key MENU, on the keypad that allows you to program the camera to work the way you want. Please refer to 3.1 Parameter Settings in Advanced Operation section. Under the test mode, one useful function you would like is testing the work area of the PIR (Passive Infrared) sensor, specifically the sensing angle and distance. To perform the test: First strap the camera on a tree aiming the region of interest (ROI). Walk slowly from one side of the ROI to the other parallel to the camera. Try different distances and angles from the camera. If the Motion Indicator flashes red, it indicates the position from where you are detected by one of the right PIR sensor. If the Motion Indicator flashes blue, it indicates the position from where you are detected by the left PIR sensor. When Motion Indicator both flashes red and blue ,it indicates the position where you are detected by overlapping area of left and right PIR sensors, it is the region where camera is ready to shoot. RN ® AC O Through the test, you can find the best placement when mounting and aiming the LTL ACORN camera. In general, you are recommended to place the camera 3 to 6 feet (1 to 2 meters) above the ground. LT L To avoid potential false triggers due to temperature and motion disturbances, please do not aim the camera at a heat source (i.e. the sun) or nearby tree branches and limbs. The ideal direction to aim at is North or South. Also, remove any limbs close to the front of the camera. -7- 2.4 Enter Live Mode Switch to the ON position to enter the live mode. The Motion Indicator will flash red for about 10 seconds and the camera starts working by itself without any manual handling. When game first crosses the PIR area of the PIR sensor, the related PIR sensor will detect and activate. If the game continually enters into the overlapping area of left and right sensor, the camera takes picture or video immediately. If the game turns back instead of enter into overlapping area, the camera will turn off goes on sleep mode. 2.5 Advantages of two horizontal PIR design RN ® In general, to save battery power, an Infer-Red camera is in “sleep” mode, with only the PIR sensor working. When game is detected by the PIR sensor, the camera is powered on and starts shooting pictures. The period from being activated to start firing is called trigger time. The trigger time varies from different scouting camera brands in the market, generally from 1.3 to 5 plus seconds. Our LTL ACORN scouting camera has an impressive 0.8 second trigger time. Ltl-6510MC infrared camera is our latest product with new patented design of two horizontal PIR sensors. This design has the following advantages: LT L AC O Minimize the time for shooting. Two side PIR come up with a 100° angle of induction, a very wide scope far outweighing the 52 ° angle of the camera lens. When game first crosses the PIR area of the PIR sensor, the camera is activated and ready to shoot. If the game continually enters into the overlapping area of left and right sensor, the camera takes pictures immediately, therefore catching the whole body of the game. This split-second process could be short as 0.2 second. However, when game passes quickly, traditional camera may only capture the rear part of the game, and possibly nothing at all .While our LTL ACORN scouting camera can catch the complete picture. Enhance the capacity of resisting disturbance. Since the camera would be influenced by different levels of electromagnetic interference in different environment. Our LTL ACORN scouting camera designed with two horizontal PIR sensors, it takes picture or video only when two side PIR both been triggered, thus to avoid wrong shoot by the shortage of anti-interference capability on single PIR. Detect the position of the game. When game comes into detective area from random direction, related PIR will feedback to Camera Processor. The system would judge if there is game into PIR area, whether it is in one side of PIR sensing area (Left PIR/Right PIR) or in shooting area. -8- -9- L LT RN AC O ® ADVANCED SETTINGS The LTL ACORN trail camera comes with preset manufacturer settings. You can change the settings to meet your requirements. Please make sure the camera is in the TEST mode. 3.1 Parameter Settings to move the marker, , Press “MENU” key to enter/exit the menu. Press , change the setting, and to confirm the change. Always remember to press the change. Otherwise you will lose your new setting. Parameter Settings to to save Description (Bold = default) Camera, Video, Cam+Video Select whether photos or video clips are taken. In Camera+Video mode, camera first takes photos and then shoots videos immediately. Enter All files will be deleted after formatting the SD card. Highly recommend to format the SD card if it has been used previously on other devices. Caution: RN Format ® Mode AC O make sure wanted files on the SD card have been backed up first! LT Video Size (affects video clips only) 12MP, 5MP,2MP L Photo Size (affects photos only) Set Clock Picture No. (affects photos only) Video Length (affects video clips only) Interval 720P VGA 1080P Enter Select desired resolution for photos from 2 to 12 megapixels. Higher resolution produces better quality photos, but creates larger files that take more of the SD card capacity. Besides, larger files require longer time to write to the SD card, which will slightly slow the shutter speed. 5MP is recommended. Select video resolution (pixels per frame). Higher resolution produces better quality videos, but creates larger files that take more of the SD card capacity. 720P is recommended. 720P=1280x720;VGA=640x480;1080P=1440x1080; Press Enter to set up date and time. Internal capacitor will retain the clock time for up to 7 minutes when changing batteries. 01 Photo, 02 Photo, 03 Photo Select the number of photo taken in at every trigger in Camera mode. Please also refer to the Interval parameter. AVI 10 s, optional from 1s to 60s Videos are in AVI format that can be played back on most media players. 1 Min, optional from 0S to 60M Select the length of time that the camera will wait from when the last picture was taken and written in the SD card, until it responds to any new triggers - 10 - from the PIR sensor. During the selected interval, the camera will not take pictures/videos. This prevents the SD card from filling up with too many redundant images. Select the sensitivity of the PIR sensor. The High setting suits indoors and environments with little interference, while the Normal/Low suits outdoors and environments with more interference, Off which turns the function off(Note: in this mode, the PIR sensor is closed. )Temperature also affects the sensitivity. The High setting is suitable when the ambient temperature is warm, and the Low setting is helpful in cold weather. Time Stamp (affects photos only) On, Off Select On if you want the date & time imprinted on every photo. Timer Off, On Select On if you only want the camera to work within a specified time period every day. For instance, if the starting time is set at 18:35 and the ending time at 8:25, the camera will function from 18:35 the current day to 8:25 the next day. Outside the time period the camera will not be triggered or take photos/videos. This feature can be used together with Time Lapse feature. Timer 2 Off, On LT L AC O RN ® High, Normal, Low, Off Sense Level Password Set Off, On Serial NO Off, On Time Lapse Off, On Select On if you only want the camera to work within a specified time period every day. For instance, if the starting time is set at 18:35 and the ending time at 8:25, the camera will function from 18:35 the current day to 8:25 the next day. The camera won’t be triggered or takes photos/videos outside the time set. This feature can be used together with Time Lapse feature. Set up a password to protect your camera from unauthorized users. (THE PASSWORD CAN ONLY BE SET UP ON THE CAMERA, NOT ON THE PC.) Select On to assign a serial number to each camera you have. You can use the combination of 4 digits (0~9) and/or alphabets (A~Z) to record the location in the photos (e.g. YSP1 for Yellow Stone Park). This helps multi-camera users identify the location when reviewing the photos. If set On, the camera will automatically take photos/videos at the set interval. It would be helpful when observing cold-blooded animals like snakes, or - 11 - the process of flowering, etc. This feature can work together with Timer feature. Beep Sound On, off Choose OFF to turn off the sounds made by pressing the keys. SD Cycle Off, On Choosing ON enables the “cycling save” function, which automatically deletes the oldest files when the SD card becomes full to make room for the latest pictures and/or videos. Press OK Enter to return all your camera settings back to the manufacturer default setting. RN ® Default Set AC O 3.2 File Format The SD card stores all original pictures and videos in the folder \DCIM\100IMAGE. Pictures are saved with filenames like IMAG0001.JPG and videos like IMAG0001.AVI. LT L In the OFF mode, you can use the provided USB cable to download the files to a computer. Or you can put the SD card to a SD card reader, plug in a computer, and browse the files on the computer without downloading. The AVI video files can be played back on most popular media players, such as Windows Media Player, etc. - 12 - 3.3 Set up Camera on PC After formatting the SD card on the camera, pop the SD card out and insert it into your computer. (If your computer cannot read SD cards, you may need to purchase a SD card reader) Of course, you can also directly connect the camera with your PC using a USB cable. Find the enclosed compact CD from the packaging box and put it on the CD tray. (If your PC does not have a disc drive then you would need an external disc drive.) Run the Setup.exe file. You can also access the same setup file by visiting the LTL ACORN national distributor’s website to download and following the link http://www.ltlacorn.cn/about/downloaden.html (download→classification→software→PC Setup→Setup.exe) ® The following Setup.exe illustration: LT L AC O RN Click on Setup.exe, and you will see the following interface: Select your language and model. For model selection, Ltl-6510MC shares the Camera setup function with other models of 6510 series .Then click on Camera Setup, and you will see the following interface: - 13 - ® RN AC O L LT Set up the camera based on your own need. Please refer to Section 3.1 Parameter Settings in Advanced Settings to find detailed explanations for each setting. Set up the camera based on your need. Click on Click on to retrieve the computer time. to choose the directory to save your settings, usually under the root directory of the SD card (You need to insert the SD card in the SD card reader and plug it in your computer.) - 14 - You can use the manufacturer default settings by clicking on if needed. . A message window will pop out as below. Then, click on ® A file named menu.dat will be created and saved in the directory you just selected. If you selected a directory other than the SD card, you need to move the menu.dat file to the root directory of the SD card before inserting the card into camera. RN Retrieve the SD card and insert it in the camera. Switch to the TEST position to enter the TEST mode. Message “Updated menu.dat Successfully” show up on the TFT display, indicating the setup file has been successfully installed on the camera. LT L AC O ATTENTION: THE PASSWORD CAN ONLY BE SET UP ON THE CAMERA, NOT ON THE PC. - 15 - Ltl-6510MC PRODUCTS 4.1 Ltl-6510MC Consists of Two Parts: 1. Ltl-6510M Camera 2. Ltl-BM2 Standard battery box (without MMS-module) L AC O RN ® 4.2 Models for Purchase: Ltl-BM2 Standard battery box LT Ltl-6510M Camera - 16 - IMPORTANT INFORMATION 5.1 Prevent From Short-Circuits LT L AC O RN ® There are electric contacts on the TFT display of the camera and on the battery compartment of the battery box, respectively. Never contact these electric contacts with any metallic materials. Otherwise it would cause a short circuit and therefore irreversible damage to the camera. 5.2 Power Supply and Battery Box Ltl-6510MC camera can work on up to 12 voltages. 4xAA batteries in the camera, 4xAA batteries (Or 8xAA alkaline batteries. Or 2 cells of 18650 size lithium battery) in the battery box (Batteries must lean to one side without empty in the middle), and the external power supply form a three-path parallel circuit. Each path is isolated and does not charge nor discharge others. As a result, the working time of camera in the field would be extended by powered by an external solar panel. To install the additional battery box (Part # Ltl-BM2), please refer to Appendix III: Instructions For Installing Battery Box. - 17 - 5.3 SD Card There are plenty of different brand SD cards on the market. We tested on our camera as many brands as we can. However, we cannot guarantee every brand SD card will work compatibly with our camera. Please format the SD card on the camera before use. If it doesn’t work, please try another brand SD card. 5.4 Auto Adjustment on Video Length ® To extend the battery life, we strongly suggest to use additional battery box when having the camera running in Video mode or Cam+Video mode. Compared to other brand hunting camera on the market, our camera takes thirty percent more full-length video clips. Besides that, when battery power gets low, our camera automatically shortens the video length so as to take more clips of more game. As a result, the total number of video clips is twice or three times as other brand camera, it provides users with more useful information. AC O RN Note: Our camera performs at extreme cold environment as low as -30°C (-22°F), in which the battery power capacity deteriorates drastically. Therefore, the number of video clips decreases accordingly. 5.5 850nm and 940nm IR LED LT L There are two selects of IR LED on the Ltl-6510MC camera, 850nm and 940nm. The former provides up to 25 meters flash range whereas the latter up to 13 meters flash range. The benefit of 940nm IR LED, however, is it emits black flash that is invisible in the dark. - 18 - FIRMWARE UPGRADES 6.1 Firmware Upgrades The manufacturer reserves the right to upgrade the camera and the firmware. Follow the steps below to implement the upgrades: ® Back up the contents on the SD card on your computer Install batteries and the SD card in the camera. Format the SD card on the camera. Retrieve the SD card and insert it in your computer (SD card reader may needed). Copy the FW6510.bin file into root directory of the SD card. (Consult with the national distributor if there is an upgrade available and where to download it.). AC O RN Retrieve the SD card, insert SD card back in the camera. Switch camera to TEST position. Until the logo “Updated Firmware Successfully” appears on the TFT screen. Enter MENU, navigate the marker to DEFAULT SET, and press OK. Re-format the SD card on the camera. The upgrade will have been installed successfully. LT L Attention: A firmware upgrade program for one model is not compatible on other models. In other word, an upgrade for Model Ltl-6510MC only applies to this model. If a camera is accidently upgraded by a non-compatible program, it will quit working and needs to be sent back for repair. This issue is not covered under warranty. - 19 - LIMITED WARRANTY We take great pride in our products. We always stand behind our promises. We provide leading warranty term and service. Every LTL ACORN trail camera comes with a limited times warranty. We guarantee our trail cameras to be free of defects in materials and workmanship under normal use and service for a period of a limited time after the registered date of purchase. This warranty does not cover damages caused by misuse, abuse, or improper handling or installation, by user installed batteries, or by repair attempts of someone other than our authorized technicians. RN ® In the event of a defect under this warranty, we will, at our option, repair your camera or replace it with the same or comparable model free of charge, provided the product is returned postage paid. This warranty only extends to the original retail buyer from our authorized dealer. Purchase receipt or other proof of the date of the original purchase is required to receive warranty benefits. The warranty on any replacement product provided under the original warranty shall be for the remaining portion of the warranty period applicable to the original product. AC O This warranty extends solely to failures due to defects in materials or workmanship under normal use. It does not cover normal wear of the product. LT L Please contact our tech support department to determine the nature of the problem before you return a LTL ACORN product under this warranty for repair or exchange. - 20 - Appendix I: TECHNICAL SPECIFICATION Parameters Ltl-6510MC Image Sensor 5 Mega Pixels Color CMOS Yes Max. Pixel Size 2560x1920 Yes Lens FOV=52°; Auto IR-Cut Yes IR Flash 850nm LED: 25Meters Yes Item 940nm LED:13Meters 48x35.69mm(2.36"); TFT Screen 480(RGB)*234DOT; Yes 16.7M Color Operation Keypad 6 Keys Yes Memory SD Card (8MB ~32GB) Yes Picture Size 5MP/12MP/2MP = Yes 2560X1920/4000X3000/1600 X1200; 1440x1080: 15 fps; 1280x720: 30fps; 640x480: 30fps; Yes ® Video Size High/Normal/Low/Off Yes PIR Sensing Distance 13~15Meters Yes PIR Sensing Angle 100° AC O RN PIR Sensitivity Yes 55° Yes Operation Mode Day/Night Yes Trigger Time 0.8 Second Yes Trigger Interval 0sec. - 60min; Programmable Yes Shooting Numbers 1~3 Yes L PIR shooting angle 1-60sec.; Programmable LT Video Length Yes Camera + Video First take Picture then Video Yes Playback Zoom In 1~16 Times Yes Time Stamp On/Off; Include serial No., temperature and Yes moon phase Timer On/Off; Programmable Yes Timer 2 On/Off; Programmable Yes Password 4-Digit Numbers(0~9); Yes Device Serial No. 4 digits(0~9) and/or alphabets(A~Z) set by Yes yourself; Time Lapse On/Off , Programmable; Yes 0 Second ~ 23 hours 59 minutes and 59 seconds Power Supply 4xAA alkaline batteries in the camera; 4xAA alkaline batteries (Or 8AA alkaline - 21 - Yes External DC Power Supply batteries, Or 2 cells of 18650 size lithium battery) in the battery box (Batteries must lean to one side without empty in the middle). Plug Size: 4.0x1.7 6 ~ 12V (1 ~ 2A) Stand-by Current 0.4mA Yes Stand-by Time 3~6 Months(4xAA~12xAA) Yes Auto Power Off Auto power off in 3 minutes while no keypad Yes Yes controlling Power Consumption 150mA (+400mA when IR LED lights up) Yes Low Battery Alarm 4.2~4.3V Yes Interface TV out (NTSC); USB; SD Card Slot; 6V DC Yes ® External Yes Waterproof IP54 Operation Temperature -22~+158°F/-30 ~+70°C Operation Humidity 5% ~ 95% Certificate FCC & CE & ROHS RN Strap; Tripod LT L AC O Mounting - 22 - Yes Yes Yes Yes Appendix II: PACKAGE CONTENTS Quantity (Ltl-6510MC) Digital Camera 1 Additional Battery Box 1 (Standard) TV AV IN Cable 1 USB Cable 1 Strap 1 External DC Cable (optional) 1 CD 1 Warranty Card 1 RN ® Part Name LT L PACKAGE. AC O ATTENTION: BATTERY IS NOT INCLUDED IN OUR - 23 - Appendix III: INSTRUCTION FOR INSTALLING BATTERY BOX 1. Below pictures are 3 different battery installations (Do not mix AC O RN ® lithium battery with AA alkaline battery) (2) LT L (1) (3) - 24 - AC O RN ® 2. Combine the two parts LT L 3. Hook camera body with two lock buckles on side of battery box - 25 - AC O RN ® 4. Snap on lock buckles Appendix IV: INSTRUCTION FOR INSTALLING CAMERA WITH BATTERY BOX L 1. Mount on tripod LT The camera can be mounted on a 1/4" tripod. Fix the camera to tripod by screw up the nut, and then adjust shooting angle. - 26 - 2. Mount on tree trunk AC O RN ® Fits holes on battery box with four tiny plastic bolts can avoid cameras being slipped off from tree and loose. Then across stripe holes with a strap, mount the camera on tree trunk. Besides, to avoid cameras being stolen and damaged, use a chain and lock to keep it safe if possible. LT L (1) (3) - 27 - (2)