1
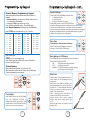
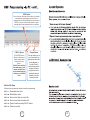
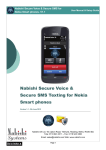
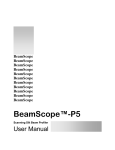
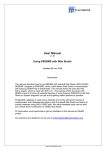
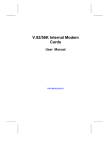
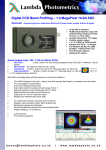
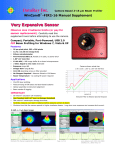
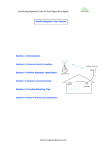
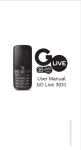
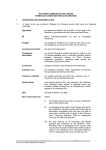
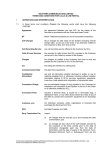
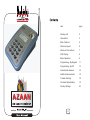
item
page
Packing List
3
Introduction
4
Main Features
5
Receiver Layout
6
Receiver Connections
7
LCD Display
8
Basic Operation
9
Programming - By Keypad
11
Programming - By PC
14
Questions & Answers
18
Additional Accessories
18
Trouble Shooting
19
Technical Specification
19
Factory Settings
20
2
3
4
Quick - Keys
Channel Access
These give immediate
access to the channel
assigned
to
them.
Channel has to be
programmed first for
these to function
5
Programming Keys
Function Keys
Used to enter alphanumeric
characters
into the receiver when
programming.
Use same technique
as mobile phone.
eg:
A = press key 2 once
B = press key 2 twice
and so on...
Have various functions
detailed later in the
manual from SCAN to
VOLUME adjustment
and programming
6
Aerial Socket
To
connect
aerial
supplied to the receiver
- fully extend to give
maximum performance.
This BNC socket also
connects receiver to
external aerial via cable
supplied.
rs
t
nd
T
F el
a :
x +
:
+ 4
-m w 4 4
4 (
: w ( 0
s w 0 )
a . ) 1
le n 1 1
a
s b 1 8
@ i 8 9
s
n h 9 56
a i. 5
b c 6 8
is o 7 1
h m 1 8
i.
6 1
c
6
o
m
u g la
d
eh n
Lt
T il á E
K ad á J
U Ro tate0 4B
h i on Es 3
DC Power
Socket
Switches the receiver
on & off. If rechargeable
batteries are installed in
the receiver, these will
continue to be charged.
To connect the mains
charger supplied. This
supplies low voltage
power to the receiver
and also charges the six
rechargeable
battery
cells when fitted.
Programming
Socket
Audio Output
Socket
To enable the receiver
to be programmed via
the PC cable supplied
as a faster alternative
to programming via
receiver keys.
Audio
output
to
external speakers or
personal headphones
via 2.5mm jack plug
e
t
G
i s Uptrial á R
a b16ncdushire
N
I
s
d erk
oa
R á B
e
g
e
D d in
ea
R
ON/OFF
Switch
Signal
Strength
Indicator
Indicates
the mosque
signal
strength
Main
Display
Can be user
programmed
with mosque
name or the
channel number
CTCSS
Indicator
Scanning
Indicator
Battery
Power
There is a CTCSS
tone set in this
channel. The Azaan
message signal from
your mosque
automatically
activates the receiver
Receiver is
in scanning
state.
This scans
all selected
channels
Internal
rechargeable
battery
indicator
Squelch
Indicator
The squelch
(mute) has been
opened. This cuts
out background
static noise from
the speaker when
no signal is being
received
Remove cover screw and fit cells
as shown.
Note: Do not dispose of any
batteries by incineration.
7
8
Time
Display
Scan List
Indicator
Displays
in 24 hour
mode.
A = This
channel has
been added
to your
scanning list
Switching Receiver On
Quick - Keys or Quick Channel Access
Slide the ON / OFF switch to ON position, a 'bleep' will
be heard. Ensure the unit is powered by:
DC Charger - supplied
Six Rechargeable Batteries - supplied
Six Alkaline Batteries - see note on page 3
Press one of the Quick-Keys to take you direct to that channel.
eg CH 1 to take you direct to Channel 1.
Note: These four channels must be programmed (not empty) for this to work
CH 1
CH 2
CH 3
CH 4
Volume Adjustment
Press the [VOL] key and you will hear a background noise & VOLUME level
will be displayed. To adjust the volume press [UP to 10] or [DOWN to 1].
If you wait for 5 seconds the display reverts to normal state.
UP
UP
Channel Name Setting
Press [FUNC] key and the display will show channel or
function setting. Press [FUNC] again for submenu.
Set mosque name using keypad. Operation as a mobile
phone. [#] = CAPS / lower case
DOWN
DOWN
VOL
FUNC
MNO
WXYZ
Keypad Lockout
To avoid accidental operation of the receiver press the asterisk button for 3
seconds to lock the keypad. When locked, an asterisk appears at bottom
right of display. To unlock press the asterisk button again for 3 seconds.
UP
Channel Adjustment
Press [UP] or [DOWN] keys to increase or decrease
from CH:01 to CH:99
DOWN
etc...
Scanning Preset Channels
SCAN
Press [SCAN] key & receiver will scan all preset memory
channels. When an Azaan signal is present scanning
pauses, & when this disappears, scanning continues.
Time between channels can be preset. If either CTCSS or
DTMF is set on the channel, signals only stay on channel
with same code, squelch is opened.
For channels preset with CTCSS the receiver will stay
tuned to the channel only when the calling code decodes with preset
channel CTCSS then continues to scan after preset delay. If channel is
preset with squelch, it will stay on the channel when it receives signals
& will open when receiving the same DTMF.
The receiver returns to scan for priority channel & if a signal is
received, no matter what channel number, scanning will only continue
after the call is complete and delay time passed.
Press [SCAN] again to stop scanning.
9
10
Squelch Settings
Channel / Memory Programming by Keypad
Before starting this procedure please ensure this information is
available:
1 Mosque Frequency *as licensed by OFCOM - obtain this from
your mosque eg: 454.40625 MHz
2 Allocated *CTCSS of the mosque. eg: 123 Hz
Press [FUNC] key CHANNEL setting - Press [FUNC] again.
Enter Mosque Frequency using keypad. eg: 454.40625 MHz.
Enter CTCSS code from table below. eg: 18 = 123.0 Hz.
1
2
3
4
5
6
7
8
9
10
11
12
13
14
15
16
17
18
19
20
67.0
71.9
74.4
77.0
79.7
82.5
85.4
88.5
91.5
94.8
97.4
100.0
103.5
107.2
110.9
114.8
118.8
123.0
127.3
131.8
21
22
23
24
25
26
27
28
29
30
136.5
141.3
146.2
151.4
156.7
162.2
167.9
173.8
179.9
186.2
31
32
33
34
35
36
37
38
UP
FUNC
192.8
203.5
210.7
218.1
225.7
233.6
241.8
250.3
Press [FUNC] & [UP] & [DOWN] set squelch level:
1 = Background noise
DOWN
2 = Normal setting
3 = Quiet - when close to mosque
Press [FUNC] again. If both CTCSS & DTMF are
preset and either one matches the calling code, then the call will be
received. If the DTMF decodes, it will 'bleep' 3 times then squelch
opens & squelch sign displayed, remains for 10 seconds after the signal
disappears. Meanwhile squelch sign stops flashing when a signal is
received. Press [VOL] key to close squelch.
Delay Time
UP
Pause between Channels when Scanning
FUNC
DOWN
Press [FUNC] & [UP] & [DOWN] set delay time normally 1.0 second Press [FUNC] again
Press [FUNC] again
Back-lighting for LCD Display
DTMF
The LCD back light can be user defined for one of three options:
Press [FUNC] & [UP] & [DOWN]
ON:
LCD light will remain ON continuously
OFF:
LCD light will remain OFF
NORMAL: LCD light will be ON for 10 seconds when any
key is pressed. Press [FUNC] again.
- this is a special paging code.
Press [FUNC] again select ADD or DEL (to add to SCAN list or
remove) Press [FUNC] again
Channel Spacing
Enter channel spacing normally 12.5 kHz (in the UK).
(Note: some older systems may be 25kHz). Press [FUNC] again.
Channel programming is now complete
Wire Clone
UP
FUNC
FUNC
DOWN
etc...
Clock Setting
Press [FUNC] key then use [UP] & [DOWN]
keys
until
FUNCTION
SETTING
is
displayed then [FUNC] again quickly. Clock
numbers flash as 12:00. Now use keypad to
set the current time & wait 3 seconds.
UP
FUNC
DOWN
etc...
Connect 'master' (fully programmed) receiver &
second receiver (to be programmed) with the
cloning cable.
Master radio: Press [FUNC] & [SCAN] for two
seconds simultaneously to start the Wire Clone
procedure & '-C-' will be displayed, then press
[VOL] key to transfer the preset data from the
'master' to the second receiver.
'END' is displayed after data transfer is
complete. Press [SNC] to return to normal.
Second receiver: When 'master' receiver
transfers data, screen displays Signal Sign
& '-PC-,.
When the data transfer is complete, screen
displays ' END'.
Cloning Lead
11
12
Connecting the Equipment
Reset Receiver Data**
To clear all stored data & reset to factory default
values: with the receiver turned OFF press & hold
[FUNC] and [VOL] keys simultaneously & turn
receiver ON. Display will show CLR.
**Note As this will erase the mosque frequencies
etc, ensure you have these stored elsewhere
1
2
FUNC
VOL
3
4
5
6
Make sure the PC is switched off
Connect the 9 pins (DB9) cable to one of the PCÕs Com Ports:
COM1, COM2, COM3 or COM4
Turn the PC on.
Make sure the receiver is switched off
Connect the supplied cable between the Deluxe
Receiver and the Serial Port of the PC
Turn the receiver on
For ease of use, the CD which
accompanies your Deluxe Azaan
receiver has a WINCAM Player
file which when clicked on will
run a demonstration video of how
to program your own unit.
Although the Deluxe receiver can be programmed using its keypad, by far
the easiest and the quickest way to set up or program the Deluxe Receiver
is by using the supplied software and programming leads.
Please check for the latest version of this software by visiting our website
at http://www.nabishi.com
We recommend that you input all the Frequencies (channel information)
using your PC as this will save a lot of time. This is very easy to do and
you can save the data which you have programmed into the receiver on
your PC.
Main Screen
Programming Overview
1
Modifying data previously written to a receiver
a
Read the transceiver data - (Tools/Read Data)
b Modify the data
c
Write the modified data to the receiver - (Tools/Write Data)
d Copy the data to disk if necessary - (File/Save As)
Hardware & Software Requirements
2
PC 486 or higher, 1 com port (serial port) and a minimum screen
resolution of 800 x 600
Operating System:
English Windows 95/98/ME/2000 or Windows XP Home or Professional.
Creating and writing new data to a receiver
a
Input all necessary frequency / channel information.
b Write the data to the receiver - (Tools/Write Data)
c
Copy the data to disk if necessary - (File/Save As)
3
Modifying disk data, then writing to a receiver
a
Read the disk data - (Tools/Read Data)
b Modify the data
c Write the data to the receiver - (Tools/Read Data)
d Copy the data to disk if necessary - (File/Save As)
The easiest way to reprogram a Deluxe receiver (and ensure the least
amount of confusion) is to READ the data from the receiver onto your PC,
make the necessary amendments (i.e. add or delete your channels) and
then WRITE the data back into the Deluxe receiver.
Software Installation:
On the CD supplied there are options which when 'clicked' automatically
install the Program software onto your PC.
13
14
File Options
As with most software
these File Options are
self-explanatory.
Hovering the mouse over
these icons will reveal
their purpose. The online
help screen may have
more recent information
on programming than in
this manual.
Read & Write
These Buttons will Read or Write to the
Receiver (the PC lead must first be
connected between the PC and Receiver)
Receiver
Displays
Channel
Selection
Squelch
The Squelch level
may be increased in
noisy
areas
to
eliminate interference
from other channels
on
the
same
frequency or interference caused by
other devices (such
as television sets).
However by increasing this setting you
will also make the
receiver less sensitive
(receiving
distance
will be decreased).
Priority Scan
If during scanning you
want to connect to your
favourite Mosque (i.e
Mosque programmed in
Channel 1) then select
Channel 1 here.
Scan Delay
This is how long the
receiver will remain in
a channel as the unit
has received a signal
and has stopped on it,
until
it
begins
scanning again or
remains
on
that
channel if you cancel
scanning by pressing
the scan button again
Clock Setup
This option will quickly
set up the clock.
Delete Options
Del Channel will delete all the information
on any selected channel.
program
or delete
'Clicking' on
any of the
numbers in
the Channel
column will
highlight that
channel
ready for
programming
or deleting
Entering
Frequency
Selecting
Steps
'Clicking' into
the
Frequency
entry box will
allow the
entry of
frequency
anywhere
between
'Clicking' into
the channel
STEP box
will allow you
the change to
either 5.00K
or 6.25K
steps for
programming
CTCSS Option
Band Option
Select a CTCSS number
ONLY if your mosque is
transmitting a CTCSS
tone of the same number
otherwise leave as OFF.
IF set to OFF, DO NOT
enter anything here
otherwise your receiver
will NOT hear any
broadcasts on this
channel without
receiving a valid
CTCSS tone!
In most cases the
frequencies you will enter
(particularly newer
systems) will be 12.5 kHz
channel spacing (also
called NARROW BAND).
However, some older
systems operate on 25kHz
channel spacing & can be
entered into your receiver
(also called WIDE BAND
channels)
Del ALL will delete ALL the programmed
information in ALL channels !
15
16
Scan List
to add
or delete
Select ADD if
you want to add
this particular
channel to the
scan list
ie: one or more
mosque
channels
DTMF Option
Do not enter any information here unless your mosque
has installed a special paging system into their
transmitter which, if fitted will page your receiver (with
'BEEPS') to let you know about a special or urgent
message about to be transmitted from your mosque
DTMF ID Option
IF the DTMF function
(Above) is fitted then a
unique number will be
entered here at the
factory.
DO NOT enter anything
here otherwise or your
receiver will NOT hear
any broadcasts without
receiving a valid DTMF
tone!
Channel Name
This will enable you to
give the channel an
appropriate name like
'Jamia Mosque' or
'London Road' to
easily identify which
mosque has been
programmed into a
particular channel
instead of just the
channel number
Shortcut Hot Keys
Shortcut keys to speed up actions to assist programming:
ctrl
ctrl
ctrl
ctrl
ctrl
ctrl
+
+
+
+
+
+
r
w
s
a
o
n
Read data from radio
Write data to radio
Save current data to current file
Save current data to another file
Open old data saved by NG-01 before
Create a new file
17
18
Trouble Shooting
No. Problem
Solution
1
No display
& no warning tone
- Rechargeable Batteries - recharge or replace
- Alkaline Batteries - reposition or replace
Too noisy
- Check antenna
- Change your location
- Recharge Batteries
2
3
Message not received
-
Confirm receiver has a valid channel
Confirm CTCSS & DTMF numbers are the same
Change your location
Check antenna
CH 1
454.39375 MHz
CH 11 454.17500 MHz
CH 2
454.40625 MHz
CH 12 454.25000 MHz
CH 3
454.79375 MHz
CH 13 454.27500 MHz
CH 4
454.80625 MHz
CH 14 454.30000 MHz
CH 5
454.02500 MHz
CH 15 454.32500 MHz
CH 6
454.05000 MHz
CH 16 454.35000 MHz
CH 7
454.07500 MHz
CH 17 454.70000 MHz
CH 8
454.10000 MHz
CH 18 454.77500 MHz
CH 9
454.12500 MHz
CH 19 454.78750 MHz
CH 10 454.15000 MHz
CH 20 454.82500 MHz
Nabishi UK Limited, established in 1984 are a leading supplier and manufacturer of Radio
Communications equipment with a worldwide reputation.
Our experts have many years of experience in the design of all types of transmitter,
receiver, antenna and their location. We have specially designed this Azaan receiver to
enable you to hear important Azaan messages of prayer beyond the Mosque walls - at
home or place of work.
Note
We have a policy of continuous improvement and reserve the right to amend this
specification without notice. Please check our website for latest information.
Nabishi UK Ltd
19
16c Upton Road
Dee Road Industrial Estate
Tilehurst Reading Berkshire RG30 4BJ
Freephone 0800 854 737
Web
www.nabishi.com
e-mail
[email protected]
Issue 8.04a