1
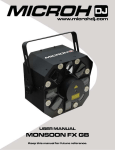
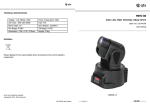
M ONSOON FX
Unpacking Instructions
R e a d M a n u a l b e f o r e O p e r a t i o n
Dear user,
Thanks for choosing our laser device, believing this brand new product will bring you unlimited marvel and
happiness. Before operating this device, please read this manual thoroughly, and retain it for future reference.
W a r n i n g D a t a
Please note the warnings in bold which will ensure the safe and smooth operation. These warnings are
important to a certain extent.
A t t e n tIndicates
i o n !a skill or other useful information for special situations.
I m p o r tIndicates
a n t ! important information to protect personnel from laser incident or injury.
C a u t iPrevent
o n ! damage or injury from incorrect operation.
L a s eLaser
r ! safety warming labels.。
Warning!
If the external flexible cable or cord of this luminaire is damaged, it shall be replaced by a special cord or cord
exclusively available from the manufacturer or his service agent.
Shields, lenses or ultraviolet screens shall be changed if they have become visibly damaged to such an extent
that their effectiveness is impaired, for example by cracks or deep scratches.
The lamps shall be changed if it has become damaged or thermally deformed.
U n p a c k i n g I n s t r u c t i o n s
As receiving a fixture, carefully unpack the carton, checking contents to ensure that all parts are in good
condition. Informing the shipper immediately and retaining packing material for inspection if any parts
damaged from shipping or device damaged. Keep packing materials as evidence for shipper's confirmation.
A t t e n t i o n !
This unit is in perfect condition before delivery; please check all accessories when unpacking the unit. User
should follow this user manual to operate this unit, and make sure that you are clear on all laser safety
information and unit operation before power it on. Any wrong operation will make this unit out of warranty.
Carefully move after receiving it, checking whether there is any damage from shipping, and all the accessories
in it.
NAME
PCS
Laser Light +LED system
1
Power Cord
1
KEYS (for key switch)
2
Interlock switch
1
User manual
1
Case
1
1
Safety Instructions
S a f e t y I n s t r u c t i o n s
To protect the environment, please try to recycle the packing material as much as possible.
0.2m
◆
◆
◆
◆
◆
◆
◆
The projector is for indoor use only, IP20. Use only in dry locations. Keep this device away from rain and
moisture, excessive heat, humidity and dust. Do not allow contact with water or any other fluids, or metallic
objects
Don’t throw this product away just as general trash, please deal with the product follow the abandon
electronic product regulation in your country.
Locate the fixture in a well ventilated spot, away from any flammable materials and/or liquids. The fixture
must be fixed at least 20cm from surrounding walls
To avoid condensation to be formed inside, allow this unit to adapt to the surrounding temperatures when
bringing it into a warm room after transport.
Condense sometimes prevents the unit from working at full performance or may even cause
damagesDon’t install it on flammable object.
Don not use it when maximum ambient temperature is higher than 40 degree,
Unplug the unit when it is not used for a longer time or before replacing the bulb.
Don’t open the top cover to avoid unit damage.
Please use the original packing when the device is to be transported.
Never expose the lens to direct sunlight, even for a short period, This may damage the light effect or even
cause fire!
L a s e r S a f e t y W a r n i n g s
According to EN 60825-1:2007, this product belongs to class 3B. Direct
eye contact may cause injury.
◆
◆
◆
◆
◆
This product is for laser show only. The class 3B laser light should be
operated by professional operator only.
A V O I D E Y E O R S K I N E X P O S U R E T O D I R E C T O R S C A T T E R E D R A D I A T I O N
4
CAUTION-CLASS 4 LASER
RADIATION WHEN OPEN.
A V O I D E Y E O R S K I N E X P O S U R E T O D I R E C T O R S C A T T E R E D R A D I A T I O N
This is so-called show laser, emitting radiation with a wavelength spectrum between 400 and 700nm and
producing lighting effects for shows.
International laser safety regulations require that the vertical height from installment to ground is more than
3 meters, horizontal distance is 2.5 meters from audience.
Never direct the laser beam to people or animals and never leave this device running unattended.
The legal requirements for using laser entertainment products vary from country to country. The user is
responsible for the legal requirements at the location/country of use.
W a r n i Avoid
n g ! direct eye contact with laser beams during operation, especially when the laser beams
stay still, or injury to eyes may occur.
L a s e r S a f e t y P r o t e c t i o n F e a t u r e
C a u t iThe
o nlaser
!
security measures are designed according to the specific terms of the relevant
international laser safety standards and has the following laser safety protection means.
Laser key switch: laser is available only when the key is turned on.
Laser Emergency switch: remote connecting switch,it will cut off the laser light path emergently once the device in
potential hazard;
Laser safety label:The labels of according with European standard are sticked on the device body.
2
Overhead Rigging
A t t e n tThe
i oinstallation
n !
must be carried out by qualified service personal only. Improper installation can
result in serious injuries and /or damage to property. Overhead rigging required extensive experience!
Working load limits should be respected, Certified installation materials should be used, the installed
device should be inspected regularly for safety.
◆
◆
◆
◆
◆
◆
Make sure the area below the installation place is free from unwanted persons during rigging, de-rigging
and servicing.
Locate the fixture in a well ventilated spot, far away from any flammable materials and/or liquids. The
fixture must be fixed at least 50cm from surrounding walls
The device should be installed out of reach of people and outside areas where persons may walk by or be
seated.
The device should be well fixed; a free swinging mounting is dangerous and may not be considered!
Do not cover any ventilation opening as this may result in overheating
Before the first time use, it must be inspected by professional staff to make sure safety, inspection regularly
every year..
Never expose the lens to direct sunlight, even for a short period, This may damage the light effect or even
cause fire!
A C P o w e r Please use the attached power, note that power voltage
and frequency are the same as the marked voltage and
frequency of device when connecting power. Every device’s
power should be connected separately, so that device can
be controlled individually.
L E N
FUSE: 5×20mm
250V 1.5A slow
T h e p o w e r c o r d s p e c i f i c a t i o n t a b l e : Cable(EU)
Cable(US)
Pin
International
Brown
Black
Live
L
Liht blue
White
Neutral
N
Yellow/Green
Green
Earth
3
Overhead Rigging
D M X c o n n e c t i o n
◆
Connection between laser lights and DMX must use the shied cable of diameter more than 0.5mm.
Please use the attached 3 pin XLR plug/socket to connect the DMX output/input interface. The
connection between socket and cable as below( note the plug/socket’s 3 pin number and position).
D M X - o u t p u t
D M X - i n p u t
X L R m o u n t i n g - s o c k e t Xs L( Rr e ma or u nv ti ie nw g) -: p l u g s ( r e a r v i e
2
1
3
1 - S h i e l d
2 - S h i e l d ( - )
3 - S h i e l d ( + )
2
1
3
◆
Note, XLR plug/socket’s 3pin can not be touched by inner hull, connection between pins is not
allowed. Except above connection, XLR plug/socket can not be connected with XLR control line.
Device receives international standard DMX512(1990) control signal.
◆
When using standard DMX512 control signal, the last device’s output interface must
be connected to a DMX plug. This plug is putting a 120 ohm resistance between
“canon” plug’s 2 pin and 3 pin. Showing as below pic. Sticking this plug into the last
device’s signal output interface, it will avoid the interference during the process of
signal transmission.
4
PIN3
PIN2
Operation instructions
14 11
4
10
13
A U T O
DM X
S L A V E
S O U N D
F U N C U P
D O W NE N T E R
M I N
M A X
2
7
8
12
1
3
5
6
9
P r o d u c t o p e r a t i o n d i a g r a m
NO
Name
1
Laser aperture
2
LED 5 colors output
3
LED white color output
4
Hanging bracket
FUNCTION
Laser show, do not look directly into the hole
RGBAW X 3W
8X1W
For hang and angle adjustment
Power input socket, built-in protective tube and spare tube
5
Power input
6
Power connection
7
DMX output
3PIN female XLR interface, for DMX communication
8
DMX input
3PIN male XLR interface, for DMX communication
9
Insurance rings
10
LED display
Power output connect with next light
Connecting wire rope to prevent illegal operation and fall
For setting model
In DMX model, red indicate light on after DMX connected,
11
DMX indicator
12
SLAVE indicator
In slave model, orange indicate light on
13
AUTO indicator
In Auto model, blue indicate light on.
14
MUSIC indicator
In sound model, green indicate light on.
5
Menu operating instruction
Once after every power on laser, the VERSION and MANUFACTURE INFORMATION will be shown in
LCD monitor of rear panel. When laser is powered on, LCD monitor on rear panel shows the current
operating standalone mode or DMX address of DMX mode. With help of LCD control panel, is very easy to
set and change the operating mode of laser. After every resetting and saved, the new mode information will
be shown on LCD monitor at next power on.
FUNC
ENTER
UP
Mode Option, to choose the operating mode of laser.
Confirmation, to confirm the laser to show the present mode at the next operation.
DOWN UP/DOWN, to change operating mode, parameter or DMX address.
UP/DOWM
UP/DOWM
UP/DOWM
UP/DOWM
UP/DOWM
UP/DOWM
UP/DOWM
UP/DOWM
UP/DOWM
UP/DOWM
UP/DOWM
UP/DOWM
UP/DOWM
UP/DOWM
Note: In sound model, device will
close light in 5 seconds automatically,
if there isn’t any sound signal. Light on
until sound signal recived.
I n i t i a l s e t t i n g
FUNC
UP
DOWN
ENTER
Auto
Aut 0
Aut 1
Aut 2
Aut 3
Aut 4
Aut 5
Aut 6
laser+RGBWA+8/W
laser+ RGBWA
laser +8/W
RGBWA+8/W
RGBWA
laser
8/W
Sound
Sou 0 laser+RGBWA+8/W
Sou 1 laser +RGBWA
Sou 2 laser+8/W
Sou 3 sound RGBWA+8/W
Sou 4 sound RGBWA
Sou 5 sound laser show
Sou 6 sound 8/W
SLAVE
It’s work will follow the procedure in host device
by DMX signal
DMX
D001 TO D504
into speed choice
UP/DOWN to choose display speed.
S 1 is fastest
S100 is slowest
S 0 is defualt
ENTER
confirm
Confirm choice, adjust sensitivity by potentiometer
6
LED letter strobes means DMX signal or SLAVE signal is
not connected well, please check cable, control panel and
other equipments.
DMX instructions
This device adopts large storage and high speed chip, which has been written lots of
effect based on laser light DMX application. There are many kinds of model in channel
one.
Value
Function
000-009
Blackout
010-024
AUT0
025-039
AUT1
040-054
AUT2
055-069
AUT3
070-084
AUT4
085-099
AUT5
100-114
AUT6
115-129
SOU0
130-144
SOU1
145-159
SOU2
160-174
SOU3
175-189
SOU4
190-204
SOU5
205-220
SOU6
221-255
DMX MODE
000-009
Blackout
010-014
Red
015-019
Green
020-024
Blue
025-029
Amber
030-034
White
035-039
White+red 15
CH2
LED
040-044
Red+green 12
operation
045-049
Green+blue 23
050-054
Blue+amber 34
055-059
Amber+white45
060-064
White+green 25
065-069
Green+amber 24
070-074
Amber+red 14
075-079
Red+blue
080-084
Blue+ White
085-089
Red+green+blue
090-094
Red+green+amber 124
Channel
CH1
MODE
123
7
DMX instructions
Channel
CH2
LED
operation
Value
Function
095-099
Red+green+white 125
100-104
Red+amber+blue 134
105-109
Red+white+blue
110-114
Red+amber+white 145
135
115-119
Amber+green+blue 234
120-124
Blue+green+white 235
125-129
Amber+green+white 245
130-134
Amber+white+blue 345
135-139
Red+green+blue+amber 1234
140-144
Red+white+blue+amber 1345
145-149
Red+green+white+amber 1245
150-154
Red+green+blue+white
155-159
White+green+blue+amber 2345
160-164
Red+green+blue+amber+white
165-209
Automatic(single colors only)
210-255
1235
Automatic(two colors at a time)
Automatic Speed(when CH2 is between 160-255)
CH3
CH4
LED
STROBE
CH5 8PCS
WHITE LED
CONTROL
CH6
LASER
000-255
Slow-fast(only colors)
000-004
No Function
005-254
Strobe(slow->fast)(max 30HZ)
255-255
Sound-activated strobe mode
000-009
Blackout闭光
010-019
Picture1((slow->fast)
020-029
Picture2((slow->fast)
030-039
Picture3((slow->fast)
040-049
Picture4((slow->fast)
050-059
Picture5((slow->fast)
060-069
Picture6((slow->fast)
070-079
Picture7((slow->fast)
080-089
Picture8((slow->fast)
090-099
Picture9((slow->fast)
100-109
Picture10((slow->fast)
110-255
ON
000-009
Black out
010-049
Red on
050-089
Green on
090-129
Red & Green on
130-169
Green on & Red strobe
170-209
Red on & Green strobe
210-255
Red & Green(alternate strobe)
8
DMX instructions / Product specification
Value
Channel
CH7
LASER
STROBE
CH8
MOTO
LED
CH9
MOTO
LASER
Function
000-004
No Function
005-254
Strobe(slow->fast)(max 30HZ)
255-255
Sound-activated strobe mode
000-004
Stop
005-127
Rotate clockwise(slow->fast)
128-133
Stop
134-255
Rotate counter-clockwise(slow->fast)
000-004
Stop
005-127
Rotate clockwise
128-133
Stop
134-255
Rotate counter-clockwise
P r o d u c t s p e c i f i c a t i o n Dimension and weight
240x220x110mm
LengthxWidth xHeight
4.2Kg
Weight
Power input
Power type
Switch power(International)
Range
100-240V 50/60Hz
Rate
66W
Fuse
1.6A
Light source
Class 3B Laser Diodes / LED CHIP
Type
Detail as below
Power
1/Red
Quantity/color
650nm 532nm
Wave length
Quantity/color
LED power rate
Wave length
1/Green
150mW 50mW
Laser power rate
1/Red
1/Green
3W
1/Blue
3W
1/Orange
3W
3W
1/White
3W
1W
620nm 520nm 460nm 600nm 6500K
Work environment
Max temperature
104ºF(40ºC)
Cool system
Fan
Control
USB version
AUTO
6
SOUND
6
channel
9
9
8/White