1
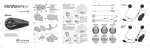
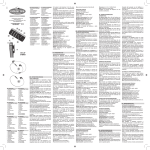
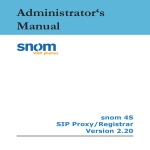
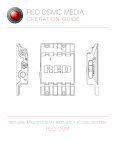
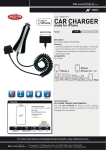
1
QUICK GUIDE EN
3
7
5
ASSEMBLY OF THE SLIDE SUPPORT
WITH REMOVABLE CLIP
Take the support and note the best place
to fasten it to the side of the helmet. Insert
the rear part of the clip into the helmet and
attach the other part on the outside.
A - GREEN
B - RED
B
*see the user manual
for complete instructions.
B
PHASE 1
PHASE 2
8
9
A
mounting on
full-face helmet
B
PHASE 3
Insert the screws and
tighten gently.
Check position and move
the support if necessary, by sliding it along.
Tighten the screws with
the screwdriver supplied.
(images A/B)
A
B
A
B
A
A
A
8
4
1 - MFB (multifunction button)
2 - Menu UP button
3 - Menu DOWN button
4 - + volume button
5 - – volume button
7 - Multifunction LED
7 - Multifunction LED
8 - Multifunction audio/data port
9 - Mounting guides for Bluetooth® module
10 - Charging/audio-in connector
B
6
2
10
PHASE 4
MOUNTING ON
FULL-FACE HELMET
ASSEMBLY OF THE ADHESIVE SLIDE
SUPPORT
Take the adhesive support and look for the
best side and place to position it. Clean and
de-grease the part of the helmet where you
are going to stick the support (do not use
any detergents that could damage the hel-
MOUNTING ON
MODULAR HELMET
MOUNTING ON
OPEN-FACE HELMET
mounting on
modular and
open-face
helmets
B
WE RECOMMEND YOU CHECK FOR
SOFTWARE UPDATES ON THE WEBSITE
WWW.INTERPHONE.CELLULARLINE.COM
B
C
PHASE 1
www.interphone.cellularline.com
PHASE 3
PHASE 2
PHASE 4
met’s finish). Remove the
protective film from the
double sided tape, and
apply the support to the
helmet.
As the support cannot
moved once it is attached
to the helmet, take great
care with its positioning
when applying.
(image C)
B
A
A
GUIDARAPF5MCNEW
RDS on/off
CALL ID on/off
FULLFACE HELMET/JET HELMET/AUTOMATIC VOLUME CONTROL off
VOICE ANSWER on/off
ERASE PAIRINGS
full/limited VOCAL HELP
ANYCOM SEARCH
INTERCOM DEVICE SEARCH
PAIRING MODE
LANGUAGE SELECTION
press to select track
press up button until the beep to share
press until the beep to play/pause
press to memorise stations
to select memorised stations press until a beep is heard
press to search
press to voice dial
press to re-dial
to connect B press the button until you hear a beep
to connect A press the button until you hear a beep
press until you hear the beep
to confirm
press the MFB button to connect A and B
Thank you for choosing our products.
Before using this product, we recommend you carefully perform the operations
outlined in this Quick Guide.
Chapter 1 - Charging
Insert the recharging cable in the audio connector kit as shown in the figure.
Insert the other end of the cable in a standard USB port.
*
* AC 220/110 - USB ADAPTOR
* EMERGENCY BATTERY
* USB PORT
* not included
SET UP
AUXILIARY INPUT
MUSIC STREAMING
FM RADIO
PHONE
INTERCOM
If the WRONG language is selected then follow this procedure:
1. Turn off the F5MC
2. Turn the F5MC on again
3. Briefly press the UP button
4. Briefly press the MFB button
5. Briefly press the UP button
6. When you hear the guide voice speak in your language press the MFB button.
Chapter 3 - Telephone or GPS pairing. Use one of the following procedures:
a) With the F5MC turned off, press the central MFB button (1) for 5 seconds until
the two red and blue LEDs flash alternately. Briefly press the central button again
and turn on the Bluetooth® function on your telephone or GPS device. Search for
new devices and select INTERPHONE.
b) With the F5MC in standby mode go to the SETUP menu. Select “PAIRING MODE”
and press the central MFB button (1) until you hear a beep. Turn on the Bluetooth®
function on your telephone or GPS device. Search for new devices and select INTERPHONE.
The LED lights up yellow/orange during charging.
The LED turns green when charging is complete.
When charging is complete, disconnect the units from the charger by pulling out
the jack plug, and also unplug the charger from the outlet.
use the arrows to scroll through the menu and use the central button to select
F5MC VOICE MENU DIAGRAM
TURNING OFF
To turn off the device hold the MFB button the voice message “INTERPHONE POWERING DOWN” is heard at which point the red LED will remain on.
Chapter 2 - Select your language (after turning the unit on for the first time):
With the F5MC in standby mode, go to the SETUP menu and select “LANGUAGE
SELECTION”. Wait for the voice guide to speak in your language and then press the
central MFB button (1) to confirm the selection.
With the double jack
you can charge two
Interphone MCs
at the same time.
www.interphone.cellularline.com
Export Dept. [email protected]
1b - Turning on for the first time (with the single control unit version)
To turn on the device, press the MFB button (1). Wait for the voice message in the
correct language; confirm the language selection with a quick press of the MFB
button (1).
The device will go into “PAIRING MODE“ at which point the following choices can
be made:
- A short press of the MFB button (1) - telephone or GPS pairing.
- A short press of the UP button (2) - Interphone intercom pairing.
- A short press of the DOWN button (3) - pairing with a third party intercom (ANYCOM).
- A long press of the MFB button (1) until you a beep is heard - this cancels “PAIRING
MODE“. The device goes into standby mode (INTERCOM menu) and the blue LED
flashes slowly.
1a - Turning on for the first time (only with the double control unit version)
To turn on the device, press the MFB button (1) on both control units. The control
units are pre-linked direct from the factory. When first switched on the two control
units will go into standby mode (INTERCOM menu).
Chapter 4 - Interphone Intercom pairing. Use one of the following procedures:
a) With the F5MC turned off, press the central MFB button (1) for 5 seconds until
the two red and blue LEDs flash alternately and then press the upper button. The
device will begin to search for a second Interphone device.
Make sure that the second Interphone device is in “PAIRING MODE“ (blue and red
LEDs flashing alternately, as indicated in Chapter 3/b).
b) With the F5MC in standby mode go to the SETUP menu. Select “INTERCOM DEVICE SEARCH” and press the central MFB button (1) until you hear a beep. The
device will begin to search for a second Interphone device.
Make sure that the second Interphone device is in “PAIRING MODE“ (blue and red
LEDs flashing alternately, as indicated in Chapter 3/b).
To activate or deactivate the connection press the central key on one of two
F5MC devices.
Repeat the same procedure to pair another unit and have a conference group.
Chapter 5 - Anycom - Third party intercom pairing. Use one of the following
procedures:
a) With the F5MC turned off, press the central MFB button (1) for 5 seconds until
the two red and blue LEDs flash alternately and then press the lower button. The
device will begin to search for a second NON Interphone device.
On the second NON Interphone device activate the search for another telephone; refer to the relative user manual if necessary.
The F5MC begins to search for a second third-party device (NON Interphone device).
b) With the F5MC in standby mode go to the SETUP menu. Select “ANYCOM
SEARCH” and press the central MFB button (1) until you hear a beep. The F5MC
begins to search for a second third-party device (NON Interphone device).
On the second NON Interphone device activate the search for another telephone; refer to the relative user manual if necessary.
Repeat the same procedure to pair another (NON Interphone ) device and have
a conference group.
Chapter 6 - Pairing of 3 or 4 Interphone F5MC devices:
A
B
C
Pairing 3 F5MC devices:
Pair A with B using the procedure described in Chapter 4.
Then pair B with C using the procedure described in Chapter 4.
To start a conversation press the central button of user B.
Pairing 4 F5MC devices:
A
B
C
D
After having paired the three devices as described above, pair C with D using
the procedure described in Chapter 4.
Start a conversation between three devices (ABC) then press the central button of user D to start add the forth user to the conversation.
For the complete user manual please consult our website
www.interphone.cellularline.com
Technical Specifications
Bluetooth® compliance:
Bluetooth® V.3.0 - Class II
Supported Bluetooth® profiles:
HFP
A2DP
AVRCP
Dimensions mm:
60x80x30
Weight:
44g
Range
Up to 10 metres
Talk time:
12h
Stand-by time
700h
Charging time:
3h
Battery type;
Rechargeable Li-ion
EQUIPMENT DISPOSAL INSTRUCTIONS FOR DOMESTIC USERS
(Applicable within the European Union and those countries with separate collection systems)
The marking shown on the product or its literature indicates that at the end of its life the
product should not be disposed together with other household waste. To prevent possible
harm to the environment or human health from uncontrolled waste disposal, please separate
this from other types of wastes and recycle it responsibly to promote the sustainable reuse
of material resources.
Domestic users are invited to contact the sales point where the product was purchased or the
local office with information regarding recycling of this type of product. Business users should
contact their supplier and check the terms and conditions of the purchase contract. This product should not be mixed with other commercial waste for disposal purposes.
This product has an embedded, non-replaceable battery, do not attempt to open the product
or remove the battery as this may cause injury and damage the product. When disposing of
the product, please contact your local waste disposal service in order to remove the battery.
The battery contained within the device and been designed to be used throughout the life
cycle of the product.
This product is CE marked in accordance with the provisions of the R&TTE Directive (1999/5/
EC) and the RoHS Directive (2011/65/EU). With this CE mark Cellular Italy S.p.A. declares that
this product complies with the essential requirements and other relevant provisions of the
1999/5/EC and 2011/65/EU Directives. The user is forbidden to make changes or modifications of any kind to this device. Changes or modifications not expressly approved by Cellular
Italy S.p.A. will void the user's authorisation to operate the device. Bluetooth® is a trademark
owned by Bluetooth SIG, Inc.
For more information please visit the website: www.interphone.cellularline.com