1
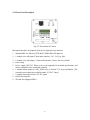
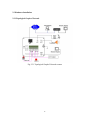
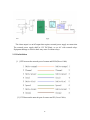
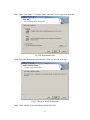
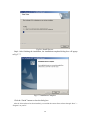
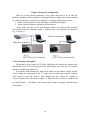
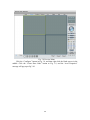
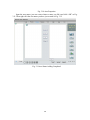
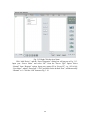
User Manual of Network Camera Version 1.3 2008.6 Thank you for purchasing our product. If there is any question or request, please do not feel hesitated to contact us. This manual may contain several technically incorrect places or printing errors, and the content is subject to change without notice. The updates will be added into the new version of this manual. We will readily improve or update the products or procedures described in the manual. INDEX CHAPTER 1 INTRODUCTION............................................................................................................... 2 1.1 NETWORK CAMERA FUNCTIONS AND FEATURES .................................................................................. 2 1.2 APPLICATIONS ..................................................................................................................................... 3 CHAPTER2 INSTALLATION.................................................................................................................. 4 2.1 NOTICE OPTIONS ................................................................................................................................. 4 2.2 PANELS DESCRIPTION .......................................................................................................................... 4 2.2.1 Side Elevation of the Camera ---------------------------------------------------------------------------- 4 2.2.2 Rear Panel Description ----------------------------------------------------------------------------------- 5 2.3 HARDWARE INSTALLATION .................................................................................................................. 6 2.3.1 Topological Graph of Network --------------------------------------------------------------------------- 6 2.3.2 Alarm Output Connection -------------------------------------------------------------------------------- 7 2.3.3 Pin Definition ---------------------------------------------------------------------------------------------- 8 2.4 INSTALLATION OF CLIENT SOFTWARE 4.0 ............................................................................................ 9 2.5 CAMERA MENU ILLUSTRATE AND E-PTZ OPERATION ........................................................................ 13 2.5.1 products e-ptz function ---------------------------------------------------------------------------------- 13 2.5.2 products menu instruction ------------------------------------------------------------------------------ 13 CHAPTER3 PARAMETERS CONFIGURATION............................................................................... 22 3.1 SET PARAMETERS THROUGH IE ......................................................................................................... 22 3.2 PARAMETER CONFIGURATION THROUGH CLIENT SOFTWARE ............................................................. 25 CHAPTER4 WAN ACCESS .................................................................................................................... 34 4.1 DIAL UP WITH PPPOE................................................................. ERROR! BOOKMARK NOT DEFINED. 4.2 WAN ACCESS .................................................................................................................................... 34 Q&A .......................................................................................................................................................... 36 APPENDIX TECHNOLOGY SPECIFICATION .................. ERROR! BOOKMARK NOT DEFINED. 1 Chapter 1 Introduction Network camera is a kind of embedded digital surveillance product that combines both the features of traditional analog camera and net DVS (Digital Video Server). Due to the embedded Linux operation system and the latest DaVinci hardware platform of TI, the system operates with high scheduling efficiency. Furthermore, the firmware is burned in the flash, which makes the product small, reliable and highly stable. 1.1 Network camera Functions and Features Functions Support E-PTZ function. Possess of OSD (On-Screen-display) while click 95th preview points. Cameras adopted MPEG4/H.264 video Encoding techniques. Cameras support H.264 video Encoding techniques. Video encoding standard which provides high compact ratio and flexible processing. Network Function:Support the complete TCP/IP protocols, video/alarm/audio data and IE browsing. Heartbeat Function: The server can acquire real time operating performance of the network camera through the heartbeat function. Alarm:The product includes 1 channel of alarm signal input and 1 channel of alarm on/off output, and supports motion detection, video missing, mask alarm and external alarm input. Voice Talking:Support bidirectional voice talking and monomial voice broadcasting. User Management: Support multilevel right management. The administrator can create up to 15 separate users with different right levels, which highly improves the system security. Compression Functions Cameras supports 1 channel video signal and 25fps in Pal(704*576) ,30fps in NTSC(704*480) real time H.264 video Encoding standard compression, which supports both variable bit rate and variable frame rate; besides, you can self-define both the video quality and its compressed bit rate. Cameras Support resolutions of UXGA (1600*1200),HD720p(1280*720), SVGA(800*600), VGA(640*480), 4CIF(PAL:704*576,NTSC:704*480), DCIF (PAL:528*384,NTSC:528*320), 2CIF(PAL:704*288,NTSC:704*240), CIF (PAL:352*288,NTSC:352*240) to QCIF(PAL:176*144,NTSC:176*120). 2 Cameras Support resolution of 4CIF(PAL:704*576,NTSC:704*480), DCIF (PAL: 528*384,NTSC:528*320), 2CIF(PAL:704*288,NTSC:704*240), CIF(PAL: 352*288,NTSC:352*240) QCIF(PAL:176*144,NTSC:176*120). Cameras Support OSD menu. Cameras support POE power supply. Cameras Support watermark techniques. Remote Control The product offers a 10M/100M self-adaptive Ethernet interface. Support PPPoE and DHCP protocols. You can set the parameters, browse real time videos or check the camera performance through software or IE, and get external alarming or save the compressed bit rate through network. Support remote upgrades and maintenance. 1.2 Applications This camera is ideal for remote control network applications. E.g.: ¾ Network surveillance for ATM, bank counters, supermarkets and factories. ¾ Remote surveillance for nursing homes, kindergartens and schools. ¾ AI janitors. ¾ AI building/district management systems. ¾ Self-service systems of power plants. ¾ Outdoor monitoring systems for bridges, tunnels and crossroad traffic. ¾ Pipelining and warehouse monitoring. ¾ 24-hour monitoring for road traffic. ¾ Remote monitoring of forest and water resources. ¾ Surveillance for airdrome, railway station, bus stop etc. 3 Chapter2 Installation 2.1 Notice options 1. Please check if all the items on the package list have been included with your camera. 2. Read the following contents carefully before the installation. 3. Make sure that all the related equipment is power-off during the installation. 4. Check the power supply to prevent any damage caused by un-matching problems. 5. This product is not for any environment of high humidity or high temperature. Conditions of rain, airlessness or frequent shaking are also prohibited. 6. If the product does not operate properly, please contact your dealer or the nearest service center. Never attempt to disassemble the camera yourself. Users are responsible for any problem caused by modification or repairing without authorization. 【Notice】Power supply, lens and SD card are optional. 2.2 Panels Description 2.2.1 Side Elevation of the Camera 4 2.2.2 Rear Panel Description Fig. 2.2.3Rear Panel of Camera Rear panel interfaces descriptions (from left to right and top to bottom): 1. Standard BNC for Ethernet (UTP) RJ45 (10M/100M self-adaptive). 2. 1 channel voice talk input,3.5mm audio interface, 2.0~2.4Vp-p, 1kΩ. 3. 4. 5. 1 channel voice talk output, 3.5mm audio interface, electric line level, 600Ω. Power lamp. Power supply (DC12V). Please refer to the appendix for detailed specification, and always remember to use a matched regulator. 6. 1 channel alarm output (1A 1B). Please refer to Section 2.3.2 for pin definition. (The external series-wound power shall be under 12V DC/ 30mA.) 7. 1 channel alarm input with 0-12V DC signal. 8. RS-485 bus interface. 9. SD card slot (Support SDHC ). 5 2.3 Hardware Installation 2.3.1 Topological Graph of Network Fig.2.3.1 Topological Graph of Network camera 6 Physical Interface Connection UTP Network Connect to network devices, such as switch , HUB, etc. Please refer to Appendix B for pin Definition. Interface Audio Input Connect to audio input devices such as active tone (2.0~ (AIN) 2.4Vp-p, 1kΩ) Audio Output Connect to sounders like loudhailer. (AOUT) Power Supply (DC12V) Alarm Output (1A 1B) Please refer to the appendix for specified types. Please use a matched regulator. 1 channel alarm out. Please refer to Section 2.3.2 for connecting instructions. (external series-wound power shall be under 12V DC / 30mA) Alarm Input(IN 1 channel alarm in. G) RS-485 Interface Connect to RS-485 devices like PTZ. (T+ T-) SD card slot Video Insert an SD card for local storage. Output (VOUT) Standard BNC, connect to monitor. 2.3.2 Alarm Output Connection Description of Alarm Output Connection 7 The alarm output is a on/off output that requires external power supply on connection. The external power supply shall be 12V DC/30mA, or use AC with external relays. Equipment damage or electric shock may cause if without relays. 2.3.3 Pin Definition (1)UTP between the network port of camera and HUB (Direct Cable) (2)UTP between the network port of camera and PC (Cross Cable): 8 2.4 Installation of Client software 4.0 【 Notice 】 Your PC adaptor shall support colorspace conversion and zooming .Adaptors like Nvidia Tnt/Tnt2、Geforce Mx 200/400/420/440 Fx5200/5600, ATI Radeon 7000/7200/7500/8500 /9000/9200 /9500/9600, MatroxG450/550 , INTEL845G/865G are already tested. Be aware that the drive of adaptor should support BLT. Step1: Double click “Client software (v4.0)” under Windows Operating System. The “Preparing Setup” dialog box will pop up as Fig.2.4.1 and goes to Fig2.4.2 automatically. 9 Fig.2.4.1 Client Software Installation Fig.2.4.2 License Agreement Step2: Enable the option “I accept the terms of the license agreement” and click the “Next” button to go to the next step as Fig.2.4.3. Fig.2.4.3 Customer Information 10 Step3: Input “User Name”, “Company Name” and click “Next” to go to the next step. Fig.2.4.4 Destination Folder Step4: Select the destination folder and click “Next” to go to the next step. Fig2.5.5 Ready to Install the Program Step5: Click “Install” to start installation shown as Fig2.6.6. 11 Fig2.6.6 Install Process Step6: After finishing the installation, the installation completed dialog box will popup as Fig.2.7.7. Fig2.7.7 Installation Complete Click the “Finish” button to close the dialog box. After the client software has been installed, you can find the remote client software through “Start” -> “Program” on your PC 12 2.5 Cameras Menu illustrate and E-PTZ operation 2.5.1 cameras products e-ptz function Under the resolution of QCIF/CIF/DCIF/2CIF/VGA/D1/SVGA, support pan\tilt\zoom operation, may carry out pan and tilt operation only after zooming in,Support 127 preset positions(95 excluded,used to invoke menu)。Cruise path only supports the preset of movement from Top left-hand corner of the screen to the bottom right-hand, does not support manual disposition.HD720p resolution only supports pan and tilt operation,does not support zoom operation。UXGA resolution does not support e-ptz function。 Max support frame rate: 50Hz QCIF/CIF/2CIF/DCIF/VGA/D1/SVGA 25fps HD720p 12.5FPS UXGA 5fps 60Hz QCIF/CIF/2CIF/DCIF/VGA/D1/SVGA 30fps HD720p 10fps UXGA 5fps Support vlc standard media player,connected as below(at default): Main code rate:rtsp://admin:[email protected] Sub code rate:rtsp://admin:[email protected]/mpeg4/ch1/sub/av_stream 2.5.2 Cameras menu instruction 1、Display menu Invoke Pre-set position95;Double click presetting points of “95th ”,main menu display on screen . 13 Main menu Language Chinese/English Flicker-proof control 50Hz Resolution CIF Frame rate 25fps Shutter OFF Auto gain LOW Color/B&W Auto White balance Auto Special effects mode OFF Specular image OFF <Exit> <Save> Select OSD menu by PTZ control key, as follows: 14 ※ U P ↑: Means select OSD menu item ※ DOWN↓: Means select OSD menu item ※ LEFT ← : Means select parameter on OSD ※ RIGHT→: Means select parameter on OSD Attention: ●Parameter on OSD exception “Flicker-proof control”, others become effective in time ●Parameter on OSD of “resolution” and “frame rate” are only make usage of display, do not support select parameter by left and right key. 2、Withdraw menu “Iris+”means『enter』,Based on withdrawal condition, “save”、“cancel” or “preset”to withdraw menu。 3、Menu concrete operations The menu selection is realized through “up” “down” “left” “right” bottoms, to select the menu function by “up” “down” bottoms, and the subentry of the specified function by left” “right” bottoms. ◆Language ENGLISH ◆Flicker-proof control 50Hz 60Hz The switch between 50Hz and 60Hz will be realized after clicking “Iris+”. 15 ◆Resolution This item is used to display the current resolution,can’t be controlled by “left” “right” bottoms. ◆Frame rate This item is used to display the output frame rate,can’t be controlled by “left” “right” bottoms. ◆Shutter OFF AUTO×2 AUTO×5 “OFF” The regulation of shutter exposure time is at default. “AUTO×2” The regulation of shutter exposure time is considerably wider. “AUTO×5” The regulation of shutter exposure time at its maximum. 16 50Hz Resolution OFF 60Hz Auto×2 Auto×5 OFF Auto×2 Auto×5 DCIF CIF QCIF 4CIF 2CIF VGA SVGA 25fps 12.5fps 5fps 30fps 15fps 5fps UXGA 5fps 5fps 5fps 5fps 5fps 5fps HD720p 12.5fps 12.5fps 5fps 10fps 10fps 5fps ◆Auto gain OFF LOW MEDIUM HIGH Establishes different auto gain value separately in the condition of low illumination, may increase the picture brightness. This function may not only be independent employment, but also coordinate with option selections in shutter establishment, in order to achieve better low light illumination mode effect. ◆Color/B&W Auto Color 17 B&W In the condition of low illumination, the auto mode has a better noise cut-down effect compare to color mode. ◆White balance Auto OFF “Auto” Enable to realize the auto WB of the current screen “OFF” Based on the current WB state,no more auto adjustment. ◆Special effects mode OFF 18 Old picture Film effect Sunlight mode 1 Sunlight mode 2 If B&W is alternated over color,this function is compelled to be “OFF”。 ◆Specular image OFF 19 Left-Right Up-Down Center 20 ◆Withdraw Save Cancel Preset This mode is realized after clicking “enter” bottom. “Save” Save the current configuration “Cancel” Cancel with the current operations,restore to the configuration before carrying out the operations. “Preset” Restore to the default configuration 21 Chapter3 Parameters Configuration There are several network parameters of the camera that need to be set after the hardware installation. Those parameters including IP address, subnet mask and port number, etc. can be set through various kinds of methods, 2 of which are introduced as below. 1. Set the camera parameters such as IP address and PPPOE through IE. 2. Set the camera parameters through the client software. Please make sure that the PC and network camera are connected and can ping successfully before the parameter setting. 2 different ways of connections are showed as Fig. 3.1 & Fig. 3.2. Fig.3.1 Direct Line Connection Fig.3.2 Cross Line Connection 3.1 Set Parameters through IE The default IP of the camera is 192.0.0.64 with 8000 as the default port, admin as the administrator, and 12345 as the password. The administrator can create up to 15 separate operators with different right levels. To login the camera through IE, input the IP address in the address column, and the “Login” dialog box will pop-up as Fig. 3.3. Input your user name and password, and then click “Login” to enter the “preview” page. Double click the “Camera 01” channel or “Preview” button to view the menu as Figure 3.4. Right click the “Camera 01” channel, and the “Main Stream”、“Sub Stream” and “Open sound” options will popup. Select the Open sound option. 22 Fig. 3.3 Login Interface Fig. 3.4 Previewing Interface The “Playback” and “Log” functions are reserved as Fig. 3.4. To set the camera parameters through IE browser, click “Config” and wait for the “Remote Parameters Config” dialog box to pop up, and then set the parameters like IP address, etc. for your demand as Fig. 3.5. 23 For more specific information of “Remote Parameters Config”, please refer to “Instructions of Client Software (version 4.0)” from Section 2.5.3 of remote-distance parameter settings. Instructions can be found in the client software4.0 in the path of “Start” → “Program”→ “client software 4.0” after installation. Fig. 3.5 Remote Parameters Config 【Notice】 Security level settings are necessary for browsing equipments by IE. Please open the IE browser and set the security level to “Low” in “Tools/ Internet Options/ Security/ Customize” or enable the “ActiveX Controls and Plug-Ins” directly. 24 3.2 Parameter Configuration through Client Software After the installation of client software 4.0, click the “client software 4.0 ”in “Start”→ “Program”→ “client software 4.0”, a message box of “Register Administrator” as Fig. 3.6 will appear by then for the first time running. Both the user name and password should be no less than 6 digits for registration. 【Notice】 Please keep the user name and password in mind .You may not be able to get access to the software if any of them is missing. Fig.3.6 Register Administrator Enter the registered user name and password as Fig. 3.7. Click “Login” to enter the “Preview” menu as Fig. 3.8. Fig. 3.7 User Login 25 Fig. 3.8 Preview Menu Click the “Configure” button in Fig. 3.8, and then right click the blank spaces in the middle. Click the “Create Root Node” button as Fig. 3.9, and the “Area Properties” message will pop up as fig 3.10. 26 Fig. 3.9 Create Root Node 27 Fig. 3.10 Area Properties Input the area name (you can create whatever name you like) and click “OK” as Fig. 3.11. Then right click the area name you have just created as Fig. 3.12. Fig. 3.11Area Name Adding Completed 28 Fig. 3.12 Right Click the Area Name Click “Add Device”, and the “Server Properties” dialog box will pop up as Fig. 3.13. Input your “Server Name” and select “HC” from the “Server Type” option. Select “Normal” from “Register” option. Input your camera IP in “Server IP”, e.g. 192.0.0.64; “User Name”: admin, “Password”: 12345, and 8000 for the default “Port”, and then modify “Channel” to 1. Click the “OK” button as Fig. 3.14. 29 Fig. 3.13 Add Device 30 Fig.3.14 DVR Adding Completed Click the “Preview” button in Fig. 3.14 to enter the “Preview” menu as Fig. 3.15. Double click the channel name in the left tree to preview the pictures. 31 Double click the channel Fig.3.15 Preview Menu Please refer to “Network Video Surveillance Software Operation Instruction (4.0)” for more detailed parameters configuration. You can find the document in PC Operating System after the installation of client software 4.0 by selecting “Start”-> “Program”-> “client software 4.0”. 32 33 Chapter4 WAN Access The IP protocol supports WAN access based on PPPoE dial up function. Make sure that the software you are using supports the function before using these network functions. 4.1 WAN Access There are two methods to get the access, which are shown as below. 1. Get a static IP from your ISP for WAN access. You can open some ports (such as 80 & 8000 ports) in the router which has got static IP from the ISP, and then connect them to the router. After that you can use the client software to control it. Turn to ch3.2 to find the client software operations. 2. Use DNS service for WAN access. You will need a PC connected to Internet with static IP that owns software providing DNS service at the same time(such as IP Server)(the PC is so-called DNS server).You can also register a domain name through the DNS service dealer and visit it with the domain name. When network camera is connected to WAN with PPPoE, it will get an IP address, and send its name and the IP to the DNS server. The client software will immediately connect to the PC that used as the DNS server to tell it which network camera is waiting for access. Then the server will search for all the registered network cameras, and match the camera with this IP. When the IP address is returned, the client software will connect to the network camera to get the video. Operations: Run the client software 4.0, select “Configure”Æ “Server Configuration” select network camera. In the right tree, input “Server Name” & “DNS Host IP” in the “Server Configuration” box as Fig 4.1, and click “Confirm”. Select “Configure”-> “Device Management”, double click the network camera name you just added, the “server attribute” message box will pop up as Fig. 4.2. Make sure that the “sever name” is consist with the sever name in “remote config”; and select “private DNS” in “register mode”; then input the IP address of DNS server in “DNS address”, click “Confirm”. Then you can preview the picture in the “preview” menu. 34 Fig.4.2 DNS Server 35 Q&A 1、Time showing incorrectness: Use client 4.01 to correct the time by selecting “configure”Æ“local configure”Æ“Hard disk recorder timing” 2、IP unknowing: Connect the camera and PC with the same hub,turn on the camera and run the “SADP Search Software” on PC to get the IP of the connected camera. You can get the SADP from your dealer. 3、Administrator password missing: Please contact your dealer. Please contact your dealer if any of the above information cannot meet your demand. If any of the above information cannot meet demand with you, please contact your dealer. 36