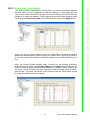
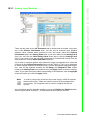
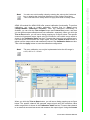
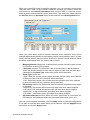
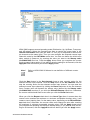
1
User Manual APAX-5070 Software Manual Copyright The documentation and the software included with this product are copyrighted 2010 by Advantech Co., Ltd. All rights are reserved. Advantech Co., Ltd. reserves the right to make improvements in the products described in this manual at any time without notice. No part of this manual may be reproduced, copied, translated or transmitted in any form or by any means without the prior written permission of Advantech Co., Ltd. Information provided in this manual is intended to be accurate and reliable. However, Advantech Co., Ltd. assumes no responsibility for its use, nor for any infringements of the rights of third parties, which may result from its use. Acknowledgements Intel and Pentium are trademarks of Intel Corporation. Microsoft Windows and MS-DOS are registered trademarks of Microsoft Corp. All other product names or trademarks are properties of their respective owners. Notes on the Manual This is the Software Manual for the Advantech APAX-5570 product. This manual will help guide the end user through implementation and use of the software portion of this product. What is covered in this manual: This manual will give a general overview of the Windows XP Embedded operating system, most of the applications that are included with Windows XP Embedded as well as the applications added and/or created by Advantech Corporation in the Windows XP Embedded image. This manual will also cover installation and use of development and utility software that is needed. It will also reference optional software that can be used by the end user with the Windows XP Embedded Operating system. What is not covered in this manual: This manual will reference the hardware but does not contain hardware setup information, wiring information, electrical specifications or any detailed hardware information. Please refer to the hardware manual for this information. Edition 1 June 2010 APAX-5070 Software Manual ii Contents Chapter 1 Quick Start ...........................................1 1.1 1.2 1.3 1.4 Hardware System Diagram ....................................................................... 2 Installing the ADAM/APAX .NET utility...................................................... 2 Configuring APAX-5070 with ADAM/APAX .NET ..................................... 2 Read/Write Data Using Modscan.............................................................. 7 2 API Programming ..............................11 2.1 2.2 VC++ API ................................................................................................ 12 .NET API (Adam .NET Class Library) ..................................................... 12 Appendix A Analog I/O Board Settings ................15 A.1 Analog I/O Board Settings....................................................................... 16 Appendix B ADAM/APAX .NET Utility Operation.19 B.1 ADAM/APAX .NET Utility General Window............................................. 20 B.1.1 Menu ........................................................................................... 21 B.1.2 Toolbar........................................................................................ 24 B.1.3 Module Tree Display Area .......................................................... 24 B.1.4 Status Display Area .................................................................... 25 General Configuration ............................................................................. 25 B.2.1 Information .................................................................................. 25 B.2.2 Setting......................................................................................... 26 B.2.3 Modbus Address Setting............................................................. 27 B.2.4 Data Stream................................................................................ 29 B.2.5 Alarm........................................................................................... 30 I/O Module Configuration ........................................................................ 32 B.3.1 Analog Input Modules ................................................................. 33 B.3.2 Analog Output Module ................................................................ 37 B.3.3 Digital Input Module .................................................................... 40 B.3.4 Digital Output Module ................................................................. 41 B.3.5 Counter Module .......................................................................... 42 Chapter B.2 B.3 Appendix C Modbus/TCP Address Mapping Table . 49 C.1 C.2 Modbus/TCP Fixed Mode Address Mapping Table (0x) ......................... 50 Modbus/TCP Fixed Mode Address Mapping Table (4x) ......................... 51 Appendix D APAX-5000 I/O Module Channel Status 59 D.1 APAX-5000 I/O Module Channel Status ................................................. 60 iii APAX-5070 Software Manual APAX-5070 Software Manual iv Chapter 1 Quick Start 1 1.1 Hardware System Diagram For the example demonstration showing how to use APAX-5070, the system hardware architecture can be shown as figure. One computer with LAN port is used to connect to the APAX-5070 and APAX-5000 I/O modules. 1.2 Installing the ADAM/APAX .NET utility Advantech provides the ADAM/APAX .NET utility which allows developers and end users to see APAX-5070 and connected I/O modules, perform configurations, and simple testing of the I/O. This software can be helpful when checking wiring inputs prior to installing the runtime project. It is also able to detect and test other Advantech supported hardware for this product such as Ethernet or Serial I/O. (ADAM-4000, ADAM-5000 and ADAM-6000 series). Therefore, you need to install ADAM/APAX .NET utility first to configure APAX-5070 and related APAX-5000 I/O modules. After that, you can use other software package which supports Modbus/TCP client (like Modscan or HMI/SCADA software) to perform write or read action to APAX-5070. The installation file is contained in the CD. When you launch the CD, select the APAX Software button and click the ADAM/APAX .NET Utility button to find the installation file. Besides, you always can link to the web site http://www.advantech.com and click into the Download area under the Support site to get the latest version of the ADAM/ APAX .NET utility. 1.3 Configuring APAX-5070 with ADAM/APAX .NET Launch ADAM/APAX .NET utility by selecting Start >> All Programs >> Advantech Automation >> AdamADAM/APAX .NET Utility >> AdamADAM/APAX .NET Utility. On the left side of the utility window, you can see several items showing IP address under the Ethernet item. (These items represent the Ethernet port on your computer). Click on the item showing the IP address which stands for the specific port used to connect with APAX-5070 module, and then click the icon Search Modules on the toolbar. (Or you can right click the item and select Search option.) Then you should be able to see APAX-5070 item showing under the IP address item, as shown below. APAX-5070 Software Manual 2 Chapter 1 Quick Start Click the item showing the APAX-5070 (with APAX-5070 IP address). Type the correct password on the pop-up window. All the connected APAX-5000 I/O modules will show under the APAX-5070 item. (In this example, they are APAX-5017, APAX-5028 and APAX-5045) Note! The default password of APAX-5070 is 00000000. 3 APAX-5070 Software Manual On the right window, you can perform all related configurations toward APAX-5070 through the five tabs: Information, Setting, Modbus address setting, Data Stream and Alarm. Click the I/O modules items under the APAX-5070 item, then you can configure or read/write specific I/O modules. Take the figure below as example, you can read the AI channel value or perform related setting after you click the APAX5017 item. Refer to Appendix B for more detail for these configurations. The most important configuration for APAX-5070 is to define the Modbus address mapping. After you have completed the address mapping, you can simply get data from or write data to APAX-5070 through the defined address. APAX-5070 offer two selections to assign the address: Fixed mapping mode and Flexible mapping mode (by clicking the Fixed and Flexible radio button and then clicking the Apply button) APAX-5070 Software Manual 4 Note! All Modbus address you can allocate must lie between 00001 ~ 09999 (0x or 4x) Modbus address 0x can only be used for APAX DI/O modules Modbus address 4x can be used for APAX DI/O, AI/O and counter modules Modbus address of a module with less ID number MUST NOT exceed Modbus address of a module with larger ID number (Example: Modbus address of the module with ID number 5 should be less than Modbus address of a module with ID number 6) Length of Modbus address 0x MUST be multiples of 8 Except for manually assigned all Modbus address by yourself, you also can click the Auto Scan or Auto Scan (4X) buttons to let APAX-5070 automatically find the optimized Modbus address allocation, according to module's channel number and type. The difference between these two options from the Fixed mapping mode lies in the address allocation way. Refer to table below. 5 APAX-5070 Software Manual Quick Start When you choose Flexible mapping mode, it means you can allocate all Modbus address manually. Simply click the Start Address and Length text box and enter the desired number to define related Modbus address for a specific module. Refer to figure below, user is configuring the start address as 1024 and length as 64 for APAX5045 module. The pencil icon shown on the left side of the raw "APAX-5045" means this module's Modbus address is editing. Chapter 1 When you choose Fixed mapping mode, all APAX-5000 I/O modules' Modbus address will be assigned by system, as the figure shown above. Refer to Appendix C for how the system will allocate the Modbus address of your APAX-5000 I/O modules. Fixed Mapping Mode Module ID Module Name Address Type Start Address Length Modbus Address 0 APAX-5017 4x 1 32 40001 ~ 40032 1 APAX-5028 4x 33 32 40033 ~ 40064 2 APAX-5045 0x 129 64 00129 ~ 00192 Flexbile Mapping Mode (Auto Scan) Module ID Module Name Address Type Start Address Length Modbus Address 0 APAX-5017 4x 1 12 40001 ~ 40012 1 APAX-5028 4x 13 8 40013 ~ 40020 2 APAX-5045 0x 1 24 00001 ~ 00024 Flexbile Mapping Mode (Auto Scan 4X) Module ID Module Name Address Type Start Address Length Modbus Address 0 APAX-5017 4x 1 12 40001 ~ 40012 1 APAX-5028 4x 13 8 40013 ~ 40020 2 APAX-5045 4x 21 2 40021 ~ 40022 For each APAX-5000 I/O module, it will be expected to occupy 64 addresses for all channels' data if the Modbus address type is 0x (32 registers will be occupied if the Modbus address type is 4x.) for Fixed mapping mode. However, usually it doesn't need so many addresses because the channel number is less. Taking APAX-5017 module as example, 32 Modbus registers will be expected to be used for Fixed mapping mode. But APAX-5017 module only has 16 channels, and each channel only needs one 4x register. So if you choose Auto Scan mode, only 16 Modbus registers will be used for APAX5017. This mechanism can help to ignore unused address in the Modbus data package transferred from APAX-5070 to remote target (PC in this example), making the data transferring more efficient (decrease the times to transfer Modbus data). When you choose Auto Scan (4X) mode, all module's data will be assigned to Modbus 4x registers sequentially. It makes the data transferring performance even better. Here, we choose to use Auto Scan mode. After clicking the Auto Scan button, the Modbus address mapping will be assigned, shown by figure below. APAX-5070 Software Manual 6 After the Modbus address mapping is done, you can start to use APAX-5070 in your application. Here, we use the Modscan software performing data access to the three APAX-5000 I/O modules. Launch the Modscan application program on your computer. Select Connect under Connection menu selection to establish a connection to the APAX-5070. Chapter 1 1.4 Read/Write Data Using Modscan Quick Start On the Connection Details pop-up window, enter the correct IP address of the APAX-5070 you want to connect on the IP Address text box. (Here it is 10.0.0.1.) Then click the OK button to apply the configuration. 7 APAX-5070 Software Manual Now, we want to read the channels' data from APAX-5017 module with ID number 0. From previous section, we know the Modbus address of APAX-5017 is located between 1 ~ 12 after you configure it using the Auto Scan mode. Select 03: HOLDING REGISTER or 04: INPUT REGISTER in the MODBUS Point Type combo box because the Modbus data type is 4x. Enter 0001 in the Address text box for the Modbus start address, and then enter 12 in the Length text box to define the Modbus address length. Then you can see the 12 AI channels' value from APAX-5017 on Modscan now, as shown by figure below. APAX-5070 Software Manual 8 Chapter 1 The procedure to perform read or write action on APAX-5045 module is similar. From previous section, we know the Modbus address of APAX-5045 is located between 1 ~ 24. Select 01: COIL STATUS or 02: INPUT STATUS in the MODBUS Point Type combo box because the Modbus data type is 0x. Quick Start Enter 0001 in the Address text box for the Modbus start address, and then enter 24 in the Length text box to define the Modbus address length. Then you can see the 24 DI/O channels' value from APAX-5045 on Modscan now, as shown by figure below. 9 APAX-5070 Software Manual APAX-5070 Software Manual 10 Chapter 2 API Programming 2 2.1 VC++ API Advantech provides a VC++ API for C/C++ development environment to control APAX-5000 I/O modules. You can install the VC++ API by the CD offered by APAX5070. The installation file is contained in the CD. When you launch the CD, select the APAX Software button and click the I/O Drivers button to find the installation file. In order to save your development time, Advantech provides several examples that you can use it as reference to build your own C or C++ application program. These examples can be found in the CD offered by APAX-5070, or from the Advantech website at http://www.advantech.com in the download area under Support page. When you launch the CD, select the APAX Software button and click the VC++ Example button to find these examples. The Modbus functions' reference manual is located on the CD that comes with the APAX-5070. When you launch the CD, click the Browser Manual button and the you can see the document APAX Modbus Library Manual.pdf there. 2.2 .NET API (Adam .NET Class Library) Advantech provides a .NET API for developing .NET applications for many Advantech products. This API interface is called Adam .NET Class library. All the functions described in Section 3.1 are supported by Adam .NET class library. You can leverage Advantech Adam .NET class library to develop application controlling APAX-5000 I/O modules under Microsoft Visual Studio .NET environment such as VB .NET or C#. The installation file is contained in the CD. When you launch the CD, select the APAX Software button and click the .NET Class Library button to find the installation file. Besides, you also can link to the website: http://www.advantech.com and click into the Download Area under the Support site to get the latest version of the Adam.NET class library. After you complete the installation, you can find Adam .NET class library help document by selecting Start >> All Programs >> Advantech Automation >> ADAM >> Adam.NET Class Library >> VS2003 >> Adam.NET Help. APAX-5070 Software Manual 12 Chapter 2 13 APAX-5070 Software Manual API Programming Besides, there are many examples offered that you can use it as reference to build your own application program. These examples can also be found by selecting Start >> All Programs >> Advantech Automation >> ADAM >> Adam.NET Class Library >> VS2003 >> APAX samples >> Apax5570 (Win32) after you have installed Adam.NET Class library. Or you can find these examples by C:\Program Files\Advantech\Adam.NET Class Library\. APAX-5070 Software Manual 14 Appendix A A Analog I/O Board Settings A.1 Analog I/O Board Settings Range Settings for Analog I/O Boards. These ranges are provided for reference. Not all boards support all ranges. Please see hardware manual for valid ranges for a particular board. Millivolts DC (mV) Volts DC (V) Milliamps (mA) Counter settings Setting Type Value (Hex) +/- 15mV 0x0100 +/- 50mV 0x0101 +/- 100mV 0x0102 +/- 150mV 0x0103 +/- 500mV 0x0104 0~150mV 0x0105 0~500mV 0x0106 +/- 1V 0x0140 +/- 2.5V 0x0141 +/- 5V 0x0142 +/- 10V 0x0143 +/- 15V 0x0144 0~1V 0x0145 0~2.5V 0x0146 0~5V 0x0147 0~10V 0x0148 0~15V 0x0149 4~20mA 0x0180 +/-20mA 0x0181 0~20mA 0x0182 Pulse/DIR 0x01C0 Up/Down 0x01C1 Up 0x01C2 Frequency 0x01C3 AB 1X 0x01C4 AB 2X 0x01C5 AB 4X 0x01C6 Pt-100 (3851) -200~850 'C 0x0200 Pt-100 (3851) -120~130 'C 0x0201 Pt-100 (3851) -200~200 'C 0x0202 Pt-100 (3851) -100~100 'C 0x0203 Pt-100 (3851) -50~150 'C 0x0204 Pt-100 (3851) 0~100 'C 0x0205 Pt-100 (3851) 0~200 'C 0x0206 Pt-100 (3851) 0~400 'C 0x0207 Pt-100 (3851) 0~600 'C 0x0208 Pt-200 (3851) Pt-200 (3851) -200~850 'C 0x0220 Pt-200 (3851) -120~130 'C 0x0221 Pt-500 (3851) Pt-500 (3851) -200~850 'C 0x0240 Pt-500 (3851) -120~130 'C 0x0241 Pt-100 (3851) APAX-5070 Software Manual 16 Pt-100 (3916) Pt-1000 (3851) -200~850 'C 0x0260 Pt-1000 (3851) -120~130 'C 0x0261 Pt-1000 (3851) -40~160 'C 0x0262 Pt-100 (3916) -200~850 'C 0x0280 Pt-100 (3916) -120~130 'C 0x0281 Pt-100 (3916) -200~200 'C 0x0282 Pt-100 (3916) -100~100 'C 0x0283 Pt-100 (3916) -50~150 'C 0x0284 Pt-100 (3916) 0~100 'C 0x0285 Pt-100 (3916) 0~200 'C 0x0286 Pt-100 (3916) 0~400 'C 0x0287 Pt-100 (3916) 0~600 'C 0x0288 Pt-200 (3916) -200~850 'C 0x02A0 Pt-200 (3916) -120~130 'C 0x02A1 Pt-500 (3916) Pt-500 (3916) -200~850 'C 0x02C0 Pt-500 (3916) -120~130 'C 0x02C1 Pt-1000 (3916) Pt-1000 (3916) -200~850 'C 0x02E0 Pt-1000 (3916) -120~130 'C 0x02E1 Pt-1000 (3916) -40~160 'C 0x02E2 Balco 500 Balcon(500) -30~120 0x0300 Ni 518 Ni(518) -80~100 'C 0x0320 Ni(518) 0~100 'C 0x0321 Ni 508 Ni(508) 0~100 'C 0x0340 Ni(508) -50~200 'C 0x0341 Thermistor 3K Thermistor 3K 0~100 'C 0x0360 Thermistor 10K Thermistor 10K 0~100 'C 0x0380 Thermistor 10K -50~100 'C 0x0381 T/C TypeJ 0~760 'C 0x0400 T/C TypeJ -200~1200 'C 0x0401 T/C TypeK 0~1370 'C 0x0420 T/C TypeK -270~1372 'C 0x0421 Pt-200 (3916) T/C TypeJ T/C TypeK T/C TypeT T/C TypeE T/C TypeR T/C TypeS T/C TypeB T/C TypeT -100~400 'C 0x0440 T/C TypeT -270~400 'C 0x0441 T/C TypeE 0~1000 'C 0x0460 T/C TypeE -270~1000 'C 0x0461 T/C TypeR 500~1750 'C 0x0480 T/C TypeR 0~1768 0x0481 T/C TypeS 500~1750 'C 0x04A0 T/C TypeS 0~1768 'C 0x04A1 T/C TypeB 500~1800 'C 0x04C0 T/C TypeB 300~1820 'C 0x04C1 17 APAX-5070 Software Manual Appendix A Analog I/O Board Settings Pt-1000 (3851) APAX-5070 Software Manual 18 Appendix B B ADAM/APAX .NET Utility Operation B.1 ADAM/APAX .NET Utility General Window After you install the ADAM/APAX .NET utility, you can launch it by selecting Start >> All Programs >> Advantech Automation >> ADAM/APAX .NET Utility >> ADAM/ APAX .NET Utility. Refer to Section 1.2 for installation information. After you launch the utility, you should see the operation window as figure below. Except APAX-5000 I/O modules, other devices such as ADAM-4000, ADAM-5000 and ADAM-6000 modules can also be searched and configured in this utility. The operation window consists of four areas --- the Menu, the Toolbar, the Module Tree Display Area and the Status Display Area. APAX-5070 Software Manual 20 The menu at the top of the operation window contains: The File menu 1. Open Favorite Group - You can configure your favorite group and save the configuration into one file. Using this option, you can load your configuration file for favorite group. 2. Save Favorite Group - You can configure your favorite group and save the configuration into one file. Using this option, you can save your favorite group into one configuration file. 3. Auto-Initial Group - If you want to have the same favorite group configuration when you exit ADAM/APAX .NET utility and launch it again, you need to check this option. 4. Exit - Exit ADAM/APAX .NET Utility. 1. 2. 3. 4. The Tools menu Search - Search if there are any remote I/O modules connected. For I/O modules communicated by serial (such as ADAM-4000 modules), click the COM1 item (COM 2 is an internal COM port) under Serial item in the Module Tree Display Area first before you click this button. For I/O modules communicated by Ethernet (such as APAX-5070 with APAX-5000 I/O modules, ADAM-6000 modules), click the Ethernet item in the Module Tree Display Area first before you click this button. Add Devices to Group - You can add any I/O modules to your favorite group by this option. You need to select the device you want to add in the Module Tree Display Area (it will be described below) first, and then select this option to add. Terminal for Command Testing - ADAM modules support ASCII commands and Modbus as communication protocol. You can launch the terminal to communicate with remote module by these two kinds of protocols directly. Refer to ADAM-4000, ADAM-5000 and ADAM-6000 manual for ASCII and Modbus command. DiagAnywhere Searcher - "DiagAnywhere" tool, an abbreviation of "Diagnostic Anywhere", is a networking solution for remotely monitoring and controlling other Windows based devices. It is very similar to a remote desktop application with some additional features. This option will show all devices with DiagAnywhere server in the same network. Click the Search button to start the search. The device with DiagAnywhere server will be listed, as shown by figure below. 21 APAX-5070 Software Manual Appendix B ADAM/APAX .NET Utility Operation B.1.1 Menu 5. 6. Print Screen - You can acquire current utility window image and save it as an image file (*.bmp). Monitor Stream/Adam5000 Event Data - APAX-5070 supports Data Stream function. If you enable APAX-5070 Data Stream functions and configure this computer (where the utility is installed) as the host to receive data, then you can use this option to receive and view the data transferred from APAX-5070. Refer to figure below. Click the Start/Stop button to start or stop the data collection. After you click the Start button, every time the host receive a pack of data, a new line represented the latest data from APAX-5070 will be added in the Package window. When the package number (the raw number in the Package window) is more than 11, there will be one scroll bar automatically appearing at the right side of the Package window. You can drag the scroll bar up and down to see all historical data. Click the Auto Scroll check box, then the latest data will always appear in the Package window. For Data Stream, there are two types of package transferred: Data message and Alarm message. Data message includes all module's channel value. Alarm message will be transferred only when alarm happens. Refer to Section B.2.5 for more detail about Alarm function. Alarm message will be shown with red text in the Package window. You also can click the Alarm message only check box, then only the alarm message will be displayed on this window. Click specific raw in the Package window, you can see the analyzed data within a specific package in the Analysis window. Refer to figure below. The third package is analyzed and displayed. APAX-5070 Software Manual 22 8. 9. Monitor Peer-to-Peer (Event Trigger) - ADAM-6000 modules support Peer-toPeer function. You can use this option to see data transferred from connected ADAM-6000 module which is enabled Peer-to-Peer function. Refer to ADAM6000 manual for more detail. Monitor GCL IO Data Message - ADAM-6000 modules support GCL function. You can use this option to see data transferred from connected ADAM-6000 module which is enabled GCL function. Refer to ADAM-6000 manual for more detail. APAX Monitor - When you select this option, there will be one pop-up window showing status of all APAX-5000 I/O modules connected with APAX-5070, including ID number and channel value. Refer to the figure below. 10. DI and AI channel values are displayed on the window. Click the DO channels to change its value. Clicking the AO channels, another pop-up window will let you configure the output value. Click the Apply button after you adjust the output value. (Refer to figure below) 23 APAX-5070 Software Manual Appendix B ADAM/APAX .NET Utility Operation 7. 1. 2. 3. 4. 5. 1. 2. The Setup menu Favorite Group - You can configure your favorite group including add one new device (only for remote device), modify or delete one current device, sort current devices and diagnose connection to one device. Refresh COM and LAN node - ADAM/APAX .NET utility will refresh the serial and LAN network connection situation. Add COM Port Tree Nodes - This option is used to add serial COM ports in APAX.NET Utility. ShowTreeView - Check this option to display the Module Tree Display Area. Enable Calibration Function - Check this option to let APAX-5000 analog module able to perform calibration procedure. The Help menu Check Up-to-Date on the Web - Choose this option, it will automatically connect to Advantech download website. You can download the latest utility there. About ADAM/APAX .NET Utility - Choose this option, you can see version of ADAM/APAX .NET Utility installed on your computer. B.1.2 Toolbar The eight buttons on toolbar represent the eight common used items from the Menu. Refer to figure below for the definition of each button: B.1.3 Module Tree Display Area ADAM/APAX .NET Utility is one complete software tool that all APAX and ADAM I/O module can be configure and operated in this utility. The Module Tree Display Area is on the left part of the utility operation window. There are four categories in the Module Tree Display Area: Serial All serial remote I/O Modules connected to the host computer will be listed in this category. You also can configure COM port parameter (such as baud rate, parity, stop bit) here. Ethernet All Ethernet remote I/O modules (including APAX-5070 modules) connected to the host computer will be listed in this category. APAX-5070 Software Manual 24 Favorite Group You can define which devices listed in Serial or Ethernet categories above into your personal favorite group. This will make you easier to find your interested modules. Click on the ADAM device item under Favorite group item, and select Favorite >> New in Setup menu to create a new group. After you create your own group, click on your group and select Favorite >> New in Setup menu to add any remote devices into your group. You can also select Diagnose connection to check the communication. B.1.4 Status Display Area Status Display Area, on the right part of utility operation window, is the main screen for operation. When you select different items in Modules Tree Display Area, Status Display Area will change dependently. You can do all configurations and tests on this area. B.2 General Configuration If you click the APAX-5070 item in the Module Tree Display Area, the Status Display Area should looks as figure below. There will be five configuration tabs shown on the Status Display Area: Information, Setting, Module Address Setting, Data Stream, Alarm. B.2.1 Information 25 APAX-5070 Software Manual Appendix B ADAM/APAX .NET Utility Operation ADAM-4500/5510 Series All ADAM-4500 and ADAM-5000 controllers connected to the host computer through serial interface in the same system, such as ADAM-5510 or ADAM-4501, will be listed in this category. Simply click this item all related modules will be displayed automatically. Refer to figure above. You can download related firmware to selected APAX-5070 by clicking the Download button in the Firmware and Kernel area. You also can name the selected APAX-5070 module by the Name and Description text box in the Device area. All I/O modules connected with APAX-5070 module with its ID number are listed in the Description tab in the Module Tree Display Area (the left tab) and Description tab on Status Display Area. You can see all I/O modules supported by APAX-5070 by the Support Modules tab. B.2.2 Setting Here, you can change related networking setting, including IP address, Subnet Mask, Default Gateway, and Host Idle Timeout. After you have complete the setting, click the Apply button to apply the setting. Besides, you also can change the password setting. Enter current password in the Old password text box, and enter the new password you want to use in the New password and Verify password text boxes. Then Click the Change button to apply the new password. The maximum connection between host device and one single APAX-5070 is 16. In other words, there could be maximum 16 host devices connecting to one APAX-5070 at the same time. In order to ensure a new connection can be established, there will be host idel timeout. When the timeout reaches, the connection between specific host device and APAX-5070 will be disconnected, letting a new host device able to connect to that APAX-5070. The Host Idle Timeout combo box defines how long the connection between host and APAX-5070 will be disconnected if there is no package transferred from that host to APAX-5070. APAX-5070 Software Manual 26 The most important configuration for APAX-5070 is to define the Modbus address mapping. After you have completed the address mapping, you can simply get data from or write data to APAX-5070 through the defined address. APAX-5070 offer two selections to assign the address: Fixed mapping mode and Flexible mapping mode (by clicking the Fixed and Flexible radio button and then clicking the Apply button) When you choose Fixed mapping mode, all APAX-5000 I/O modules' Modbus address will be assigned by system, as the figure shown above. Refer to Appendix C for how the system will allocate the Modbus address of your APAX-5000 I/O modules. When you choose Flexible mapping mode, it means you can allocate all Modbus address manually. Simply click the Start Address and Length text box and enter the desired number to define related Modbus address for a specific module. Refer to figure below, user is configuring the start address as 1024 and length as 64 for APAX5045 module. The pencil icon shown on the left side of the raw "APAX-5045" means this module's Modbus address is editing. 27 APAX-5070 Software Manual Appendix B ADAM/APAX .NET Utility Operation B.2.3 Modbus Address Setting Note! 1.All Modbus address you can allocate must lie between 00001 ~ 09999 (0x or 4x) 2.Modbus address 0x can only be used for APAX DI/O modules 3.Modbus address 4x can be used for APAX DI/O, AI/O and counter modules 4.Modbus address of a module with less ID number MUST NOT exceed Modbus address of a module with larger ID number (Example: Modbus address of the module with ID number 5 should be less than Modbus address of a module with ID number 6) 5.Length of Modbus address 0x MUST be multiples of 8 Except for manually assigned all Modbus address by yourself, you also can click the Auto Scan or Auto Scan (4X) buttons to let APAX-5070 automatically find the optimized Modbus address allocation, according to module's channel number and type. The difference between these two options from the Fixed mapping mode lies in the address allocation way. Refer to table below. Fixed Mapping Mode Module ID Module Name Address Type Start Address Length Modbus Address 0 APAX-5017 4x 1 32 40001 ~ 40032 1 APAX-5028 4x 33 32 40033 ~ 40064 2 APAX-5045 0x 129 64 00129 ~ 00192 Flexbile Mapping Mode (Auto Scan) Module ID Module Name Address Type Start Address Length Modbus Address 0 APAX-5017 4x 1 12 40001 ~ 40012 1 APAX-5028 4x 13 8 40013 ~ 40020 2 APAX-5045 0x 1 24 00001 ~ 00024 Flexbile Mapping Mode (Auto Scan 4X) Module ID Module Name Address Type Start Address Length Modbus Address 0 APAX-5017 4x 1 12 40001 ~ 40012 1 APAX-5028 4x 13 8 40013 ~ 40020 2 APAX-5045 4x 21 2 40021 ~ 40022 For each APAX-5000 I/O module, it will be expected to occupy 64 addresses for all channels' data if the Modbus address type is 0x (32 registers will be occupied if the Modbus address type is 4x.) for Fixed mapping mode. However, usually it doesn't need so many addresses because the channel number is less. Taking APAX-5017 module as example, 32 Modbus registers will be expected to be used for Fixed mapping mode. But APAX-5017 module only has 16 channels, and each channel only needs one 4x register. So if you choose Auto Scan mode, only 16 Modbus registers will be used for APAX5017. This mechanism can help to ignore unused address in the Modbus data package transferred from APAX-5070 to remote target (PC in this example), making the data transferring more efficient (decrease the times to transfer Modbus data). APAX-5070 Software Manual 28 Click the Save Config button to save current Modbus address mapping setting into a specific file. Next tme, you can click the Load Config button to load previous address mapping setting. B.2.4 Data Stream APAX-5070 supports Data Stream function. When you enable this function, APAX5070 will automatically and periodically send its Modbus data to remote host. Define the period by the Hours, Minutes, Second and Millisecond text box in the Sending Interval (50ms ~ 10 hours) Area. Refer to figure below. The period in this example is 1 second. Then, type the IP address of the hosts, which you want to use to receive the data transferred from APAX-5070 module, and click related check box in the Hosts to receive data Area. The host in this example is equipped with IP address 10.0.0.23 and 10.0.0.44. You also can change the port number used for Data Stream by the Datastream Port (Default: 5168) text box in the Data Stream Port Setting Area. For each configuration, remember to click Apply button to apply your configuration. 29 APAX-5070 Software Manual Appendix B ADAM/APAX .NET Utility Operation When you choose Auto Scan (4X) mode, all module's data will be assigned to Modbus 4x registers sequentially. It makes the data transferring performance even better. B.2.5 Alarm APAX-5070 supports Alarm function. You can use specific input channel value from a selected APAX-5000 module (connected with APAX-5070 module) as parameter. And if that channel value is higher or lower than a pre-defined reference value, then an alarm will be activated. An output channel value of a selected output module will change according to your define. There are maximum 16 alarms you can use for one APAX-5070 module. Refer to figure below. In this example, alarm 0 will be activated when channel 2 value of APAX5017 module (ID number 0) is higher than 5. And APAX-5045 module's (ID number 2) 14th channel value (APAX-5045 has 12 DI channels and 12 DO channels, so it is DO channel 2) will become logic high (integer value "1") at this moment. APAX-5070 Software Manual 30 Note! Once the alarm condition has occurred, even if the condition disappears, the alarm status will remain "True". You need to manually clear the alarm to make its status back to "False". Double click related cells of the Status column will clear the alarm. 31 APAX-5070 Software Manual Appendix B ADAM/APAX .NET Utility Operation You can simply click the cells of the LimitVal column and enter the reference value. (In this example, it is 5.) And you can click the cells of the OutVal column and enter the desired output value. (In this example, it is 1.) Remember to click the check box to enable the specific alarms. After the alarm setting is done, click the Apply button to apply the configuration. At this moment, you can see the alarm value shown in the cells of the Status column. (In this example, it is "True", meaning the alarm is happening) B.3 I/O Module Configuration When you click any I/O module in the Module Tree Display Area, the Status Display Area at the right side will automatically change to show the module's information. There will be two tabs displayed: Module Information and I/O Information. (Refer to the figure below) On the Module Information tab, module information (such as module name, switch ID, module description, and firmware version) is displayed. You also can update related firmware to the specific module by the Download button. On the I/O Information tab, you can write or read all channels' status and perform related configuration and calibration. Refer to sections below for more detail. All APAX-5000 I/O modules support Locate function. Using this function, you can easily identify specific APAX modules through utility. Click the Locate button in the upper right corner of the Status Display Area, and the text on the button will become "Disable". Refer to figure below. It means you have enabled Locate function, and the power LED of that selected module will continuously flashing, letting you easily to identify. Click the Locate button again to disable the Locate function (the text on the button will become "Enable"), and that module's LED will stop flashing. APAX-5070 Software Manual 32 There are two parts for the I/O Informaion tab of APAX-5000 AI module. At the bottom is the Channel Information Area. You can see all channels' type, Modbus address, value, channel status (burnout or not), and range. Above the Channel Information Area is the Setting Panel Area. If you don't want see the Setting Panel Area, you can click the Hide Setting Panel check box to hide the Setting Panel Area. If you want to see the raw data (presented in Hexadecimal format) from the input channels, click the Show Raw Data check box. If you want to configure specific input channels' range or integration time, select the channels in the Channel Information Area (use the "Shift" or "Ctrl" key on keyboard to select multiple channels at the same time). Choose appropriate range and integration time for the selected channels by the Range and Integration Time combo boxes in the Setting Panel Area and then click the Apply button to save the configuration. If you want to save the same range setting for all channels, click the ApplyAll check box before you click the Apply button. Note! In order to remove the noise from the power supply, APAX AI modules feature built-in filter. Filters are used to remove noise generated from environment. The integration time is used to configure the filter frequency. You can define specific channels reading or not by the Enable and Disable buttons. Refer to figure below, channel 2 ~ 6 are disabled that no data will be read. 33 APAX-5070 Software Manual Appendix B ADAM/APAX .NET Utility Operation B.3.1 Analog Input Modules Most APAX-5000 analog module supports auto calibration. To perform calibration, you need to enable calibration function by Setup menu (Setup>>Enable Calibration Function). After that, you can perform auto calibration to the AI modules by clicking the Auto button in the Calibration Area. The module will automatically calibrate itself. You don’t need to connect any external devices or instruments. APAX-5070 Software Manual 34 Click the Start Record to start data logging. At first, a pop-up window will appear to let you configure where you want to save the log file. Then, the data logging will start and the data will be displayed on the plot. 35 APAX-5070 Software Manual Appendix B ADAM/APAX .NET Utility Operation APAX-5000 AI modules offer data logging functionality. Click the Trend Log button to launch Trend Log window. Here, you can configure which channels you want to log by the check box representing specific channels in the Draw Setting Area. Click the color box beside the channel index to configure the color of the trend line on the plot. You can set the data log period (how often APAX-5000 modules record its channel value) by the PollingInterval combo box. Refer to figure below. Here, only channel 0 ~ channel 4 value are logged, and the data log period is 200 milliseconds. APAX-5000 AI modules support Burnout function. It means when there is no signal wiring, the input channel will detect it. Below are the modules which supports Burnout function: 1. 2. 3. 4. APAX-5013: Burnout function available for RTD input (all type) APAX-5017: Burnout function only available for current input (only 4 ~ 20 mA) APAX-5017H: Burnout function only available for current input (only 4 ~ 20 mA) APAX-5018: Burnout function available for thermocouple input (all type) and current input (only 4 ~ 20 mA) Refer to figure below. Now we configure all input channels' range as 4 ~ 20 mA for APAX-5017 module. Only channel 1 has real current signal input, so you can see other channels' status showing "Burnout". (Only channel 1 status shows "Good", means there is signal input.) You can choose to show the maximum value or minimum value of the input range as the read value when burnout condition happens (no wire input signal). It is configured by the Range combo box in the Burnout Value Area. Refer to figure above. The setting is "Up scale", meaning the maximum value of the input range will be shown when burnout condition happens. So you can see all other channels' values (except channel 1) are 20. (meaning 20 mA, the maximum value of the input range) Now, if we select "Down scale" for the Range combo box in the Burnout Value Area, it means the minimum value of the input range will be shown when burnout condition happens. Refer to figure below. You can see all other channels' values (except channel 1) are 4. (meaning 4 mA, the minimum value of the input range) APAX-5070 Software Manual 36 Appendix B ADAM/APAX .NET Utility Operation B.3.2 Analog Output Module There are two parts for the I/O Information tab of APAX-5000 AO module. At the bottom is the Channel Information Area. You can see all channels' type, Modbus address, value, range, startup value (the initial value when the AO module is poweron) and safety value (the default value when the communication is broken). Above the Channel Information Area is the Setting Panel Area. If you don't want see the Setting Panel Area, you can click the Hide Setting Panel check box to hide the Setting Panel Area. If you want to see the raw data (presented in Hexadecimal format) from the output channels, click the Show Raw Data check box. 37 APAX-5070 Software Manual If you want to configure specific output channels' range, select the channels in the Channel Information Area. Choose appropriate range by the Range combo box in the Setting Panel Area and then click the Apply button to save the configuration. If you want to save the same range setting for all channels, click the ApplyAll check box before you click the Apply button. If you want to change specific output channel' output value, select that channel by clicking the channel in the Channel Information Area or choosing it from Channel combo box in the Setting Panel Area. Then define the output value by the Value text box or the horizontal slide below in the Setting Panel Area. Then, click the Apply Output button to save the configuration. You can see the channel output value changed in the Channel Information Area. Similarly, you can save the value in the Value text box to become the startup value by the Set as Startup button. And you also can see the startup value changed in the Channel Information Area. Note! Startup value means the default value when the module boots. APAX-5000 output module like AO or DO module supports Fail Safety Value (FSV) function. When the output module lose its ability to communicate with controller or coupler, all output channels will become the pre-defined value (the safety value). You can enable the FSV function by clicking the Enable check box in the Safety Function Area. Then, click the Set Value button to configure the safety value. A pop-up window will appear, like the figure below. You can simply type the desired safety value for each channel. In this example, safety value of channel 0 is configured as 10 mA, while other channels' are 0 mA. Click the Apply button after you have complete your setting. You can see the modified safety value showing by the Safety Value column in the Channel Information Area. APAX-5070 Software Manual 38 You also can set the safety value by entering the value to the Value text box or drawing the horizontal slide below in the Setting Panel Area. Then click the Set as Safety button to apply that value as safety value. APAX AO module like APAX-5028 offer manual calibration functionality. To perform calibration, you need to enable calibration function first by Setup menu (Setup>>Enable Calibration Function). After the calibration functionality is enabled, you can click the Trim to Span button and Trim to Zero button, and then you can perform span calibration and zero calibration, separately. When you click the Trim to Zero button, you will see a dialog popping-up as figure below. The specific channel will generate output signal using the minimum value within range which is shown in the Calibration Value text box. Connect that channel to an external accurate instrument and measure the output signal. Using the Counts to trim buttons to adjust until the output value real matches the value in the Calibration Value text box. Then click the Apply button to save the calibration configuration. Note! The zero calibration can only be implemented when the AO range is ±10V, ±5V or 0 ~ 20 mA When you click the Trim to Span button, you will see a dialog popping-up as figure below. The specific channel will generate output signal using the maximum value within range which is shown in the Calibration Value text box. Connect that channel to an external accurate instrument and measure the output signal. Using the Counts 39 APAX-5070 Software Manual Appendix B ADAM/APAX .NET Utility Operation Note! to trim buttons to adjust until the output value real matches the value in the Calibration Value text box. Then click the Apply button to save the calibration configuration. Note! Note: The S\span calibration can only be implemented when the AO range is ±10V, ±5V or 0 ~ 20 mA B.3.3 Digital Input Module There are two parts for the I/O Information tab of APAX-5000 DI module. At the bottom is the Channel Information Area. You can see all channels' type, Modbus addres, value, and mode. Above the Channel Information Area is the Setting Panel APAX-5070 Software Manual 40 Note! APAX-5040 is equipped with a filter which minimum period is 3 ms. Therefore, the minimum value for the Minimum low signal width text box is 30. B.3.4 Digital Output Module There are two parts for the I/O Information tab of APAX-5000 DO module. At the bottom is the Channel Information Area. You can see all channels' type, Modbus address, value, mode and safety value (the default value when the communication is broken). Above the Channel Information Area is the Setting Panel Area. If you don't want see the Setting Panel Area, you can click the Hide Setting Panel check box to hide the Setting Panel Area. If you want to change specific output channels' output value, select those channels by clicking the channel in the Channel Information Area (use the "Shift" or "Ctrl" key on keyboard to select multiple channels at the same time). Then define the output value by the Set True button or Set False button in the Setting Panel Area. Then, click the Apply button to save the configuration. You can see the channel output value changed in the Channel Information Area. 41 APAX-5070 Software Manual Appendix B ADAM/APAX .NET Utility Operation Area. If you don't want see the Setting Panel Area, you can click the Hide Setting Panel check box to hide the Setting Panel Area. APAX DI module supports digital filter functionality. Signals with period less the filter width will be filtered (regarding as high frequency noise). You can configure the filter width (acceptable pulse width). Select the channels you want to configure in the Channel Information Area (use the "Shift" or "Ctrl" key on keyboard to select multiple channels at the same time). Type the appropriate value (unit: 0.1 ms) into the Minimum low signal width text box to configure acceptable minimum pulse width in the Setting Panel Area. After you complete the configuration, click the Apply button to save the configuration. APAX-5000 output module like AO or DO module supports Fail Safety Value (FSV) function. When the output module lose its ability to communicate with controller or coupler, all output channels will become the pre-defined value (the safety value). You can enable the FSV function by clicking the Enable check box in the Safety Function Area. Then, click the Set Value button to configure the safety value. A pop-up window will appear, like the figure below. You can simply type the desired safety value for each channel. In this example, safety value of channel 3 to 8 are "True", while other channels' safety value are "False". Click the Apply button after you have complete your setting. (You can set all channels' safety value together by clicking the check box inside the Safety State cell.) You can see the modified safety value showing by the Safety Value column in the Channel Information Area. B.3.5 Counter Module Usually, except counter input channels, there are also digital input and digital output channels for counter module like APAX-5080. So there will three I/O Information tabs (DI, DO and CNT) (A) DI tab for digital input channels Refer to figure below. It is similar to standard DI module's I/O Information tab (Refer to Section B.3.3). At the bottom is the Channel Information Area. You can see all channels' type, Modbus address, value, and mode. Note! For APAX-5080, there is no digital filter for digital input channels. So you can not configure the minimum accept signal width like DI module. APAX-5070 Software Manual 42 You can configure each DO channel as simple digital output channel (it can be controlled manually) or an alarm channel (channel status will depend on value from a specific counter channel) on the Setting Panel Area. Select the channels you want to configure in the Channel Information Area (use the "Shift" or "Ctrl" key on keyboard to select multiple channels at the same time). You can set these channels' mode by clicking DO or Alarm radio button. Then click Apply button to save the configuration. If you want to save the same mode setting for all channels, click the ApplyAll check box before you click the Apply button. 43 APAX-5070 Software Manual Appendix B ADAM/APAX .NET Utility Operation (B) DO tab for digital output channels The DO tab for counter module looks very similar to the DO module's I/O Information tab (Refer to Section B.3.4). At the bottom is the Channel Information Area. You can see all channels' type, Modbus address, value, and alarm situation. Above the Channel Information Area is the Setting Panel Area. If you don't want see the Setting Panel Area, you can click the Hide Setting Panel check box to hide the Setting Panel Area. When you select DO mode for specific channels, you can manually control these channels' value. Refer to figure below. Select the channels you want to control the output value in the Channel Information Area (use the "Shift" or "Ctrl" key on keyboard to select multiple channels at the same time). Then define the output value by the Set True button or Set False button at the lower left of the Setting Panel Area. When you select Alarm mode for specific channels, those channels' value will be changed automatically based on the mapping counter input channel's value. In other words, the DO channel becomes alarm channel for specific counter channel. Below are some related parameters you need to set for alarm: 1. 2. 3. 4. 5. Mapping Channel combo box: It defines which counter channel's value is used for this alarm channel (DO channel). Limit value text box: The reference value to decide when an alarm happens. When the specific channel counter value is higher or lower than this limit value (depends on the Alarm Type combo box), alarm will be activated. Alarm Type combo box: "High": When the counter value is higher than the reference limit value (defined by the Limit value text box), the alarm will be activated. "Low": When the counter value is lower than the reference limit value (defined by the Limit value text box), the alarm will be activated. DO behavior combo box: What action that DO channel will perform when alarm is activated. "High Level": DO channel will become logic high level when alarm happens. "Low Level": DO channel will become logic low level when alarm happens. "High Pulse": A high pulse will be generated when alarm happens. "Low Pulse": A low pulse will be generated when alarm happens. DO pulse width (ms) text box: When you select "High Pulse" or "Low Pulse" for DO behavior, this parameter define the generated pulse width. (Unit: ms) After you have complete the setting, click the Apply button to save the configuration. If you want to save the same mode setting for all channels, click the ApplyAll check box before you click the Apply button. APAX-5070 Software Manual 44 Once alarm is activated, the alarm status will be latched. It won't change its value to previous status even when alarm condition is gone. You need to manually clear the alarm to make it back to the normal status, by click the Clear alarm latch button in the Alarm Area on the Setting Panel Area. (C) CNT tab for counter input channels At the bottom is the Channel Information Area. You can see all channels' type, Modbus address, value, mode, startup value, counter status, and counter gate setting situation. Above the Channel Information Area is the Setting Panel Area. If you don't want see the Setting Panel Area, you can click the Hide Setting Panel check box to hide the Setting Panel Area. If you want to see the raw data (presented in Hexadecimal format) from the input channels, click the Show Raw Data check box. 45 APAX-5070 Software Manual Appendix B ADAM/APAX .NET Utility Operation Refer to figure below. DO channel 1 is configured as alarm channel for counter input channel 7 (defined by the Mapping channel combo box). So as long as the counted value of the counter input channel 7 is greater (defined by the Alarm Type combo box) than 50 (defined by the Limit value combo box), then the alarm is activated, and the value of DO channel 1 will become logic low level (defined by the DO behavior combo box). APAX-5080 supports several operating mode (Bi-direction, Up, Up/Down, Frequency, and A/B phase). Select the channels you want to control the output value in the Channel Information Area (use the "Shift" or "Ctrl" key on keyboard to select multiple channels at the same time). Then you can configure the selected counter input channels' mode by the CNT Mode combo box. You also can define the initial value when module is power-on, by entering the value you want to the Startup value (0~4294967295) text box. Click the Apply button when you complete the counter mode or startup value setting. If you want to save the setting for all channels, click the ApplyAll check box before you click the Apply button. Note! Refer to APAX-5000 I/O Manual to see definition of different counter modes. Click the Start button in the Set channels Area to start counting action for the selected counter input channel. Click the Stop button in the Set channels Area to stop the counting action for the selected counter input channel. You can reset the selected counter input channel by clicking the Reset Cnt button in the Set channels Area. Counter value will become the startup value (defined by the Startup value (0~4294967295) text box) if you click the ReloadToStartup check box. Otherwise, the counter value should back to zero after you click the Reset Cnt button. When you click the Repeat check box in the Count Type Area, it means when the counter value reaches the maximum or minimum acceptable counting value, it will restart to count (starting from 0 or the startup value, depending on the ReloadToStartup check box.) Otherwise, the counter value won't change its value after reaching the maximum or minimum acceptable counting value. Click the Apply button when you complete the repeating and reload to startup setting. If you want to save the setting for all channels, click the ApplyAll check box before you click the Apply button. APAX-5070 Software Manual 46 1. 2. 3. 4. Enable check box: Enable or disable the counter gate function. Mapping gate combo box: It defines which DI channel's is used (as the gate channel) for this counter channel. Gate Active Type combo box: What condition when the DI channel's status match will let the counter channel perform the counting action. "Low level": The specific counter channel will perform counting action only when the gate channel (specific DI channel) value is logic low. "Falling edge": The specific counter channel will perform counting action only when a falling edge (the DI channel changes from logic high to logic low) is detected. "High level": The specific counter channel will perform counting action only when the gate channel (specific DI channel) value is logic high. "Rising edge": The specific counter channel will perform counting action only when a rising edge (the DI channel changes from logic low to logic high) is detected. Trigger Mode combo box: It defines if the gate can repeatedly trigger the counter channel performing counting action. 47 APAX-5070 Software Manual Appendix B ADAM/APAX .NET Utility Operation APAX counter module supports counter gate function. It means the counter action (counting or not) will be performed depending on signal value from specific digital input channel. Related configuration is done by the parameter in the Counter Gate Setting Area. Select the channels you want to configure in the Channel Information Area (use the "Shift" or "Ctrl" key on keyboard to select multiple channels at the same time). Then configure the parameters listed below for the counter gate function: APAX-5070 Software Manual 48 Appendix C C Modbus/TCP Address Mapping Table C.1 Modbus/TCP Fixed Mode Address Mapping Table (0x) Start Length Address (0x) Address Description Attribute 1 64 00001 ~ 00064 DI/O channels' value ( module with ID # 0 ) Read/Write 65 64 00065 ~ 00128 DI/O channels' value ( module with ID # 1 ) Read/Write 129 64 00129 ~ 00192 DI/O channels' value ( module with ID # 2 ) Read/Write 193 64 00193 ~ 00256 DI/O channels' value ( module with ID # 3 ) Read/Write 257 64 00257 ~ 00320 DI/O channels' value ( module with ID # 4 ) Read/Write 321 64 00321 ~ 00384 DI/O channels' value ( module with ID # 5 ) Read/Write 385 64 00385 ~ 00448 DI/O channels' value ( module with ID # 6 ) Read/Write 449 64 00449 ~ 00512 DI/O channels' value ( module with ID # 7 ) Read/Write 513 64 00513 ~ 00576 DI/O channels' value ( module with ID # 8 ) Read/Write 577 64 00577 ~ 00640 DI/O channels' value ( module with ID # 9 ) Read/Write 641 64 00641 ~ 00704 DI/O channels' value ( module with ID # 10 ) Read/Write 705 64 00705 ~ 00768 DI/O channels' value ( module with ID # 11 ) Read/Write 769 64 00769 ~ 00832 DI/O channels' value ( module with ID # 12 ) Read/Write 833 64 00833 ~ 00896 DI/O channels' value ( module with ID # 13 ) Read/Write 897 64 00897 ~ 00960 DI/O channels' value ( module with ID # 14 ) Read/Write 961 64 00961 ~ 01024 DI/O channels' value ( module with ID # 15 ) Read/Write 1025 64 01025 ~ 01088 DI/O channels' value ( module with ID # 16 ) Read/Write 1089 64 01089 ~ 01152 DI/O channels' value ( module with ID # 17 ) Read/Write 1153 64 01153 ~ 01216 DI/O channels' value ( module with ID # 18 ) Read/Write 1217 64 01217 ~ 01280 DI/O channels' value ( module with ID # 19 ) Read/Write 1281 64 01281 ~ 01344 DI/O channels' value ( module with ID # 20 ) Read/Write 1345 64 01345 ~ 01408 DI/O channels' value ( module with ID # 21 ) Read/Write 1409 64 01409 ~ 01472 DI/O channels' value ( module with ID # 22 ) Read/Write 1473 64 01473 ~ 01536 DI/O channels' value ( module with ID # 23 ) Read/Write 1537 64 01537 ~ 01600 DI/O channels' value ( module with ID # 24 ) Read/Write 1601 64 01601 ~ 01664 DI/O channels' value ( module with ID # 25 ) Read/Write 1665 64 01665 ~ 01728 DI/O channels' value ( module with ID # 26 ) Read/Write 1729 64 01729 ~ 01792 DI/O channels' value ( module with ID # 27 ) Read/Write 1793 64 01793 ~ 01856 DI/O channels' value ( module with ID # 28 ) Read/Write 1857 64 01857 ~ 01920 DI/O channels' value ( module with ID # 29 ) Read/Write 1921 64 01921 ~ 01984 DI/O channels' value ( module with ID # 30 ) Read/Write 1985 64 01985 ~ 02048 DI/O channels' value ( module with ID # 31 ) Read/Write Example 1: Read channel 2 value from APAX-5040 DI module with ID number 2 ID number 2 means the Modbus address is between 00129 ~ 00192 For DI/O module, each channel occupy one 0x address (1-bit) Therefore, You can read channel 2 value from Modbus address 00131 Example 2: Write "True" value to channel 5 of APAX-5046 DO module with ID number 7 ID number 7 means the Modbus address is between 00449 ~ 00512 For DI/O module, each channel occupy 1 0x address (1-bit) Therefore, You can write "True" value to Modbus address 00453 for channel 5 APAX-5070 Software Manual 50 Start Length Address (4x) Address Description Attribute 1 32 00001 ~ 00032 AI/O, counter channels' value (module with ID # 0) Read/Write 33 32 00033 ~ 00064 AI/O, counter channels' value ( module with ID # 1 ) Read/Write 65 32 00065 ~ 00096 AI/O, counter channels' value ( module with ID # 2 ) Read/Write 97 32 00097 ~ 00128 AI/O, counter channels' value ( module with ID # 3 ) Read/Write 129 32 00129 ~ 00160 AI/O, counter channels' value ( module with ID # 4 ) Read/Write 161 32 00161 ~ 00192 AI/O, counter channels' value ( module with ID # 5 ) Read/Write 193 32 00193 ~ 00224 AI/O, counter channels' value ( module with ID # 6 ) Read/Write 225 32 00225 ~ 00256 AI/O, counter channels' value ( module with ID # 7 ) Read/Write 257 32 00257 ~ 00288 AI/O, counter channels' value ( module with ID # 8 ) Read/Write 289 32 00289 ~ 00320 AI/O, counter channels' value ( module with ID # 9 ) Read/Write 321 32 00321 ~ 00352 AI/O, counter channels' value ( module with ID # 10 ) Read/Write 353 32 00353 ~ 00384 AI/O, counter channels' value ( module with ID # 11 ) Read/Write 385 32 00385 ~ 00416 AI/O, counter channels' value ( module with ID # 12 ) Read/Write 417 32 00417 ~ 00448 AI/O, counter channels' value ( module with ID # 13 ) Read/Write 449 32 00449 ~ 00480 AI/O, counter channels' value ( module with ID # 14 ) Read/Write 481 32 00481 ~ 00512 AI/O, counter channels' value ( module with ID # 15 ) Read/Write 513 32 00513 ~ 00544 AI/O, counter channels' value ( module with ID # 16 ) Read/Write 545 32 00545 ~ 00576 AI/O, counter channels' value ( module with ID # 17 ) Read/Write 577 32 00577 ~ 00608 AI/O, counter channels' value ( module with ID # 18 ) Read/Write 609 32 00609 ~ 00600 AI/O, counter channels' value ( module with ID # 19 ) Read/Write 641 32 00641 ~ 00672 AI/O, counter channels' value ( module with ID # 20 ) Read/Write 673 32 00673 ~ 00704 AI/O, counter channels' value ( module with ID # 21 ) Read/Write 705 32 00705 ~ 00736 AI/O, counter channels' value ( module with ID # 22 ) Read/Write 737 32 00737 ~ 00768 AI/O, counter channels' value ( module with ID # 23 ) Read/Write 769 32 00769 ~ 00800 AI/O, counter channels' value ( module with ID # 24 ) Read/Write 801 32 00801 ~ 00832 AI/O, counter channels' value ( module with ID # 25 ) Read/Write 833 32 00833 ~ 00864 AI/O, counter channels' value ( module with ID # 26 ) Read/Write 865 32 00865 ~ 00896 AI/O, counter channels' value ( module with ID # 27 ) Read/Write 897 32 00897 ~ 00928 AI/O, counter channels' value ( module with ID # 28 ) Read/Write 929 32 00929 ~ 00960 AI/O, counter channels' value ( module with ID # 29 ) Read/Write 961 32 00961 ~ 00992 AI/O, counter channels' value ( module with ID # 30 ) Read/Write 993 32 00993 ~ 01024 AI/O, counter channels' value ( module with ID # 31 ) Read/Write Example 1: Read channel 4 value from APAX-5017 AI module with ID number 2 ID number 2 means the Modbus address (fixed mode) is between 65 ~ 96 For AI/O channel, each channel occupy one 4x address (2 byte) Therefore, You can read AI channel 4 value from Modbus address 69 Example 2: Write analog value to channel 7 on APAX-5028 AO module with ID number 15 ID number 15 means the Modbus address (fixed mode) is between 481 ~ 512 For AI/O channel, each channel occupy one 4x address (2 byte) Therefore, You can write value to AO channel 4 value by Modbus address 488 51 APAX-5070 Software Manual Appendix C Modbus/TCP Address Mapping Table C.2 Modbus/TCP Fixed Mode Address Mapping Table (4x) Example 3: Read channel 2 value from APAX-5080 Counter module with ID number 9 ID number 9 means the Modbus address (fixed mode) is between 289 ~ 320 For counter channel, each channel occupy two 4x address (4 byte) Therefore, You can read channel 2 value from Modbus address 293 and 294 Start Length Address (4x) Address Description Attribute 10001 32 10001 ~ 10032 Channels' status ( module with ID # 0 ) Read 10033 32 10033 ~ 10064 Channels' status ( module with ID # 1 ) Read 10065 32 10065 ~ 10096 Channels' status ( module with ID # 2 ) Read 10097 32 10097 ~ 10128 Channels' status ( module with ID # 3 ) Read 10129 32 10129 ~ 10160 Channels' status ( module with ID # 4 ) Read 10161 32 10161 ~ 10192 Channels' status ( module with ID # 5 ) Read 10193 32 10193 ~ 10224 Channels' status ( module with ID # 6 ) Read 10225 32 10225 ~ 10256 Channels' status ( module with ID # 7 ) Read 10257 32 10257 ~ 10288 Channels' status ( module with ID # 8 ) Read 10289 32 10289 ~ 10320 Channels' status ( module with ID # 9 ) Read 10321 32 10321 ~ 10352 Channels' status ( module with ID # 10 ) Read 10353 32 10353 ~ 10384 Channels' status ( module with ID # 11 ) Read 10385 32 10385 ~ 10416 Channels' status ( module with ID # 12 ) Read 10417 32 10417 ~ 10448 Channels' status ( module with ID # 13 ) Read 10449 32 10449 ~ 10480 Channels' status ( module with ID # 14 ) Read 10481 32 10481 ~ 10512 Channels' status ( module with ID # 15 ) Read 10513 32 10513 ~ 10544 Channels' status ( module with ID # 16 ) Read 10545 32 10545 ~ 10576 Channels' status ( module with ID # 17 ) Read 10577 32 10577 ~ 10608 Channels' status ( module with ID # 18 ) Read 10609 32 10609 ~ 10640 Channels' status ( module with ID # 19 ) Read 10641 32 10641 ~ 10672 Channels' status ( module with ID # 20 ) Read 10673 32 10673 ~ 10704 Channels' status ( module with ID # 21 ) Read 10705 32 10705 ~ 10736 Channels' status ( module with ID # 22 ) Read 10737 32 10737 ~ 10768 Channels' status ( module with ID # 23 ) Read 10769 32 10769 ~ 10800 Channels' status ( module with ID # 24 ) Read 10801 32 10801 ~ 10832 Channels' status ( module with ID # 25 ) Read 10833 32 10833 ~ 10864 Channels' status ( module with ID # 26 ) Read 10865 32 10865 ~ 10896 Channels' status ( module with ID # 27 ) Read 10897 32 10897 ~ 10928 Channels' status ( module with ID # 28 ) Read 10929 32 10929 ~ 10960 Channels' status ( module with ID # 29 ) Read 10961 32 10961 ~ 10992 Channels' status ( module with ID # 30 ) Read 10993 32 10993 ~ 11024 Channels' status ( module with ID # 31 ) Read Example: Read channel 2 status from APAX-5045 DI/O module with ID number 5 ID number 5 means the Modbus address (fixed mode) is between 10161 ~ 10192 Each channel 's status occupy one 4x address (4 byte) Therefore, You can read channel 2 status from Modbus address 10163 APAX-5070 Software Manual 52 20001 2 Description Attribute 20001 ~ 20002 Which ID # are used in this APAX-5070 system Read Example: Read Modbus address 20001 and 20002 Response 000D (Hex) means there are 3 modules with ID number 0, 1 and 2 in the system Start Length Address (4x) Address Description Attribute 20005 1 20005 Alarm status on APAX-5070 module Read 20006 1 20006 Clear APAX-5070 module alarm status Write Description Attribute Start Length Address (4x) Address 20101 2 20101 ~ 20102 Channels' Enable Mask status ( module with ID # 0 ) Read/Write 20103 2 20103 ~ 20104 Channels' Enable Mask status ( module with ID # 1 ) Read/Write 20105 2 20105 ~ 20106 Channels' Enable Mask status ( module with ID # 2 ) Read/Write 20107 2 20107 ~ 20108 Channels' Enable Mask status ( module with ID # 3 ) Read/Write 20109 2 20109 ~ 20110 Channels' Enable Mask status ( module with ID # 4 ) Read/Write 20111 2 20111 ~ 20112 Channels' Enable Mask status ( module with ID # 5 ) Read/Write 20113 2 20113 ~ 20114 Channels' Enable Mask status ( module with ID # 6 ) Read/Write 20115 2 20115 ~ 20116 Channels' Enable Mask status ( module with ID # 7 ) Read/Write 20117 2 20117 ~ 20118 Channels' Enable Mask status ( module with ID # 8 ) Read/Write 20119 2 20119 ~ 20120 Channels' Enable Mask status ( module with ID # 9 ) Read/Write 20121 2 20121 ~ 20122 Channels' Enable Mask status ( module with ID # 10 ) Read/Write 20123 2 20123 ~ 20124 Channels' Enable Mask status ( module with ID # 11 ) 20125 2 20125 ~ 20126 Channels' Enable Mask status ( module with ID # 12 ) Read/Write 20127 2 20127 ~ 20128 Channels' Enable Mask status ( module with ID # 13 ) Read/Write 20129 2 20129 ~ 20130 Channels' Enable Mask status ( module with ID # 14 ) Read/Write 20131 2 20131 ~ 20132 Channels' Enable Mask status ( module with ID # 15 ) Read/Write 20133 2 20133 ~ 20134 Channels' Enable Mask status ( module with ID # 16 ) Read/Write 20135 2 20135 ~ 20136 Channels' Enable Mask status ( module with ID # 17 ) Read/Write 20137 2 20137 ~ 20138 Channels' Enable Mask status ( module with ID # 18 ) Read/Write 20139 2 20139 ~ 20140 Channels' Enable Mask status ( module with ID # 19 ) Read/Write 20141 2 20141 ~ 20142 Channels' Enable Mask status ( module with ID # 20 ) Read/Write 20143 2 20143 ~ 20144 Channels' Enable Mask status ( module with ID # 21 ) Read/Write 20145 2 20145 ~ 20146 Channels' Enable Mask status ( module with ID # 22 ) Read/Write 20147 2 20147 ~ 20148 Channels' Enable Mask status ( module with ID # 23 ) Read/Write 20149 2 20149 ~ 20150 Channels' Enable Mask status ( module with ID # 24 ) Read/Write 20151 2 20151 ~ 20152 Channels' Enable Mask status ( module with ID # 25 ) Read/Write 20153 2 20153 ~ 20154 Channels' Enable Mask status ( module with ID # 26 ) Read/Write 20155 2 20155 ~ 20156 Channels' Enable Mask status ( module with ID # 27 ) Read/Write 20157 2 20157 ~ 20158 Channels' Enable Mask status ( module with ID # 28 ) Read/Write 20159 2 20159 ~ 20160 Channels' Enable Mask status ( module with ID # 29 ) Read/Write 20161 2 20161 ~ 20162 Channels' Enable Mask status ( module with ID # 30 ) Read/Write 20163 2 20163 ~ 20164 Channels' Enable Mask status ( module with ID # 31 ) Read/Write Read/Write Note: For AI module, enabling channel mask status means enabling that channel (able to read) For Counter module, enabling/disabling channel mask status means start/stop counter counting action 53 APAX-5070 Software Manual Appendix C Modbus/TCP Address Mapping Table Start Length Address (4x) Address Start Length Address (4x) Address Description Attribute 20201 2 20201 ~ 20202 Clear channels' overflow or underflow status ( module Write with ID # 0 ) 20203 2 20203 ~ 20204 Clear channels' overflow or underflow status ( module Write with ID # 1 ) 20205 2 20205 ~ 20206 Clear channels' overflow or underflow status ( module Write with ID # 2 ) 20207 2 20207 ~ 20208 Clear channels' overflow or underflow status ( module Write with ID # 3 ) 20209 2 20209 ~ 20210 Clear channels' overflow or underflow status ( module Write with ID # 4 ) 20211 2 20211 ~ 20212 Clear channels' overflow or underflow status ( module Write with ID # 5 ) 20213 2 20213 ~ 20214 Clear channels' overflow or underflow status ( module Write with ID # 6 ) 20215 2 20215 ~ 20216 Clear channels' overflow or underflow status ( module Write with ID # 7 ) 20217 2 20217 ~ 20218 Clear channels' overflow or underflow status ( module Write with ID # 8 ) 20219 2 20219 ~ 20220 Clear channels' overflow or underflow status ( module Write with ID # 9 ) 20221 2 20221 ~ 20222 Clear channels' overflow or underflow status ( module Write with ID # 10 ) 20223 2 20223 ~ 20224 Clear channels' overflow or underflow status ( module Write with ID # 11 ) 20225 2 20225 ~ 20226 Clear channels' overflow or underflow status ( module Write with ID # 12 ) 20227 2 20227 ~ 20228 Clear channels' overflow or underflow status ( module Write with ID # 13 ) 20229 2 20229 ~ 20230 Clear channels' overflow or underflow status ( module Write with ID # 14 ) 20231 2 20231 ~ 20232 Clear channels' overflow or underflow status ( module Write with ID # 15 ) 20233 2 20233 ~ 20234 Clear channels' overflow or underflow status ( module Write with ID # 16 ) 20235 2 20235 ~ 20236 Clear channels' overflow or underflow status ( module Write with ID # 17 ) 20237 2 20237 ~ 20238 Clear channels' overflow or underflow status ( module Write with ID # 18 ) 20239 2 20239 ~ 20240 Clear channels' overflow or underflow status ( module Write with ID # 19 ) 20241 2 20241 ~ 20242 Clear channels' overflow or underflow status ( module Write with ID # 20 ) 20243 2 20243 ~ 20244 Clear channels' overflow or underflow status ( module Write with ID # 21 ) 20245 2 20245 ~ 20246 Clear channels' overflow or underflow status ( module Write with ID # 22 ) 20247 2 20247 ~ 20248 Clear channels' overflow or underflow status ( module Write with ID # 23 ) 20249 2 20249 ~ 20250 Clear channels' overflow or underflow status ( module Write with ID # 24 ) APAX-5070 Software Manual 54 2 20251 ~ 20252 Clear channels' overflow or underflow status ( module Write with ID # 25 ) 20253 2 20253 ~ 20254 Clear channels' overflow or underflow status ( module Write with ID # 26 ) 20255 2 20255 ~ 20256 Clear channels' overflow or underflow status ( module Write with ID # 27 ) 20257 2 20257 ~ 20258 Clear channels' overflow or underflow status ( module Write with ID # 28 ) 20259 2 20259 ~ 20260 Clear channels' overflow or underflow status ( module Write with ID # 29 ) 20261 2 20261 ~ 20262 Clear channels' overflow or underflow status ( module Write with ID # 30 ) 20263 2 20263 ~ 20264 Clear channels' overflow or underflow status ( module Write with ID # 31 ) Start Length Address (4x) Address Description Attribute 20301 2 20301 ~ 20302 Counter channels' alarm status ( module with ID # 0 ) Read 20303 2 20303 ~ 20304 Counter channels' alarm status ( module with ID # 1 ) Read 20305 2 20305 ~ 20306 Counter channels' alarm status ( module with ID # 2 ) Read 20307 2 20307 ~ 20308 Counter channels' alarm status ( module with ID # 3 ) Read 20309 2 20309 ~ 20310 Counter channels' alarm status ( module with ID # 4 ) Read 20311 2 20311 ~ 20312 Counter channels' alarm status ( module with ID # 5 ) Read 20313 2 20313 ~ 20314 Counter channels' alarm status ( module with ID # 6 ) Read 20315 2 20315 ~ 20316 Counter channels' alarm status ( module with ID # 7 ) Read 20317 2 20317 ~ 20318 Counter channels' alarm status ( module with ID # 8 ) Read 20319 2 20319 ~ 20320 Counter channels' alarm status ( module with ID # 9 ) Read 20321 2 20321 ~ 20322 Counter channels' alarm status ( module with ID # 10 ) Read 20323 2 20323 ~ 20324 Counter channels' alarm status ( module with ID # 11 ) Read 20325 2 20325 ~ 20326 Counter channels' alarm status ( module with ID # 12 ) Read 20327 2 20327 ~ 20328 Counter channels' alarm status ( module with ID # 13 ) Read 20329 2 20329 ~ 20330 Counter channels' alarm status ( module with ID # 14 ) Read 20331 2 20331 ~ 20332 Counter channels' alarm status ( module with ID # 15 ) Read 20333 2 20333 ~ 20334 Counter channels' alarm status ( module with ID # 16 ) Read 20335 2 20335 ~ 20336 Counter channels' alarm status ( module with ID # 17 ) Read 20337 2 20337 ~ 20338 Counter channels' alarm status ( module with ID # 18 ) Read 20339 2 20339 ~ 20340 Counter channels' alarm status ( module with ID # 19 ) Read 20341 2 20341 ~ 20342 Counter channels' alarm status ( module with ID # 20 ) Read 20343 2 20343 ~ 20344 Counter channels' alarm status ( module with ID # 21 ) Read 20345 2 20345 ~ 20346 Counter channels' alarm status ( module with ID # 22 ) Read 20347 2 20347 ~ 20348 Counter channels' alarm status ( module with ID # 23 ) Read 20349 2 20349 ~ 20350 Counter channels' alarm status ( module with ID # 24 ) Read 20351 2 20351 ~ 20352 Counter channels' alarm status ( module with ID # 25 ) Read 20353 2 20353 ~ 20354 Counter channels' alarm status ( module with ID # 26 ) Read 20355 2 20355 ~ 20356 Counter channels' alarm status ( module with ID # 27 ) Read 20357 2 20357 ~ 20358 Counter channels' alarm status ( module with ID # 28 ) Read 20359 2 20359 ~ 20360 Counter channels' alarm status ( module with ID # 29 ) Read 20361 2 20361 ~ 20362 Counter channels' alarm status ( module with ID # 30 ) Read 20363 2 20363 ~ 20364 Counter channels' alarm status ( module with ID # 31 ) Read 55 APAX-5070 Software Manual Appendix C Modbus/TCP Address Mapping Table 20251 Start Length Address (4x) Address Description Attribute 20401 2 20401 ~ 20402 Reset counter channels' value ( module with ID # 0 ) Write 20403 2 20403 ~ 20404 Reset counter channels' value ( module with ID # 1 ) Write 20405 2 20405 ~ 20406 Reset counter channels' value ( module with ID # 2 ) Write 20407 2 20407 ~ 20408 Reset counter channels' value ( module with ID # 3 ) Write 20409 2 20409 ~ 20410 Reset counter channels' value ( module with ID # 4 ) Write 20411 2 20411 ~ 20412 Reset counter channels' value ( module with ID # 5 ) Write 20413 2 20413 ~ 20414 Reset counter channels' value ( module with ID # 6 ) Write 20415 2 20415 ~ 20416 Reset counter channels' value ( module with ID # 7 ) Write 20417 2 20417 ~ 20418 Reset counter channels' value ( module with ID # 8 ) Write 20419 2 20419 ~ 20420 Reset counter channels' value ( module with ID # 9 ) Write 20421 2 20421 ~ 20422 Reset counter channels' value ( module with ID # 10 ) Write 20423 2 20423 ~ 20424 Reset counter channels' value ( module with ID # 11 ) Write 20425 2 20425 ~ 20426 Reset counter channels' value ( module with ID # 12 ) Write 20427 2 20427 ~ 20428 Reset counter channels' value ( module with ID # 13 ) Write 20429 2 20429 ~ 20430 Reset counter channels' value ( module with ID # 14 ) Write 20431 2 20431 ~ 20432 Reset counter channels' value ( module with ID # 15 ) Write 20433 2 20433 ~ 20434 Reset counter channels' value ( module with ID # 16 ) Write 20435 2 20435 ~ 20436 Reset counter channels' value ( module with ID # 17 ) Write 20437 2 20437 ~ 20438 Reset counter channels' value ( module with ID # 18 ) Write 20439 2 20439 ~ 20440 Reset counter channels' value ( module with ID # 19 ) Write 20441 2 20441 ~ 20442 Reset counter channels' value ( module with ID # 20 ) Write 20443 2 20443 ~ 20444 Reset counter channels' value ( module with ID # 21 ) Write 20445 2 20445 ~ 20446 Reset counter channels' value ( module with ID # 22 ) Write 20447 2 20447 ~ 20448 Reset counter channels' value ( module with ID # 23 ) Write 20449 2 20449 ~ 20450 Reset counter channels' value ( module with ID # 24 ) Write 20451 2 20451 ~ 20452 Reset counter channels' value ( module with ID # 25 ) Write 20453 2 20453 ~ 20454 Reset counter channels' value ( module with ID # 26 ) Write 20455 2 20455 ~ 20456 Reset counter channels' value ( module with ID # 27 ) Write 20457 2 20457 ~ 20458 Reset counter channels' value ( module with ID # 28 ) Write 20459 2 20459 ~ 20460 Reset counter channels' value ( module with ID # 29 ) Write 20461 2 20461 ~ 20462 Reset counter channels' value ( module with ID # 30 ) Write 20463 2 20463 ~ 20464 Reset counter channels' value ( module with ID # 31 ) Write Start Length Address (4x) Address Description Attribute 20501 2 20501 ~ 20502 Clear counter channels' alarm status ( module with ID # Write 0) 20503 2 20503 ~ 20504 Clear counter channels' alarm status ( module with ID # Write 1) 20505 2 20505 ~ 20506 Clear counter channels' alarm status ( module with ID # Write 2) 20507 2 20507 ~ 20508 Clear counter channels' alarm status ( module with ID # Write 3) 20509 2 20509 ~ 20510 Clear counter channels' alarm status ( module with ID # Write 4) 20511 2 20511 ~ 20512 Clear counter channels' alarm status ( module with ID # Write 5) APAX-5070 Software Manual 56 2 20513 ~ 20514 Clear counter channels' alarm status ( module with ID # Write 6) 20515 2 20515 ~ 20516 Clear counter channels' alarm status ( module with ID # Write 7) 20517 2 20517 ~ 20518 Clear counter channels' alarm status ( module with ID # Write 8) 20519 2 20519 ~ 20520 Clear counter channels' alarm status ( module with ID # Write 9) 20521 2 20521 ~ 20522 Clear counter channels' alarm status ( module with ID # Write 10 ) 20523 2 20523 ~ 20524 Clear counter channels' alarm status ( module with ID # Write 11 ) 20525 2 20525 ~ 20526 Clear counter channels' alarm status ( module with ID # Write 12 ) 20527 2 20527 ~ 20528 Clear counter channels' alarm status ( module with ID # Write 13 ) 20529 2 20529 ~ 20530 Clear counter channels' alarm status ( module with ID # Write 14 ) 20531 2 20531 ~ 20532 Clear counter channels' alarm status ( module with ID # Write 15 ) 20533 2 20533 ~ 20534 Clear counter channels' alarm status ( module with ID # Write 16 ) 20535 2 20535 ~ 20536 Clear counter channels' alarm status ( module with ID # Write 17 ) 20537 2 20537 ~ 20538 Clear counter channels' alarm status ( module with ID # Write 18 ) 20539 2 20539 ~ 20540 Clear counter channels' alarm status ( module with ID # Write 19 ) 20541 2 20541 ~ 20542 Clear counter channels' alarm status ( module with ID # Write 20 ) 20543 2 20543 ~ 20544 Clear counter channels' alarm status ( module with ID # Write 21 ) 20545 2 20545 ~ 20546 Clear counter channels' alarm status ( module with ID # Write 22 ) 20547 2 20547 ~ 20548 Clear counter channels' alarm status ( module with ID # Write 23 ) 20549 2 20549 ~ 20550 Clear counter channels' alarm status ( module with ID # Write 24 ) 20551 2 20551 ~ 20552 Clear counter channels' alarm status ( module with ID # Write 25 ) 20553 2 20553 ~ 20554 Clear counter channels' alarm status ( module with ID # Write 26 ) 20555 2 20555 ~ 20556 Clear counter channels' alarm status ( module with ID # Write 27 ) 20557 2 20557 ~ 20558 Clear counter channels' alarm status ( module with ID # Write 28 ) 20559 2 20559 ~ 20560 Clear counter channels' alarm status ( module with ID # Write 29 ) 20561 2 20561 ~ 20562 Clear counter channels' alarm status ( module with ID # Write 30 ) 20563 2 20563 ~ 20564 Clear counter channels' alarm status ( module with ID # Write 31 ) 57 APAX-5070 Software Manual Appendix C Modbus/TCP Address Mapping Table 20513 APAX-5070 Software Manual 58 Appendix D D APAX-5000 I/O Module Channel Status D.1 APAX-5000 I/O Module Channel Status Channel Status Bit Representation Table Bit order DIO AO Counter AI (Voltage, Current) AI (RTD) 0 Channel Channel Bad Bad AI (Thermocouple) Channel Bad Channel Bad Channel Bad Channel Bad 1 Overflow Over Current Over Current Over Current 2 Underflow Under Current Under Current Under Current 3 Burnout Burnout Burnout 4 OpenLoop AI (RTD) OpenLoop 5 Not Ready Not Ready Not Ready 6 Short Short Short 7 Channel Temperautre Sensor Error (5018) 8 Channel Temperautre Sensor Error (5018) 9 Zero Span Cali- Zero Span Calibration bration Error Error (5013) (5013) 10 Factory Calibra- Factory Calition Error bration Error (5013) (5013) 11 CJC Initial Error (5018 ) 12 13 14 15 APAX-5070 Software Manual 60 Appendix D APAX-5000 I/O Module Channel Status APAX-5070 Software Manual 61 www.advantech.com Please verify specifications before quoting. This guide is intended for reference purposes only. All product specifications are subject to change without notice. No part of this publication may be reproduced in any form or by any means, electronic, photocopying, recording or otherwise, without prior written permission of the publisher. All brand and product names are trademarks or registered trademarks of their respective companies. © Advantech Co., Ltd. 2009