1
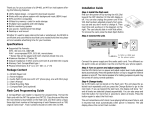
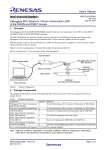
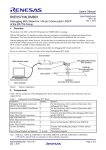
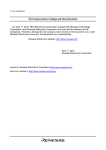
Trouble Shooting
1. The power light is on but there is no sound.
a. Make sure the output level is turned up.
b. Turn on the internal speaker by pressing down the Speaker Button on
case top. If the audio can be heard from the internal speaker, then the
audio patch cord is probably loose.
c. If the audio cannot be heard from the internal speaker, then the flash
card may have been installed improperly. To fix this problem, turn the
power off and re-install the flash card.
2. It’s playing the wrong track.
Press the Change Button momentarily to advance to the next track. Repeat this process until the desired track is reached.
3. The sound quality is poor.
The output level is properly too high - turn it down with the VOL Dial.
Three Year Limited Warranty
Eletech Electronics, Inc. warranty obligations are limited to the terms set
forth below:
Eletech Electronics, Inc. (“we” or “us”) warrants this PRODUCT against
defects in materials and workmanship to the original purchaser, under
normal use and conditions, for a period of THREE (3) YEARS from the
date of original purchase.
If you discover a defect, we will at our option, either repair the PRODUCT
with new or refurbished replacement parts, or replace the PRODUCT if
we are unable to restore it to good working order after a reasonable
number of attempts at no charge, subject to verification of the defect or
malfunction and proof of the date of purchase.
This limited warranty does not apply to damage caused by (1) a direct
lightning strike, (2) misuse, neglect, casualty, or improper installation,
(3) repairs done or attempted by someone not authorized by us, (4)
improper use, maintenance or modification of this PRODUCT, or (5) any
other cause outside of our control. This Limited Warranty does not apply
to anyone other than the original purchaser of the PRODUCT.
Hold-n-Tell
TM
DP-400 MP3 On-Hold System
User’s Manual
Revision 1.1
(c) 2004, 2005 Eletech Enterprise Co. Ltd.
All rights reserved
* Hold-n-Tell is a trademark of Eletech Enterprise Co. Ltd.
Thank you for your purchase of a DP-400, an MP3 on hold system offering the following features:
! 100% digital design - no tape/CD download required
! Works with any phone system with background music (BGM) input
! MP3 and WAV compatible
! Utilizes tiny memory cards for audio storage
! Multiple track capability with LED display
! Built-in monitoring speaker
! Low power, maintenance free design
! Desktop or wall mount
Whether it’s used to keep callers informed or entertained, the DP-400 is
an efficient and cost effective tool that turns wasted hold time into pleasant and valuable advertising time for your business.
Installation Guide
Step 1: Install the flash card.
First turn the power off by turning the VOL Dial
toward the OFF direction till the LED display is
off. You can also unplug the power cord if the
VOL Dial has been adjusted properly from previous use and you don’t want to change it. Then
insert the card as shown in the diagram on the
right. The card should slide in with little effort.
To remove the card, press the black Eject Button.
Step 2: Connect the unit.
Specifications
! Supported File Formats:
MP3 - ISO 11172-3, CBR/VBR
WAV - uncompressed PCM, 8/16 bit, mono/stereo
* Stereo files will be played with both channels mixed into one.
! Maximum Number of Tracks: 99
! Output Impedance: 8 Ohm (works with both 8 and 600 Ohm inputs)
! Memory Card: CompactFlash type I
! Physical Dimensions: 6.6” (L) x 4.5” (W) x 1.1” (H)
Package Content
1x
1x
2x
1x
1x
1x
DP-400 Player Unit
Power Adaptor
Audio Patch Cords (one with 1/8” phone plug, one with RCA plug)
User’s Manual
Metal Mounting Plate
CompactFlash Card (optional)
Flash Card Programming Guide
A CompactFlash card reader is required for programming. Format the
flash card with the FAT file system (not FAT32). Copy the sound files into
the root directory (top folder) on the flash card, and then add a unique,
three digit track number at the beginning of each filename such as “001
original name.mp3”. Track numbers should be within 001 to 099.
Connect the power supply and the audio patch cord. Two different audio patch cords are provided. Use the one that fits your phone system.
Step 3: Turn on power and adjust output level.
Use the VOL Dial to turn on power and adjust output level. Audio playback
starts automatically. Press the Speaker Button on top to toggle the internal
speaker on and off. The internal speaker is for testing purpose only and may
be turned off during normal operation.
Step 4: Change tracks.
Up to 99 tracks can be stored on the flash card. The unit plays the selected track repeatedly until you press the Change Button to go to the
next track. If you go beyond the last track, the display will show “AL”
and all tracks are selected (played sequentially). You can also press and
hold the button for more than 2 seconds to select all tracks. Press the
button again to select the first track.
The unit remembers which track it was playing before power failure, and
it resumes that track automatically when power is restored. The LED
display shows the current track number.