1
INSTALLATION
LOCATION (continued)
NOTE: If shade comes equipped with plastic nut
and nipple in stem mounting hole, both nut and
nipple must be removed before installing stem to
shade.
CAUTION
For safe and proper operation the maximum
capacity of Power-Trac is 20A per circuit. Check
the fuses and circuits carefully before installing.
20A maximum incudes all lights and appliances
connected to the circuit. 120 volt only, maximum
1920 watts per any length track.
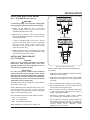
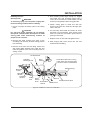
1. Feed wires from the lamp
through the stem and
screw stem into coupling
on lamp. Tighten until snug.
CAUTION
For units not equipped with Hatco supplied
switch (N-no switch), a qualified electrician must
choose an appropriate switch for the application
based on amperage and inrush rating of the
switch.
2. Open the pendant side
access panel and feed wires
up into pendant enclosure.
3. Follow instructions supplied
with pendant and connect the
white wire leads together, the
black wire leads together, and
the green wire leads together
using the wire nuts provided.
ASSEMBLY
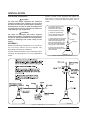
Models with Mounting Designation C, CT, R and RT
are cord hung fixtures and are shipped fully
assembled and ready for installation.
Stem
4. Screw stem into pendant
and tighten until snug so stem
does not rotate.
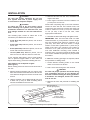
All other models will require some assembly before
mounting. See the Figures 4 or 5 for your applicable
model.
Figure 4. Assembly for ST Mount
canopy)
Figure 5. Assembly for A, S or P Mount
Form No. DHLM-0105
Track
Pendant
6
Coupling