1
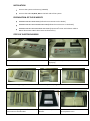
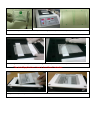
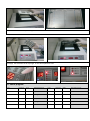
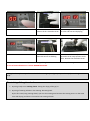
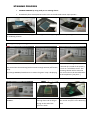
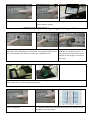
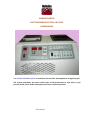
SEMIAUTOMATIC
ELECTROPHORESIS SYSTEM AES 2007
USER MANUAL
The Hellabio AES2007 system is intended to be used for electrophoresis on Agarose gels.
The System automates the most critical steps of electrophoresis to save time, to get
precise results and to make electrophoresis easier and more practical.
Code: HM 001
ELECTROPHORESIS By AES2007 SYSTEM
IMPORTANT NOTES:
You must:
Be technical trained personnel to work with this system.
Follow thoroughly the instructions.
Do not exceed the maximum operating voltage.
Use only distilled water to prepare working solutions.
MENU OF BUTTONS
AES FRONT SIDE
AES BACK SIDE
1: IN: In of distaining solution. 2: OUT: Out of waste distaining
solution. 3: In and Out of staining solution
1: Electrode carrier on the Application area. 2: Sample dilution plate. 3: Temperature. 4: Electrophoresis
program to select ( 1-10). 5: ON/OF of the system. 6: Ventilation. 7:(-). 8: Gel carrier. 9:
Staining/Distaining bath. 10: Enter (of Electrode Carrier). 11: Volts. 12: Time. 13: Up/Down of time. 14:
Volt regulator. 15: Start of Staining/Distaining process. 16: Clear the former step. 17: NORMAL/STAIN
BUTTON. 18: IN of Saline in case of IFE. 19: IN/OUT of Staining Solution. 20: Select program. 21: Clear
previous function. 22: Start/Stop of electrophoresis
AES ACCESSORIES
Sample Application System
Sample Application System consists of the Sample Template carrier, the Sample
template and the Sample Applicator.
Sample Template Carrier [included in
AES007 and in AEU01]
Sample template [included in AES007 and in
AEU01]
Sample Applicator [included in AES007 and in AEU01]
Electrode carrier [included in AES007 and in AEU01] and Buffer Sponges
Buffer sponges [included in
KIT for AES2007 and AEU01]
Sample dilution
Plate[included in
AES2007 and in AEU01]
Gel Carrier
Bottles for distaining solution
and waste liquids[included in
AES2007 and AEU02]
INSTALATION
Connect the system in electricity (220v0lts)
Connect the tubes IN, OUT, INK on the back side of the system.
PREPARATION OF THE REAGENTS
PREPARATION OF THE BUFFER [Follow the instructions on the bottle]
PREPARATION OF THE STAINING SOLUTION[Follow the instructions on the bottle]
PREPARATION OF THE DISTAINING SOLUTION [Prepare 10% acetic acid solution. Add to
900 ml dest.water 100ml clasial acetic acid and mix it].
STEPS OF ELECTROPHORESIS
1. Turn on the system
2. The lamps of temperature,volts and time are
displaying.
3. Take 3 buffering stonges and the electrode carrier and adjust the sponges on the electrode carrier.
4. Add to each sponge 6ml buffer and let it
2-3 minutes to be absorbed
5. Prepare the samples
dilution.
6. Add 200ml dest water on the
electrophoresis area
7. Cut the envelop and carefully take out the plate with the gel, carefully uncover it and put it on the electroporesis area
8. Blot the gel on the sample application area with gel blotter strips and discurd the strips
The total Application time is less than 2 minutes.
9. Adjust the Sample Template on the carrier
10. Apply the Carrier+Sample Template on the electrophoresis area and press enter
11. Gently press with forefinger the sample template
and…
13 .Adjust the sample applicator on the sample
template and ….
12…apply the samples on the corner of the basin, near the
slits.
14….in 1 minute press Clear
15. Remove the carrier+template+ applicator
16. Apply the electrode carrier+sponges on the electrophoresis area.
17. Select program:
Prog.
Time/min.
Volts
Electrophoresis of
Prog.
Time/min
Volts
Electrophoresis of
1
13
100
Proteins
6
16
120
To choose
2
15
180
Hemoglobin’s in alkali
7
17
120
To choose
3
13
110
Lipoproteins
8
13
100
Immunofixation
4
14
100
Hemoglobin’s in acid
9
13
110
Immunofixation
5
15
100
To choose
10
Manual
Manual
To choose
18. Press ENTER…..
19…and control the correct
position of the electrode carrier
20. According to the selected program
the volts and time are displaying.
21. Press START
22. The red lamps on the
electrode carrier are blinking
23. At the end of electrophoresis the
electrode carrier steps upstairs and it
clinks. Remove the electrode carrier.
TAKE ATTENTION: Automatically starts the drying of the gel. You have to decide the way of staining.
In case of Immunofixation see section IMMUNOFIXATION.
During the electrophoresis you have to decide the staining way and go to prepare the steps (see staining Process I
or II).
The staining of the gel can be done:
1. By using ready to use staining sheets during the drying of the gel, or
2. By using of staining solution in the staining- distaining bath.
By the first case (using staining sheets) you save the staining time because the staining occurs on the same
time with drying and there is no need to use staining solution.
STAINING PROCESS
I.
STAINING PROCESS by using ready to use staining sheets:
1. Immediately after electrophoresis and as soon as the electrode carrier steps upstairs….
2. … remove the electrode carrier, apply one staining sheet on the gel, slightly press it by forefinger and add on it 2.5
ml stabilizing solution.
3.During the drying + staining process:
3a) Control the Waste bottle to be empty.
3b) Control that the Distaining bottle contains enough solution (10% Acetic
acid).
3c) Change NORMAL/STAIN button in STAIN. The green lamp is displaying.
5. Return NORMAL/STAIN button in
NORMAL.
6. After 8 minutes remove the
staining sheet and let the gel
drying. At the end of the
process it clinks.
4. Press IN. Distaining solution enters
in the tank [it is inside of the system];
as soon as it is fulfilled it clinks. This
distaining solution will be reused in
each case and must be discarded after
10 electrophoresis [see point…]
7. Take the dried gel, adjust it on the
Film carrier and put it in the distaining
bath.
8.Press CLEAR and…
9. …then Press Button SB. Automatically the gel will be washed, dried and
will be ready for analysis
ii.STAINING PROCESS by using staining solution:
1. During the gel is drying Turn NORMA/STAIN button in STAIN, put the
INK tube in the staining solution and press IN. The staining solution enters
in the tank [inside of the system]. As soon as it is fulfilled it clinks
2. Return the NORMA/STAIN button in
NORMAL. The staining solution is in
the tank (inside of the system) and is
enough to stain 10 gels. To discard it
see point…
3. After electrophoresis, point 23, and after the end of drying process it clinks. Take the gel and adjust it on the Film
carrier and insert it in the staining distaining bath.
4. Press CLEAR and…
5. …then Press Button SB. Automatically the gel will be washed, dried
and will be ready for analysis
How to discard and renew the staining and or distaining
solution from the tank
1. In case you have chosen the staining of the gels by staining sheets you
have to renew the distaining solution in the tank after 10 distaining
processes.
1a.Turn on button NORMAL/STAIN in STAIN. Put the INK tube in the waste bottle and press CLEAR/OUT. The
distaining solution goes out. After that press CLEAR, put the INK tube in clear distaining solution and press IN to
fulfill the tank with new solution.
2. In case you have chosen the staining of the gels by staining solution you
must renew the staining solution in the tank after 10 staining processes.
1a.Turn on button NORMAL/STAIN in STAIN. Put the INK tube in the waste bottle and press CLEAR/OUT. The
distaining solution goes out. After that press CLEAR, put the INK tube in the new staining solution and press IN to
fulfill the tank with new staining solution.
IMMUNOFIXATION [under constraction]
For Immunofixation select program 8.
For sample application use Sample Template 24.
Go on the steps of electrophoresis point 1-29.
1. After point 29 of
2. Adjust the antisera
3…and apply it on the
electrophoresis it
template on the
electrophoresis area.
clinks and the
Sample templa
temperature
carrier…
increases until about
300C. Blot quickly the
surface of the gel by
one gel blotter sheet.
4. Press ENTER. The
5.Apply the protein
6.After 10 minutes
antisera template
fixation solution and
press CLEAR.
steps down.
the antisera on the
correct position