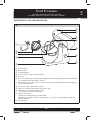
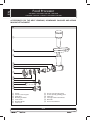
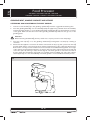
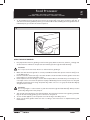
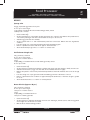
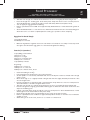
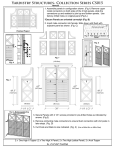
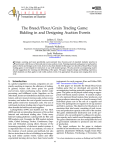
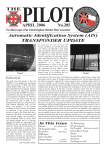
1
EN
Food Processor
User's manual
STM 40WH / STM 41GR / STM 42BL
STM 43OR / STM 44RD / STM 45VT
STM 46YL / STM 47GG / STM 48RS
Prior to using this appliance, please read the user's manual thoroughly, even if you already have
experience in using similar appliances. Only use the appliance in the manner described in this user's
manual. Keep this user's manual in a safe place where it can be easily retrieved for future use.
We recommend saving the original cardboard box, packaging material, purchase receipt and
responsibility statement of the vendor and warranty card for at least the the duration of the legal
liability for unsatisfactory performance or quality. In the event of transportation, pack the appliance
using the original packaging materials only.
EN-1
2014
11/2014
EN
Food Processor
STM 40WH / STM 41GR / STM 42BL / STM 43OR
STM 44RD / STM 45VT / STM 46YL / STM 47GG / STM 48RS
TABLE OF CONTENTS
IMPORTANT SAFETY INSTRUCTIONS . . . . . . . . . . . . . . . . . . . . . . . . . . . . . . . . . . . . . . . . . . . . . . . . . . . . . . 3
DESCRIPTION OF THE FOOD PROCESSOR . . . . . . . . . . . . . . . . . . . . . . . . . . . . . . . . . . . . . . . . . . . . . . . . . . 5
MEAT GRINDING, HOMEMADE SAUSAGE AND KEBAB MAKING ATTACHMENT ACCESSORIES . . . . . . . 6
GRATING AND SLICING ATTACHMENT ACCESSORIES. . . . . . . . . . . . . . . . . . . . . . . . . . . . . . . . . . . . . . . . . 7
BEFORE FIRST USE . . . . . . . . . . . . . . . . . . . . . . . . . . . . . . . . . . . . . . . . . . . . . . . . . . . . . . . . . . . . . . . . . . . . 7
PURPOSE OF USE OF THE FOOD PROCESSOR . . . . . . . . . . . . . . . . . . . . . . . . . . . . . . . . . . . . . . . . . . . . . . . 7
BLENDING, WHIPPING AND KNEADING . . . . . . . . . . . . . . . . . . . . . . . . . . . . . . . . . . . . . . . . . . . . . . . . . . . 8
GRINDING MEAT, MAKING SAUSAGES AND KEBABS. . . . . . . . . . . . . . . . . . . . . . . . . . . . . . . . . . . . . . . . 10
GRATING AND SLICING . . . . . . . . . . . . . . . . . . . . . . . . . . . . . . . . . . . . . . . . . . . . . . . . . . . . . . . . . . . . . . . 13
CLEANING AND MAINTENANCE . . . . . . . . . . . . . . . . . . . . . . . . . . . . . . . . . . . . . . . . . . . . . . . . . . . . . . . . 14
STORAGE. . . . . . . . . . . . . . . . . . . . . . . . . . . . . . . . . . . . . . . . . . . . . . . . . . . . . . . . . . . . . . . . . . . . . . . . . . . 14
TIPS AND ADVICE FOR PREPARING VARIOUS TYPES OF DOUGHS AND BAKING THEM . . . . . . . . . . . . 15
RECIPES . . . . . . . . . . . . . . . . . . . . . . . . . . . . . . . . . . . . . . . . . . . . . . . . . . . . . . . . . . . . . . . . . . . . . . . . . . . . 19
TECHNICAL SPECIFICATIONS . . . . . . . . . . . . . . . . . . . . . . . . . . . . . . . . . . . . . . . . . . . . . . . . . . . . . . . . . . . 22
INSTRUCTIONS AND INFORMATION REGARDING THE DISPOSAL OF USED PACKAGING MATERIALS . . . 22
DISPOSAL OF USED ELECTRICAL AND ELECTRONIC EQUIPMENT . . . . . . . . . . . . . . . . . . . . . . . . . . . . . . 22
EN-2
2014
11/2014
EN
Food Processor
STM 40WH / STM 41GR / STM 42BL / STM 43OR
STM 44RD / STM 45VT / STM 46YL / STM 47GG / STM 48RS
IMPORTANT SAFETY INSTRUCTIONS
•
•
Children must not use this appliance or
play with it. Keep this appliance and its
power cord out of reach of children.
This appliance may be used by persons
with physical or mental impairments or
by inexperienced persons, if they are
properly supervised or have been informed about how to use the product
in a safe manner and understand the
potential dangers.
EN-3
2014
11/2014
EN
Food Processor
STM 40WH / STM 41GR / STM 42BL / STM 43OR
STM 44RD / STM 45VT / STM 46YL / STM 47GG / STM 48RS
IMPORTANT SAFETY INSTRUCTIONS
READ CAREFULLY AND STORE FOR FUTURE USE.
•
•
•
•
•
•
•
•
•
•
•
•
•
•
•
•
•
•
•
•
•
•
•
•
•
•
Before connecting this appliance to a power socket, make sure the voltage stated on the
product's rating label corresponds to the voltage in your power socket.
Never use accessories, which have not been supplied with this appliance or which have not been
explicitly recommended by the manufacturer.
The appliance is intended and designed for processing a standard amount of food in the household.
Do not use the appliance for anything other than its intended purpose.
Do not use the appliance in an industrial environment or outdoors.
Do not place the appliance on window sills or on unstable surfaces. Only place the appliance on an
even, dry and stable surface.
Do not place the appliance on an electric or gas stove, in the vicinity of an open flame or appliances
that are sources of heat.
Ensure that the power plug contacts do not come into contact with water or moisture.
Never use multiple attachments simultaneously.
Do not wash the appliance (except for the removable parts) under running water and do not
submerge it in water or any other liquid.
Always turn off the appliance, disconnect it from the power socket if you will not be using it, if you
will be leaving it without supervision, and before assembling, disassembling, cleaning or moving it.
Prior to disassembling the appliance and replacing accessories or accessible parts that move during
use, wait until all moving parts come to a stop.
For safety reasons, this appliance is equipped with a safety mechanism that prevents the motor
from being started if the appliance's arm is tilted out.
Before putting the appliance into operation, check that it is correctly assembled and that the arm
is in the horizontal position.
Allow hot liquids or food to cool down before mixing them.
Do not attempt to grind bones, nut shells or other hard ingredients.
Do not leave the appliance in continuous operation under a heavy load for a period longer than
10 minutes. Before turning it on again, allow it to cool down for at least 30 minutes.
Do not tilt out the arm or put your hands or items, such as a kitchen knife, fork or wooden spoon,
into the bowl while the appliance is running. Do not touch rotating parts of the appliance or
attachments and ensure that foreign items such as clothing, hair, etc. are kept away. An injury could
occur or the appliance could be damaged.
If an item, such as a spoon, falls into the mixing bowl while the appliance is running, immediately
set the speed control knob to the OFF position (stand-by mode), disconnect the power cord from
the power socket and take the item out of the bowl.
If ingredients stick to the attachments or the inside of the bowl, turn off the appliance and
disconnect it from the power socket. Use a spatula to clean the attachments and the inside of the
bowl. Then you can continue mixing.
Never use your fingers or other items to push ingredients through the feed tube of the meat
grinder or the slicing and grating attachment. For this purpose there is a pusher included as an
accessory to this appliance.
The appliance must not run without a load. The incorrect use of the appliance may negatively
affect its lifetime.
Before storing the appliance, check that the stand arm is tilted to the horizontal position.
Do not place heavy items on the power cord. Make sure the power cord does not hang over the
edge of a table or that it does not touch a hot surface.
Do not disconnect the appliance from the power socket by pulling on the power cord. This could
damage the power cord or the power socket. Disconnect the cord from the power socket by gently
pulling the plug of the power cord.
If the power cord is damaged, have it replaced at a specialised service centre. It is forbidden to use
the appliance if it has a damaged power cord or plug.
To avoid the danger of injury by electrical shock, do not repair the appliance yourself or make any
adjustments to it. Have all repairs or adjustments of the appliance performed at an authorised
service centre. By tampering with the appliance you risk voiding your legal rights arising from
unsatisfactory performance or quality warranty.
EN-4
2014
11/2014
EN
Food Processor
STM 40WH / STM 41GR / STM 42BL / STM 43OR
STM 44RD / STM 45VT / STM 46YL / STM 47GG / STM 48RS
DESCRIPTION OF THE FOOD PROCESSOR
A
6
7
8
9
1
0
2
3
qa
4
qs
5
1 Kneading hook
2 Balloon whisk
3 A-shaped beater
4 4.5-litre stainless steel bowl with handles
5 Base unit
6 Button for the release of the meat grinding attachment and the grating and slicing attachment
is located under the removable cover A7
7 Removable cover for the connection hub for the meat grinding attachment and the grating
and slicing attachment
8 Tilt-out arm with a multi-function head
9 Shaft for connecting attachments A1, A2 or A3
0 Slider button for unlocking the arm A8
is located on the rear side of the arm
qa Speed control knob
enables the variable setting of 8 speed levels
OFF (turn off to stand-by mode) – speed level 1, 2, 3, 4, 5, 6, 7, 8 (50, 70, 90, 110, 130, 155,
180 and 210 rpm)
qs Anti-slip feet
EN-5
2014
11/2014
EN
Food Processor
STM 40WH / STM 41GR / STM 42BL / STM 43OR
STM 44RD / STM 45VT / STM 46YL / STM 47GG / STM 48RS
ACCESSORIES FOR THE MEAT GRINDING, HOMEMADE SAUSAGE AND KEBAB
MAKING ATTACHMENT
B
1
2
3
4
5
6
7
8
9
0
qa
qs
qd
1
2
3
4
5
6
7
Pusher
Stainless steel hopper
Feed tube
Grinding chamber
Screw shaft
Grinding blade
Screw lock
8
9
0
qa
qs
qd
Fine (3 mm) grinding plate
Coarse (8 mm) grinding plate
Separator
Sausage stuffer attachment
Moulder
Conical attachment
EN-6
2014
11/2014
EN
Food Processor
STM 40WH / STM 41GR / STM 42BL / STM 43OR
STM 44RD / STM 45VT / STM 46YL / STM 47GG / STM 48RS
ACCESSORIES FOR THE GRATING AND SLICING ATTACHMENT
C
1
2
3
4
5
6
1 Pusher
2 Feed tube
3 Grating chamber
4 Coarse grater
5 Fine grater
6 Grater for cutting slices
BEFORE FIRST USE
1.
2.
Take the appliance and its accessories out of the packaging materials.
Thoroughly wash all removable parts, i.e. kneading hook A1, whisk A2, beater A3, the stainless
steel mixing bowl A4 and accessories shown in figures B and C, using warm water and a neutral
kitchen detergent. Then rinse them with clean water and dry thoroughly with a fine wiping cloth.
PURPOSE OF USE OF THE FOOD PROCESSOR
•
Thanks to a wide range of accessories, this food processor will find its place in every kitchen. You
can use it to beat, whip, knead, grind, mince, grate or to make kebabs or homemade sausages.
EN-7
2014
11/2014
EN
Food Processor
STM 40WH / STM 41GR / STM 42BL / STM 43OR
STM 44RD / STM 45VT / STM 46YL / STM 47GG / STM 48RS
BLENDING, WHIPPING AND KNEADING
PLANETARY MIXING SYSTEM
•
The planetary mixing system is based on the principle of dual rotation of the attachment. The
attachment rotates anticlockwise along the inner perimeter of the bowl while rotating around
its own axis in the opposite direction. This ensures that ingredients are processed thoroughly and
evenly.
SELECTING ATTACHMENT TYPES
ATTACHMENT TYPE
APPLICATION
Kneading hook A1
It is used for kneading and preparing heavy and thick doughs containing
yeast, e.g. bread dough.
Beater A3
It is used for mixing medium heavy and lighter doughs not containing yeast,
for mixing sauces, creams, fillings, etc.
Whisk A2
It is used for whisking whole eggs or egg whites, whipped cream, light
doughs, foamy creams, etc. Do not use it for mixing heavy and thick doughs.
ASSEMBLING AND DISASSEMBLING THE FOOD PROCESSOR
•
Before you start assembling or disassembling the food processor, check that it is turned off and
disconnected from the el. power socket.
1. Inserting the mixing bowl
1.1 Place the food processor on an even, dry surface, for example on a kitchen countertop.
1.2 Slide button A0 upwards and hold it there. Tilt out the arm A8. To lock the arm A8 in the open
position, release button A0.
1.3 Place the stainless steel bowl A4 into the hole in the base unit A5 and secure it in place by turning
it clockwise. When the bowl A4 is properly attached, it is not possible to lift it off the base unit
A5.
2. Attaching an attachment (kneading hook, beater or whisk)
2.1 When attaching an attachment, the arm A8 must be secured in the open position, see point 1.2
in chapter Inserting the mixing bowl. Attach one of the attachments on to the shaft of the mixing
head A9 so that the shaft A9 fits into the hole on the attachment. Push the attachment towards
the mixing head A8 and turn it anticlockwise to secure it to the shaft A9.
2.2 With one hand, hold the attachment and gently pull it downwards. If it is properly secured to the
shaft A9, it will not come off.
2.3 If you will not be immediately placing ingredients into the mixing bowl A4, slide the button A0
upwards, hold it down and tilt the arm A8 to the horizontal position. After tilting the arm A8 to
the horizontal position, release the button A0.
3. Removing the attachments and mixing bowl
3.1 Slide button A0 upwards and hold it there. Tilt out the arm A8. To lock the arm A8 in the open
position, release button A0.
3.2 Hold the attachment and gently push it against the mixing head A8. Then rotate it clockwise until
it is released from the shaft A9 and take it off. Turn the mixing bowl A4 anticlockwise and take
it off the base unit A5. Move the arm A8 back to the horizontal position.
EN-8
2014
11/2014
EN
Food Processor
STM 40WH / STM 41GR / STM 42BL / STM 43OR
STM 44RD / STM 45VT / STM 46YL / STM 47GG / STM 48RS
USING THE MIXER
1.
Tilt out the arm A8 and place ingredients into the bowl A4 located in the base unit A5.
Attention:
The maximum weight of the ingredients that can be processed in a single batch is 1.5 kg. The
maximum number of egg whites that can be whisked at once is 8 pieces.
2.
3.
4.
Tilt the arm A8 with the attached attachment down to the horizontal position.
Make sure that the food processor is correctly assembled and that the speed control knob Aqa is set
to the OFF position (stand-by mode). Connect the power cord to an el. power socket.
Use the speed control knob Aqa to set the required speed level from 1 to 8. First, set a lower speed
to prevent ingredients from being splattered around. As soon as they are mixed together, increase
the speed to the required level. The speed can be adjusted at any time as required.
Attention:
If it is necessary to wipe ingredients off the inside of the mixing bowl A4 and the attachment,
first turn off the food processor by setting the speed control knob Aqa to the OFF position
(stand-by mode) and then disconnect it from the power socket. Then wipe away the ingredients
using a plastic spatula.
The maximum operating time is 10 minutes. Do not leave the appliance in continuous operation
for longer than indicated above. This is especially true under a heavy load (e.g. when processing
heavy, thick doughs). If the appliance is in operation under heavy load, allow it to cool down for
at least 30 minutes before turning it on again.
5.
6.
7.
After you have finished using the appliance, set the speed control knob Aqa to the OFF position
(stand-by mode) and disconnect the power cord from the power socket.
Disassemble the food processor according to the instructions included in chapter Assembling and
disassembling the food processor. Use a soft plastic spatula to remove mixes from the mixing bowl
A4 and the attachment.
Clean out the food processor after each use according to the instructions in chapter Cleaning and
maintenance.
QUICK GUIDE TO MIXING
Attachment type
Ingredients
Amount
Processing time
Speed selection
Whisk A2
Egg whites
max. 8 pcs
5 minutes
Level 8
Whisk A2
Cream
250 ml
3 minutes
Level 8
Whisk A2
Mayonnaise
3 egg yolks
1 minute
Level 3–5
Beater A3
Cake dough
approx. 800 g
6 minutes
Level 3–7
Kneading hook A1
Bread dough
max. 600 g of flour
4 minutes
Level 3
Note:
The above processing times are only a reference. To prevent ingredients from splattering out of
the bowl, select an initial speed level of 1 or 2. Later set a higher speed based on requirements.
EN-9
2014
11/2014
EN
Food Processor
STM 40WH / STM 41GR / STM 42BL / STM 43OR
STM 44RD / STM 45VT / STM 46YL / STM 47GG / STM 48RS
GRINDING MEAT, MAKING SAUSAGES AND KEBABS
ASSEMBLING AND DISASSEMBLING THE MEAT GRINDER
1.
2.
Insert the screw shaft B5 into the grinding chamber B4 with the cogged wheel entering first.
Place the grinding blade B6 on to the shaft B5 (with the edge facing outwards from the chamber)
and attach either the fine or coarse grinding plate B8 or B9 depending on the preferred coarseness
of the grind. Make sure that the notch in the grinding chamber B4 slides into the groove on the
grinding plate.
Attention:
When attaching the blade B6, be very careful not to injure yourself on the sharp edge.
3.
4.
Place the screw cap B7 on to the grinding chamber B4 and tighten it securely by screwing it
clockwise.
Check that the appliance is turned off and disconnected from the el. power socket. The arm A8
must be tilted down to a horizontal position and the attachment A1, A2 or A3 must be removed.
Remove the cover A7 from the multi-function head. Push the assembled meat grinder at an angle
of 45° against the attachment hub that is located on the front part of the multi-function head and
secure it in place by turning it anticlockwise (fig. D). The meat grinder is secured in the vertical
position when the push button A6 slides out together with an audible click. Place the stainless
steel hopper B2 on to the feed tube B3. The meat grinder is now assembled and ready for use.
D
45°
EN-10
2014
11/2014
EN
Food Processor
STM 40WH / STM 41GR / STM 42BL / STM 43OR
STM 44RD / STM 45VT / STM 46YL / STM 47GG / STM 48RS
5.
To disassemble the meat grinder, first remove the hopper B2. Then press the button A6 (fig. E)
and remove the meat grinder by turning it clockwise. When disassembling the meat grinder into its
individual parts, proceed in the reverse sequence.
E
USING THE MEAT GRINDER
1.
First prepare the meat for grinding in the following way. Remove all bones, tendons, cartilage and
cut the meat into 2x2x6 cm size pieces that will freely pass through the feed tube B3.
Attention:
Do not process frozen meat. Allow it to defrost before grinding it.
2.
3.
4.
Make sure that the meat grinder is correctly assembled and that the speed control knob Aqa is set
to the OFF position.
Place the stainless steel bowl A4 or another suitable container under the meat grinder. Insert the
power plug into an electrical power socket.
Use the speed control knob Aqa to set the desired speed. We recommend that you initially set it to
5 and then lower or increase the speed as required. Gradually place the meat pieces into the feed
tube B3 and push them in using the pusher B1. Take care not to clog up the feed tube B3 by
a large amount of meat.
Attention:
Do not use fingers or other utensils to push the meat through the feed tube B3. Always use the
pusher B1 designed for this purpose.
5.
6.
7.
The ground meat will fall into the prepared bowl. The meat that remains in the grinding chamber
B4 can be removed by grinding a slice of bread or a bread roll.
To turn off the appliance, set the speed control knob Aqa to the OFF position.
Clean out the meat grinder after each use according to the instructions in chapter Cleaning and
maintenance.
EN-11
2014
11/2014
EN
Food Processor
STM 40WH / STM 41GR / STM 42BL / STM 43OR
STM 44RD / STM 45VT / STM 46YL / STM 47GG / STM 48RS
ASSEMBLING AND DISASSEMBLING THE SAUSAGE STUFFER ATTACHMENT
1.
2.
3.
When assembling the sausage stuffer for filling sausage casings (making sausages), proceed in
the same way as when assembling the meat grinder, only with the difference that instead of the
grinding blade B6 and the grinding plate B8 or B9 only parts B0 and Bqa are used.
Place the separator B0 on to the screw shaft so that the notch in the grinding chamber B4 fits into
the groove in the separator B0. Place the sausage stuffer attachment Bqa on to the separator B0
and complete the entire sausage stuffer assembly by screwing the screw cap B7 on to the grinding
chamber B4.
To disassemble proceed in the reverse sequence.
USING THE SAUSAGE STUFFER ATTACHMENT
1.
2.
3.
Make sure that the appliance is correctly assembled and that the speed control knob Aqa is set to
the OFF position. Insert the power plug into an electrical power socket.
Prepare a sausage casing that you will stuff with ground meat and allow it to soak in lukewarm
water for approx. 10 minutes. Place the ground meat mixture on to the hopper B2. Take the
sausage casing out of the water and skewer or tie up one end and slide the other end like a sock
on to the sausage stuffer attachment Bqa.
Use the speed control knob Aqa to set the desired speed. We recommend to initially set the lowest
speed and then increase it as required. With one hand hold the sausage casing on the attachment Bqa
and use the other hand to push the ground meat mixture with the pusher B1 through the feed tube
B3. If the sausage casing sticks to the attachment Bqa, it is necessary to moisten it with water again.
Attention:
Do not use fingers or other utensils to push the ground meat through the feed tube B3. Always
use the pusher B1 designed for this purpose.
4.
5.
To turn off the appliance, set the speed control knob Aqa to the OFF position.
Clean out the individual parts of the attachment after each use according to the instructions in
chapter Cleaning and maintenance.
ASSEMBLING AND DISASSEMBLING THE KEBAB MAKER ATTACHMENT
1.
2.
3.
When assembling the kebab maker attachment, proceed in the same way as when assembling the
meat grinder, only with the difference that instead of the grinding blade B6 and the grinding
plate B8 or B9 only parts Bqs a Bqd are used.
Place the moulder Bqs on to the screw shaft so that the notch in the grinding chamber B4 fits
into the groove in the moulder Bqs. Place the kebab moulder attachment Bqs on to the conical
attachment Bqd and complete the entire kebab maker assembly by screwing the screw cap B7 on
to the grinding chamber B4.
To disassemble proceed in the reverse sequence.
USING THE KEBAB MAKER ATTACHMENT
1.
2.
Make sure that the appliance is correctly assembled and that the speed control knob Aqa is set to
the OFF position. Insert the power plug into an electrical power socket.
Place the ground kebab meat mixture on to the hopper B2. Use the speed control knob Aqa to
set the desired speed. We recommend to initially set lower speed and then increase it as required.
Using the pusher B1, push the mixture through the feed tube B3. The result will be a hollow meat
EN-12
2014
11/2014
EN
Food Processor
STM 40WH / STM 41GR / STM 42BL / STM 43OR
STM 44RD / STM 45VT / STM 46YL / STM 47GG / STM 48RS
tube that is then cut into smaller pieces. The kebab is a traditional meal from the Middle East made
predominantly from ground meat and whole grain wheat.
Attention:
Do not use fingers or other utensils to push the ground meat mixture through the feed tube B3.
Always use the pusher B1 designed for this purpose.
3.
4.
To turn off the appliance, set the speed control knob Aqa to the OFF position.
Clean out the individual parts of the attachment after each use according to the instructions in
chapter Cleaning and maintenance.
GRATING AND SLICING
ASSEMBLING AND DISASSEMBLING THE GRATING AND SLICING ATTACHMENT
1.
2.
3.
4.
The attachment is assembled by inserting one of the graters C4, C5 or C6 into the chamber C3.
Check that the appliance is turned off and disconnected from the el. power socket. The arm A8
must be tilted down to a horizontal position and the attachment A1, A2 or A3 must be removed.
Remove the cover A7 from the multi-function head and push the assembled attachment at an
angle of 45° against the attachment hub that is located on the front part of the multi-function
head and secure it in place by turning it anticlockwise (fig. D). The attachment is secured in the
vertical position when the push button A6 slides out together with an audible click.
Now the attachment is ready for operation.
To disassemble, press the button A6 (see fig. E) and remove the attachment by turning it clockwise.
When disassembling the attachment into its individual parts, proceed in the reverse sequence.
USING THE GRATING AND SLICING ATTACHMENT
1.
2.
The attachment is designed for grating or slicing fruit and vegetables (e.g. potatoes, beetroot,
cabbage, carrot, cucumber, apples, etc.) and for making breadcrumbs.
Prepare the ingredients and cut them into pieces that will pass through the feed tube C2. Remove
kernels and stones from the fruit and vegetables.
Attention:
Do not process frozen food. Under no circumstances should you attempt to process hard stones
that are found for example in mango or avocado.
3.
4.
5.
Make sure that the appliance is correctly assembled and that the speed control knob Aqa is set to
the OFF position. Insert the power plug into an electrical power socket.
Place the stainless steel bowl A4 or another suitable container under the attachment. Use the
speed control knob Aqa to set the desired speed. We recommend to initially set the lowest speed
and then increase it as required.
Gradually add the ingredients into the feed tube C2 and push through using the pusher C1.
Attention:
Do not use fingers or other utensils to push ingredients through the feed tube C2. Always use
the pusher C1 designed for this purpose.
6.
7.
To turn off the appliance, set the speed control knob Aqa to the OFF position.
Clean out the individual parts of the attachment after each use according to the instructions in
chapter Cleaning and maintenance.
EN-13
2014
11/2014
EN
Food Processor
STM 40WH / STM 41GR / STM 42BL / STM 43OR
STM 44RD / STM 45VT / STM 46YL / STM 47GG / STM 48RS
CLEANING AND MAINTENANCE
•
•
Before cleaning the food processor, always turn it off by setting the speed control knob Aqa to the
OFF position and disconnect it from the power socket.
After each use, thoroughly wash the accessories (assembled attachments must be first disassembled
into their individual parts) with warm water and neutral kitchen detergent. Then rinse under clean
running water and wipe dry with a fine wiping cloth. After washing and drying, we recommend to
coat the grinding plates B8 and B9 and the blade B6 with cooking oil.
Attention:
Pay increased attention when handling the grinding blade B6 to avoid injury.
Plastic accessories may be washed in a dishwasher. Do not wash metal parts in a dishwasher,
otherwise their surface may be damaged. Certain foods may cause discolouration of plastic parts
on accessories. If this occurs, coat these parts with cooking oil and then wash in the normal way.
Tip:
If you whisked egg whites, first rinse the whisk A2 and the mixing bowl A4 under cold water.
If you were to use hot water, the egg white remains would harden and their removal would be
more difficult.
•
•
To clean the base A5 and the arm A8, use a cloth dipped in a weak detergent solution. Then wipe
everything dry.
Never submerge the appliance or its power cord in water or any other liquids. For cleaning do
not use thinners or solvents or cleaning agents causing abrasion. Otherwise the surface of the
appliance may be damaged.
STORAGE
•
If you will not be using the food processor, store it in a dry place out of children's reach. Make sure
that the arm A8 is tilted into the horizontal position.
EN-14
2014
11/2014
EN
Food Processor
STM 40WH / STM 41GR / STM 42BL / STM 43OR
STM 44RD / STM 45VT / STM 46YL / STM 47GG / STM 48RS
TIPS AND ADVICE FOR PREPARING VARIOUS TYPES OF DOUGHS AND BAKING THEM
BREAD DOUGH – INGREDIENTS
FLOUR
This is the most important ingredient used for baking bread. Together with yeast it creates the texture
of the loaf. When it is mixed with a liquid, the proteins contained in it start to create gluten. Gluten is
a web of flexible fibres which entrap gases produced by the yeast.
White wheat flour
It is sold as baking flour, bread flour or fine wheat flour. Fine flour is the most readily available,
nevertheless, you will achieve better result with flour with a protein content of at least 11% to 12%.
The recipes included in this user's manual require the use of bread flour with a protein content of 11%.
This information is provided on the packaging of the flour. Do not sieve the flour or use flour with
baking powder unless specified in the recipe.
Whole grain wheat flour
It is produced from wheat grains and contains bran and germ. Bread baked from this type of flour will
be denser. You will achieve a less dense bread by replacing one cup of whole grain flour with one cup
of white bread flour.
Rye flour
It is very popular in bread making. It contains a large amount of mineral compounds, but has a low
protein content and so it is usually combined with wheat flour to ensure that the bread rises well.
Gluten flour
It is produced by extracting gluten from wheat grains. Adding gluten flour can improve the texture and
quality of the bread when using a flour with a lower protein content.
BREAD MIXES
They contain flour, sugar, dried milk, salt and other ingredients such as bread improver. Usually water
and yeast is added.
BREAD IMPROVER
It is available in supermarkets and health food stores. The ingredients contained in bread improver are
usually food processing industry acids such as ascorbic acid (vitamin C) and enzymes (amylase) extracted
from wheat flour.
Bread improver will help in firming up the dough, thus achieving a larger size loaf and finer texture.
The bread is more stable and lasts longer.
SUGAR
It provides sweetness, flavour and a brown colour to the bread crust. It is added to yeast. White sugar,
brown sugar or honey are suitable.
DRIED MILK AND DAIRY PRODUCTS
They enrich the taste and increase the nutritional value of the bread. Dried milk is suitable and easy to
use. Store it in an air-tight container in the refrigerator. Likewise, dried soya milk may be used but it
makes the bread tougher. Fresh milk should not be substituted unless indicated in the recipe otherwise.
SALT
It is an important ingredient for baking bread. It increases the absorption capacity of the dough,
improves kneading, supports gluten development and has an effect on the shape of the loaf, texture
of the crumb, taste and increases the lifetime of the bread. Measure it out carefully as it prevents the
bread from rising.
EN-15
2014
11/2014
EN
Food Processor
STM 40WH / STM 41GR / STM 42BL / STM 43OR
STM 44RD / STM 45VT / STM 46YL / STM 47GG / STM 48RS
FAT
Adds flavour and retains moisture. Vegetable oils such as safflower, sunflower or rape seed oil may
be used. Oils can be substituted for by butter or margarine, however the crust colour may become
yellowish.
YEAST
It is used as a leavening agent. The recipes in this user's manual use dried yeast. Prior to using dried
yeast, always check the use-by-date because yeast with an expired use-by-date may cause the dough
not to rise.
Three times as much fresh or pressed yeast must be used compared to dried yeast. To create a starter,
one needs liquid, sugar and heat.
FAST RISING YEAST
It is a mix of yeast and bread improver. If you wish to replace standard yeast in your recipe with this type
of yeast then leave out the bread improver. Fast rising dough should not be used in combination with
bread mixes as a bread improver is usually already contained in them.
WATER
Standard tap water is usually used. It is necessary to warm cold water up to room temperature before
use. Water that is too cold or too hot will prevent the starter from forming.
EGGS
They are used in certain bread recipes. They help the dough to rise and increase the nutritional value of
the bread. They add flavour and a fine crust and usually are used for sweeter types of bread.
OTHER INGREDIENTS
Ingredients such as dried fruit, nuts, chocolate chips, etc. which should remain whole in the baked
bread, should be mixed into the dough. They should be added to the dough gradually during the
kneading process before the dough rises.
BREAD DOUGH – PREPARATION
•
•
•
•
•
•
•
•
•
Check the minimum lifetime or the use-by-date of all the ingredients.
Add the ingredients in the order that they are provided in the recipe.
Store opened foods in air-tight containers.
Allow ingredients that you have taken out of the refrigerator to first reach room temperature
before using them.
If not indicated in the recipe otherwise, use bread flour. Do not use flour with a protein content
lower than 11%.
Do not use flour with baking powder for making a yeast-based bread, unless indicated otherwise
in the recipe.
If you live in a location that is above 900 m above sea level, you will probably need to adjust the
amount of yeast indicated in the recipe. The higher the above-sea-level altitude, the lower the air
pressure and the faster dough rises. It is recommended to use ¼ of a teaspoon of yeast less than
indicated in the recipe.
If the weather is hot and humid, use ¼ of a teaspoon of yeast less than is indicated in the recipe to
prevent the dough from over-rising.
The properties of the flour may change with the season or type of storage. Then it is necessary to
adjust the water to flour ratio in the following way. If the dough is too sticky, add 1 to 2 tablespoons
of flour. If the dough is too dry, add 1 to 2 tablespoons of water. Several minutes are needed for
these ingredients to be absorbed. It should be possible to shape a dough with the right amount of
flour and water into a smooth loaf that is moist to touch but not sticky.
EN-16
2014
11/2014
EN
Food Processor
STM 40WH / STM 41GR / STM 42BL / STM 43OR
STM 44RD / STM 45VT / STM 46YL / STM 47GG / STM 48RS
How to prepare a yeast starter
•
Pour the amount of warm water indicated in the recipe into a clean glass bowl. Then add the
necessary amount of fresh or pressed yeast together with 1 teaspoon of sugar and one teaspoon
of flour. Carefully mix everything together and cover with a plastic bag. Leave it in a warm place
(30 °C) for approximately 30 minutes or until the mixture foams up. This mixture should be used
immediately.
Rising in a warm location
•
Yeast, whether it be during fermentation or in the dough, requires heat to grow in volume. Create
a warm place for rising your dough by placing a metal baking tray onto a bowl with sufficiently
hot water. Place the prepared dough on to the baking tray and cover with a lightly greased thicker
plastic bag or a kitchen wiping cloth. A warm location without a draft is required for dough to rise.
Allow the dough to rise until it doubles in volume.
CAKE AND PASTRY DOUGH – INGREDIENTS
FLOUR
Flour used for cakes and fine pastries should have a lower protein (gluten) content, than flour used for
baking bread.
Medium-fine and fine flour
This flour has a lower protein (gluten) content and gives the baked goods, such as cakes, tarts, fine
pastry, pancakes a finer texture.
Flour with baking powder
It is a mixture of flour and leavening agents such as baking powder. To make 1 cup of the flour and
baking powder mixture, mix 1 cup of flour with 2 teaspoons of baking powder.
Whole grain flour
Contains bran and wheat germ and may be used in doughs for tarts and pies. The texture of a product
made from whole wheat flour will be denser.
Corn flour
It is made from corn and is used for certain baked goods to which it loans a finer texture. It may be used
to thicken sauces and desserts.
Rice flour
It is made from rice and is used to make the texture of baked goods finer, for example for shortcrust
pastry.
BAKING POWDER
It is used as a leavening agent in baking.
BAKING SODA
It is known as sodium bicarbonate. It can be used as an additional leavening agent or for darkening
certain baked goods.
BUTTER
It provides a specific taste and a fine texture to baked goods. In certain recipes it is possible to substitute
oil for butter, however the resulting taste and texture of the baked good will be different. In this case,
use ¼ less butter than the amount of oil indicated in the recipe. Before you start whipping butter
together with sugar, allow it to soften at room temperature.
EN-17
2014
11/2014
EN
Food Processor
STM 40WH / STM 41GR / STM 42BL / STM 43OR
STM 44RD / STM 45VT / STM 46YL / STM 47GG / STM 48RS
EGGS
Eggs should be at room temperature to give the correct volume to baked goods. Crack the eggs
individually into a separate bowl and only then add to the other ingredients. This will prevent ruining
the entire batch if one of the eggs is rotten. If you will be whisking the egg whites, carefully separate
them from the yolks. Egg yolks contain fat and their remains prevent the successful whipping up of egg
whites. Before you start whipping the egg whites, make sure that the whisk and the mixing bowl are
completely clean and without fat residues. Otherwise, the egg whites might not be perfectly whipped.
MILK
Full-cream milk should be used unless indicated in the recipe otherwise. Low-fat or half-cream milk can
be used but the final taste and texture of the baked goods may be different.
SUGAR
Usually white granulated sugar is used. It adds flavour, texture and colour to baked goods.
Caster sugar is also frequently used because it dissolves easier when it is whipped with butter. Brown
sugar may be used to add a different taste and colour to the baked goods.
BAKING
•
•
•
•
•
Allow the oven to preheat to the correct temperature before starting baking.
The baking temperature may differ depending on the type of baking oven. Reduce the temperature
indicated in the recipe by 15 – 20 ˚C if using a hot-air oven.
Instead of floured baking pans and trays, you can use parchment paper if appropriate. You can coat
the baking pan with a small amount of fat to prevent the parchment paper from sliding on the
smooth surface of the baking pan.
Test that the baked good is finished before taking it out of the oven. Gently touch the top of the
baked good, if it returns to its initial shape, it should be properly baked. Carefully insert a skewer
into the middle of the baked good and pull it out. If the dough does not stick to the skewer, the
baked good is finished.
To make biscuits crispier, take the baking tray out of the oven and place it onto a metal rack. Move
the individual items on the baking tray from their baking location and allow them to cool down.
Once they cool down move them from the baking tray to a platter.
EN-18
2014
11/2014
EN
Food Processor
STM 40WH / STM 41GR / STM 42BL / STM 43OR
STM 44RD / STM 45VT / STM 46YL / STM 47GG / STM 48RS
RECIPES
Sponge cake
4 eggs, separated egg whites from yolks
¼ of a cup of caster sugar
1 cup (150 g) of medium-fine flour with baking powder, sieved
3 tablespoons of water
•
•
•
•
•
•
•
Use the whisk A2.
Set the speed level to 8 and whisk up the egg whites into a thick foam. Reduce the speed level to
1 and slowly add sugar until the foam thickens and stops to be smooth.
Add the egg yolks and mix carefully.
Set the speed level to 1 and intermittently add flour and water. Whisk until the ingredients
combine.
Pour the dough into a pre-prepared greased and floured baking pan.
Bake in a preheated oven at 180 °C for approx. 20–25 minutes.
Allow the baked sponge cake to cool down on a metal rack.
Vanilla batter dough cake
125 g of butter, softened
¾ of a cup of caster sugar
1 teaspoon of vanilla essence
2 egg
2 cups (300 g) of medium-fine flour with baking powder, sieved
¾ of a cup of milk
•
•
•
•
•
•
•
Use the beater A3.
Set the speed to 8 and beat the butter together with sugar until the mixture is fluffy and smooth.
Add the vanilla essence, eggs one after the other and beat them thoroughly.
Reduce the speed to 2 and slowly intermittently add flour and milk and beat until a smooth dough
forms.
Pour the dough into a pre-greased and floured baking pan with a diameter of 22 cm.
Bake in a preheated oven at 180 °C for approximately 45–50 minutes or until the dough is golden
in colour.
Allow the baked cake to cool down on a metal platter.
Butter biscuits (approx. 40 pcs)
125 g of butter, softened
¾ of a cup of caster sugar
1 teaspoon of vanilla essence
1 egg
2 cups (300 g) of medium-fine flour
1 teaspoon of baking powder
•
•
•
Use the beater A3.
Set the speed to 8 and beat the butter until smooth. Add sugar, vanilla essence and the egg. Beat
until a light smooth mixture is created.
Mix the flour and the baking powder.
EN-19
2014
11/2014
EN
Food Processor
STM 40WH / STM 41GR / STM 42BL / STM 43OR
STM 44RD / STM 45VT / STM 46YL / STM 47GG / STM 48RS
•
•
•
•
Set the speed to 2 and gradually add the flour until everything is properly combined into a single
mass. Do not, however, beat for too long.
Use a teaspoon to form small balls and lay them out evenly on to a lightly greased or parchment
paper covered baking tray. Leave sufficient room around each ball. Using a lightly floured fork,
push down each of the balls.
Bake in a preheated oven at 190 °C for approximately 12-15 minutes or until the biscuits are lightly
golden in colour.
Take the biscuits off the baking tray and leave to cool down on a metal rack.
Cream snow puffs (20–24 pcs)
4 egg whites
1 cup of caster sugar
•
•
•
•
Use the whisk A2.
Set the speed level to 8 and whip up a thick snow from the egg whites. Lower the speed to level 1
and carefully add half the sugar and whip it in. Then add the remaining sugar.
Using a spoon, apply a small amount of the snowy mixture on to a lightly greased baking tray.
Leave about 3 cm around the individual pieces so that they do not bake to one another.
Bake in the oven at 120 °C about 1 to 1½ hours or until the snow puffs are dry. To avoid burning
them, do not, however, bake then too long. Take them off the baking tray and put them aside to
cool down and store them in an air-tight container.
Note:
You can use a decorating tool to create larger snow puffs. This may necessitate a longer baking
time.
White bread
4 cups (600 g) of bread flour
3 tablespoons of dried milk
1½ teaspoons of salt
1½ tablespoons of sugar
1 teaspoon of bread improver
2 teaspoons of instant yeast
2 tablespoons of oil
1½ cups (375 ml) of water
additional bread flour for hand kneading
•
•
•
•
Use the kneading hook A1.
In the mixing bowl, mix the flour, dried milk, salt, sugar, bread improver and the instant yeast.
Set the speed to 1–2 and slowly add water and oil into the dry mix. Leave it to knead until a dough
starts to form.
Move the dough on to a lightly floured rolling board and thoroughly knead by hand until the
dough is sufficiently fine and smooth.
Note:
At this stage, the dough should be very well kneaded so that gluten is formed, which gives the
dough the correct elasticity and helps it to rise.
•
Place the dough into a large bowl and cover with plastic wrap. Allow it to rise in a warm place for
about 20 minutes or until the dough doubles in size.
EN-20
2014
11/2014
EN
Food Processor
STM 40WH / STM 41GR / STM 42BL / STM 43OR
STM 44RD / STM 45VT / STM 46YL / STM 47GG / STM 48RS
•
•
•
•
•
Take the risen dough out of the bowl and knead once more on a lightly floured rolling board.
Place the dough into a baking pan. Cover with plastic wrap and allow it rise in a warm place for
about 30–40 minutes or until the dough has risen sufficiently. Remove the plastic wrap.
You can apply an egg glaze before baking.
Bake in a preheated oven at 200 °C for approximately 40–50 minutes or until the bread is golden in
colour.
Allow the baked bread to cool down for 15 to 20 minutes and then remove it from the baking pan.
Allow the loaf to cool down completely before cutting it, to prevent it from collapsing.
Egg glaze for bread dough
1 egg, lightly beaten
2–3 tablespoons of water
•
Mix both ingredients together until a smooth mixture is formed. Do not whip. If necessary strain
through a sieve. Brush the egg glaze on to the bread dough before baking.
Focaccia (2–4 portions)
3 cups (450 g) of bread flour
1 teaspoon of salt
2 teaspoons of sugar
2 teaspoons of instant yeast
2 tablespoons of olive oil
1 cup (250 ml) of water
For glazing:
2 tablespoons of olive oil
1 tablespoon of coarse salt
2 tablespoons of black olives, sliced
•
•
•
•
•
•
•
•
•
•
•
Use the kneading hook A1.
In the mixing bowl, mix the flour, salt, sugar and yeast.
Set the speed to 1–2 and slowly add water and oil into the dry mix. Leave it to knead until a dough
starts to form.
Move the dough on to a lightly floured rolling board and thoroughly knead by hand until a fine
smooth dough forms.
Place the dough into a large bowl and cover with plastic wrap. Allow it to rise in a warm place for
about 20 minutes or until the dough doubles in size.
Take the risen dough out of the bowl and knead once more on a lightly floured rolling board.
Place the dough into a lightly greased Teflon baking pan of dimensions 20 × 30 cm and roll into the
shape of the baking pan.
Lightly cover with plastic wrap and allow it rise in a warm place for about 20-30 minutes or until
the dough has risen a little. Remove the plastic wrap.
Brush the dough with olive oil and sprinkle on the coarse salt and sliced olives.
Bake in a preheated oven at 200 °C for approximately 30-35 minutes or until the focaccia bread is
golden in colour.
After taking it out of the oven, allow it to cool down on a metal rack.
EN-21
2014
11/2014
EN
Food Processor
STM 40WH / STM 41GR / STM 42BL / STM 43OR
STM 44RD / STM 45VT / STM 46YL / STM 47GG / STM 48RS
TECHNICAL SPECIFICATIONS
Rated voltage range ...................................................................................................................... 220−240 V
Rated frequency ................................................................................................................................ 50/60 Hz
Rated power input .............................................................................................................................. 1000 W
Noise level ......................................................................................................................................... 79 dB(A)
The declared noise emission level of the appliance is 79 dB(A), which represents a level A of acoustic
power with respect to a reference acoustic power of 1 pW.
Changes to text and technical parameters are reserved.
INSTRUCTIONS AND INFORMATION REGARDING THE DISPOSAL OF USED
PACKAGING MATERIALS
Dispose of used packaging material at a site designated for waste in your municipality.
DISPOSAL OF USED ELECTRICAL AND ELECTRONIC EQUIPMENT
This symbol on products or original documents means that used electric or electronic
products must not be added to ordinary municipal waste. For proper disposal,
renewal and recycling hand over these appliances to determined collection points.
Alternatively, in some European Union states or other European countries you may
return your appliances to the local retailer when buying an equivalent new appliance.
Correct disposal of this product helps save valuable natural resources and prevents
potential negative effects on the environment and human health, which could result
from improper waste disposal. Ask your local authorities or collection facility for more
details. In accordance with national regulations penalties may be imposed for the
incorrect disposal of this type of waste.
For business entities in European Union states
If you want to dispose of electric or electronic appliances, ask your retailer or supplier
for the necessary information.
Disposal in other countries outside the European Union.
This symbol is valid in the European Union. If you wish to dispose of this product,
request the necessary information about the correct disposal method from the local
council or from your retailer.
This appliance meets all the basic requirements of EU directives related to it.
EN-22
2014
11/2014