Transcript
2
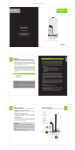
EZ Faucet Functional Specifications
1
1
PSI Water Fitting Controls Water PSI.
DO NOT REMOVE
2
LOCK indicator (green color)
Low Power indicator (red color)
3
Manual Override button
4
Filter
5
Hexnut Adaptor
6
Battery Cover
7
Aerator
3
Package Contents:
4
1.
3.
2.
4.
5
22
27
6
7
“Hexnut” Wrench
Rubber Washer
KEEP INSTRUCTIONS FOR FUTURE REFERENCE
FIG. A
User Manual
EZ Faucet Unit
Thank you for purchasing a quality EZ Faucet TM Infrared Sensor Adaptor. It will help conserve
water and prevent cross–contamination of germs and bacteria through faucets. Please read
all instructions before installation.
FIG. B
FIG. C1
FIG. C2
!
CAUTION: Always turn water OFF before
removing existing faucet.
FIG. D
FIG. E
22
27
22
27
Quick Installation Guide:
Attention:
1. Remove existing faucet aerator by turning clockwise. Use the “Hexnut” Wrench, pliers,
or vice grips if it is tight (FIG. A) .
1. Water may be HOT from last use! If you are not sure about the water temperature,
always turn the faucet handles to COLD position (See Setting Water Temperature and
Flow Rate section).
2. After aerator is removed ensure that the rubber washer from existing aerator is
removed. If the washer is not in the lip of the existing aerator, it should be in the top
of the existing faucet.
3. Open the EZ Faucet battery door (see No.3 in Changing Battery section) and insert 4
new AAA Batteries (make sure batteries are inserted in correct directions (+ and –) as
indicated in the battery holder). Close the battery door firmly (see No.5 in Changing
Battery section) (FIG. B) .
4. Before install the EZ Faucet, check if your faucet head is Inside Thread (male adapter)
or Outside Thread (female adaptor) type. Male adapter type: Insert the Rubber Washer
that comes with package into the Adaptor (FIG. C1) . Female adapter type: Do not use
any rubber washer (FIG. C2) .
5. Install EZ Faucet by turning the EZ Faucet Adaptor counter-clockwise to attach to the
faucet (first use fingers to tighten and snug firmly with the “Hexnut” Wrench) (FIG. D) .
6. Adjust the sensor range (see Manual Adjust Sensor Range section). The EZ Faucet is
set and ready for use after turning the faucet handles to ON position (adjust and check
the water temperature properly before use — see Setting Water Temperature and Flow
Rate section) (FIG. E) .
If you have problem with installation, please call technical support at 1–800–660–7978 or
visit our website at http://www.ezfaucet.com.
Manual Adjust Sensor Range:
2. If water is leaking at the connection between the EZ Faucet and faucet head after
installation, check if you put in the correct rubber washer (see No.4 in Quick Installation
Guide and Troubleshooting FAQs sections).
3. Keep the EZ Faucet surface clean and dry. DO NOT WASH, clean with damp towel.
Never immerse unit in water or any other liquid.
4. Make sure each battery is put in the correct direction.
5. Water stops flowing after 1 minute when an object is kept in the sensor area. Green light
will flash signaling to remove object out of the sensor area.
6. Objects of dark color or transparent objects are not easily detected. Press Manual Override
button to use manual operation when objects are not detected.
7. EZ Faucet sensor may not operate in direct sunlight. Reducing sensor range to activity
only when hand is closest to unit may correct.
8. Do not obstruct water flow drainage when EZ Faucet is unattended. During extended
absence from premise, best to turn water tap off.
9. If the EZ Faucet keeps turning on by itself even after adjust the sensor range manually
(see Manual Adjust Sensor Range section), press and hold the Manual Override button
for 3 second to allow auto–detect sensor range function.
10. If unit malfunctions, press and hold the Manual Override button for 3 second to reset.
If this fails, remove and reinsert batteries to reset.
(FIG. E)
1. Turn the faucet handles to OFF position.
2. Use left hand to locate the distance you need. At the same time, use right hand to
press the Manual Override Button for 3 seconds until the green light flashes and
release button.
3. Wait until the green flashing light stops, remove left hand.
4. New sensor range is set and ready for use after turning the faucet handles to ON
position (adjust and check the water temperature properly before use — see Setting
Water Temperature and Flow Rate section).
Troubleshooting FAQs:
Q: I press the Manual Override button once (manual operation) to allow three (3) minutes of continuous water flow
and now it is not working. Why does this happen?
A: Once you have used the three (3) minutes of continuous water flow, the automatic operation of the unit may
have to be manually reset. Press and hold the Manual Override button for 3 seconds to reset. This will be the
case with sinks that have a basin with finishes or plugs that are very reflective. Dark colors may also affect the
automatic operation. Reduce the sensor range (see Manual Adjust Sensor Range section).
Note: If the manual sensor adjustment fails, try to use the auto–detect sensor range
function by pushing and holding the Manual Override Button for 3 seconds. The green
light will flash and then stop in about 5 seconds. The auto–detect sensor range
adjustment is set.
Q: Why there is no flashing light neither “red” nor “green” on the indicator above the Manual Override button?
A: Always use 4 new AAA batteries with same brand name (Alkaline battery preferred). Check all 4 batteries have
been inserted facing the correct direction (+ and –) as indicated in the battery holder. Also check and ensure
the batteries are snapped into place.
Setting Water Temperature and Flow Rate:
Q: I have attached the EZ Faucet to the faucet; however when I turn on the tap, water is spraying out where the
connection is. How do I fix this?
1. Turn faucet handles to COLD position.
A: You may have a poor connection if you have not used the black rubber washers (see No.4 in Quick Installation
Guide section). Remove the unit and try inserting the Rubber Washer. Every faucet is different so you may
have to take some time to make the best adjustment for yours. Tightening the Adaptor with “Hexnut” Wrench
may also be needed.
2. Press Manual Override Button once.
3. While the water is running, move faucet handles to adjust water temperature and flow rate.
4. After water temperature and flow rate is set, press Manual Override Button once to set
EZ Faucet back to automatic mode.
Low Battery Indicator:
Best to use 4 Alkaline Batteries with same brand. They will last longer and keep EZ Faucet
at the best performance. Normal battery life is about 9 to 12 months depending on usage.
Approximately 3 to 4 weeks before the power of batteries is out, the red color indicator light
located above the Manual Override button will begin to flash. Change the batteries as soon
as possible. The batteries can be changed without removing the EZ Faucet from your faucet
(see Changing Battery section).
Changing Battery:
Q: The EZ Faucet sensor is too sensitive and even walking past the faucet will activate the water flow or the EZ
Faucet keeps turning on by itself. How do I adjust this?
A: You can adjust the detecting range of the sensor that activates the EZ Faucet. If your basin is shiny or the plug
is bright silver color (almost like a mirror), the sensor will pick up movement off of these reflections. To avoid
this, simply set the sensor range only a few inches below the EZ Faucet (see Manual Adjust Sensor Range section).
Q: I am unable to remove the current existing aerator from the faucet or I am unable to tighten the new EZ Faucet.
What should I do?
A: If you are having difficulties removing the existing aerator, please first ensure that it actually can be removed.
Although this piece is removable in all standard faucets, there may be a few that functions differently. Also
check if you are removing in a correct direction (usually turning in clockwise). If the aerator is too tight,
remove it by using the “Hexnut” Wrench, pliers, or vice grips. Wrap a cloth between the faucet and the tool;
this will avoid harmful scratches that the manufacturer is not liable for. To tighten the new EZ Faucet, turn
the EZ Faucet Adaptor counter–clockwise by fingers first, and then snug firmly with the “Hexnut” Wrench that
comes with package.
(FIG. B)
1. Turn the faucet handle to OFF position.
2. Rotate EZ Faucet counter–clockwise to reach the battery door.
3. Open the battery door with care (with Right hand holding the EZ Faucet and pull the bottom
edge of the battery door with the Left hand to open).
4. Take 4 batteries out one–by–one and replace new batteries (make sure to put batteries in
correct direction).
5. Close battery door securely and make sure it is locked in place (push the battery door
against the battery door hinge while closing it that can close the door easier). Then adjust
the sensor range (see Manual Adjust Sensor Range section).
Q: I am experiencing intermittent fluctuations in water flow from EZ Faucet, any suggestion?
A: Water flow fluctuations could be due to normal changes in water pressure at different times of the day in some
residential areas. Turn the faucet handles to OFF position and let stand for a few minutes. The EZ Faucet will
reset itself. You can also reduce water flow to unit by adjusting the faucet handles (see Setting Water Temperature
and Flow Rate section). If EZ Faucet continues to malfunction, remove and reinsert batteries to reset.
Q: Why I hear a loud (“water–hammer”) sound when the EZ Faucet just turned off automatically?
A: This is normal. In some areas, the water pressure is too high. Reduce water flow to unit by adjusting the faucet
handles (see Setting Water Temperature and Flow Rate section).
ONE (1) YEAR LIMITED WARRANTY
EZ Faucet is manufactured or distributed by iTouchless Housewares & Products, Inc. (iTouchless) with the highest
quality components and most advanced technology available. It is warranted to be free from defects in material and
workmanship, given normal use and care, for 365 days from the date of the original purchase with proof of purchase.
We will replace a new unit or parts thereof which fail as the result of such a defect during the warranty period.
TM
This warranty is the customers’ exclusive remedy for product defect and does not apply to:
User modification
Any product, on which the seals and/or serial numbers
Attachments to product by user that causes damage
have been broken, removed, tampered with, defaced or
Damage caused by abuse, misuse, accident, water or theft altered in any manner
Except as stated above, iTouchless makes no express or implied warranties as to any product, in particular, makes no
warranty of merchantability or of fitness for any particular purpose. iTouchless shall not be liable for consequential or
incidental damages arising from any product defect. Our Liability is limited to the replacement of any defective product.
iTouchless expressly disclaims all warranties not satisfied in this limited warranty. Any implied warranties that may be
imposed by law are limited to the terms of this limited warranty.
If any part should fail during the warranty period, visit our website at http://www.ezfaucet.com to request an EX#
before returning to us. We WILL NOT ACCEPT package that without the EX#. Remember to return package FREIGHT
PREPAID with all original contents including original boxes. We will not pay for any return shipping fee.
Return Address:
iTouchless Housewares & Products, Inc.
550 Pilgrim Dr. Unit I, Foster City, CA 94404, USA
Subject to the above conditions, we will repair or ship you a new EZ Faucet unit within 30 working days after receipt.
This warranty gives you specific legal rights, and you may also have other rights that vary from state to state and
province to province. For more information, please visit our website at http://www.ezfaucet.com
Thank you for purchasing the EZ Faucet TM !