1
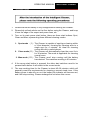
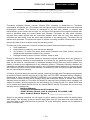
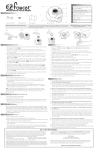
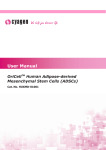
INTELLIGENT CLEANER AV002A Auto Cleaner With Remote Controller OPERATING MANUAL Register Today to Protect Your Product www.iTouchless.com/register OPERATING MANUAL INTELLIGENT CLEANER INTELLIGENT CLEANER Dear customers, Thank you for using our Intelligent Vacuum Cleaner! The Intelligent Vacuum Cleaner is our creation and manufactured by using our advanced mechanical electronic technology. It can be used widely in your home, office and entertainment areas, and can also easily clean hard to access areas. With the help of the intelligent Cleaner, your quality of life is sure to be enhanced. The Cleaner is only recommended for indoor use. It can be used to clean floor surfaces including hardwood, linoleum, tile and low pile carpets. If you want your hardwood or tile floors to shine brighter, clean the brush after it finishes cleaning, and then apply some liquid wax with the included spoon and start the Cleaner again. The fashionable flat design extends its reach under the sofa, table, beds, etc. The included remote control function facilitates hands-free operation. - 1- OPERATING MANUAL INTELLIGENT CLEANER INTELLIGENT CLEANER 1. 2. 3. 4. 5. 6. 7. 8. Battery Charger x 1 Rechargeable Battery Pack (Installed) x 1 Spoon x 1 Filter Mesh x 1 Remote Controller x 1 Side Brush x 1 Dust Brush x 1 Operating Manual x 1 Intelligent Cleaner Dust Brush Spoon Remote Controller Charger Filter Mesh - 2- Rechargeable Battery Pack Side Brush OPERATING MANUAL INTELLIGENT CLEANER INTELLIGENT CLEANER ***When unit is in operation, the side with sensor should move forward. Start button Infrared sensor Battery life indicator Easy to grab handle Removable particle bin Surface Rechargeable battery Sensors Main brush Sensors Filter Side brush Vacuum inlet lid Power switch Battery charger socket Bottom - 3- OPERATING MANUAL INTELLIGENT CLEANER INTELLIGENT CLEANER 1. Please ensure the battery is fully charged before starting the Cleaner. 2. Please tidy unfixed articles on the floor before using the Cleaner, and keep it from the edge of the carpet and power lines, etc. 3. Turn on its main power start button, there are three start buttons: Spot, Clean and Max, representing three different cleaning modes. 1. Spot mode ( I ): The Cleaner is capable of spot-type cleaning within a 3-foot diameter, focusing the cleaning area to a single spot for 4 minutes. It’s ideal for cleaning rooms with dirt in partial places. 2. Clean mode ( II ): The Cleaner will automatically clean the room it’s in for 30 minutes. The mode is applicable for cleaning a small room. 3. Max mode ( III ): The Cleaner won’t stop running until the battery has drained. The maximum working is 60 minutes 4. If the wrong start button is pressed, the other start switches need to be pressed twice before it will switch to the correct mode. 5. The max working time for the Cleaner is about 45-60 minutes, which will generally meet the requirements for cleaning a normal sized room. If the battery power is about to run out, the battery life indicator will become red, and it will stop working. Please recharge the unit when this occurs. - 4- OPERATING MANUAL INTELLIGENT CLEANER INTELLIGENT CLEANER Battery charger socket Note on charging: a. Firstly confirm whether the using voltage of charge confirms to the local one for unconformity will result in damage to the unit. b. The power indicator on the panel will keep flashing during charging, and turn solid green from flashing green upon fully charging. The charging will cease automatically to prevent damage to the charger. Generally, the charging time is about 4-5 hours. c. The charger should be stored in a dry and well-ventilated area, and can’t be used in wet environments such as the bathroom, etc. d. Mistreatment of the charger (i.e.: pulling it out of the power socket by its cable) may result in damage to the unit and pose a potential electrical hazard. e. In order to extend the life of the battery, it should initially be charged for 89 hours or when being used again after a long time. It will reach its best performance after 2-3 circles for charging and discharging. - 5- OPERATING MANUAL INTELLIGENT CLEANER INTELLIGENT CLEANER Power key Clean key Indicator Max key Direction key The cleaner can be controlled by the infrared remote controller. As shown in the diagram above, there are three mode keys: Spot, Clean and Max, which will activate the respective three working modes. By using the directional keys, the remote can control the cleaners’ movement. The “P” key is used to power the unit on/off. If you press the P key, the indicator light on the unit will turn off, and the Cleaner will enter Sleep mode, which will save energy while in its nonoperating state. If you press the P key again, indicator light on the unit will turn on, and the Cleaner will enter the Standby mode, while waiting for the next command. The Intelligent cleaner is user-friendly with very little maintenance required after use. To ensure optimal performance please observe the following procedures: - 6- OPERATING MANUAL INTELLIGENT CLEANER INTELLIGENT CLEANER 1. Empty the bin a. Turn off the power switch. b. Press down the bin clip and pull out the bin as shown in the following illustrations below: c. Clear the bin. d. Press down the clip on the bin to insert the bin back to the unit. 2. Clean the filter mesh a. Turn the bin upside down b. Press the bottom slightly, take the filter mesh out as shown in the following illustration: c. Clear the dirt on the filter mesh. d. Fit the filter mesh back to the bin. Press the clip slightly and put the bin back to the Cleaner. - 7- OPERATING MANUAL INTELLIGENT CLEANER INTELLIGENT CLEANER Clean the main brushes of the Cleaner 1. Turn off the power switch and put the Cleaner on a flat surface with its bottom side up. 2. Use cross head screwdriver to remove the fixing screw on the right, and then take out the main brush, rubber brush and brush coupler together as shown in the following drawing. Brush Coupler 3. Clean the chamber where the brush is located as well as the debris on brush and rubber brush. 4. Wipe out dirt on the metal shaft and bearing of the brush coupler and the brushes (this may not be necessary after every use) as per the following illustrations. If necessary, you may add a little lubricant to it. 5. Put the brush coupler and brushes back and tighten the screw. - 8- OPERATING MANUAL INTELLIGENT CLEANER INTELLIGENT CLEANER Clean the vacuum inlet lid 1. Turn off the power switch; turn the Cleaner upside down on a flat surface. 2. Take the Vacuum Inlet Lid out as per the illustration below. 3. Clean the Vacuum Inlet Lid and the fan-shaped mechanism to ensure good ventilation. 4. Guide the hinge tabs on the Vacuum Inlet Lid back into their holes carefully. Method for replacement of side brush The side brush is replaceable. See the following picture for the replacement method. Bottom Fig. 1 Fig. 2 1. Remove the two screws as per the Fig.1. 2. Turn the side brush to the extent that the screwdriver can be inserted as per the Fig.2, loosen the screw, take off the old brush and replace with new one. 3. Install the side brush and bottom housing in reverse order. - 9- OPERATING MANUAL INTELLIGENT CLEANER INTELLIGENT CLEANER Intelligent path judgment The cleaner is intelligently controlled so that it operates powerfully to avoid any obstruction and also from falling down from the edge of the table, staircase or pathway. Please remove small objects such as a vase, small paper boxes etc., which can be knocked down while the cleaner is in operation. Please clear these items first before starting the cleaner cycle. 1. It is switched on but stops after the short sound plays. Then this may mean the battery is low or off and charging is needed. 2. Please do not use the Cleaner on medium and high-pile carpets. 3. Avoid using the Cleaner where there are objects such as clothing, power cords, towels, etc. These things may entangle the brushes of the Cleaner. 4. Turn off the power when not in use, and make sure the unit is fully charged if it has not been used for a long period of time. Take battery out of the unit and store the battery and unit in a cooler place when it’s not being used. Keep the bottom of the cleaner dry and clean - 10 - OPERATING MANUAL INTELLIGENT CLEANER Troubleshooting: 1. What should we do if the Cleaner is dropped down from the edge of stairs? Solution: Wipe away the dust for the probe at the bottom of the front plate with a dry cloth. 2. The cleaner and light turns on, however, there’s no movement Make sure no obstacles in pathway Check if carpet is less than 1 inch Clean off debris from brushes Clean out trash compartment Clean sensors with a damp and dry cloth Try all 3 modes Charge overnight 3. Will run for a few minutes, then turn off Check for any obstacles in the way Try to run mode 3 Charge overnight 4. No light, no response Check if unit is flashing green while charging Charge overnight 5. Cannot charge battery Make sure battery installed correctly Check the connection 6. Will not run from one surface to another Check if carpet is under 1 inch Make sure no obstacles in pathway Remove side brush and try again 7. Cleaner stays in one place and rotates Make sure no obstacles in pathway Clean off brushes - 11 - OPERATING MANUAL INTELLIGENT CLEANER Caution of usage Replacement of Battery: Model of battery: YX-Ni-CD-015144 Battery replacement of the Cleaner: 1. Press the Bucket on each edge of battery and then take out the battery vertically. (Refer to Figure 1 and Figure 2) 2. Please place the positive and negative electrode correctly for fear of the damage due to wrong electrode! 3. Please set the Cleaner in charging state to keep the best of the battery while the Cleaner is unused. Battery replacement of the Space Isolator: 1. Release the screw with the screwdriver and then open its base plate. (Refer to Figure 1) 2. Please place the positive and negative Electrode correctly for fear of the damage due to wrong Electrode! (Refer to Figure 2) 3. The right place of battery. (Refer to Figure 3) 4. Please take out the battery if it was unused for long. Battery replacement of the Remote Control: 1. Open the battery cover and then replace the battery. (Refer to Figure 1) 2. Please place the positive and negative electrode correctly for fear of the damage due to wrong electrode! (Refer to Figure 2) 3. Please take out the battery if it was unused for long. Please don’t forget to take out the battery before discarding the Cleaner. Please remember to turn off the switch before taking out the battery from the Cleaner and space Isolator. Please don’t place the battery in the high temperature environment above 45°C or in the water. Please don’t exert external force to the battery or drop them from high place. The battery should be recycled with safe disposal. Please don’t discard it freely or throw it into fire for fear of explosion! 6. If the battery leakage, be careful avoid the liquid to skin or clothes, use dry mop to clean if touched and send the battery to recycle bin or maintenance service, do not throw anywhere. 1. 2. 3. 4. 5. Safety Precautions: Caution No one else can disassemble, maintain or transform the product except the maintenance technicians designated by our company, or it has the potential to become a fire or electric hazard and risk personal injury. Don’t use any other charger but the one included with the Cleaner, or it may cause damage to the product, or pose an electric/fire hazard due to voltage differences. Don’t touch high-voltage power cord of the electric appliance with your wet hand, or it may cause electric shock. Don’t bend the power cord too extremely or place weight on it, or it may cause power cord damage, fire or electric shock. Don’t twist your clothes or any part of your body (head, finger, etc.) into the brush or wheel of the Cleaner, or it may result in personal injury. Don’t approach cigarette, lighter, match and other heat objects or combustible materials such as the gasoline cleaner. Attention Check whether the charger and socket is connected well, or it may cause charging failure or even fire. Insert the power cord of the charger well or it may cause electric shock, short circuit, smoking or fire. Don’t forget to turn off the power while transporting or storing the Cleaner for long, or the battery may be damaged. Remove all easily damaged objects (including luminous objects, fabrics, glass bottles, etc.) before using, or it may cause damage to these objects or affect the using of the Cleaner. Please use the Cleaner cautiously in the presence of the children to avoid frightening or harming them. Don’t stand or sit on the Cleaner, or it may cause damage to the Cleaner or personal injury. Don’t make the Cleaner take in water and other liquors for fear of the product damage. Don’t use the Cleaner on small tables and chairs or other small space; otherwise the Cleaner may be damaged. Don’t use the Cleaner outdoors, or it may cause the product damage. Don’t use the Cleaner in commercial places, or the Cleaner may be damaged by excessive use. Don’t leave movable thread, wire and other objects with the length of more than 150mm on the ground or the brush may be entangled. The Cleaner is not for use of the disabled (people with physical or mental handicap), children and those who use the Cleaner before reading the User Manual carefully. - 12 - OPERATING MANUAL INTELLIGENT CLEANER Any Problem? DO NOT RETURN TO STORE. Contact us at www.iTouchless.com/contacts/ or call toll free 1-844-660-7978. ONE (1) YEAR LIMITED WARRANTY iTouchless Intelligent Robotic Vacuum Cleaner PRO (Cleaner) is distributed by iTouchless Housewares & Products, Inc. (iTouchless) with the highest quality components and most advanced technologies available. The Cleaner is warranted to be free from defects in material and workmanship, given normal use and care, for 365 days from the date of the original purchase with proof of purchase within the United States and Canada. iTouchless will only honor warranty requests from orders placed with our authorized dealers. Items sold as used, floor sample or refinished are sold solely under the terms and conditions of the selling party; iTouchless will not warrant such purchase. iTouchless will repair or replace a working condition Cleaner thereof which fails as the result of such a defect during the warranty period. The warranty is the customers’ exclusive remedy for product defect and does not apply to: User modification Attachments to product by user that causes damage Any product, on which the seals and/or serial numbers have been broken, removed, tampered with defaced or altered in any manner Damage caused by abuse, misuse, accident, water or theft Except as stated above, iTouchless makes no express or implied warranties as to any product, in particular, makes no warranty of merchantability or of fitness for any particular purpose. iTouchless shall not be liable for consequential or incidental damages arising from any product defect. Our liability is limited to the replacement of any defective product. iTouchless expressly disclaims all warranties not satisfied in this limited warranty. Any implied warranties that may be imposed by law are limited to the terms of this limited warranty. All Accessory Parts including Charger and Battery are not covered by this warranty. If Cleaner should fail during the warranty period, contact us through www.iTouchless.com/contacts/ to request a Repair # before returning to us. We WILL NOT ACCEPT packages without a Repair #. Remember to return package FREIGHT PREPAID by an insured carrier such as UPS or FedEx and include a check for the return postage along with authorized Repair #. Please refer to the warranty email provided by iTouchless for details. All warranty fees (including return postage) are subject to location, and fee references are as following: for Contiguous 48 U.S. States $9.95 and up, for Alaska and Hawaii $49.95 and up, for Canada $29.95 and up. iTouchless will not cover any warranty service postage fee. Return Address: iTouchless Housewares & Products, Inc. 23497 Eichler Street, Unit A, Hayward, CA 94545, USA Attn: Product Return Repair #___________________ Subject to the above conditions, we will repair or ship a working Cleaner within 30 working days after receipt. This warranty gives you specific legal rights, and you may also have other rights that vary from state to state and province to province. For more information, please visit our website at www.iTouchless.com. - 13 -